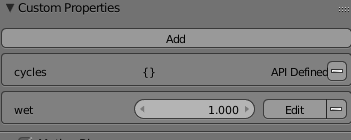
The limitations of Blender's linking system make this a little awkward, but you can make it work with the proxy system. Proxies are Blender's funky solution to editing linked properties. You can "make a proxy" of a certain object from a linked group. This makes a local copy of that object which will then push any changes into the linked object it was copied from. Here's generally how it's meant to work in practice.
Your asset has an armature in its source file. This armature object is set up to control all other objects and materials in the asset via drivers, constraints, parenting, modifiers, or whatever. You pack everything into a group, then link that group. With the group selected, you hit Object > Make Proxy in the 3D view, and select your control rig from the object list in the prompt. You knownow have a control proxy that you can move and manipulate to control your linked asset.
It doesn't necessarily need to be an armature, you might just use an empty in this case. But essentially what you need to do is connect your material's wetness in the source file to some property of this empty/armature via a driver. A custom property on the object datablock is probably easiest:
Once you make a proxy of your control object, you will then be able to adjust this "wet" property from the main scene. Word of warning though: it will affect ALL instances of this group in the scene, not just the one you had selected when you hit 'make proxy'. Best way to get around that is to add a symlink to your source file, then link the group again by select the symlink. Blender organizes links by filepath, so it will believe this is a different asset even though it's reading the same one. You can then make the new linked copy its own proxy and control them separately.

