In this tutorial, I will show you way to build Angular 17 File upload & download example with Spring Boot Rest API server.
More Practice:
– Spring Boot + Thymeleaf: File Upload example
– Angular 17 + Spring Boot: CRUD example
– Angular 17 + Spring Boot: JWT Authentication example
– Angular + Spring Boot: Pagination example
For Image/Multiple Files Upload at once:
– Angular 17 Image Upload with Preview example
– Angular 17 Multiple Files upload example
Serverless with Firebase:
Angular 17 File Upload with Firebase Storage
With Angular Material:
Angular Material 17 File upload example
Contents
- Overview
- Angular 17 + Spring Boot File upload Architecture
- Technology
- Spring Boot Rest APIs for File Upload & Storage
- Angular 17 Client for file upload/download UI
- Angular 17 Project Structure
- Set up HttpClient
- Add Bootstrap to the project
- Create Angular 17 Service for Upload Files to Spring Boot Server
- Create Component for File Upload UI
- Add Upload File Component to App Component
- Run the Application
- Further Reading
- Conclusion
Overview
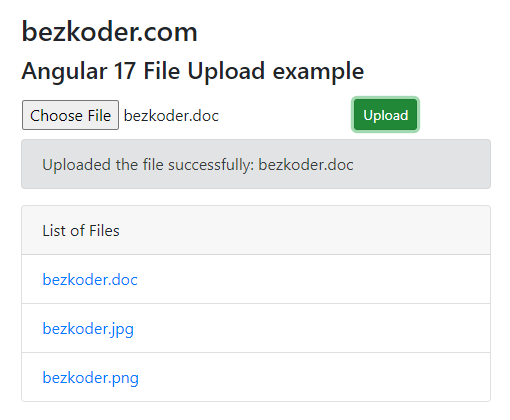
We’re gonna create a full-stack Angular 17 + Spring Boot File upload/download example in which user can:
- know the file upload status
- view all uploaded files
- download by clicking on the file name
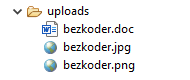
All uploaded files will be saved in uploads folder:
You can change Spring Boot server for uploading file to database:
Spring Boot File upload to database example
Angular Client with Progress Bar (working with this Spring Server):
Angular 17 File upload example with Progress bar
If you want to upload image with preview, you can visit:
Angular 17 Image Upload with Preview example
Angular 17 + Spring Boot File upload Architecture
Let’s look at the architecture below:
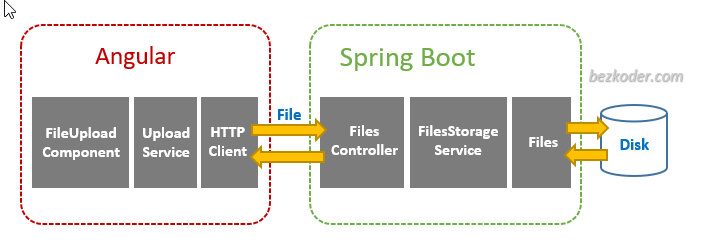
Angular 17 Client:
FileUploadComponent callsUploadServicefunctions for upload/download/display filesUploadServiceusesHttpClientModuleto make HTTP requests
Spring Boot Server:
FilesControllerreceives the HTTP requests from Client, then callsFilesStorageServicefunctions for upload/download/getting filesFilesStorageServiceimplements functions for storing and retrieving file systems using JavaFileslibrary
Technology
Server:
- Java 17 / 11 / 8
- Spring Boot 3 / 2 (with Spring Web MVC)
- Maven
Client:
- Angular 17
- RxJS 7
- Bootstrap 4
Spring Boot Rest APIs for File Upload & Storage
Spring Boot App will provide APIs:
| Methods | Urls | Actions |
|---|---|---|
| POST | /upload | upload a File |
| GET | /files | get List of Files (name & url) |
| GET | /files/[filename] | download a File |
This is the project structure:
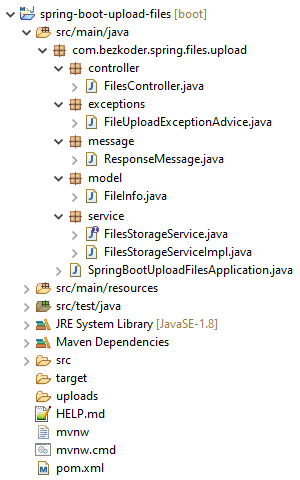
– FileInfo contains information of the uploaded file.
– FilesStorageService helps us to initialize storage, save new file, load file, get list of Files’ info, delete all files.
– FilesController uses FilesStorageService to export Rest APIs: POST a file, GET all files’ information, download a File.
– FileUploadExceptionAdvice handles exception when the controller processes file upload.
– application.properties contains configuration for Servlet Multipart.
– pom.xml for Spring Boot dependency.
You can find Step by Step to implement the Spring Boot Server (with Github) at:
Spring Boot Multipart File upload (to static folder) example
Or: Spring Boot Multipart File upload (to database) example
Angular 17 Client for file upload/download UI
Let’s open cmd and use Angular CLI to create a new Angular 17 Project as following command:
ng new angular-17-file-upload ? Which stylesheet format would you like to use? CSS ? Do you want to enable Server-Side Rendering (SSR) and Static Site Generation (SSG/Prerendering)? No We also need to generate some Components and Services:
ng g s services/file-upload ng g c components/file-upload Now you can see that our project directory structure looks like this.
Angular 17 Project Structure
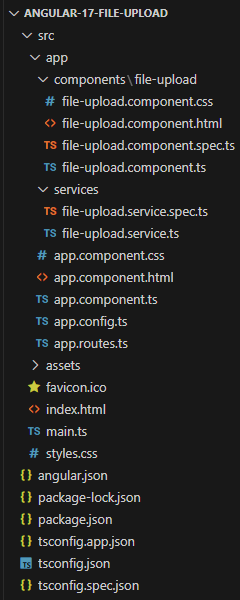
Let me explain it briefly.
– We import necessary library in app.config.ts.
– file-upload.service provides methods to save File and get Files from Rest API Server using HttpClient.
– file-upload.component contains upload form, display of list files.
– app.component is the container that we embed all components.
– angular.json for importing the Bootstrap library.
Set up HttpClient
Open app.config.ts and import provideHttpClient from Angular Http Module:
import { ApplicationConfig } from '@angular/core'; import { provideRouter } from '@angular/router'; import { provideHttpClient } from '@angular/common/http'; import { routes } from './app.routes'; export const appConfig: ApplicationConfig = { providers: [ provideRouter(routes), provideHttpClient() ] }; Add Bootstrap to the project
Run the command: npm install [email protected].
Next, open angular.json and add following code:
"styles": [ "node_modules/bootstrap/dist/css/bootstrap.min.css", "src/styles.css" ], "scripts": [ "node_modules/jquery/dist/jquery.slim.min.js", "node_modules/popper.js/dist/umd/popper.min.js", "node_modules/bootstrap/dist/js/bootstrap.min.js" ] Create Angular 17 Service for Upload Files to Spring Boot Server
This service will use Angular HttpClient to send HTTP requests.
There are 2 functions:
upload(file): returnsObservable<HttpEvent<any>>that we’re gonna use in File Upload ComponentgetFiles(): returns a list of Files’ information asObservableobject
services/file-upload.service.ts
import { Injectable } from '@angular/core'; import { HttpClient, HttpRequest, HttpEvent } from '@angular/common/http'; import { Observable } from 'rxjs'; @Injectable({ providedIn: 'root', }) export class FileUploadService { private baseUrl = 'http://localhost:8080'; constructor(private http: HttpClient) {} upload(file: File): Observable<HttpEvent<any>> { const formData: FormData = new FormData(); formData.append('file', file); const req = new HttpRequest('POST', `${this.baseUrl}/upload`, formData, { responseType: 'json', }); return this.http.request(req); } getFiles(): Observable<any> { return this.http.get(`${this.baseUrl}/files`); } } – FormData is a data structure that can be used to store key-value pairs. We use it to build an object which corresponds to an HTML form with append() method.
– We call the request(PostRequest) & get() method of HttpClient to send an HTTP POST & Get request to the File Upload Rest API server.
Create Component for File Upload UI
Let’s create a File Upload UI with Card, Button and Message.
First we need to use the following imports:
file-upload.component.ts
import { Component, OnInit } from '@angular/core'; import { CommonModule } from '@angular/common'; import { HttpResponse } from '@angular/common/http'; import { Observable } from 'rxjs'; import { FileUploadService } from '../../services/file-upload.service'; @Component({ selector: 'app-file-upload', standalone: true, imports: [CommonModule], templateUrl: './file-upload.component.html', styleUrl: './file-upload.component.css', }) export class FileUploadComponent implements OnInit { ... } Then we define the some variables and inject FileUploadService as follows:
export class FileUploadComponent implements OnInit { currentFile?: File; message = ''; fileInfos?: Observable<any>; constructor(private uploadService: FileUploadService) { } } Next we define selectFile() method. It helps us to get the selected File.
selectFile(event: any): void { this.currentFile = event.target.files.item(0); } Next we write upload() method for upload file:
export class FileUploadComponent implements OnInit { currentFile?: File; message = ''; fileInfos?: Observable<any>; constructor(private uploadService: FileUploadService) { } selectFile(event: any): void { this.currentFile = event.target.files.item(0); } upload(): void { if (this.currentFile) { this.uploadService.upload(this.currentFile).subscribe({ next: (event: any) => { if (event instanceof HttpResponse) { this.message = event.body.message; this.fileInfos = this.uploadService.getFiles(); } }, error: (err: any) => { console.log(err); if (err.error && err.error.message) { this.message = err.error.message; } else { this.message = 'Could not upload the file!'; } }, complete: () => { this.currentFile = undefined; }, }); } } } We use currentFile for accessing current File as the first Item. Then we call uploadService.upload() method on the currentFile.
If the transmission is done, the event will be a HttpResponse object. At this time, we call uploadService.getFiles() to get the files’ information and assign the result to fileInfos variable.
We also need to do this work in ngOnInit() method:
ngOnInit(): void { this.fileInfos = this.uploadService.getFiles(); } Now we create the HTML template of the Upload File UI. Add the following content to file-upload.component.html file:
<div class="row"> <div class="col-8"> <label class="btn btn-default p-0"> <input type="file" (change)="selectFile($event)" /> </label> </div> <div class="col-4"> <button class="btn btn-success btn-sm" [disabled]="!currentFile" (click)="upload()"> Upload </button> </div> </div> @if (message) { <div class="alert alert-secondary" role="alert">{{ message }}</div> } <div class="card mt-3"> <div class="card-header">List of Files</div> <ul class="list-group list-group-flush"> @for (file of fileInfos | async; track file.name) { <li class="list-group-item"> <a href="{{ file.url }}">{{ file.name }}</a> </li> } </ul> </div> Add Upload File Component to App Component
Import FileUploadComponent in app.component.ts
import { Component } from '@angular/core'; import { CommonModule } from '@angular/common'; import { RouterOutlet } from '@angular/router'; import { FileUploadComponent } from './components/file-upload/file-upload.component'; @Component({ selector: 'app-root', standalone: true, imports: [CommonModule, RouterOutlet, FileUploadComponent], templateUrl: './app.component.html', styleUrl: './app.component.css' }) export class AppComponent { title = 'Angular 17 File Upload example'; } Open app.component.html and embed the FileUpload Component with <app-file-upload> tag.
<div class="container" style="width:500px"> <div class="my-3"> <h3>bezkoder.com</h3> <h4>{{ title }}</h4> </div> <app-file-upload></app-file-upload> </div> Run the Application
Run Spring Boot Server with command: mvn spring-boot:run.
Refresh the project directory and you will see uploads folder inside it.
Because we configure CORS for origin: http://localhost:8081, so you need to run Angular 17 Client with command:
ng serve --port 8081
Open Browser with url http://localhost:8081/ and check the result.
Further Reading
Using Template Engine:
Thymeleaf + Spring Boot: File Upload example
Fullstack CRUD App:
– Angular 17 + Spring Boot + H2 example
– Angular 17 + Spring Boot + MySQL example
– Angular 17 + Spring Boot + PostgreSQL example
– Angular 17 + Spring Boot + MongoDB example
Serverless with Firebase:
– Angular 17 File Upload with Firebase Storage
Conclusion
Today we’re learned how to build an example for upload Files from Angular 17 to Spring Boot server. We also provide the ability to show list of files, upload progress using Bootstrap, and to download file from the server.
Next tutorials will show you way to implement the full-stack (with source code):
– Back-end: File Upload to Static folder / File Upload to Database
– Front-end / Front-end with Progress Bar
If you want to upload multiple files at once like this:
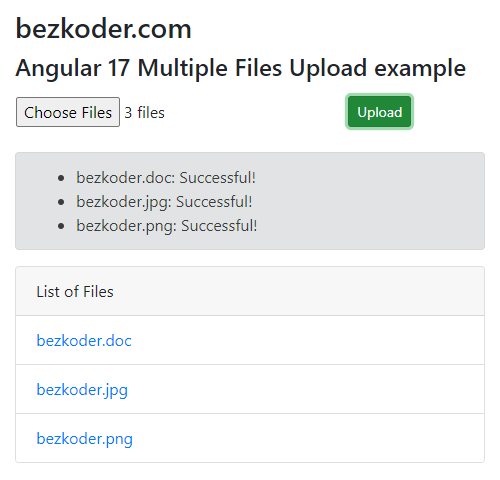
You can find the instruction (with Github) here:
Angular 17 Multiple Files upload example
Or use Angular Material like this:
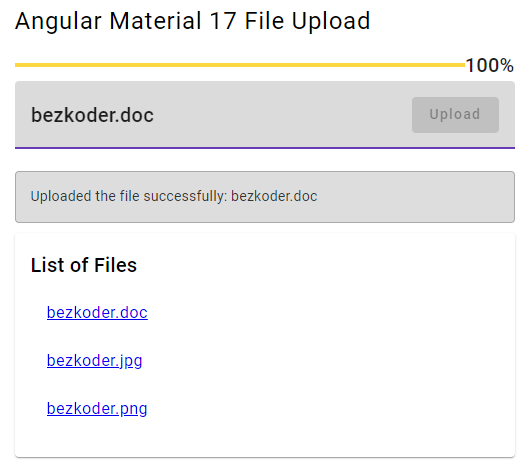
Please visit: Angular Material 17 File upload example
You will want to know how to run both projects on same port:
How to Integrate Angular with Spring Boot Rest API
Happy Learning! See you again.