In this tutorial, we will learn how to build a full stack Angular 16 + Spring Boot + PostgreSQL example with a CRUD App. The back-end server uses Spring Boot with Spring Web MVC for REST Controller and Spring Data JPA for interacting with PostgreSQL database. Front-end side is made with Angular 16, HttpClient, Router and Bootstrap 4.
Security: Angular 16 + Spring Boot: JWT Authentication example
Upload: Angular 16 + Spring Boot: File upload/download example
Pagination: Angular + Spring Boot: Pagination example
Contents
Angular 16 + Spring Boot + PostgreSQL example
We will build a full-stack Angular 16 and Spring Boot PostgreSQL CRUD Tutorial Application in that:
- Each Tutorial has id, title, description, published status.
- We can create, retrieve, update, delete Tutorials.
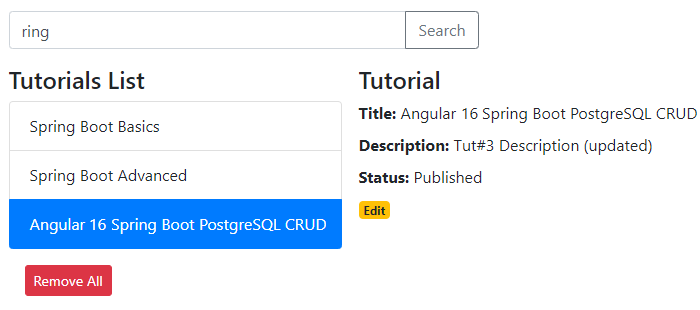
- We can also find Tutorials by title.
The images below shows screenshots of our System.
– Add Tutorial:

– Retrieve Tutorials:
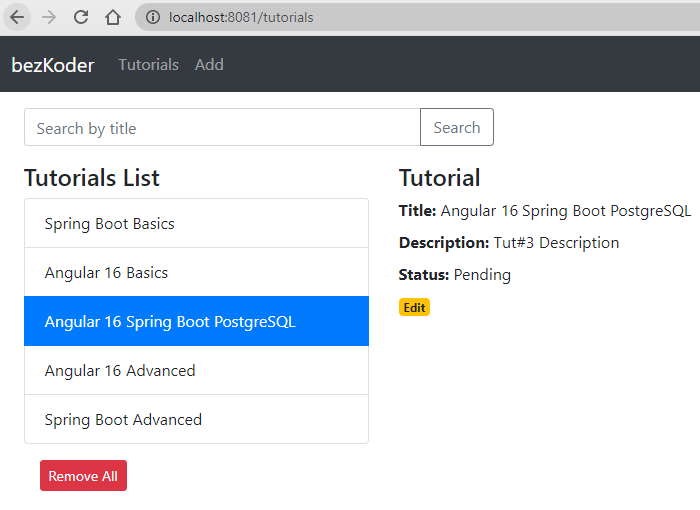
– Click on Edit button to go to a Tutorial page:
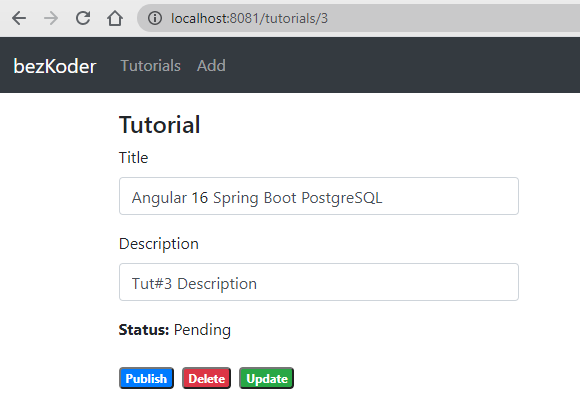
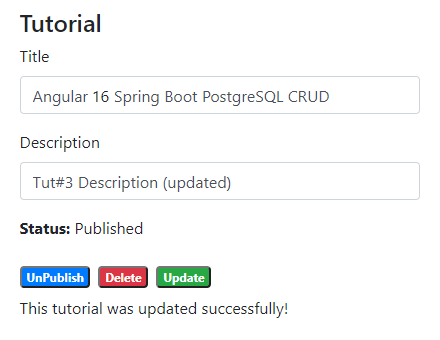
On this Page, you can:
- change status to Published using Publish button
- delete the Tutorial using Delete button
- update the Tutorial details with Update button
If you want to implement Form Validation, please visit:
- Angular 16 Form Validation example (Reactive Forms)
- Angular 16 Template Driven Form Validation example
– Search Tutorials by title:
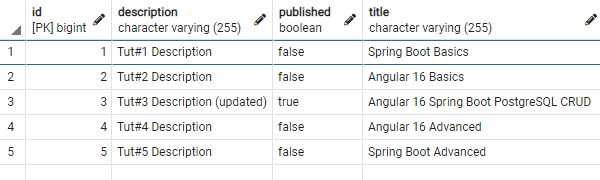
– PostgreSQL database table looks like this:
Angular 16, Spring Boot PostgreSQL Architecture
This is the application architecture we will build:
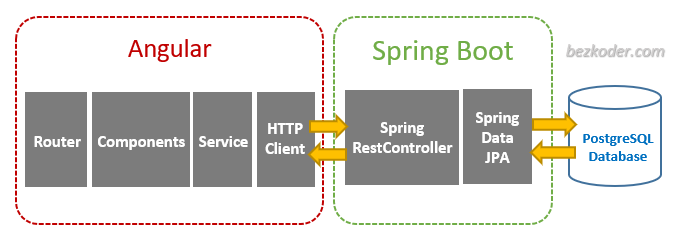
– Spring Boot exports REST Apis using Spring Web MVC & interacts with PostgreSQL Database using Spring Data JPA.
– Angular 16 Client sends HTTP Requests and retrieve HTTP Responses using HttpClient Module, shows data on the components. We also use Angular Router for navigating to pages.
Video
This is our Angular + Spring Boot + PostgreSQL CRUD application demo and brief instruction:
In the video, we use Angular 10, but it has the same logic & UI as Angular version 16 in this tutorial.
Spring Boot PostgreSQL Server
Overview
These are APIs that Spring Boot App will export:
| Methods | Urls | Actions |
|---|---|---|
| POST | /api/tutorials | create new Tutorial |
| GET | /api/tutorials | retrieve all Tutorials |
| GET | /api/tutorials/:id | retrieve a Tutorial by :id |
| PUT | /api/tutorials/:id | update a Tutorial by :id |
| DELETE | /api/tutorials/:id | delete a Tutorial by :id |
| DELETE | /api/tutorials | delete all Tutorials |
| GET | /api/tutorials?title=[keyword] | find all Tutorials which title contains keyword |
– We make CRUD operations & finder methods with Spring Data JPA’s JpaRepository.
– The database will be PostgreSQL by configuring project dependency & datasource.
Technology
- Java 17 / 11 / 8
- Spring Boot 3 / 2 (with Spring Web MVC, Spring Data JPA)
- PostgreSQL
- Maven
Project Structure
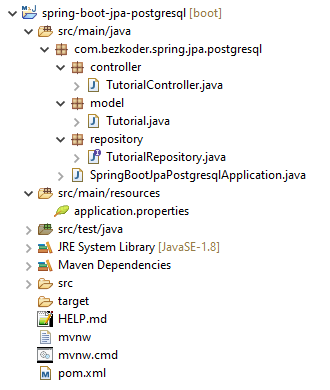
– Tutorial data model class corresponds to entity and table tutorials.
– TutorialRepository is an interface that extends JpaRepository for CRUD methods and custom finder methods. It will be autowired in TutorialController.
– TutorialController is a RestController which has request mapping methods for RESTful requests such as: getAllTutorials, createTutorial, updateTutorial, deleteTutorial, findByPublished…
– Configuration for Spring Datasource, JPA & Hibernate in application.properties.
– pom.xml contains dependencies for Spring Boot and PostgreSQL.
Create & Setup Spring Boot project
Use Spring web tool or your development tool (Spring Tool Suite, Eclipse, Intellij) to create a Spring Boot Maven project.
Then open pom.xml and add these dependencies:
<dependency> <groupId>org.springframework.boot</groupId> <artifactId>spring-boot-starter-data-jpa</artifactId> </dependency> <dependency> <groupId>org.springframework.boot</groupId> <artifactId>spring-boot-starter-web</artifactId> </dependency> We also need to add one more dependency for PostgreSQL:
<dependency> <groupId>org.postgresql</groupId> <artifactId>postgresql</artifactId> <scope>runtime</scope> </dependency> Configure Spring Datasource, JPA, Hibernate
Under src/main/resources folder, open application.properties and write these lines.
spring.datasource.url= jdbc:postgresql://localhost:5432/testdb spring.datasource.username= postgres spring.datasource.password= 123 spring.jpa.properties.hibernate.jdbc.lob.non_contextual_creation= true spring.jpa.properties.hibernate.dialect= org.hibernate.dialect.PostgreSQLDialect # Hibernate ddl auto (create, create-drop, validate, update) spring.jpa.hibernate.ddl-auto= update spring.datasource.username&spring.datasource.passwordproperties are the same as your database installation.- Spring Boot uses Hibernate for JPA implementation, we configure
PostgreSQLDialectfor PostgreSQL spring.jpa.hibernate.ddl-autois used for database initialization. We set the value toupdatevalue so that a table will be created in the database automatically corresponding to defined data model. Any change to the model will also trigger an update to the table. For production, this property should bevalidate.
Define Data Model
Our Data model is Tutorial with four fields: id, title, description, published.
In model package, we define Tutorial class.
model/Tutorial.java
package com.bezkoder.spring.jpa.postgresql.model; // import javax.persistence.*; // for Spring Boot 2 import jakarta.persistence.*; // for Spring Boot 3 @Entity @Table(name = "tutorials") public class Tutorial { @Id @GeneratedValue(strategy = GenerationType.AUTO) private long id; @Column(name = "title") private String title; @Column(name = "description") private String description; @Column(name = "published") private boolean published; ... } – @Entity annotation indicates that the class is a persistent Java class.
– @Table annotation provides the table that maps this entity.
– @Id annotation is for the primary key.
– @GeneratedValue annotation is used to define generation strategy for the primary key. GenerationType.AUTO means Auto Increment field.
– @Column annotation is used to define the column in database that maps annotated field.
Create Repository Interface
Let’s create a repository to interact with Tutorials from the database.
In repository package, create TutorialRepository interface that extends JpaRepository.
repository/TutorialRepository.java
package com.bezkoder.spring.jpa.postgresql.repository; ... public interface TutorialRepository extends JpaRepository<Tutorial, Long> { List<Tutorial> findByPublished(boolean published); List<Tutorial> findByTitleContaining(String title); } Now we can use JpaRepository’s methods: save(), findOne(), findById(), findAll(), count(), delete(), deleteById()… without implementing these methods.
We also define custom finder methods:
– findByPublished(): returns all Tutorials with published having value as input published.
– findByTitleContaining(): returns all Tutorials which title contains input title.
The implementation is plugged in by Spring Data JPA automatically.
You can modify this Repository:
– to work with Pagination, the instruction can be found at:
Spring Boot Pagination & Filter example | Spring JPA, Pageable
– or to sort/order by multiple fields with the tutorial:
Spring Data JPA Sort/Order by multiple Columns | Spring Boot
You also find way to write Unit Test for this JPA Repository at:
Spring Boot Unit Test for JPA Repositiory with @DataJpaTest
Create Spring Rest APIs Controller
Finally, we create a controller that provides APIs for creating, retrieving, updating, deleting and finding Tutorials.
controller/TutorialController.java
package com.bezkoder.spring.jpa.postgresql.controller; ... @CrossOrigin(origins = "http://localhost:8081") @RestController @RequestMapping("/api") public class TutorialController { @Autowired TutorialRepository tutorialRepository; @GetMapping("/tutorials") public ResponseEntity<List<Tutorial>> getAllTutorials(@RequestParam(required = false) String title) { ... } @GetMapping("/tutorials/{id}") public ResponseEntity<Tutorial> getTutorialById(@PathVariable("id") long id) { ... } @PostMapping("/tutorials") public ResponseEntity<Tutorial> createTutorial(@RequestBody Tutorial tutorial) { ... } @PutMapping("/tutorials/{id}") public ResponseEntity<Tutorial> updateTutorial(@PathVariable("id") long id, @RequestBody Tutorial tutorial) { ... } @DeleteMapping("/tutorials/{id}") public ResponseEntity<HttpStatus> deleteTutorial(@PathVariable("id") long id) { ... } @DeleteMapping("/tutorials") public ResponseEntity<HttpStatus> deleteAllTutorials() { ... } @GetMapping("/tutorials/published") public ResponseEntity<List<Tutorial>> findByPublished() { ... } } – @CrossOrigin is for configuring allowed origins.
– @RestController annotation is used to define a controller and to indicate that the return value of the methods should be be bound to the web response body.
– @RequestMapping("/api") declares that all Apis’ url in the controller will start with /api.
– We use @Autowired to inject TutorialRepository bean to local variable.
You can continue with step by step to implement this Spring Boot Server in the post:
Spring Boot, PostgreSQL: Build Rest CRUD Apis example
Or Reactive Rest API: Spring Boot R2DBC + PostgreSQL example
The Angular 16 Client in this tutorial also works well with other databases, you can find instruction in one of the posts:
– Spring Boot + H2
– Spring Boot + MySQL
– Spring Boot + MongoDB
– Spring Boot + Oracle
– Spring Boot + SQL Server
– Spring Boot + Cassandra
Run the Spring Boot Server
Run Spring Boot application with command: mvn spring-boot:run.
Angular 16 Client
Overview
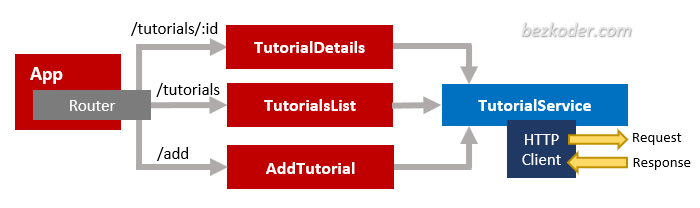
– The App component is a container with router-outlet. It has navbar that links to routes paths via routerLink.
– TutorialsList component gets and displays Tutorials.
– TutorialDetails component has form for editing Tutorial’s details based on :id.
– AddTutorial component has form for submission new Tutorial.
– These Components call TutorialService methods which use Angular HTTPClient to make HTTP requests and receive responses.
Technology
- Angular 16
- Angular HttpClient
- Angular Router
- Bootstrap 4
Project Structure
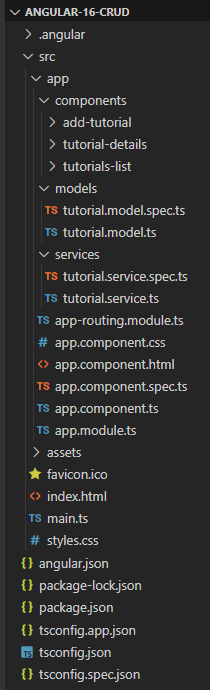
– tutorial.model.ts exports the main class model: Tutorial.
– There are 3 components: tutorials-list, tutorial-details, add-tutorial.
– tutorial.service has methods for sending HTTP requests to the Apis.
– app-routing.module.ts defines routes for each component.
– app component contains router view and navigation bar.
– app.module.ts declares Angular components and import necessary modules.
Setup Angular 16 Project
Let’s open cmd and use Angular CLI to create a new Angular Project as following command:
ng new angular-16-crud ? Would you like to add Angular routing? Yes ? Which stylesheet format would you like to use? CSS We also need to generate some Components and Services:
ng g s services/tutorial ng g c components/add-tutorial ng g c components/tutorial-details ng g c components/tutorials-list ng g class models/tutorial --type=model Set up App Module
Open app.module.ts and import FormsModule, HttpClientModule:
... import { FormsModule } from '@angular/forms'; import { HttpClientModule } from '@angular/common/http'; @NgModule({ declarations: [ ... ], imports: [ ... FormsModule, HttpClientModule ], providers: [], bootstrap: [AppComponent] }) export class AppModule { } Define Routes for Angular AppRoutingModule
There are 3 main routes:
– /tutorials for tutorials-list component
– /tutorials/:id for tutorial-details component
– /add for add-tutorial component
app-routing.module.ts
import { NgModule } from '@angular/core'; import { RouterModule, Routes } from '@angular/router'; import { TutorialsListComponent } from './components/tutorials-list/tutorials-list.component'; import { TutorialDetailsComponent } from './components/tutorial-details/tutorial-details.component'; import { AddTutorialComponent } from './components/add-tutorial/add-tutorial.component'; const routes: Routes = [ { path: '', redirectTo: 'tutorials', pathMatch: 'full' }, { path: 'tutorials', component: TutorialsListComponent }, { path: 'tutorials/:id', component: TutorialDetailsComponent }, { path: 'add', component: AddTutorialComponent } ]; @NgModule({ imports: [RouterModule.forRoot(routes)], exports: [RouterModule] }) export class AppRoutingModule { } Define Model Class
Our main model class Tutorial will be exported in tutorial.model.ts with 4 fields:
idtitledescriptionpublished
models/tutorial.model.ts
export class Tutorial { id?: any; title?: string; description?: string; published?: boolean; } Create Data Service
This service will use Angular HttpClient to send HTTP requests.
You can see that its functions includes CRUD operations and finder method.
services/tutorial.service.ts
import { Injectable } from '@angular/core'; import { HttpClient } from '@angular/common/http'; import { Observable } from 'rxjs'; import { Tutorial } from '../models/tutorial.model'; const baseUrl = 'http://localhost:8080/api/tutorials'; @Injectable({ providedIn: 'root' }) export class TutorialService { constructor(private http: HttpClient) { } getAll(): Observable<Tutorial[]> { return this.http.get<Tutorial[]>(baseUrl); } get(id: any): Observable<Tutorial> { return this.http.get(`${baseUrl}/${id}`); } create(data: any): Observable<any> { return this.http.post(baseUrl, data); } update(id: any, data: any): Observable<any> { return this.http.put(`${baseUrl}/${id}`, data); } delete(id: any): Observable<any> { return this.http.delete(`${baseUrl}/${id}`); } deleteAll(): Observable<any> { return this.http.delete(baseUrl); } findByTitle(title: any): Observable<Tutorial[]> { return this.http.get<Tutorial[]>(`${baseUrl}?title=${title}`); } } Create Angular 16 Components
As you’ve known before, there are 3 components corresponding to 3 routes defined in AppRoutingModule.
- Add new Item Component
- List of items Component
- Item details Component
You can continue with step by step to implement this Angular App in the post:
Angular 16 CRUD example with Web API
Run the Angular 16 App
You can run this App with command: ng serve --port 8081.
If the process is successful, open Browser with Url: http://localhost:8081/ and check it.
Further Reading
Security: Angular 16 + Spring Boot: JWT Authentication example
Upload: Angular 16 + Spring Boot: File upload/download example
If you want to implement Form Validation, please visit:
- Angular 16 Form Validation example (Reactive Forms)
- Angular 16 Template Driven Form Validation example
Or Pagination: Angular + Spring Boot: Pagination example
Serverless with Firebase:
– Angular 16 Firebase CRUD with Realtime Database
– Angular 16 Firestore CRUD example
– Angular 16 File Upload with Firebase Storage
Source Code
You can find Github source code for this tutorial at:
Spring Boot + Angular 16 + PostgreSQL example Github.
Conclusion
Now we have an overview of Angular 16 + Spring Boot + PostgreSQL example when building a fullstack CRUD App.
We also take a look at client-server architecture for REST API using Spring Web MVC & Spring Data JPA, as well as Angular 16 project structure for building a front-end app to make HTTP requests and consume responses.
Next tutorials show you more details about how to implement the system (with Github source code):
– Back-end / Back-end with Reactive Rest API
– Front-end:
- Using Angular 8
- Using Angular 10
- Using Angular 11
- Using Angular 12
- Using Angular 13
- Using Angular 14
- Using Angular 15
- Using Angular 16
The Angular 16 Client in this tutorial also works well with other databases, you can find instruction in one of the posts:
– Spring Boot + H2
– Spring Boot + MySQL
– Spring Boot + MongoDB
– Spring Boot + Oracle
– Spring Boot + SQL Server
– Spring Boot + Cassandra
Happy learning, see you again!