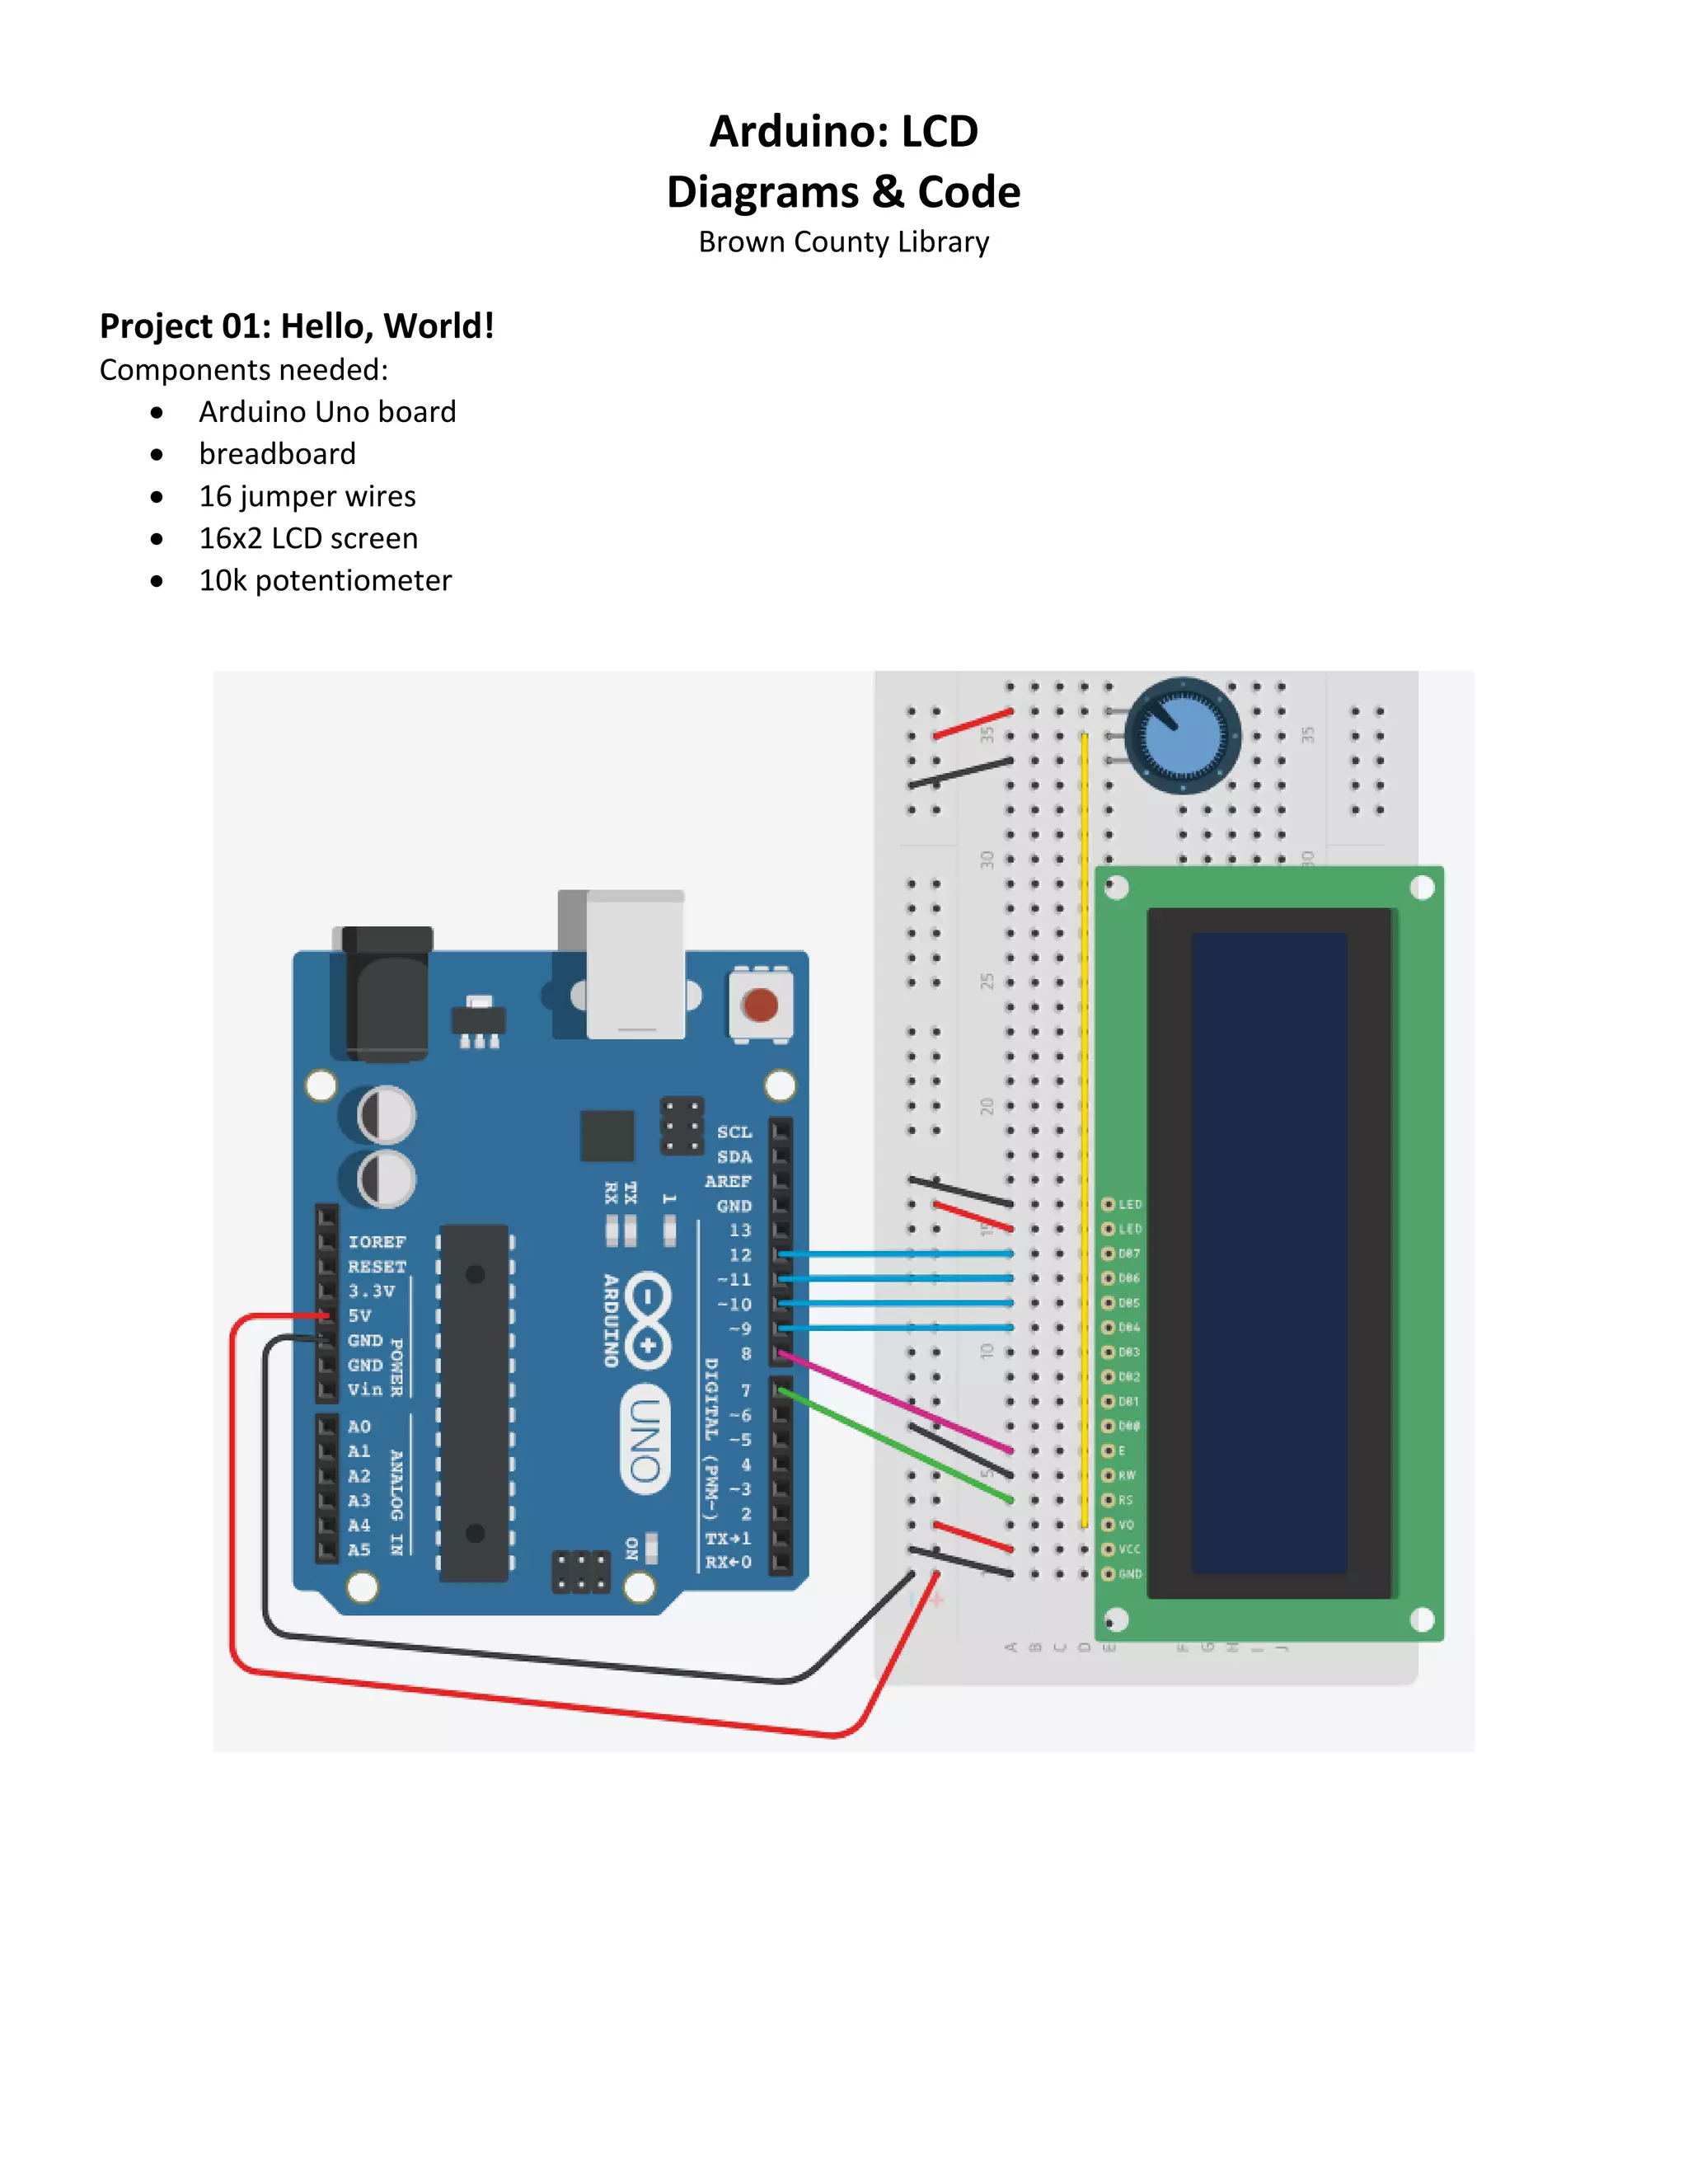
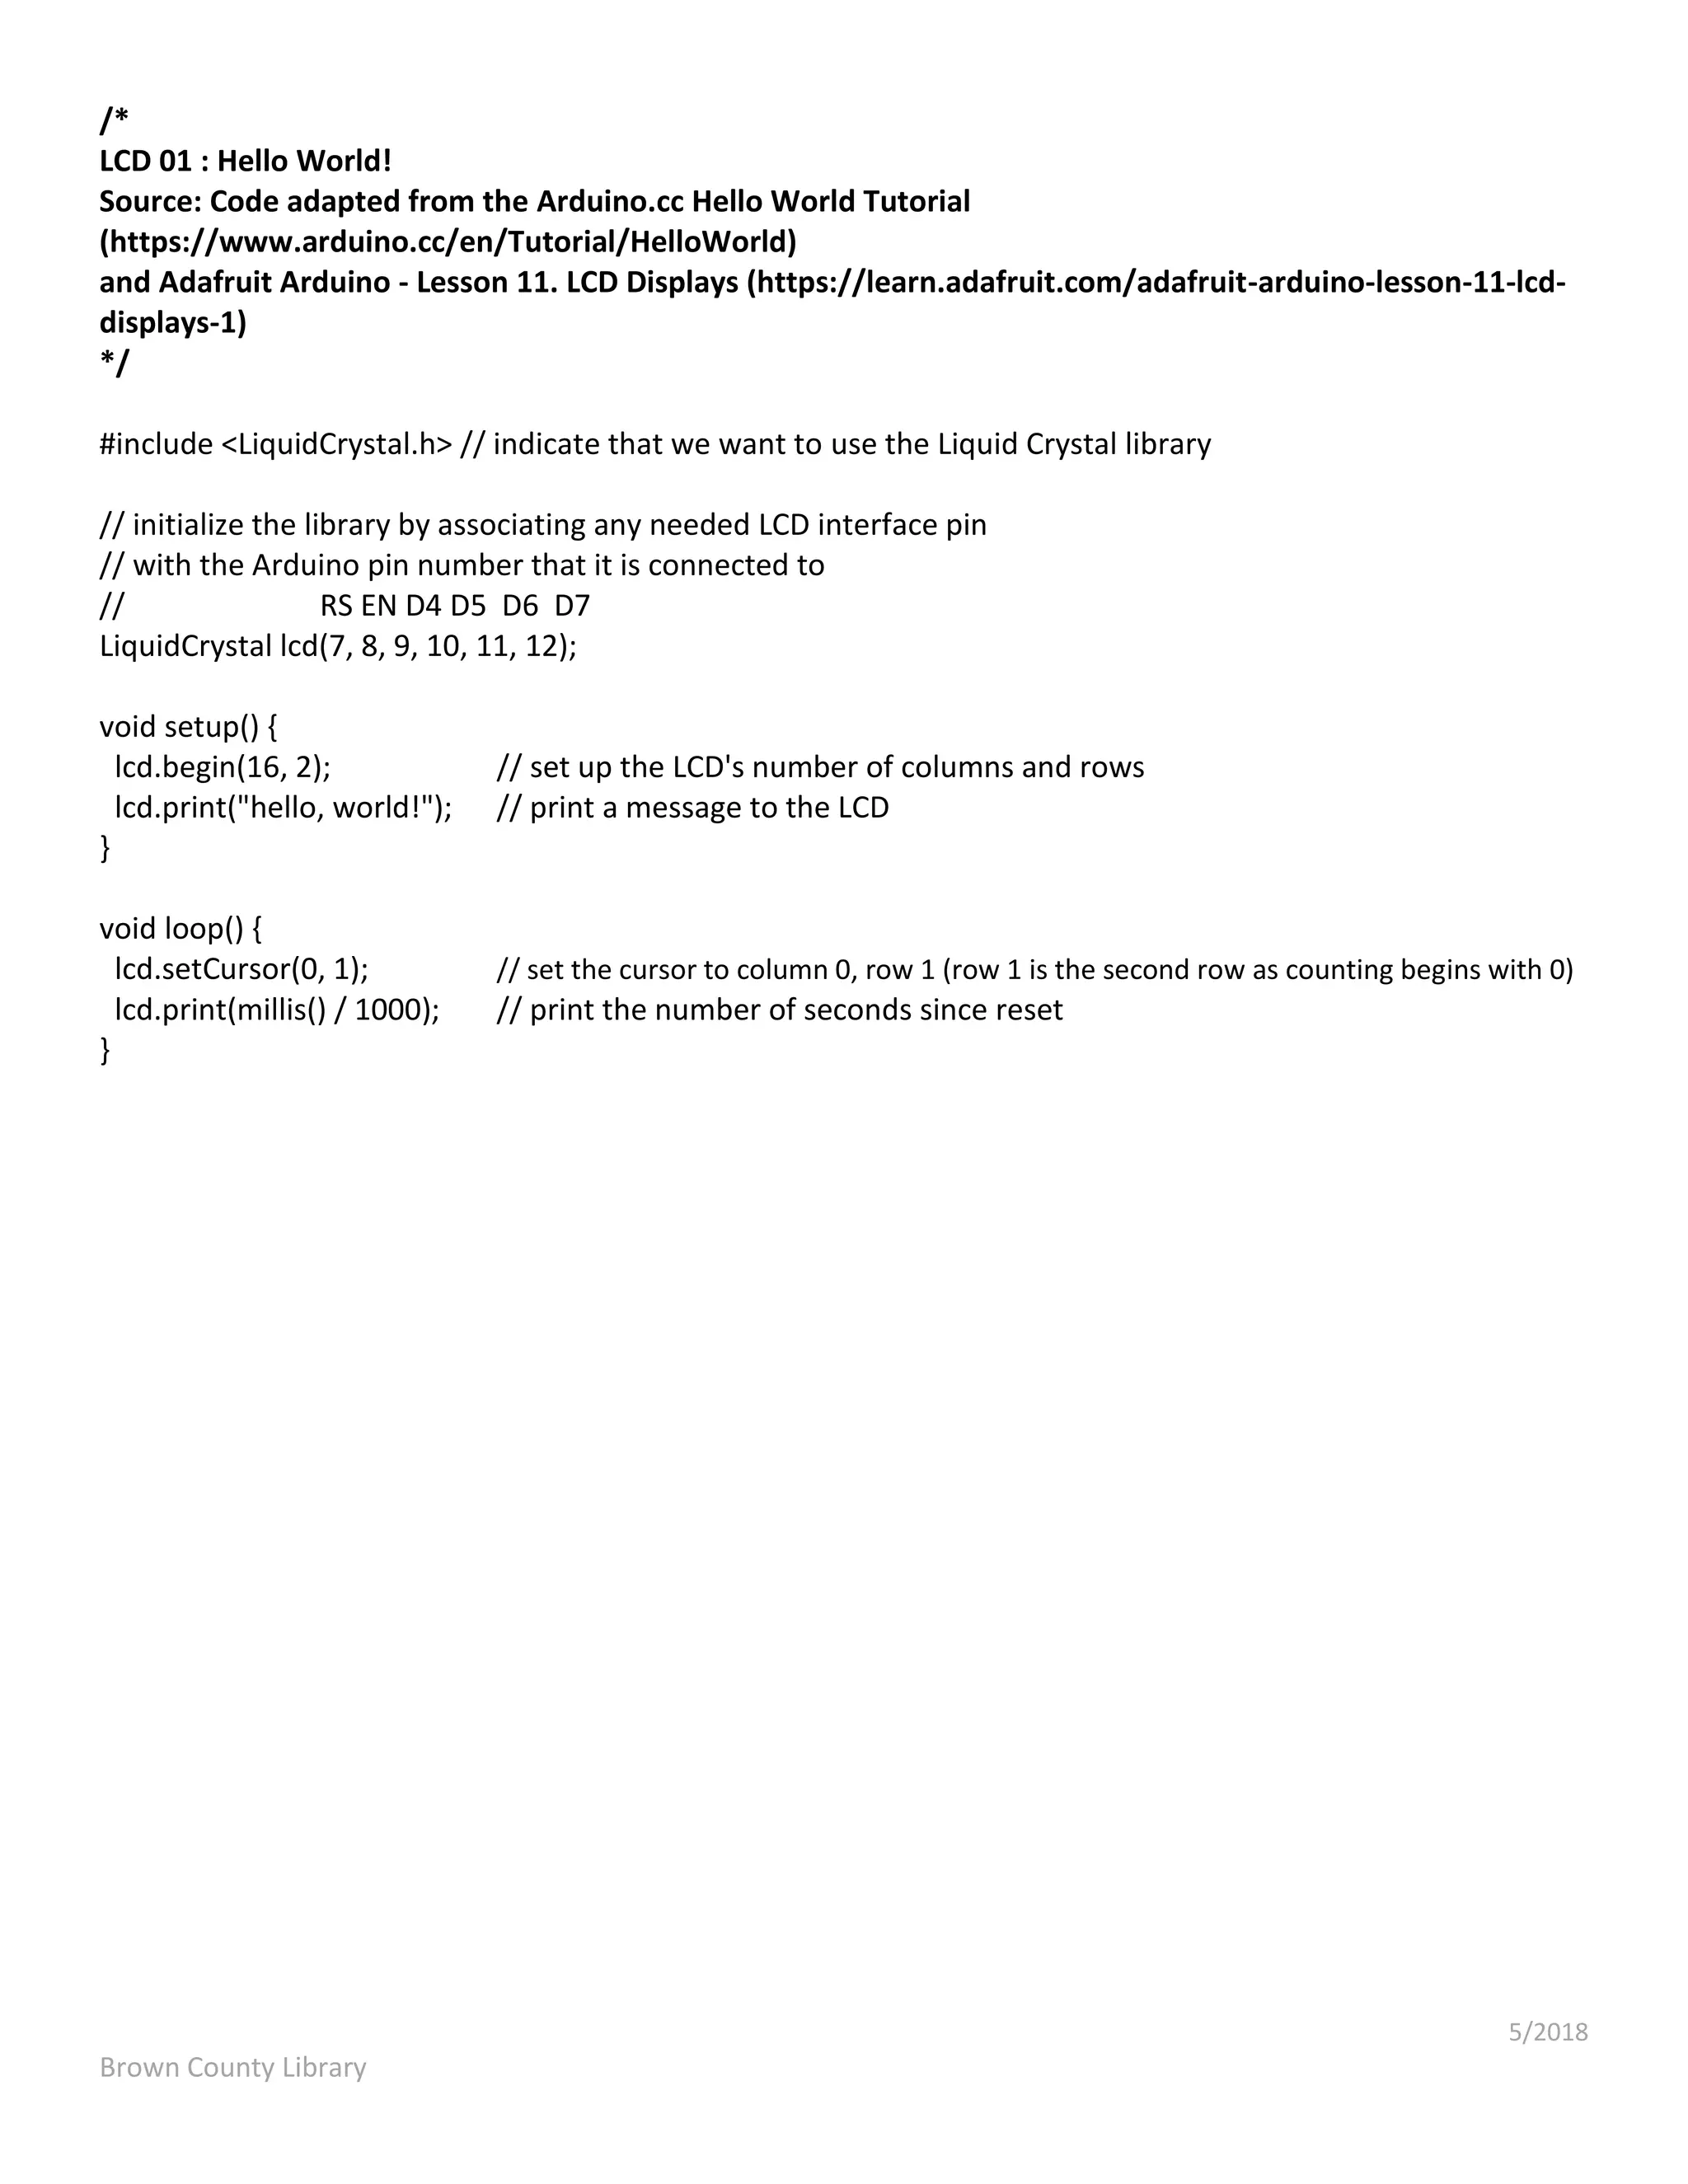
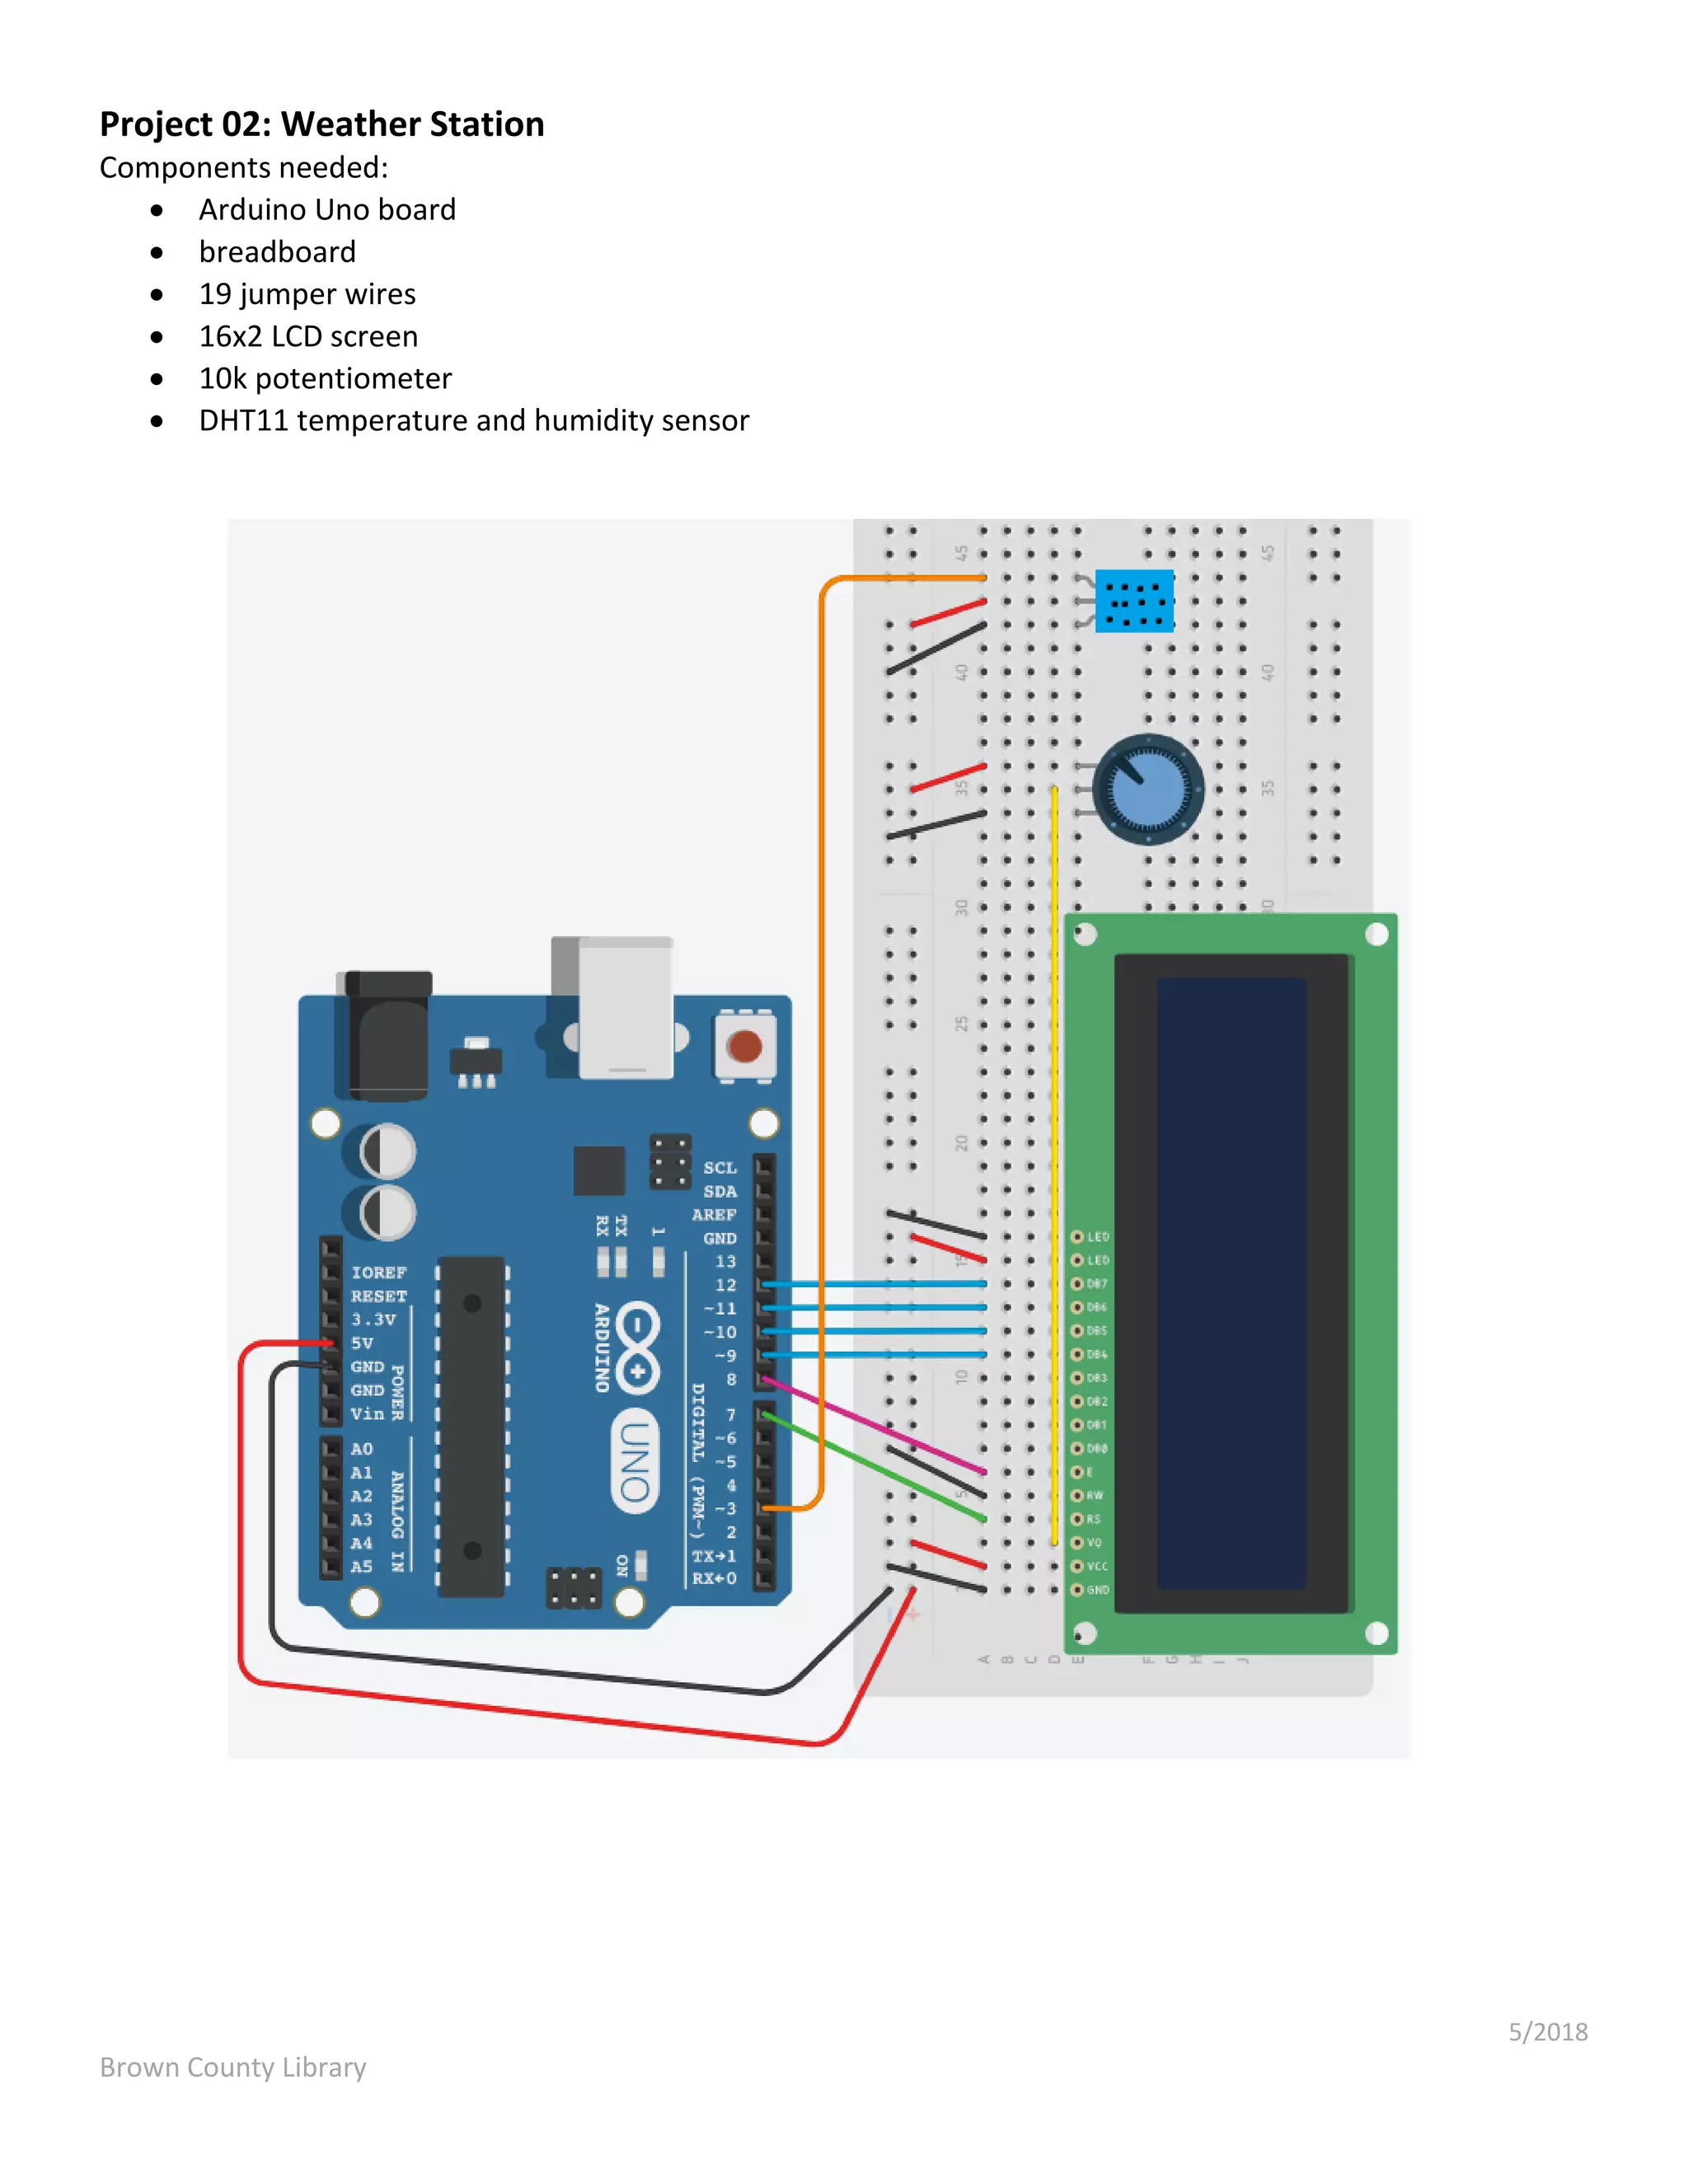
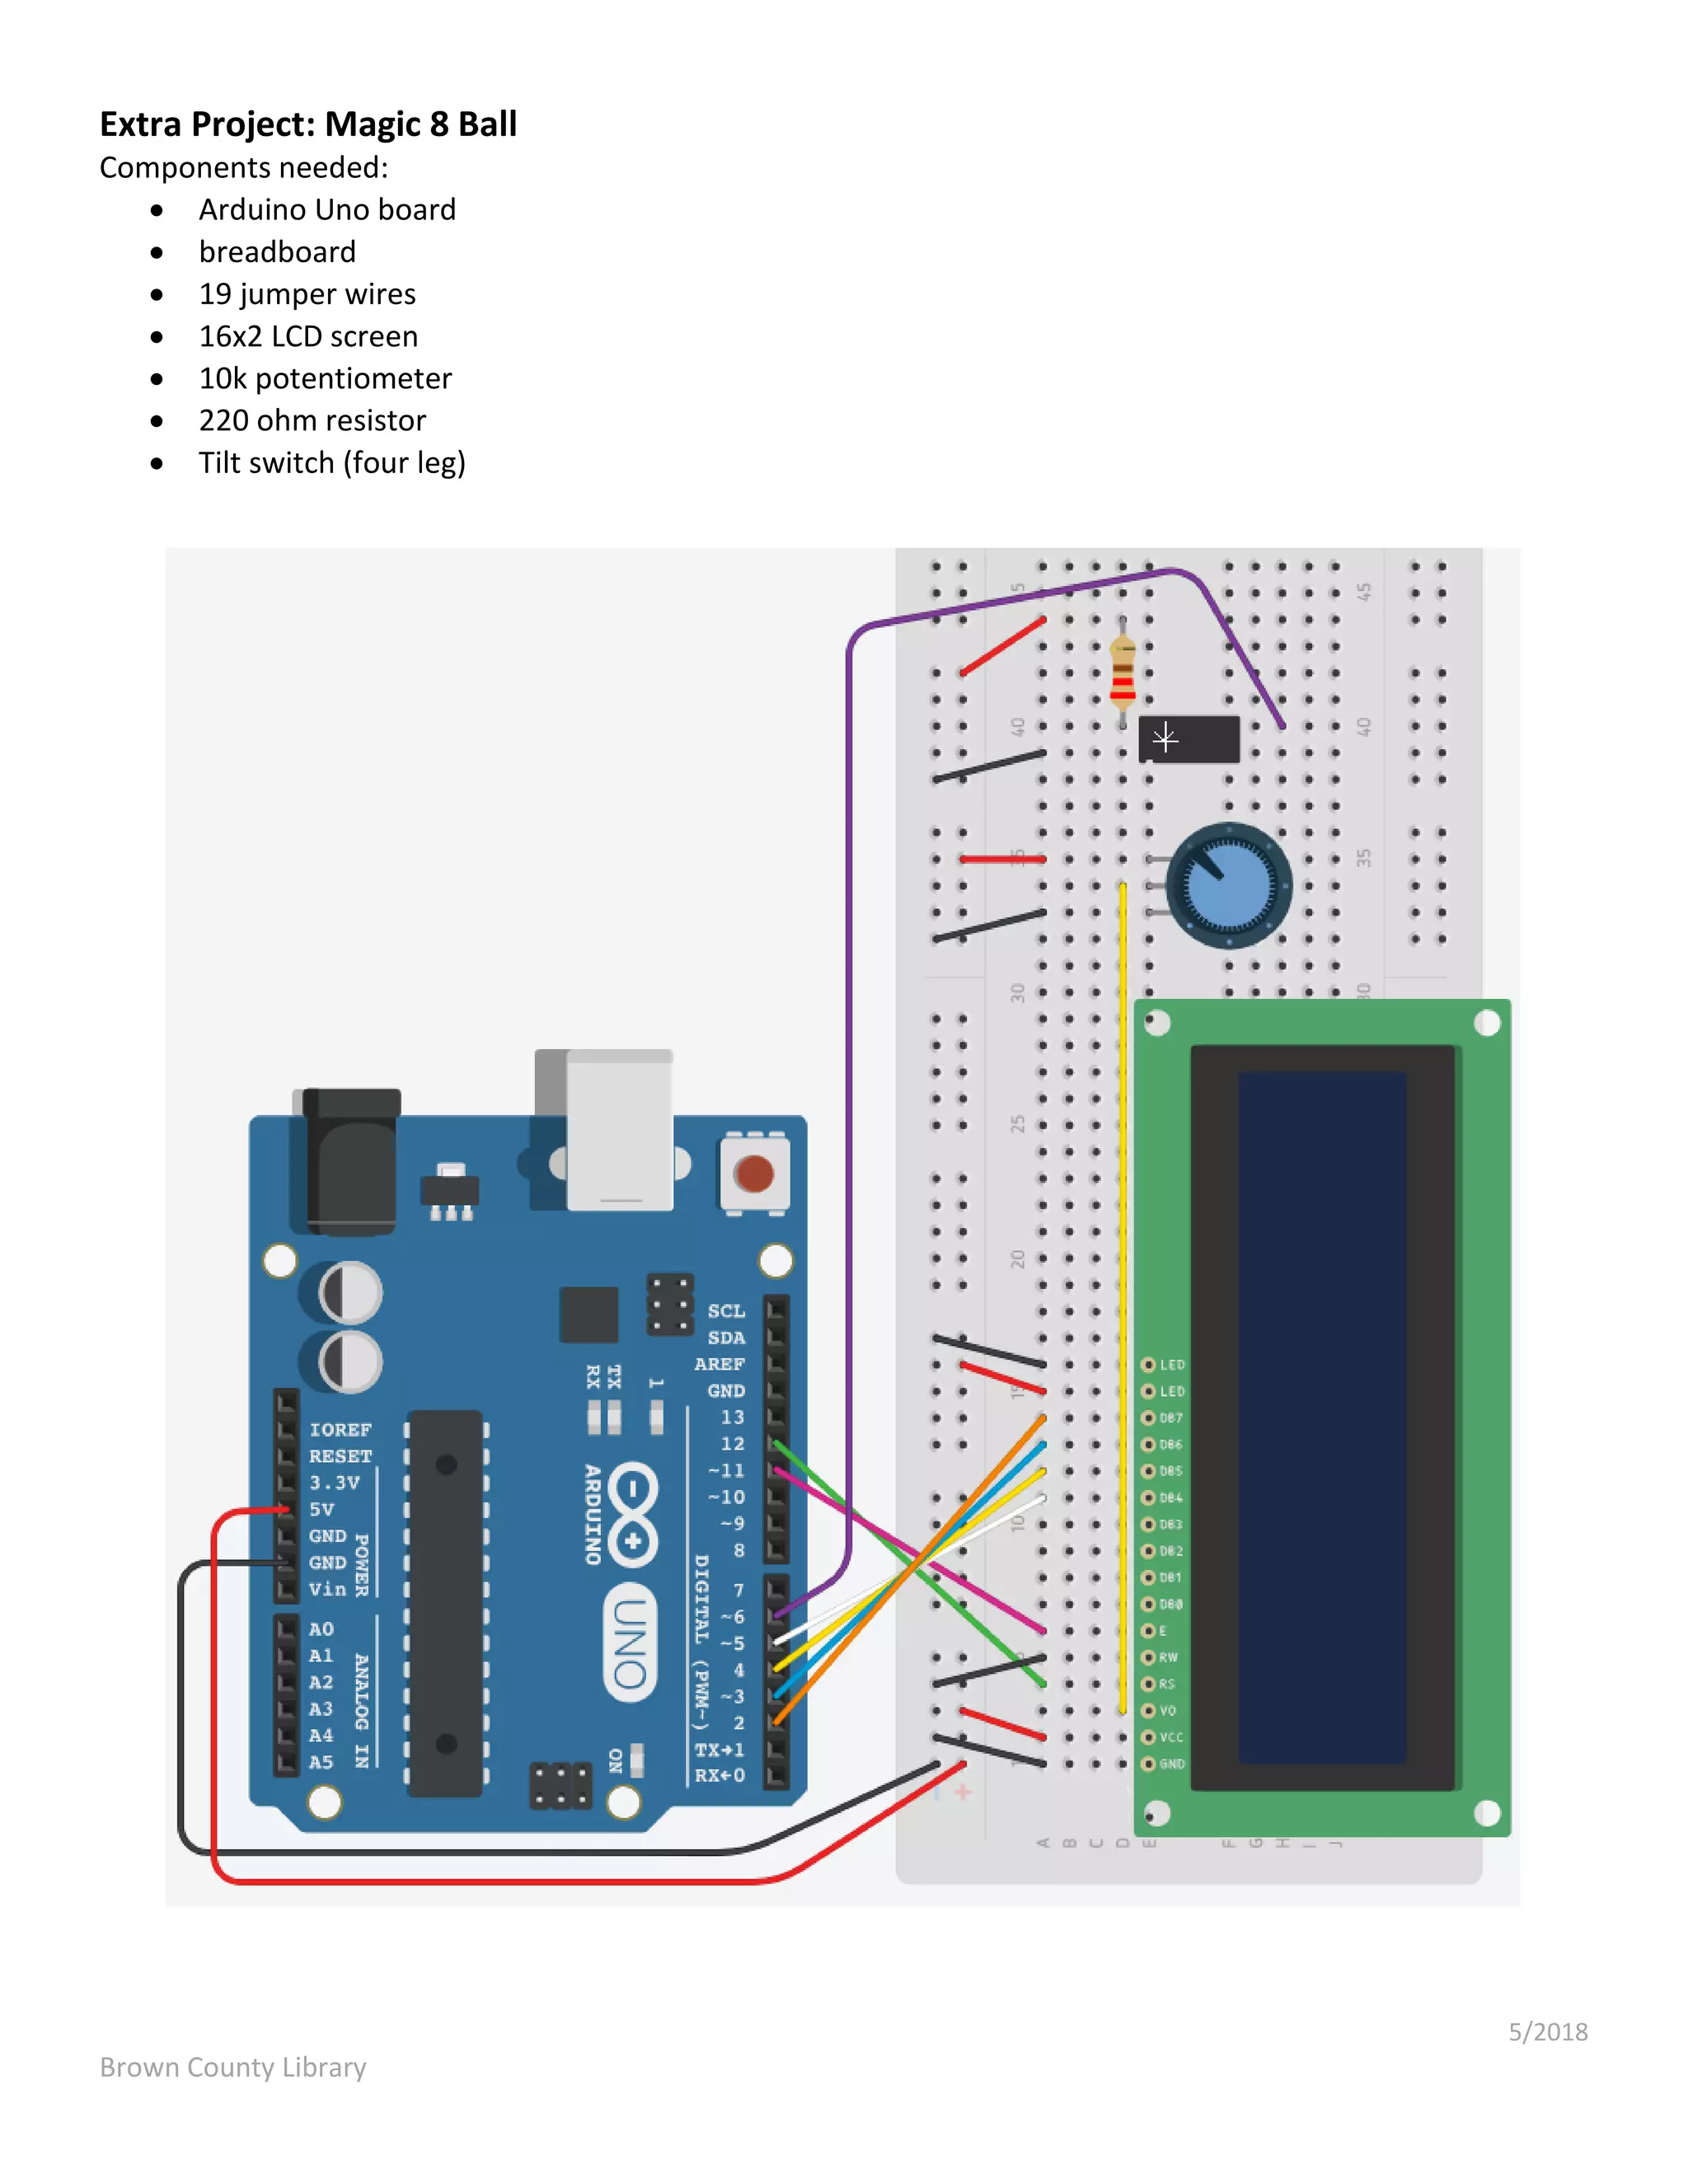
Arduino: LCD Diagrams & Code Brown County Library Project 01: Hello, World! Components needed:  Arduino Uno board  breadboard  16 jumper wires  16x2 LCD screen  10k potentiometer
5/2018 Brown County Library /* LCD 01 : Hello World! Source: Code adapted from the Arduino.cc Hello World Tutorial (https://www.arduino.cc/en/Tutorial/HelloWorld) and Adafruit Arduino - Lesson 11. LCD Displays (https://learn.adafruit.com/adafruit-arduino-lesson-11-lcd- displays-1) */ #include <LiquidCrystal.h> // indicate that we want to use the Liquid Crystal library // initialize the library by associating any needed LCD interface pin // with the Arduino pin number that it is connected to // RS EN D4 D5 D6 D7 LiquidCrystal lcd(7, 8, 9, 10, 11, 12); void setup() { lcd.begin(16, 2); // set up the LCD's number of columns and rows lcd.print("hello, world!"); // print a message to the LCD } void loop() { lcd.setCursor(0, 1); // set the cursor to column 0, row 1 (row 1 is the second row as counting begins with 0) lcd.print(millis() / 1000); // print the number of seconds since reset }
5/2018 Brown County Library Project 02: Weather Station Components needed:  Arduino Uno board  breadboard  19 jumper wires  16x2 LCD screen  10k potentiometer  DHT11 temperature and humidity sensor
5/2018 Brown County Library /* LCD 02 : Weather Station Source: Code adapted from the Arduino Project Handbook (Geddes, 2016) and ladyada's DHT humidity/temperature sensors testing sketch (https://learn.adafruit.com/dht?view=all) */ #include <LiquidCrystal.h> // call the Liquid Crystal library #include <DHT.h> // call the DHT library const int DHTPIN = 3; // pin connected to DHT const int DHTTYPE = DHT11; // set the type of sensor // initialize the Liquid Crystal library by associating any needed LCD interface pin // with the Arduino pin number that it is connected to // RS E D4 D5 D6 D7 LiquidCrystal lcd(7, 8, 9, 10, 11, 12); // initialize the DHT library by telling it the pin and sensor type // pin sensor type DHT dht(DHTPIN, DHTTYPE); void setup() { dht.begin(); // start the DHT sensor lcd.begin(16, 2); // set up the LCD's number of columns and rows } void loop() { float h = dht.readHumidity(); // get a humidity reading float t = dht.readTemperature(); // get a temperature reading t = t * 9 / 5 + 32; // change temp reading from Celsius to Fahrenheit if (isnan(t) || isnan(h)) { // check that DHT sensor is working lcd.setCursor(0, 0); // set the cursor to column 0, row 0 lcd.print("Failed to read from DHT"); // if DHT is not working, display this } else { // otherwise show the readings on the screen lcd.clear(); lcd.setCursor(0, 0); // set the cursor to column 0, row 0 // display humidity reading lcd.print("Humidity: "); lcd.print(h); lcd.print("%"); lcd.setCursor(0, 1); // set the cursor to column 0, row 1 // display temperature reading lcd.print("Temp: "); lcd.print(t); lcd.print("f"); } delay(1000); // stabilizes the LCD screen }
5/2018 Brown County Library Ideas to Build On Build an electronic Magic 8 Ball - ask a question and get an answer when you gently tap or shake your breadboard! See page 6 of this document. Try to beat a reaction timer - how quickly can you press a button when a RGB LED flashes red? See page 9 of this document. https://learn.sparkfun.com/tutorials/sik-experiment-guide-for-arduino---v33/experiment-12-driving-a-motor Build your own time clock, complete with buttons to set the hour and minute! Note: The diagram for this project is a bit confusing – it make take some critical thinking to come up with your own setup. https://www.hackster.io/Annlee_Fores/simple-arduino-digital-clock-without-rtc-7d4303 Learn More Want to learn more about how LCD screens and Arduino Libraries work? Try these resources: Adafruit Arduino Lesson 11: LCD Displays Part 1. Simon Monk. https://learn.adafruit.com/adafruit-arduino-lesson-11-lcd-displays-1?view=all Adafruit Arduino Lesson 12: LCD Displays Part 2. Simon Monk. https://learn.adafruit.com/adafruit-arduino-lesson-12-lcd-displays-part-2?view=all Adafruit Tips, Tricks & Techniques: Arduino Libraries. Lady Ada and Tyler Cooper. https://learn.adafruit.com/arduino-tips-tricks-and-techniques/arduino-libraries Adafruit Character LCDs OverView. Lady Ada and Tony DiCola. https://learn.adafruit.com/character-lcds?view=all Arduino – Hello World! https://www.arduino.cc/en/Tutorial/HelloWorld Arduino – Libraries. https://www.arduino.cc/en/Reference/Libraries Arduino Project Handbook. Mark Geddes. 2016. Pg. 102-132. Exploring Arduino: Tools and Techniques for Engineering Wizardry. Jeremy Blum. 2013. Pg. 199-219. Sparkfun SIK Experiment Guide for Arduino V4.0 – Circuit 4A: LCD “Hello World!”. https://learn.sparkfun.com/tutorials/sparkfun-inventors-kit-experiment-guide---v40/circuit-4a-lcd-hello-world
5/2018 Brown County Library Extra Project: Magic 8 Ball Components needed:  Arduino Uno board  breadboard  19 jumper wires  16x2 LCD screen  10k potentiometer  220 ohm resistor  Tilt switch (four leg)
5/2018 Brown County Library /* LCD Extra Project : Magic 8 Ball Source: Code adapted from the Arduino Projects Book (Fitzgerald, Shiloh & Igoe, 2012) and Arduino Project Handbook (Geddes, 2016) */ #include <LiquidCrystal.h> LiquidCrystal lcd(12, 11, 5, 4, 3, 2); const int switchPin = 6; int switchState = 0; int prevSwitchState = 0; int reply; void setup() { // put your setup code here, to run once: lcd.begin(16, 2); pinMode(switchPin,INPUT); lcd.print("Ask the"); lcd.setCursor(0,1); lcd.print("Crystal Ball!"); // if analog input pin 0 is unconnected, random analog // noise will cause the call to randomSeed() to generate // different seed numbers each time the sketch runs. // randomSeed() will then shuffle the random function. randomSeed(analogRead(0)); } void loop() { // put your main code here, to run repeatedly: switchState = digitalRead(switchPin); if (switchState != prevSwitchState) { if (switchState == LOW) { reply = random(8); lcd.clear(); lcd.setCursor(0, 0); lcd.print("The ball says:"); lcd.setCursor(0, 1); switch(reply){ case 0: lcd.print("Yes"); break; case 1:
5/2018 Brown County Library lcd.print("Most likely"); break; case 2: lcd.print("Certainly"); break; case 3: lcd.print("Outlook good"); break; case 4: lcd.print("Unsure"); break; case 5: lcd.print("Ask a Librarian"); break; case 6: lcd.print("Doubtful"); break; case 7: lcd.print("No"); break; } } } prevSwitchState = switchState; }
5/2018 Brown County Library Extra Project: Reaction Timer Components needed:  Arduino Uno board  breadboard  25 jumper wires  16x2 LCD screen  10k potentiometer  4 x 220 ohm resistors  Piezo buzzer  RGB LED (common cathode)  Push button
5/2018 Brown County Library /* LCD Extra Project : Reaction Timer Source: Code adapted from the Arduino Project Handbook (Geddes, 2016) Originally created by Steven De Lannoy http://www.wingbike.nl Used a RGB LED with a common anode (3 cathodes: R, G, B) */ #include <LiquidCrystal.h> LiquidCrystal lcd(12, 11, 5, 4, 3, 2); int LEDR = 8; // Pin connected to red LED int LEDB = 6; // Pin connected to blue LED int LEDGr = 7; // Pin connected to green LED int Button = 9; // Pin connected to pushbutton int COLOR; // Variable color int Beep; int PSE; // Variable pause int TME; // Time int RTME = 0; // Reaction time void setup() { lcd.begin(16, 2); pinMode(LEDR, OUTPUT); // Set LED pins as output pinMode(LEDB, OUTPUT); pinMode(LEDGr, OUTPUT); pinMode(Button, INPUT); // Set pushbutton as input digitalWrite(LEDR, LOW); // Switch on all LED colors digitalWrite(LEDB, LOW); digitalWrite(LEDGr, LOW); } void loop() { lcd.clear(); // Clear screen lcd.print("Hold Button to"); // Display message on LCD screen lcd.setCursor(0, 1); // Move to second line lcd.print("start."); while (digitalRead(Button) == LOW) { // Test does not start until // button is pushed (and held) tone(13, 1200, 30); delay(1400); noTone(13); } lcd.clear(); digitalWrite(LEDR, HIGH); // Switch off start light digitalWrite(LEDB, HIGH); digitalWrite(LEDGr, HIGH); randomSeed(analogRead(0)); // Random noise from pin 0 COLOR = random(1, 4); // Generate random color PSE = random(500, 1200); // Set random pause duration between lights // Repeat this loop while color is green or blue AND pushbutton // is held while (COLOR != 1 && digitalRead(Button) == HIGH) { digitalWrite(LEDGr, HIGH); digitalWrite(LEDB, HIGH); delay(PSE); randomSeed(analogRead(0)); Beep = random(1, 4); // Select random beep from buzzer // (buzzer beeps 1 in 3 times) PSE = random(750, 1200); // Select random pause duration between // lights (to increase surprise effect) if (Beep == 1) { tone(13, 1600, 350);
5/2018 Brown County Library delay(750); noTone(13); } if (COLOR == 2) { digitalWrite(LEDGr, LOW); } if (COLOR == 3) { digitalWrite(LEDB, LOW); } delay(PSE); randomSeed(analogRead(0)); COLOR = random(1, 4); // Select random color } // Execute this loop if color is red if (COLOR == 1 && digitalRead(Button) == HIGH) { digitalWrite(LEDGr, LOW); digitalWrite(LEDB, LOW); delay(50); TME = millis(); // Record time since program has started digitalWrite(LEDR, HIGH); while (digitalRead(Button) == HIGH) { // Runs until button is // released, recording the // reaction time delay(1); } lcd.display(); RTME = millis() - TME; // Reaction time in milliseconds lcd.print("Reaction Time:"); // Display on LCD screen lcd.setCursor(0, 1); lcd.print(RTME); } // Execute if color is NOT red but the pushbutton is released if (COLOR != 1) { lcd.print("Released too"); lcd.setCursor(0, 1); // Move to second line lcd.print("soon!!!"); tone(13, 3000, 1500); delay(500); noTone(13); } // Test does not restart until the button is pushed once while (digitalRead(Button) == LOW) { delay(10); } digitalWrite(LEDR, LOW); // Reset all lights to begin again digitalWrite(LEDB, LOW); digitalWrite(LEDGr, LOW); lcd.clear(); lcd.print("Hold Button to"); lcd.setCursor(0, 1); lcd.print("start."); int Time = 0; delay(1000); }

Arduino: Arduino lcd

  • 1.
    Arduino: LCD Diagrams &Code Brown County Library Project 01: Hello, World! Components needed:  Arduino Uno board  breadboard  16 jumper wires  16x2 LCD screen  10k potentiometer
  • 2.
    5/2018 Brown County Library /* LCD01 : Hello World! Source: Code adapted from the Arduino.cc Hello World Tutorial (https://www.arduino.cc/en/Tutorial/HelloWorld) and Adafruit Arduino - Lesson 11. LCD Displays (https://learn.adafruit.com/adafruit-arduino-lesson-11-lcd- displays-1) */ #include <LiquidCrystal.h> // indicate that we want to use the Liquid Crystal library // initialize the library by associating any needed LCD interface pin // with the Arduino pin number that it is connected to // RS EN D4 D5 D6 D7 LiquidCrystal lcd(7, 8, 9, 10, 11, 12); void setup() { lcd.begin(16, 2); // set up the LCD's number of columns and rows lcd.print("hello, world!"); // print a message to the LCD } void loop() { lcd.setCursor(0, 1); // set the cursor to column 0, row 1 (row 1 is the second row as counting begins with 0) lcd.print(millis() / 1000); // print the number of seconds since reset }
  • 3.
    5/2018 Brown County Library Project02: Weather Station Components needed:  Arduino Uno board  breadboard  19 jumper wires  16x2 LCD screen  10k potentiometer  DHT11 temperature and humidity sensor
  • 4.
    5/2018 Brown County Library /* LCD02 : Weather Station Source: Code adapted from the Arduino Project Handbook (Geddes, 2016) and ladyada's DHT humidity/temperature sensors testing sketch (https://learn.adafruit.com/dht?view=all) */ #include <LiquidCrystal.h> // call the Liquid Crystal library #include <DHT.h> // call the DHT library const int DHTPIN = 3; // pin connected to DHT const int DHTTYPE = DHT11; // set the type of sensor // initialize the Liquid Crystal library by associating any needed LCD interface pin // with the Arduino pin number that it is connected to // RS E D4 D5 D6 D7 LiquidCrystal lcd(7, 8, 9, 10, 11, 12); // initialize the DHT library by telling it the pin and sensor type // pin sensor type DHT dht(DHTPIN, DHTTYPE); void setup() { dht.begin(); // start the DHT sensor lcd.begin(16, 2); // set up the LCD's number of columns and rows } void loop() { float h = dht.readHumidity(); // get a humidity reading float t = dht.readTemperature(); // get a temperature reading t = t * 9 / 5 + 32; // change temp reading from Celsius to Fahrenheit if (isnan(t) || isnan(h)) { // check that DHT sensor is working lcd.setCursor(0, 0); // set the cursor to column 0, row 0 lcd.print("Failed to read from DHT"); // if DHT is not working, display this } else { // otherwise show the readings on the screen lcd.clear(); lcd.setCursor(0, 0); // set the cursor to column 0, row 0 // display humidity reading lcd.print("Humidity: "); lcd.print(h); lcd.print("%"); lcd.setCursor(0, 1); // set the cursor to column 0, row 1 // display temperature reading lcd.print("Temp: "); lcd.print(t); lcd.print("f"); } delay(1000); // stabilizes the LCD screen }
  • 5.
    5/2018 Brown County Library Ideasto Build On Build an electronic Magic 8 Ball - ask a question and get an answer when you gently tap or shake your breadboard! See page 6 of this document. Try to beat a reaction timer - how quickly can you press a button when a RGB LED flashes red? See page 9 of this document. https://learn.sparkfun.com/tutorials/sik-experiment-guide-for-arduino---v33/experiment-12-driving-a-motor Build your own time clock, complete with buttons to set the hour and minute! Note: The diagram for this project is a bit confusing – it make take some critical thinking to come up with your own setup. https://www.hackster.io/Annlee_Fores/simple-arduino-digital-clock-without-rtc-7d4303 Learn More Want to learn more about how LCD screens and Arduino Libraries work? Try these resources: Adafruit Arduino Lesson 11: LCD Displays Part 1. Simon Monk. https://learn.adafruit.com/adafruit-arduino-lesson-11-lcd-displays-1?view=all Adafruit Arduino Lesson 12: LCD Displays Part 2. Simon Monk. https://learn.adafruit.com/adafruit-arduino-lesson-12-lcd-displays-part-2?view=all Adafruit Tips, Tricks & Techniques: Arduino Libraries. Lady Ada and Tyler Cooper. https://learn.adafruit.com/arduino-tips-tricks-and-techniques/arduino-libraries Adafruit Character LCDs OverView. Lady Ada and Tony DiCola. https://learn.adafruit.com/character-lcds?view=all Arduino – Hello World! https://www.arduino.cc/en/Tutorial/HelloWorld Arduino – Libraries. https://www.arduino.cc/en/Reference/Libraries Arduino Project Handbook. Mark Geddes. 2016. Pg. 102-132. Exploring Arduino: Tools and Techniques for Engineering Wizardry. Jeremy Blum. 2013. Pg. 199-219. Sparkfun SIK Experiment Guide for Arduino V4.0 – Circuit 4A: LCD “Hello World!”. https://learn.sparkfun.com/tutorials/sparkfun-inventors-kit-experiment-guide---v40/circuit-4a-lcd-hello-world
  • 6.
    5/2018 Brown County Library ExtraProject: Magic 8 Ball Components needed:  Arduino Uno board  breadboard  19 jumper wires  16x2 LCD screen  10k potentiometer  220 ohm resistor  Tilt switch (four leg)
  • 7.
    5/2018 Brown County Library /* LCDExtra Project : Magic 8 Ball Source: Code adapted from the Arduino Projects Book (Fitzgerald, Shiloh & Igoe, 2012) and Arduino Project Handbook (Geddes, 2016) */ #include <LiquidCrystal.h> LiquidCrystal lcd(12, 11, 5, 4, 3, 2); const int switchPin = 6; int switchState = 0; int prevSwitchState = 0; int reply; void setup() { // put your setup code here, to run once: lcd.begin(16, 2); pinMode(switchPin,INPUT); lcd.print("Ask the"); lcd.setCursor(0,1); lcd.print("Crystal Ball!"); // if analog input pin 0 is unconnected, random analog // noise will cause the call to randomSeed() to generate // different seed numbers each time the sketch runs. // randomSeed() will then shuffle the random function. randomSeed(analogRead(0)); } void loop() { // put your main code here, to run repeatedly: switchState = digitalRead(switchPin); if (switchState != prevSwitchState) { if (switchState == LOW) { reply = random(8); lcd.clear(); lcd.setCursor(0, 0); lcd.print("The ball says:"); lcd.setCursor(0, 1); switch(reply){ case 0: lcd.print("Yes"); break; case 1:
  • 8.
    5/2018 Brown County Library lcd.print("Mostlikely"); break; case 2: lcd.print("Certainly"); break; case 3: lcd.print("Outlook good"); break; case 4: lcd.print("Unsure"); break; case 5: lcd.print("Ask a Librarian"); break; case 6: lcd.print("Doubtful"); break; case 7: lcd.print("No"); break; } } } prevSwitchState = switchState; }
  • 9.
    5/2018 Brown County Library ExtraProject: Reaction Timer Components needed:  Arduino Uno board  breadboard  25 jumper wires  16x2 LCD screen  10k potentiometer  4 x 220 ohm resistors  Piezo buzzer  RGB LED (common cathode)  Push button
  • 10.
    5/2018 Brown County Library /* LCDExtra Project : Reaction Timer Source: Code adapted from the Arduino Project Handbook (Geddes, 2016) Originally created by Steven De Lannoy http://www.wingbike.nl Used a RGB LED with a common anode (3 cathodes: R, G, B) */ #include <LiquidCrystal.h> LiquidCrystal lcd(12, 11, 5, 4, 3, 2); int LEDR = 8; // Pin connected to red LED int LEDB = 6; // Pin connected to blue LED int LEDGr = 7; // Pin connected to green LED int Button = 9; // Pin connected to pushbutton int COLOR; // Variable color int Beep; int PSE; // Variable pause int TME; // Time int RTME = 0; // Reaction time void setup() { lcd.begin(16, 2); pinMode(LEDR, OUTPUT); // Set LED pins as output pinMode(LEDB, OUTPUT); pinMode(LEDGr, OUTPUT); pinMode(Button, INPUT); // Set pushbutton as input digitalWrite(LEDR, LOW); // Switch on all LED colors digitalWrite(LEDB, LOW); digitalWrite(LEDGr, LOW); } void loop() { lcd.clear(); // Clear screen lcd.print("Hold Button to"); // Display message on LCD screen lcd.setCursor(0, 1); // Move to second line lcd.print("start."); while (digitalRead(Button) == LOW) { // Test does not start until // button is pushed (and held) tone(13, 1200, 30); delay(1400); noTone(13); } lcd.clear(); digitalWrite(LEDR, HIGH); // Switch off start light digitalWrite(LEDB, HIGH); digitalWrite(LEDGr, HIGH); randomSeed(analogRead(0)); // Random noise from pin 0 COLOR = random(1, 4); // Generate random color PSE = random(500, 1200); // Set random pause duration between lights // Repeat this loop while color is green or blue AND pushbutton // is held while (COLOR != 1 && digitalRead(Button) == HIGH) { digitalWrite(LEDGr, HIGH); digitalWrite(LEDB, HIGH); delay(PSE); randomSeed(analogRead(0)); Beep = random(1, 4); // Select random beep from buzzer // (buzzer beeps 1 in 3 times) PSE = random(750, 1200); // Select random pause duration between // lights (to increase surprise effect) if (Beep == 1) { tone(13, 1600, 350);
  • 11.
    5/2018 Brown County Library delay(750); noTone(13); } if(COLOR == 2) { digitalWrite(LEDGr, LOW); } if (COLOR == 3) { digitalWrite(LEDB, LOW); } delay(PSE); randomSeed(analogRead(0)); COLOR = random(1, 4); // Select random color } // Execute this loop if color is red if (COLOR == 1 && digitalRead(Button) == HIGH) { digitalWrite(LEDGr, LOW); digitalWrite(LEDB, LOW); delay(50); TME = millis(); // Record time since program has started digitalWrite(LEDR, HIGH); while (digitalRead(Button) == HIGH) { // Runs until button is // released, recording the // reaction time delay(1); } lcd.display(); RTME = millis() - TME; // Reaction time in milliseconds lcd.print("Reaction Time:"); // Display on LCD screen lcd.setCursor(0, 1); lcd.print(RTME); } // Execute if color is NOT red but the pushbutton is released if (COLOR != 1) { lcd.print("Released too"); lcd.setCursor(0, 1); // Move to second line lcd.print("soon!!!"); tone(13, 3000, 1500); delay(500); noTone(13); } // Test does not restart until the button is pushed once while (digitalRead(Button) == LOW) { delay(10); } digitalWrite(LEDR, LOW); // Reset all lights to begin again digitalWrite(LEDB, LOW); digitalWrite(LEDGr, LOW); lcd.clear(); lcd.print("Hold Button to"); lcd.setCursor(0, 1); lcd.print("start."); int Time = 0; delay(1000); }