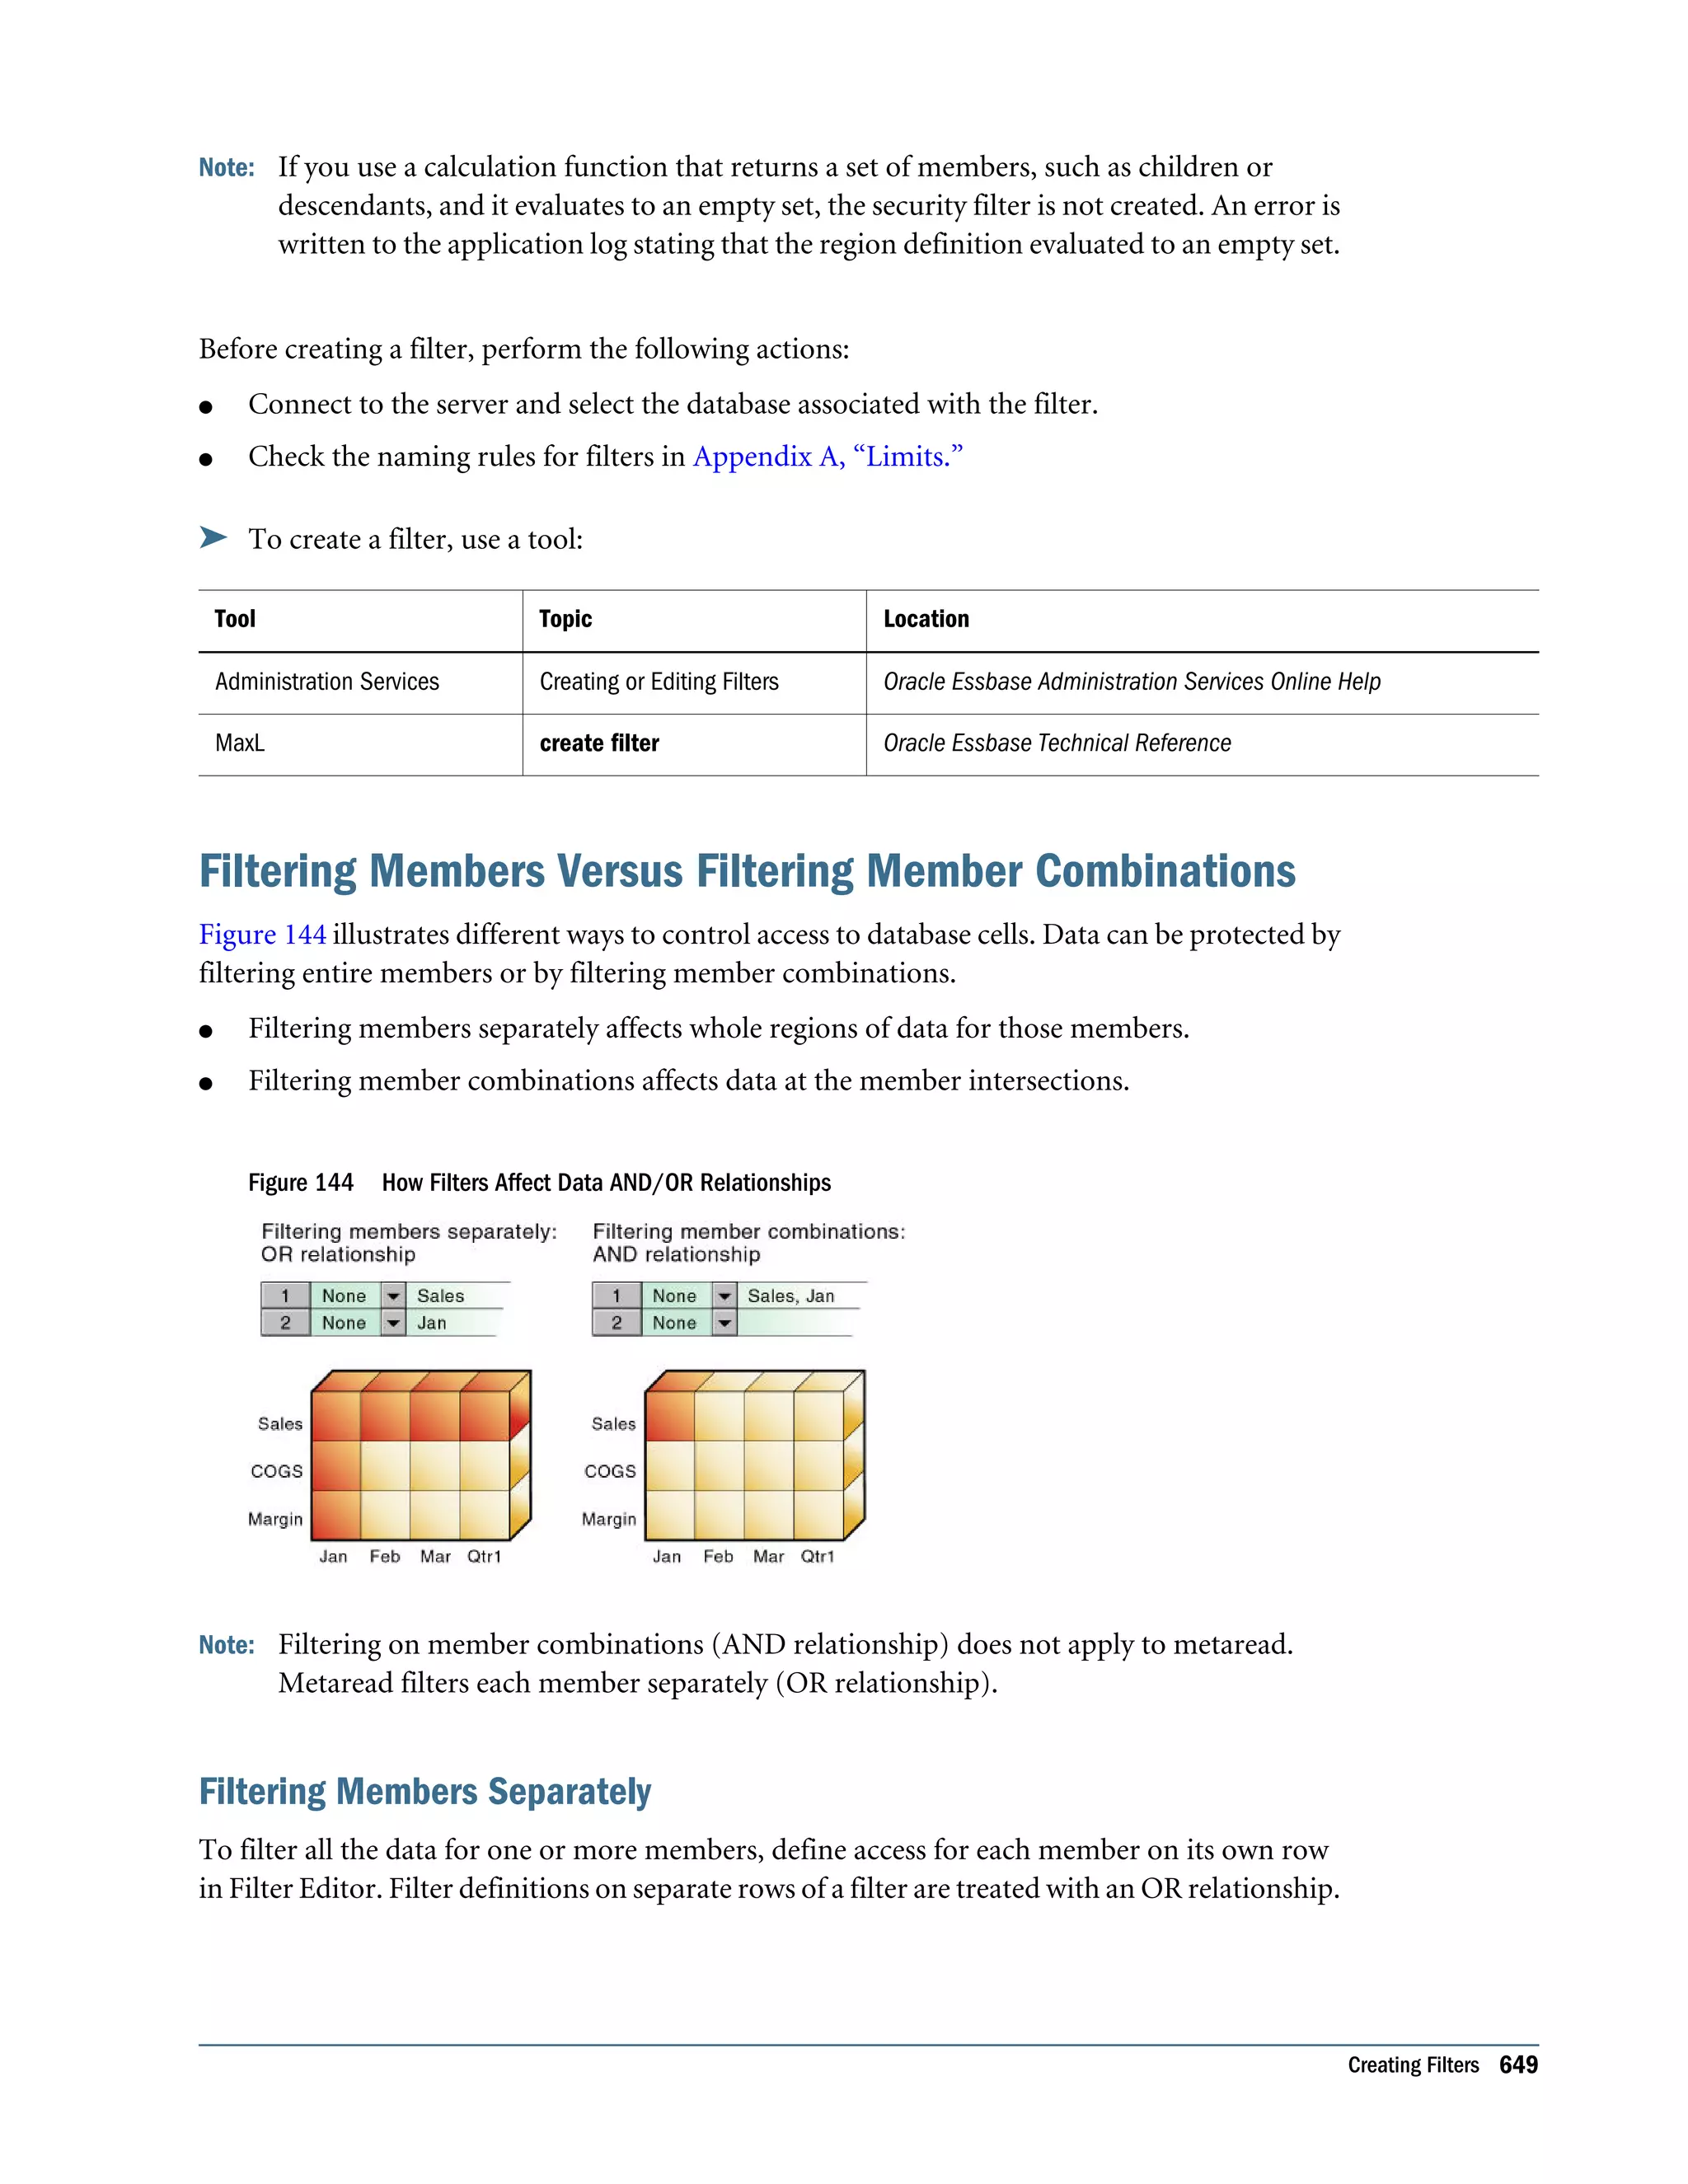
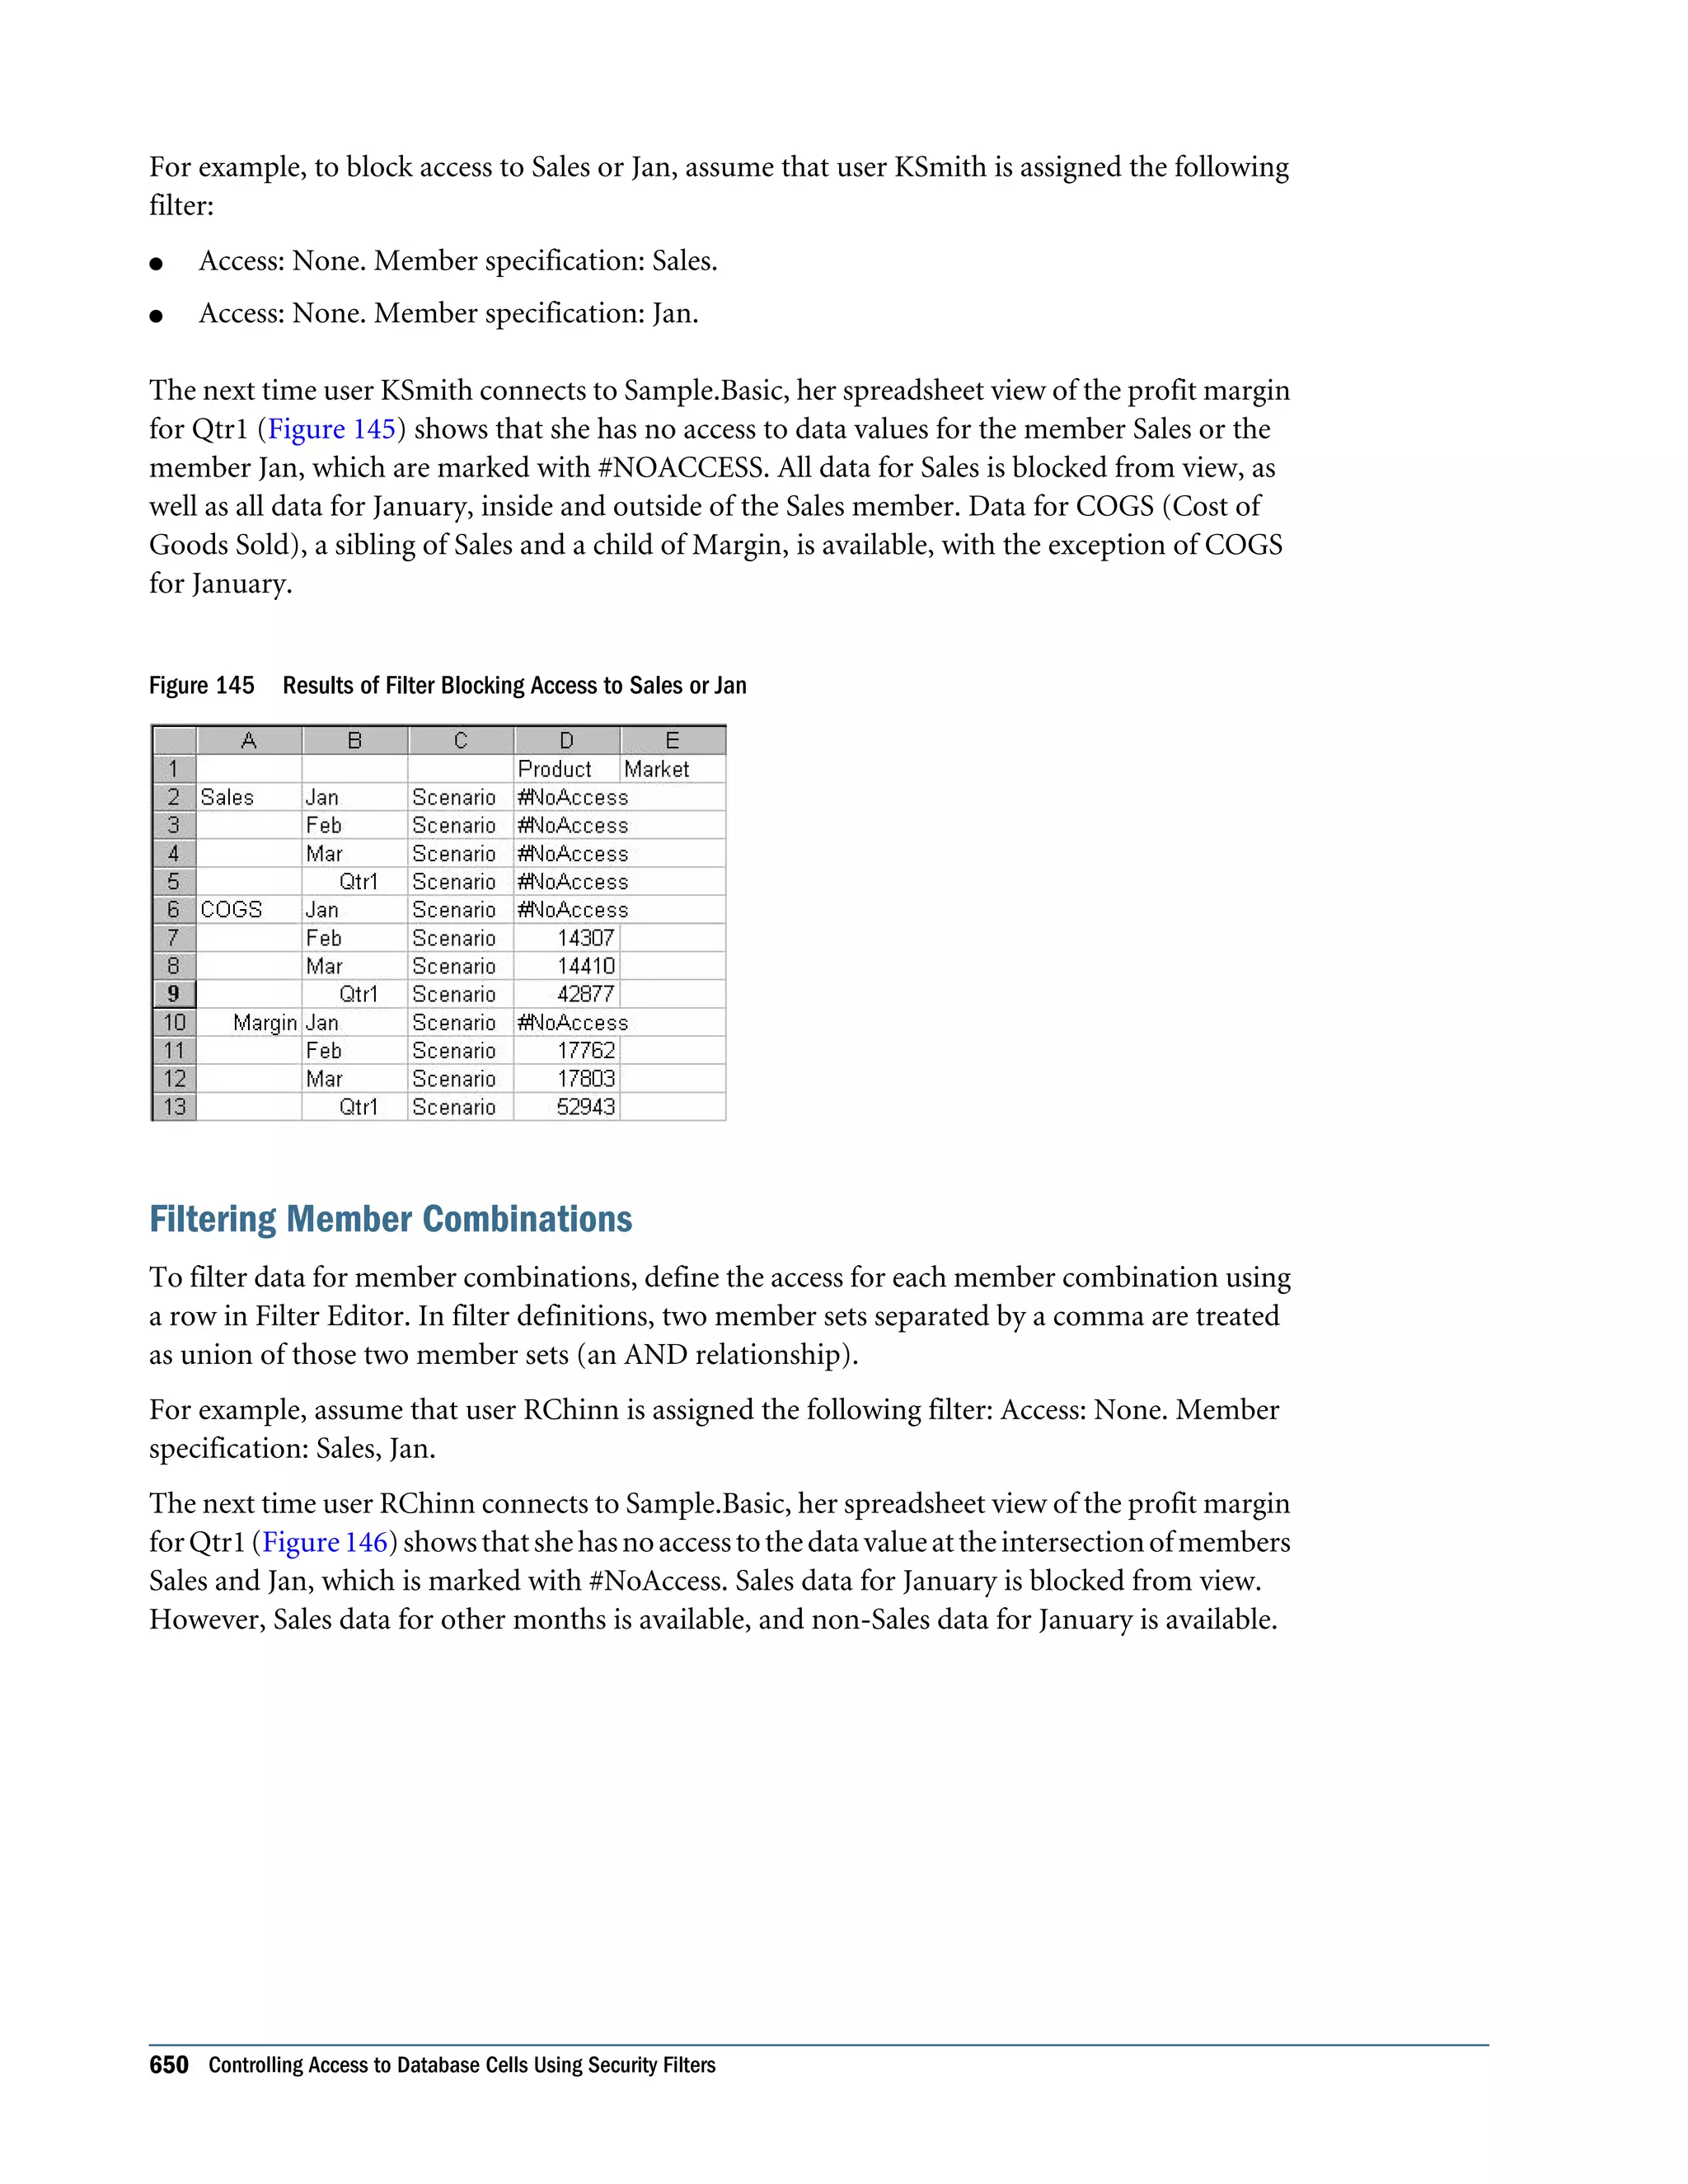
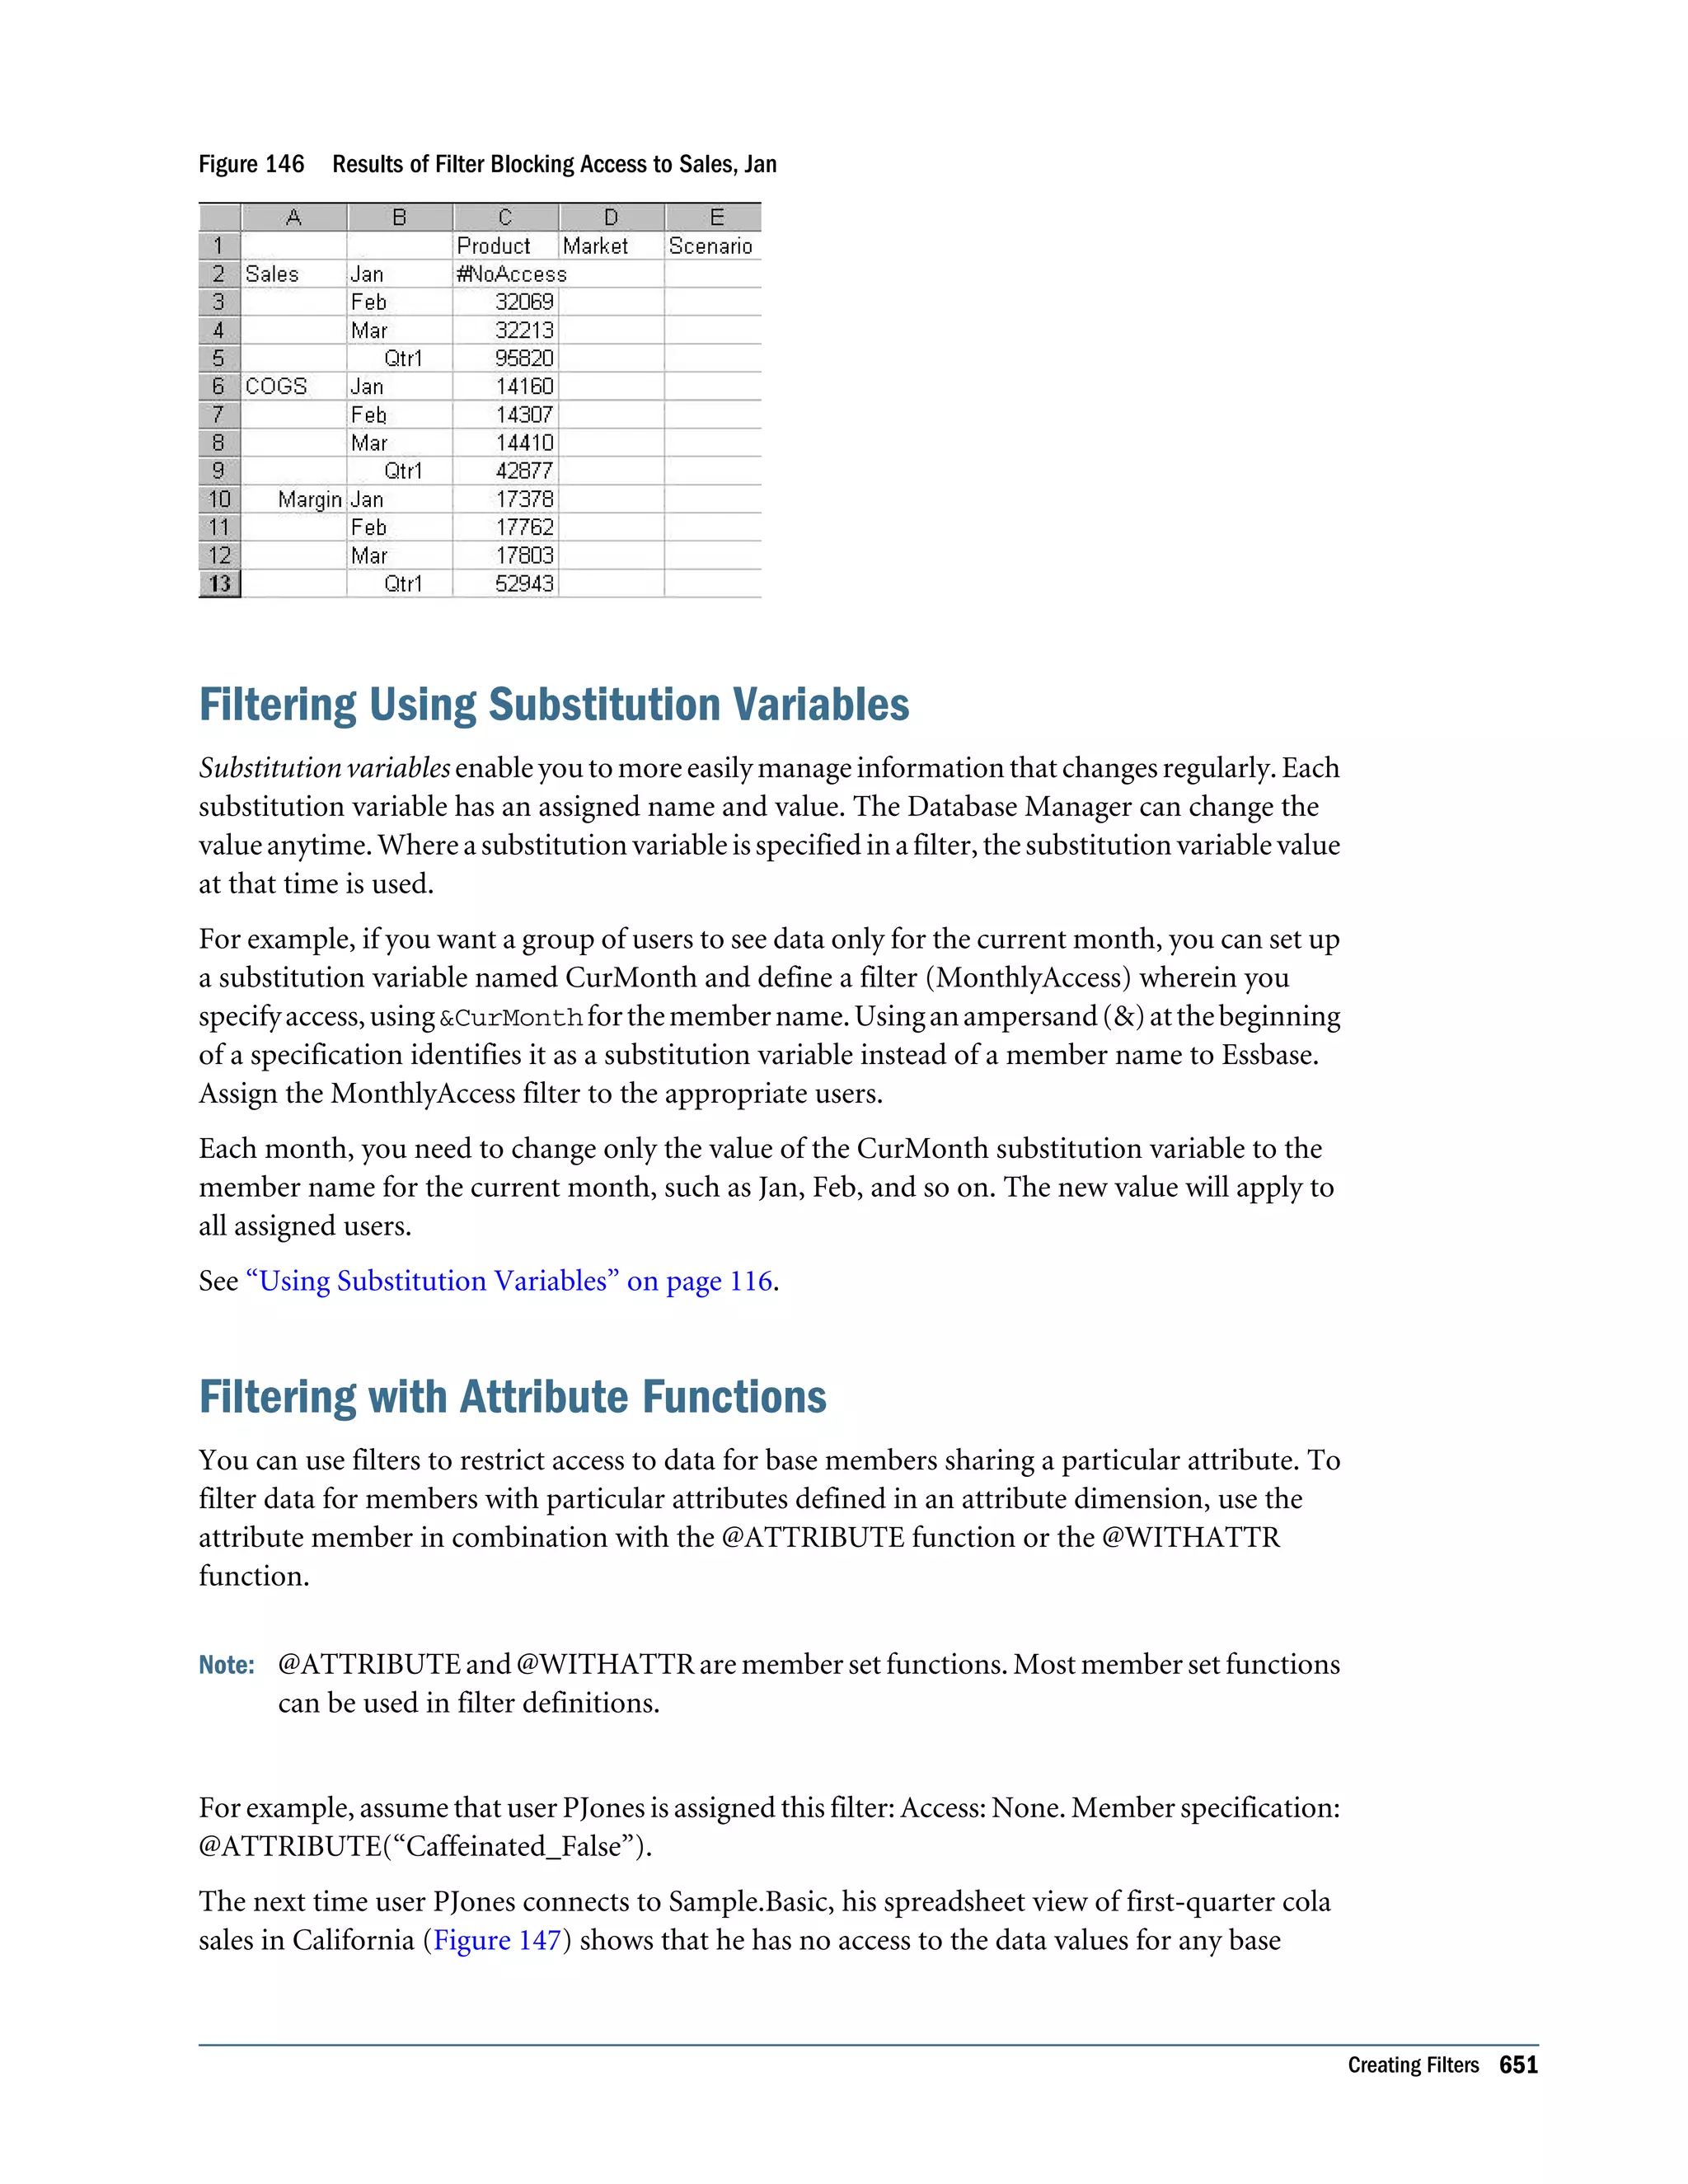
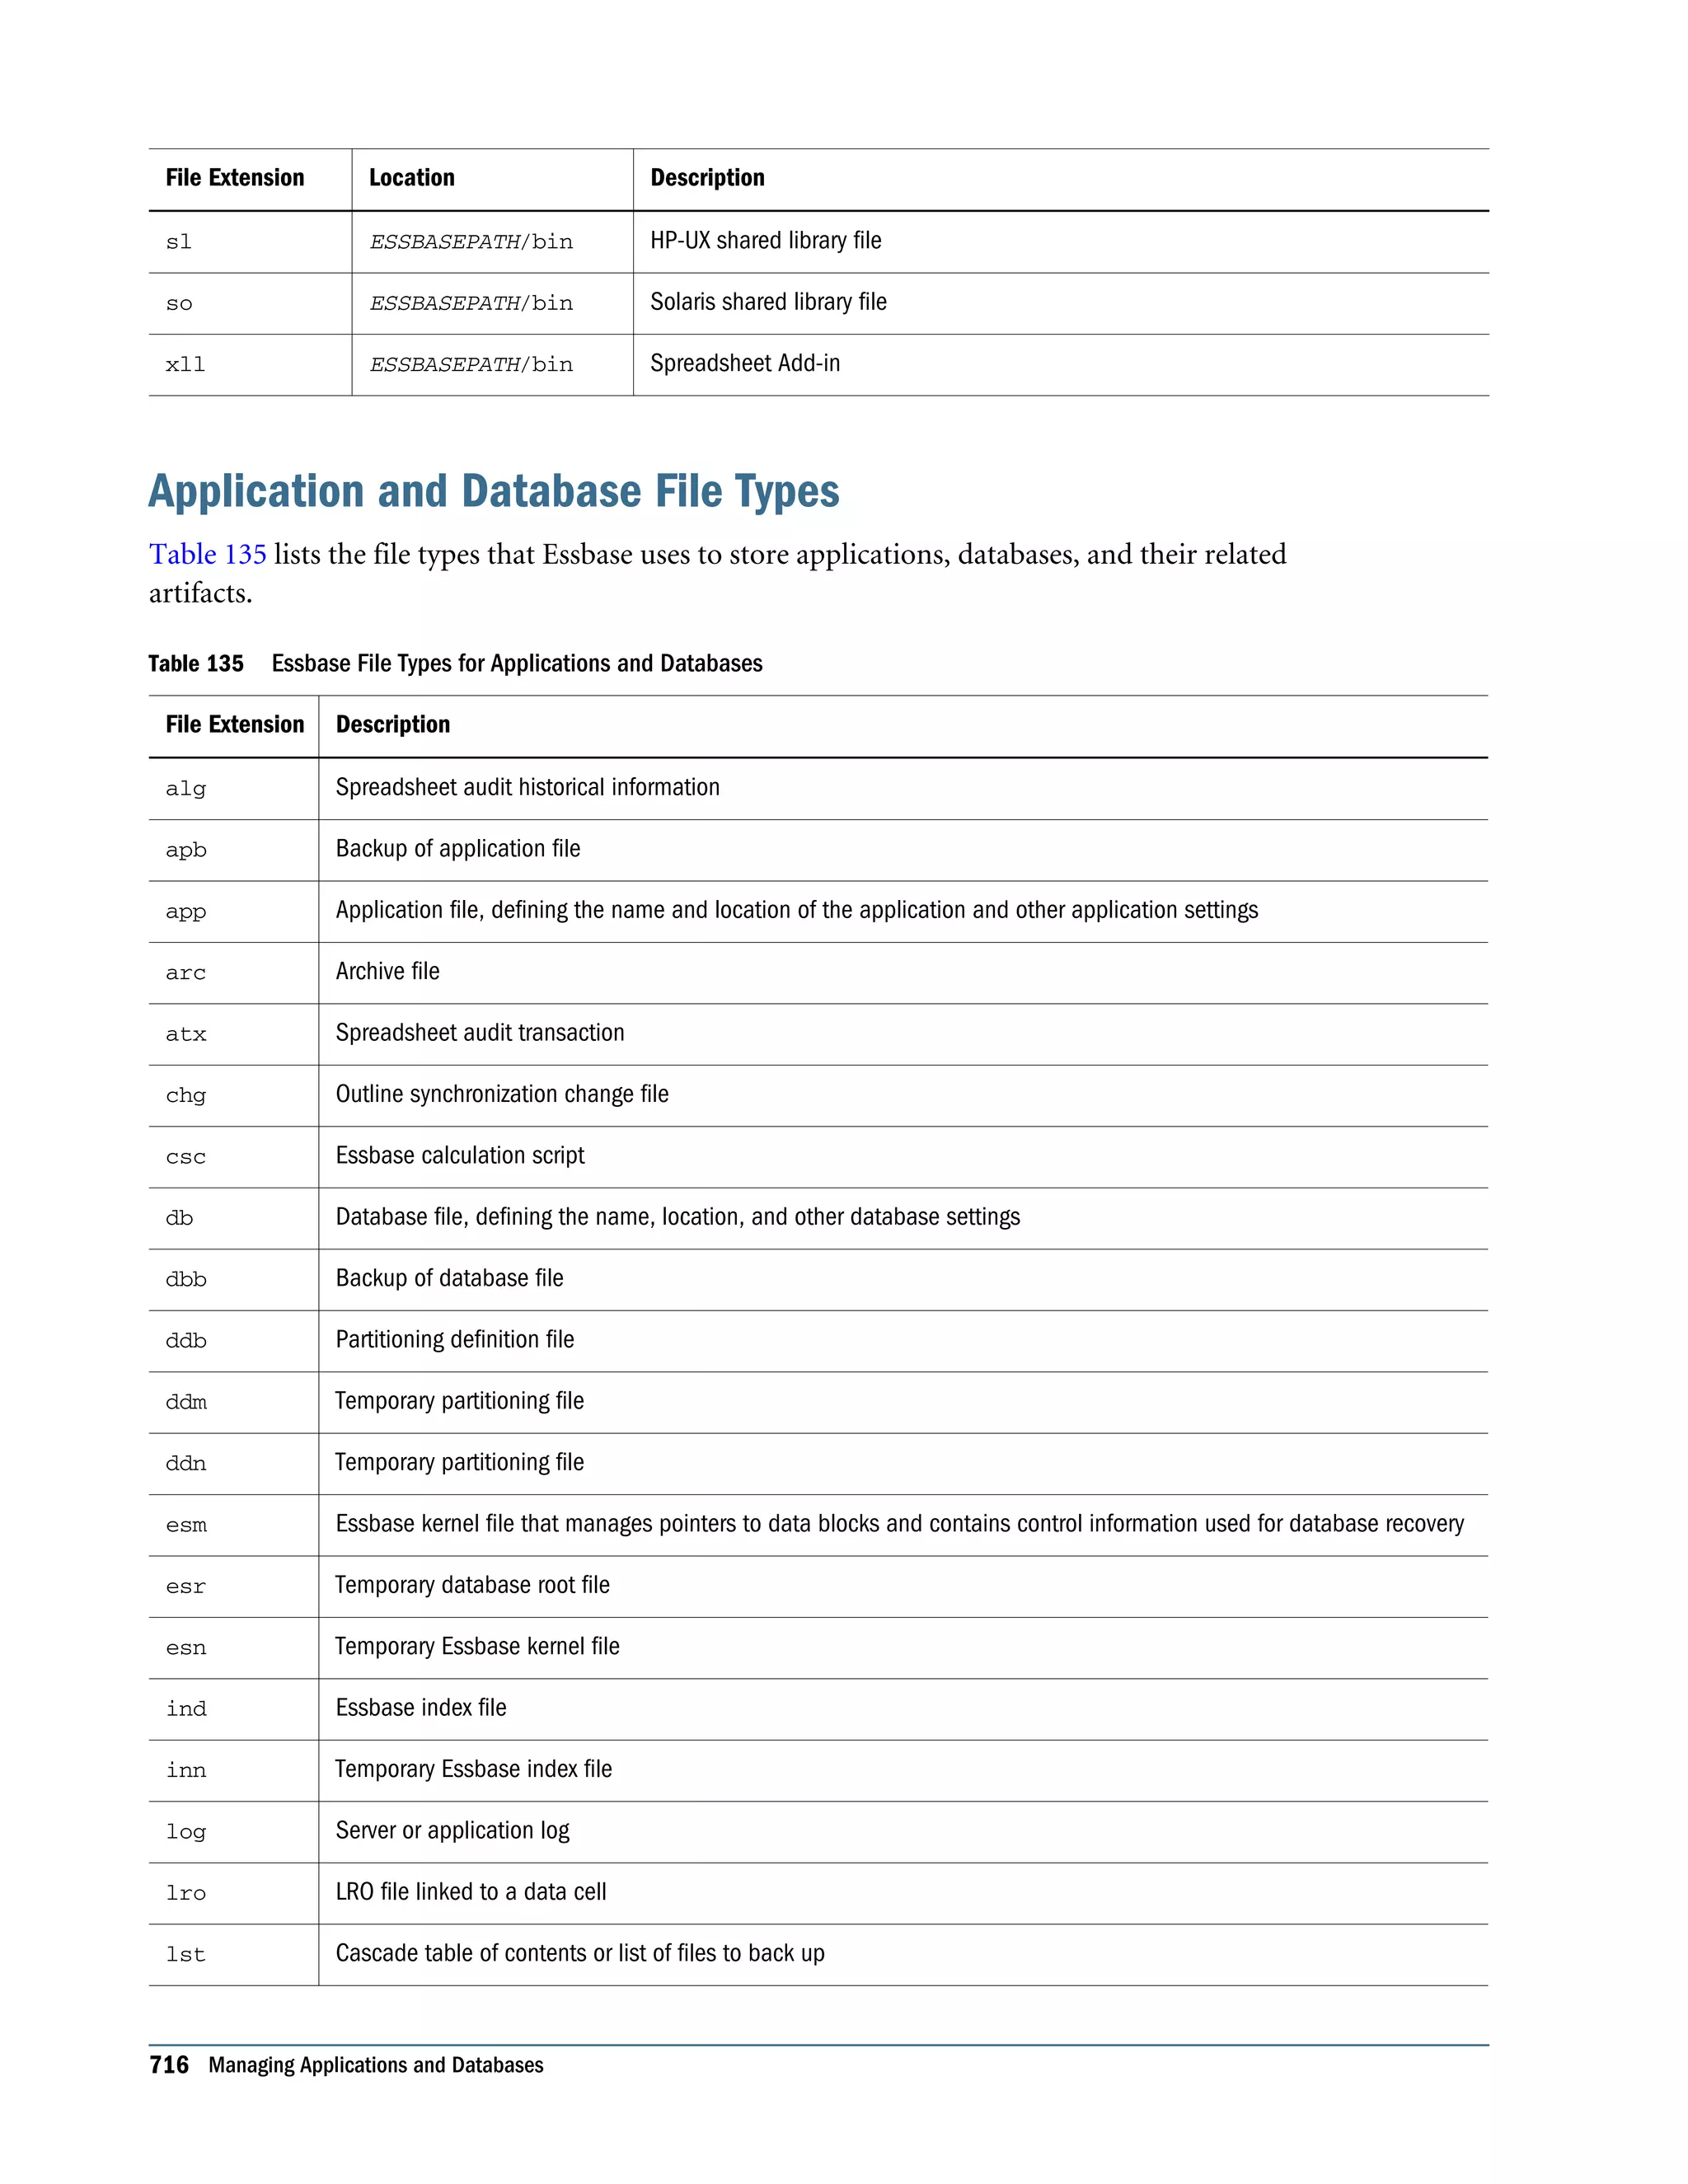
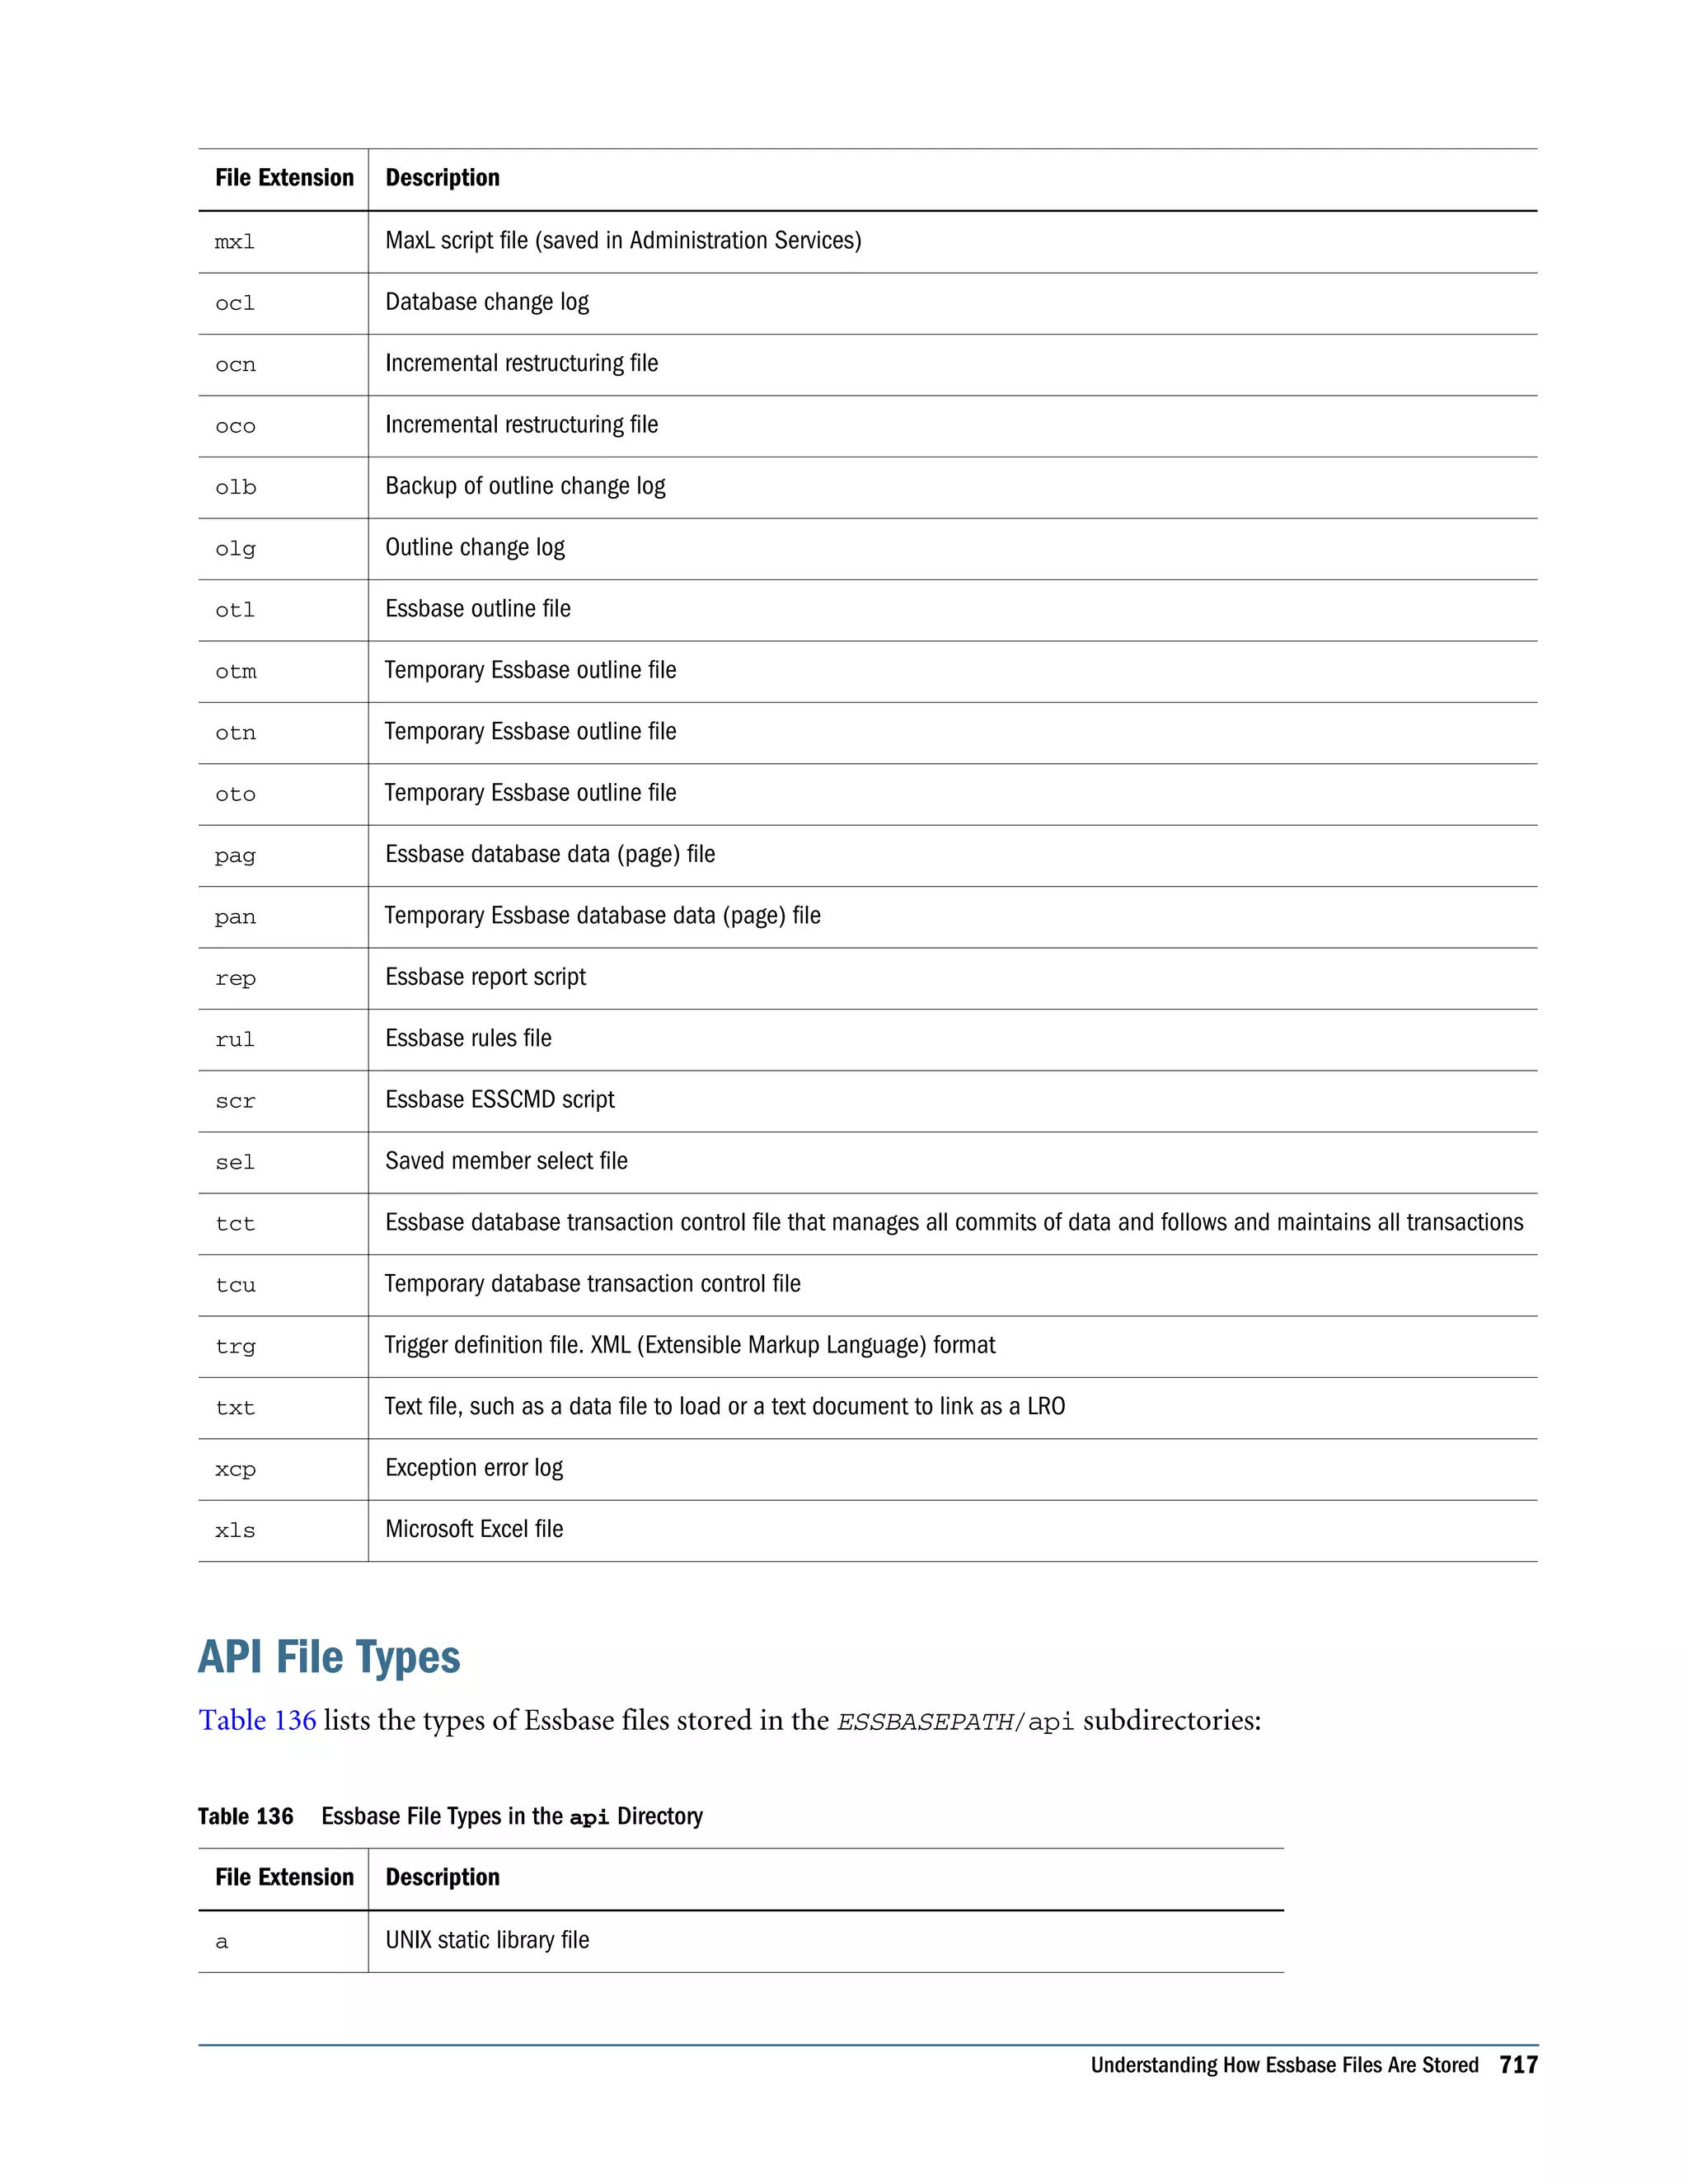
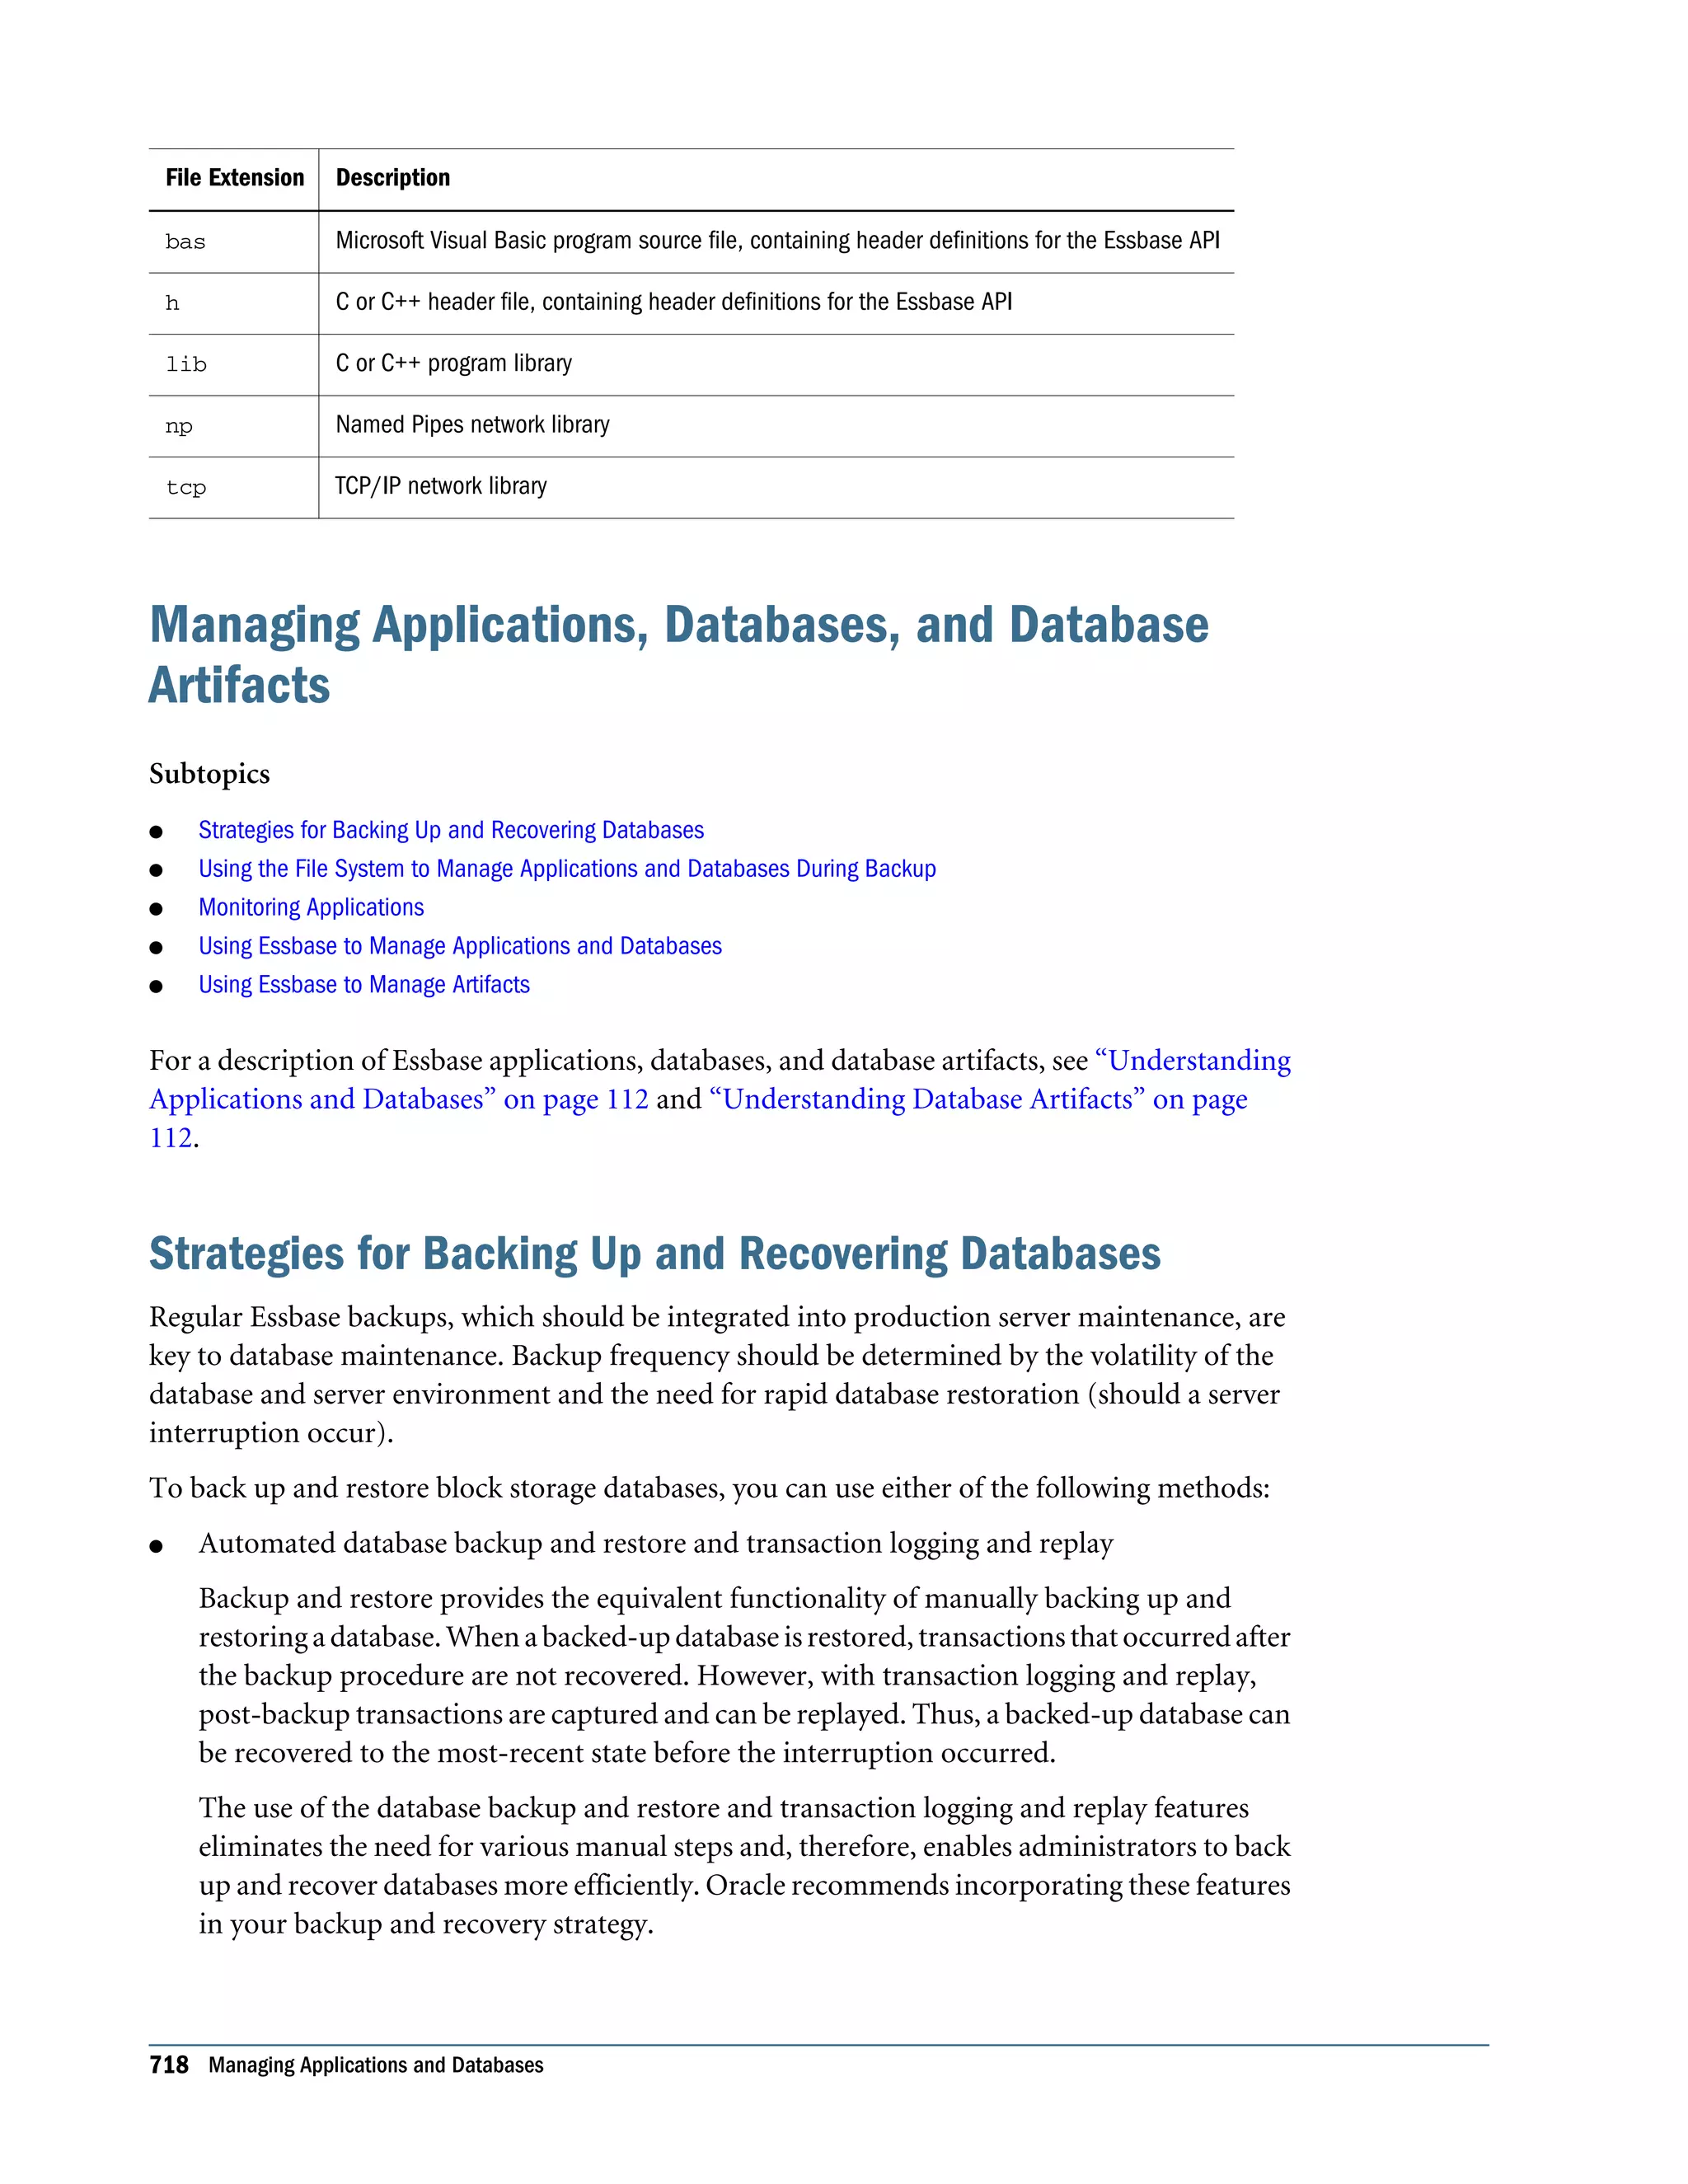
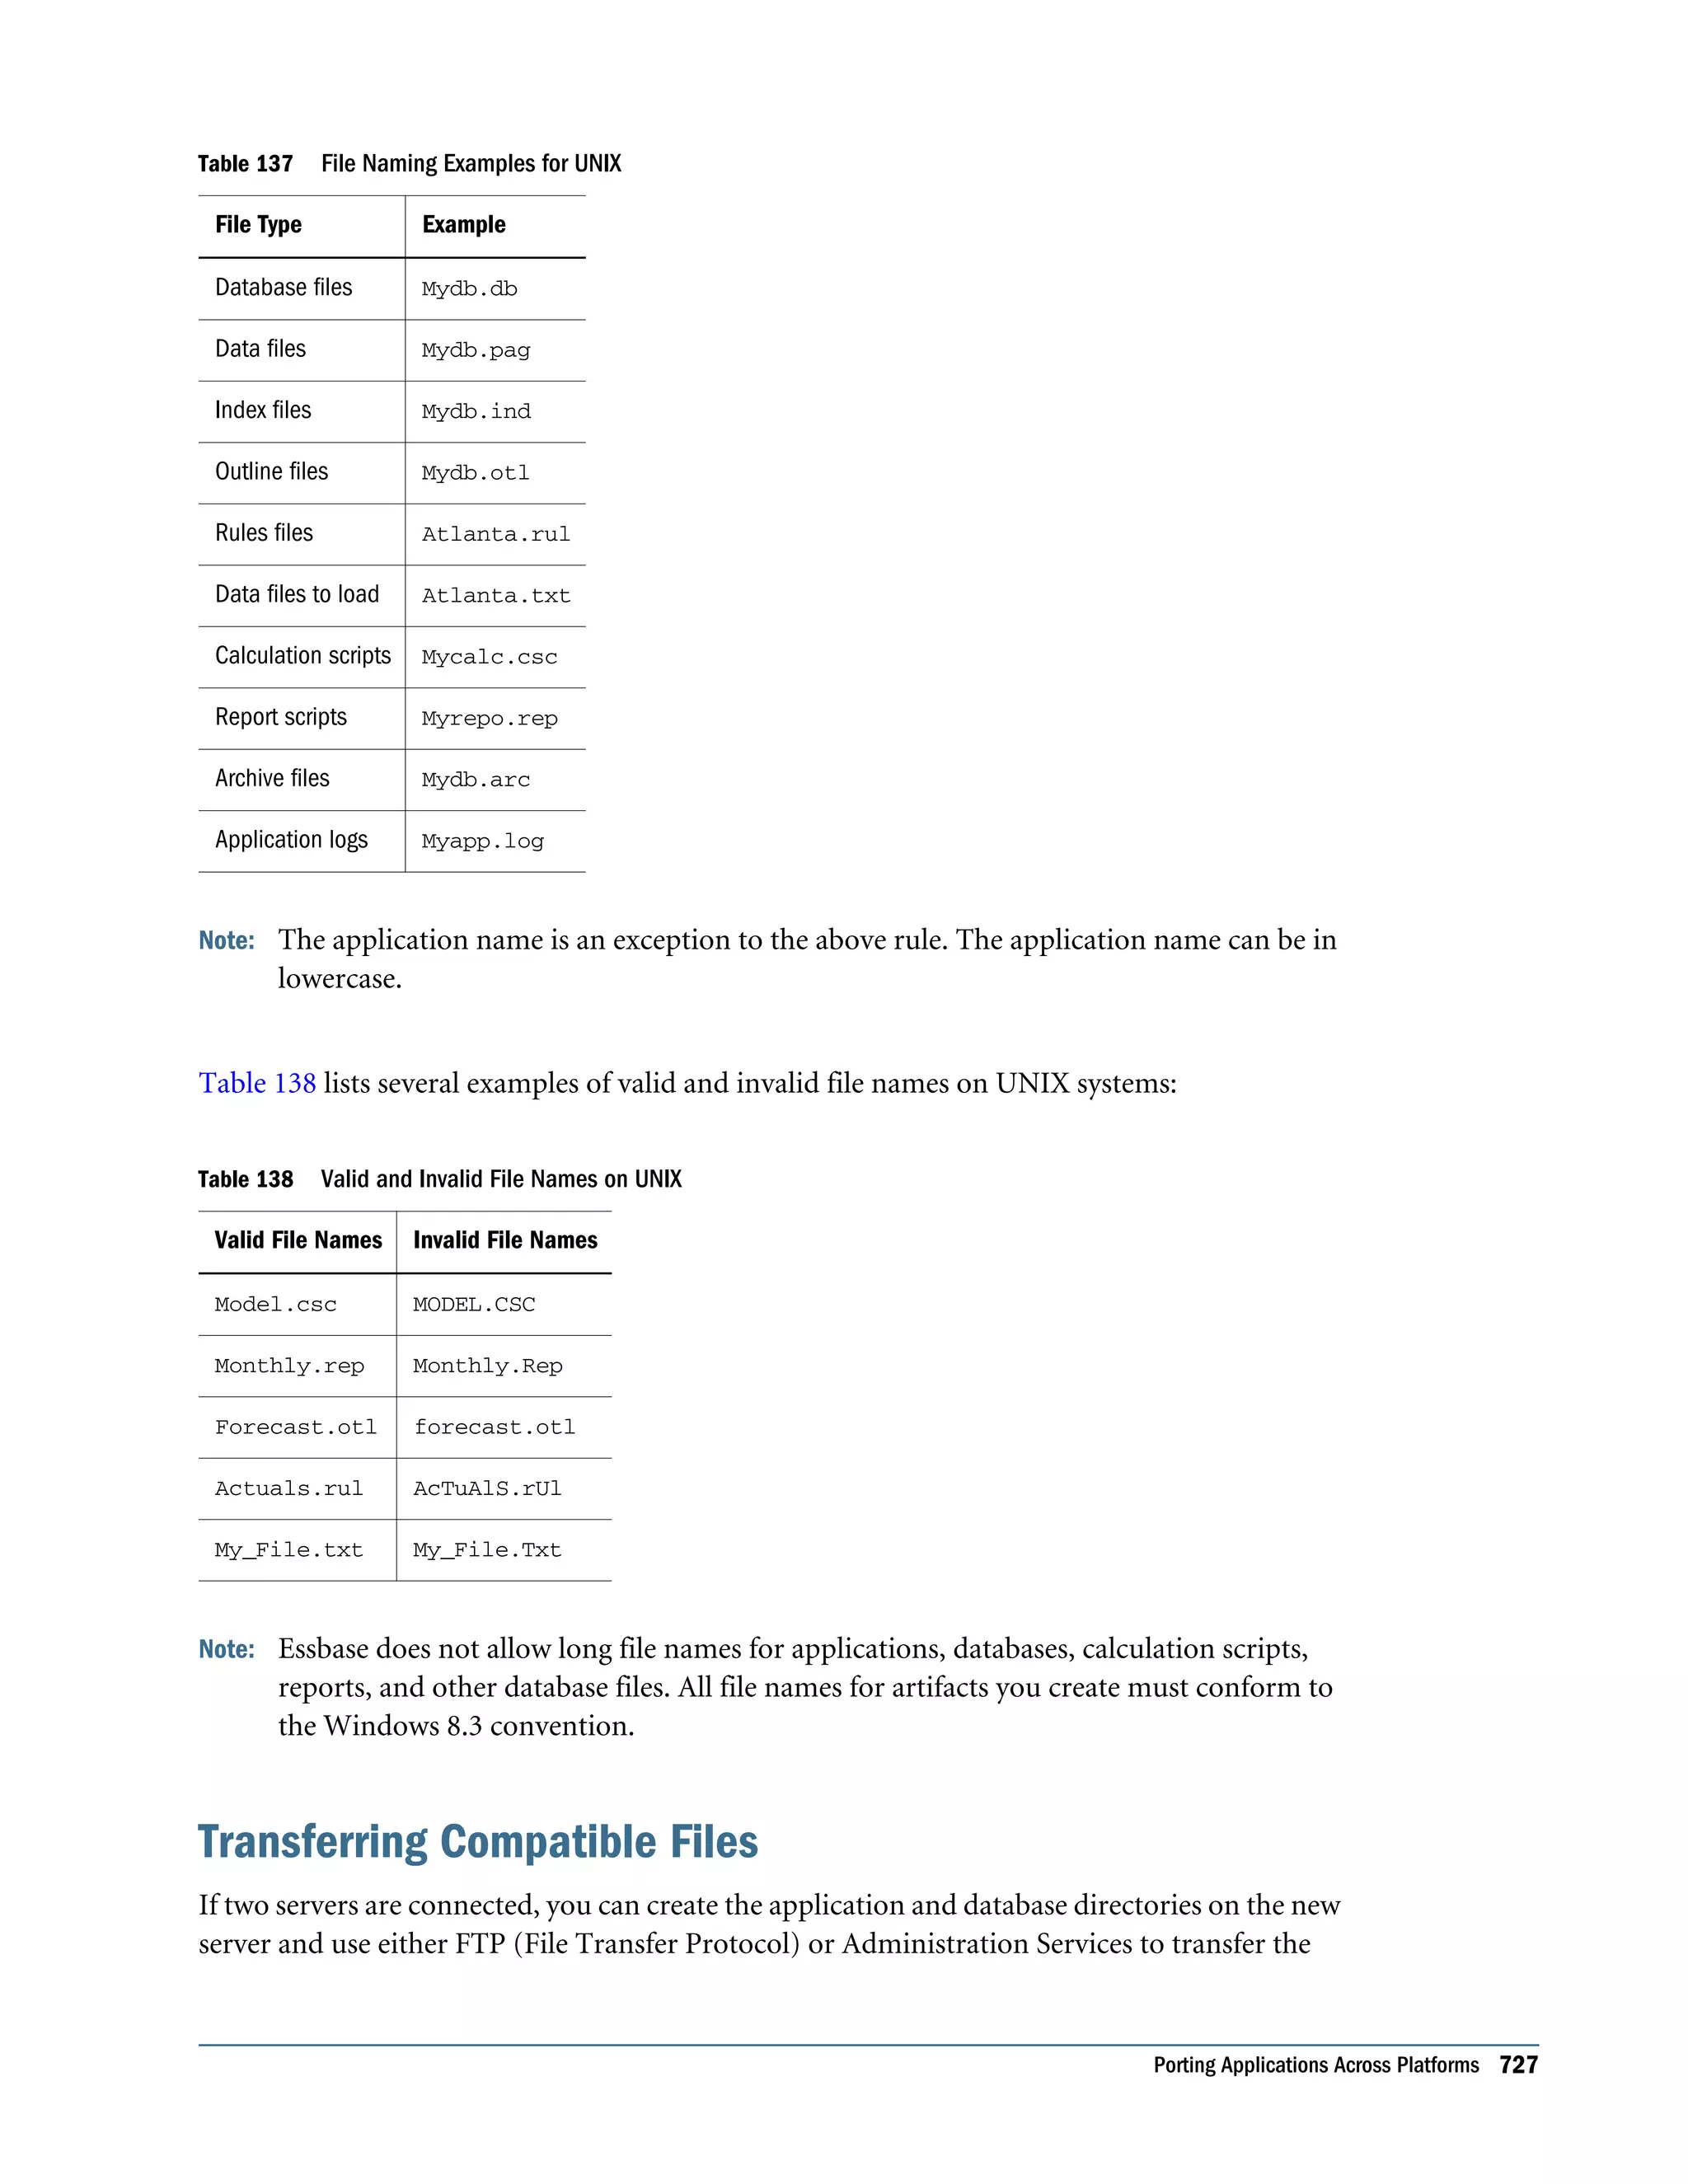
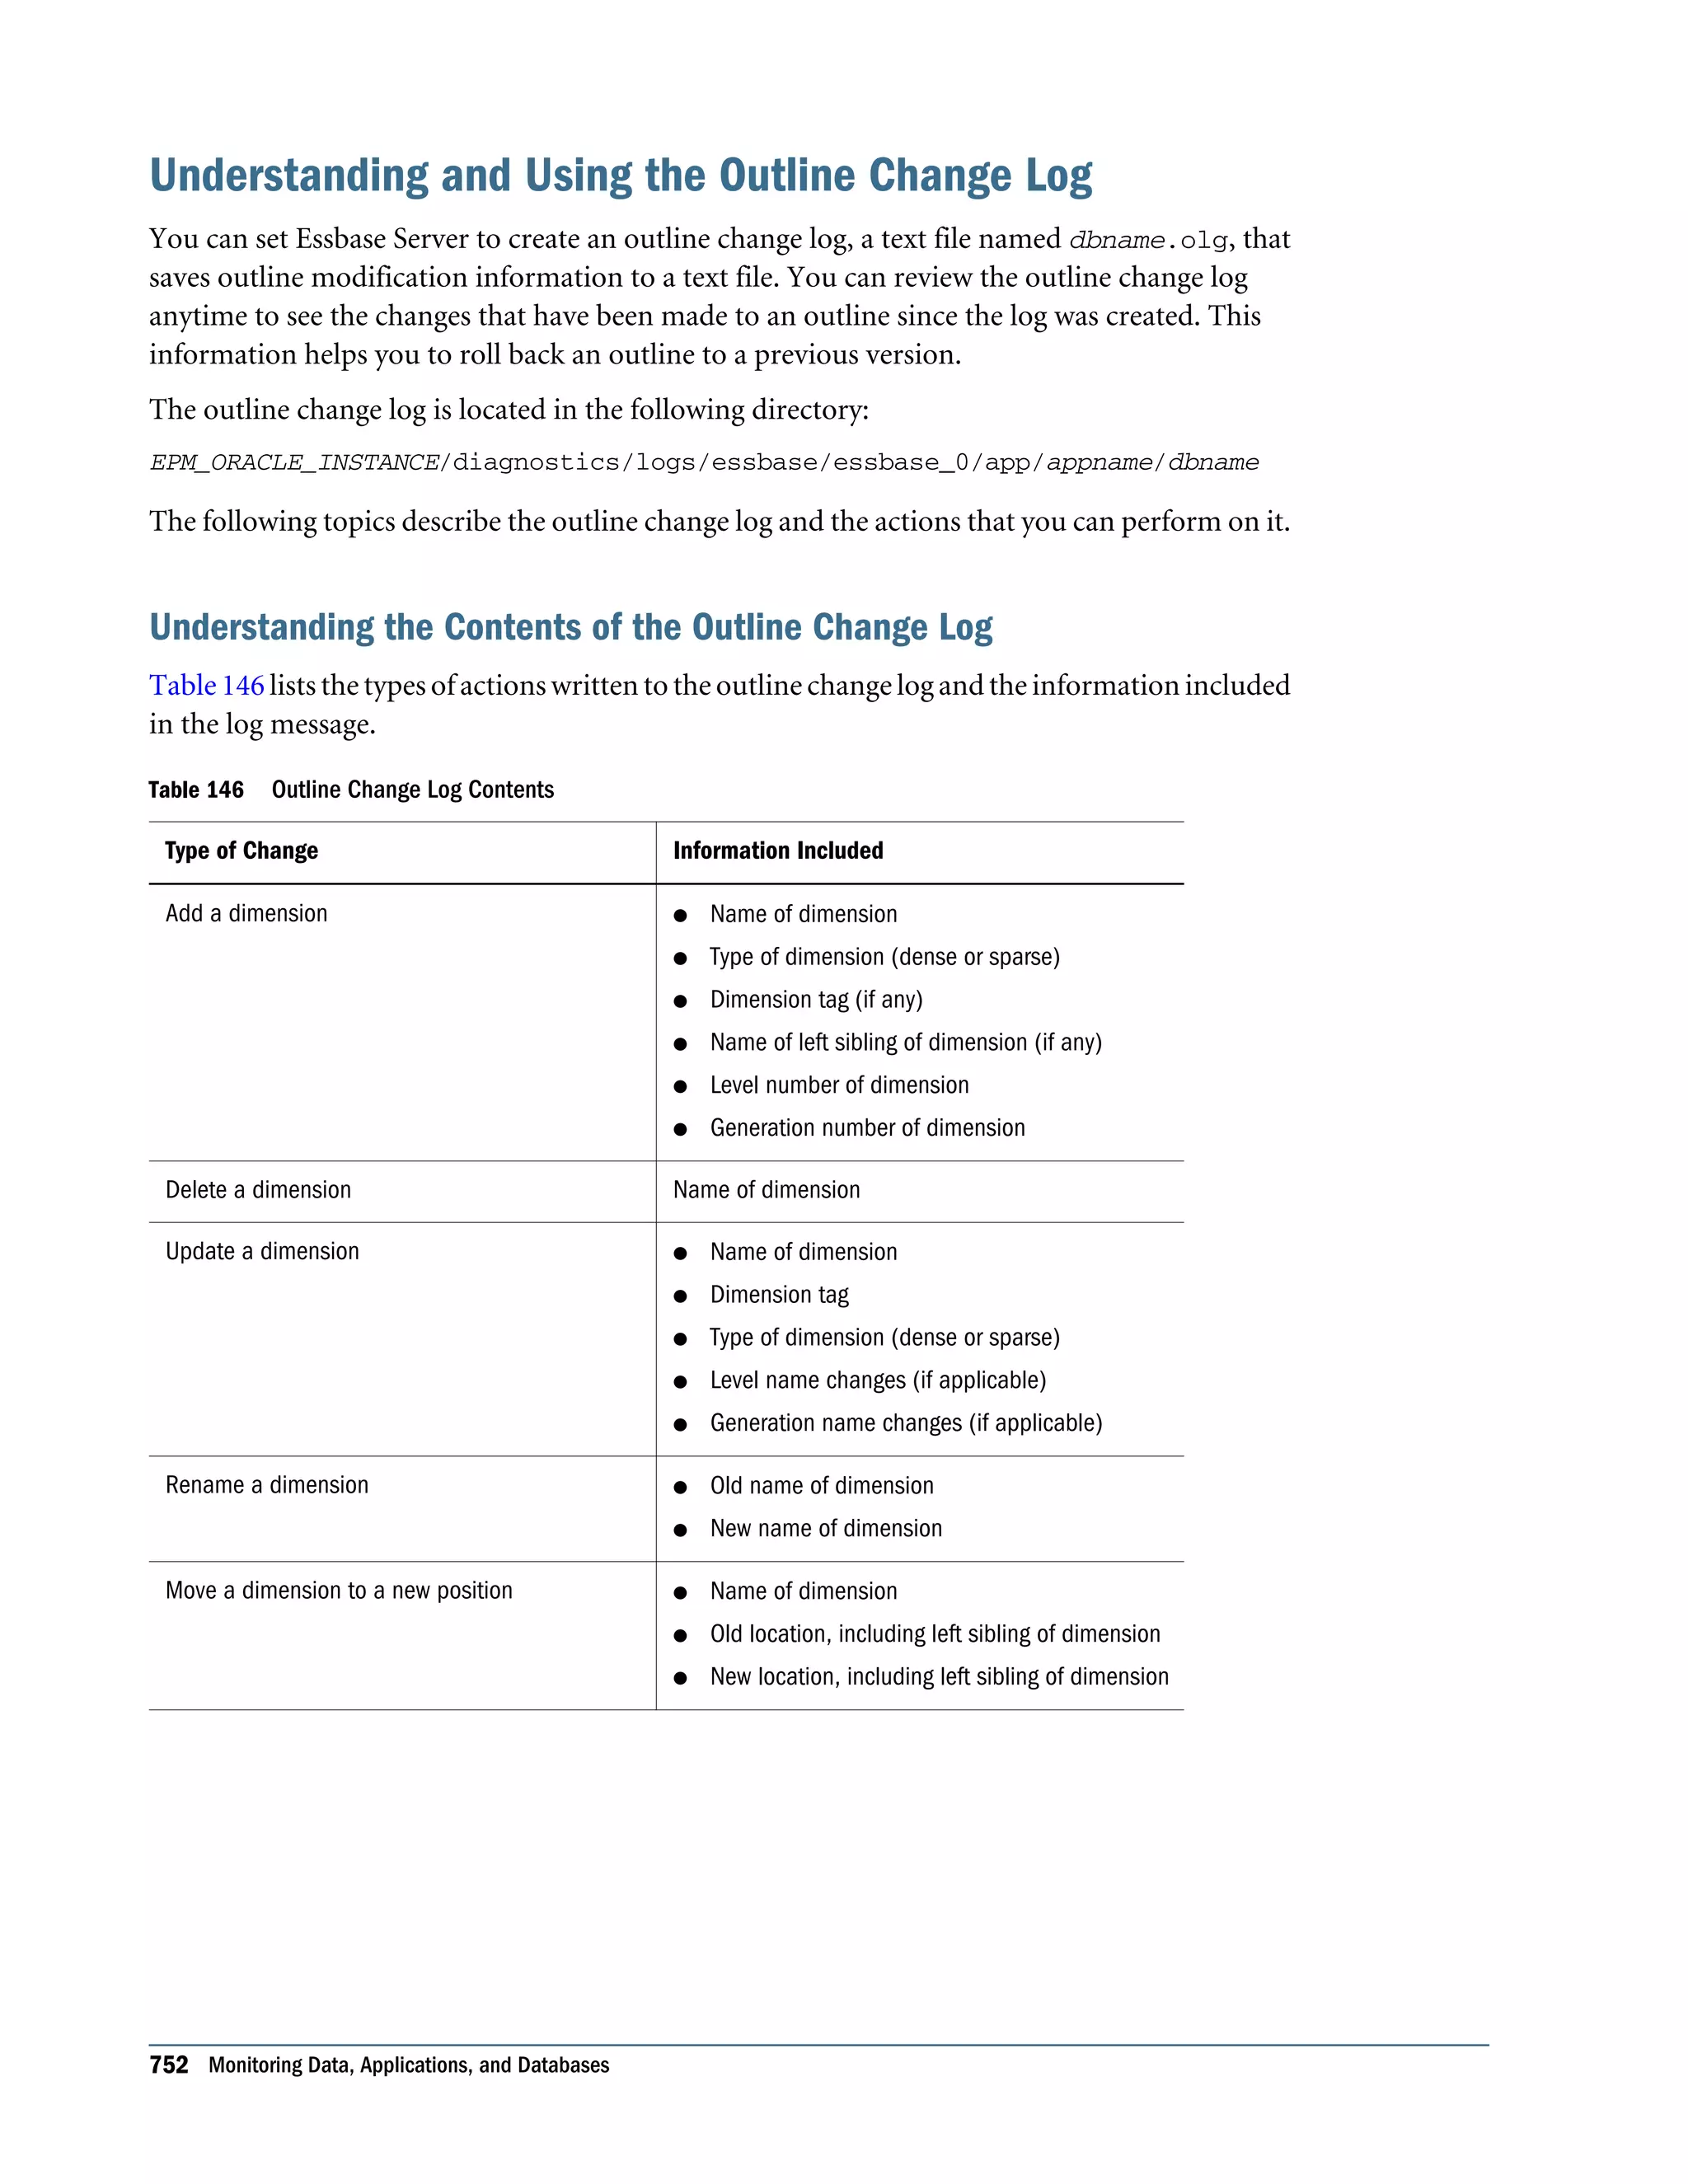
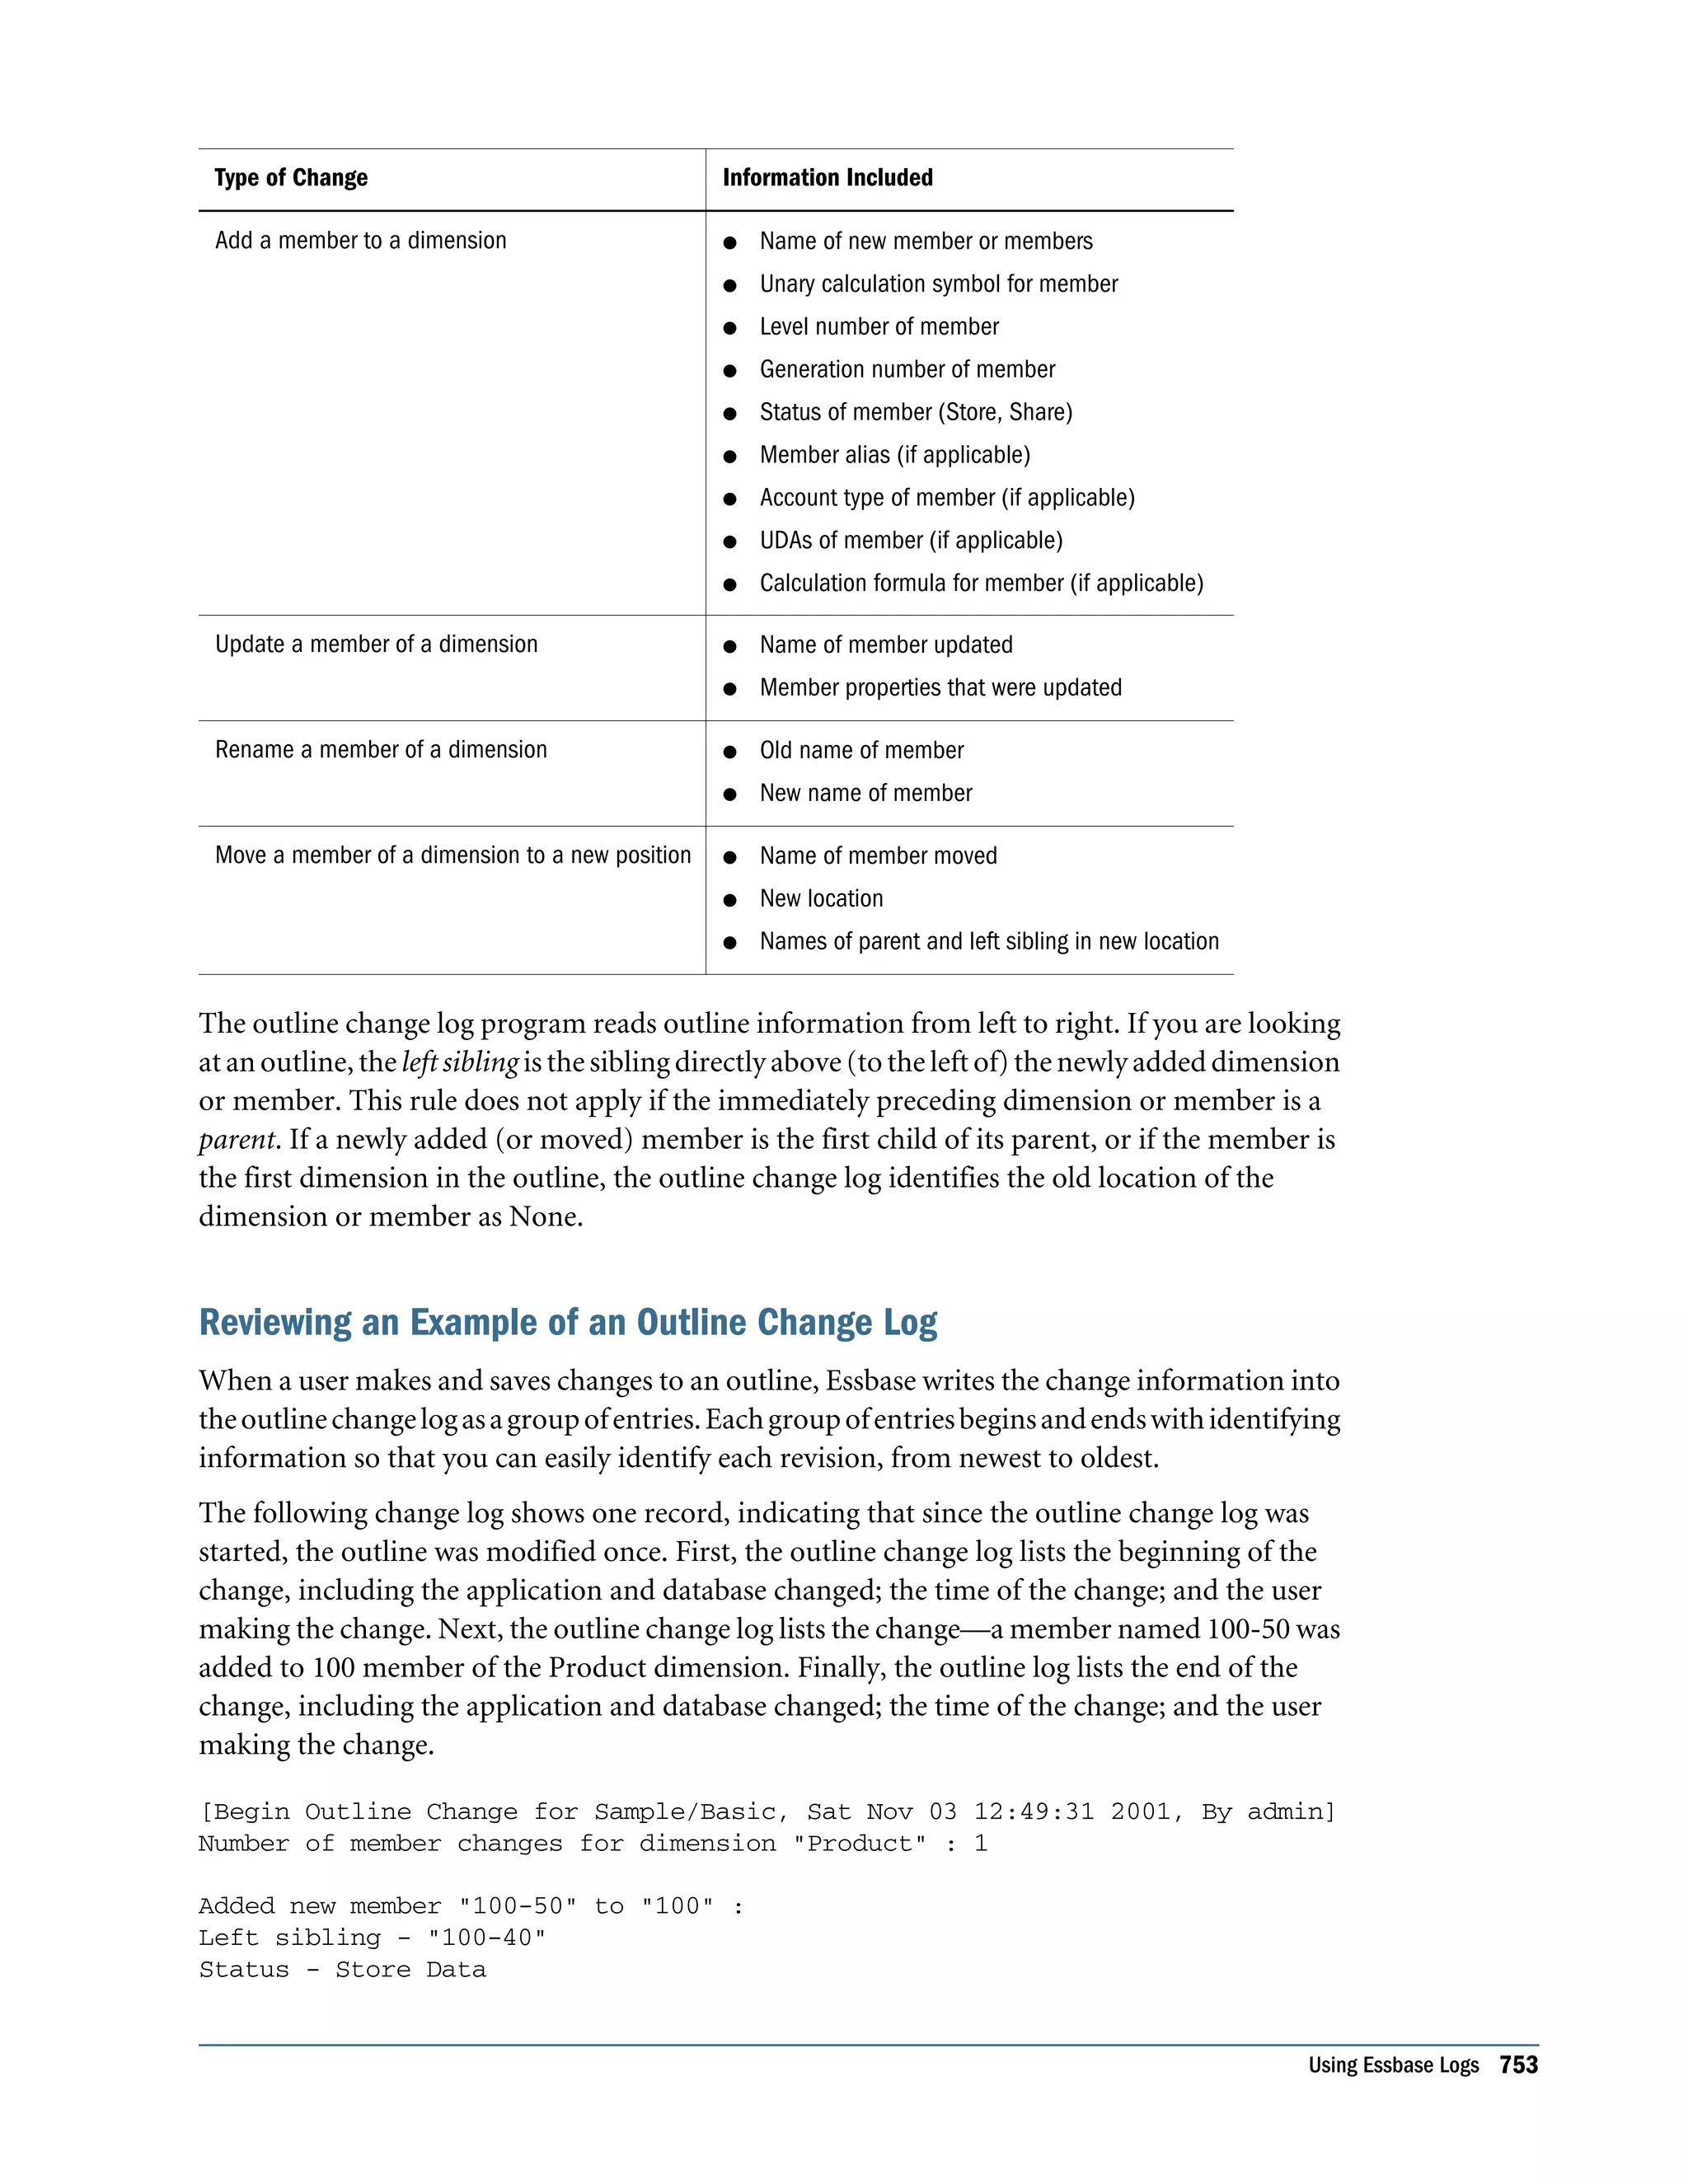
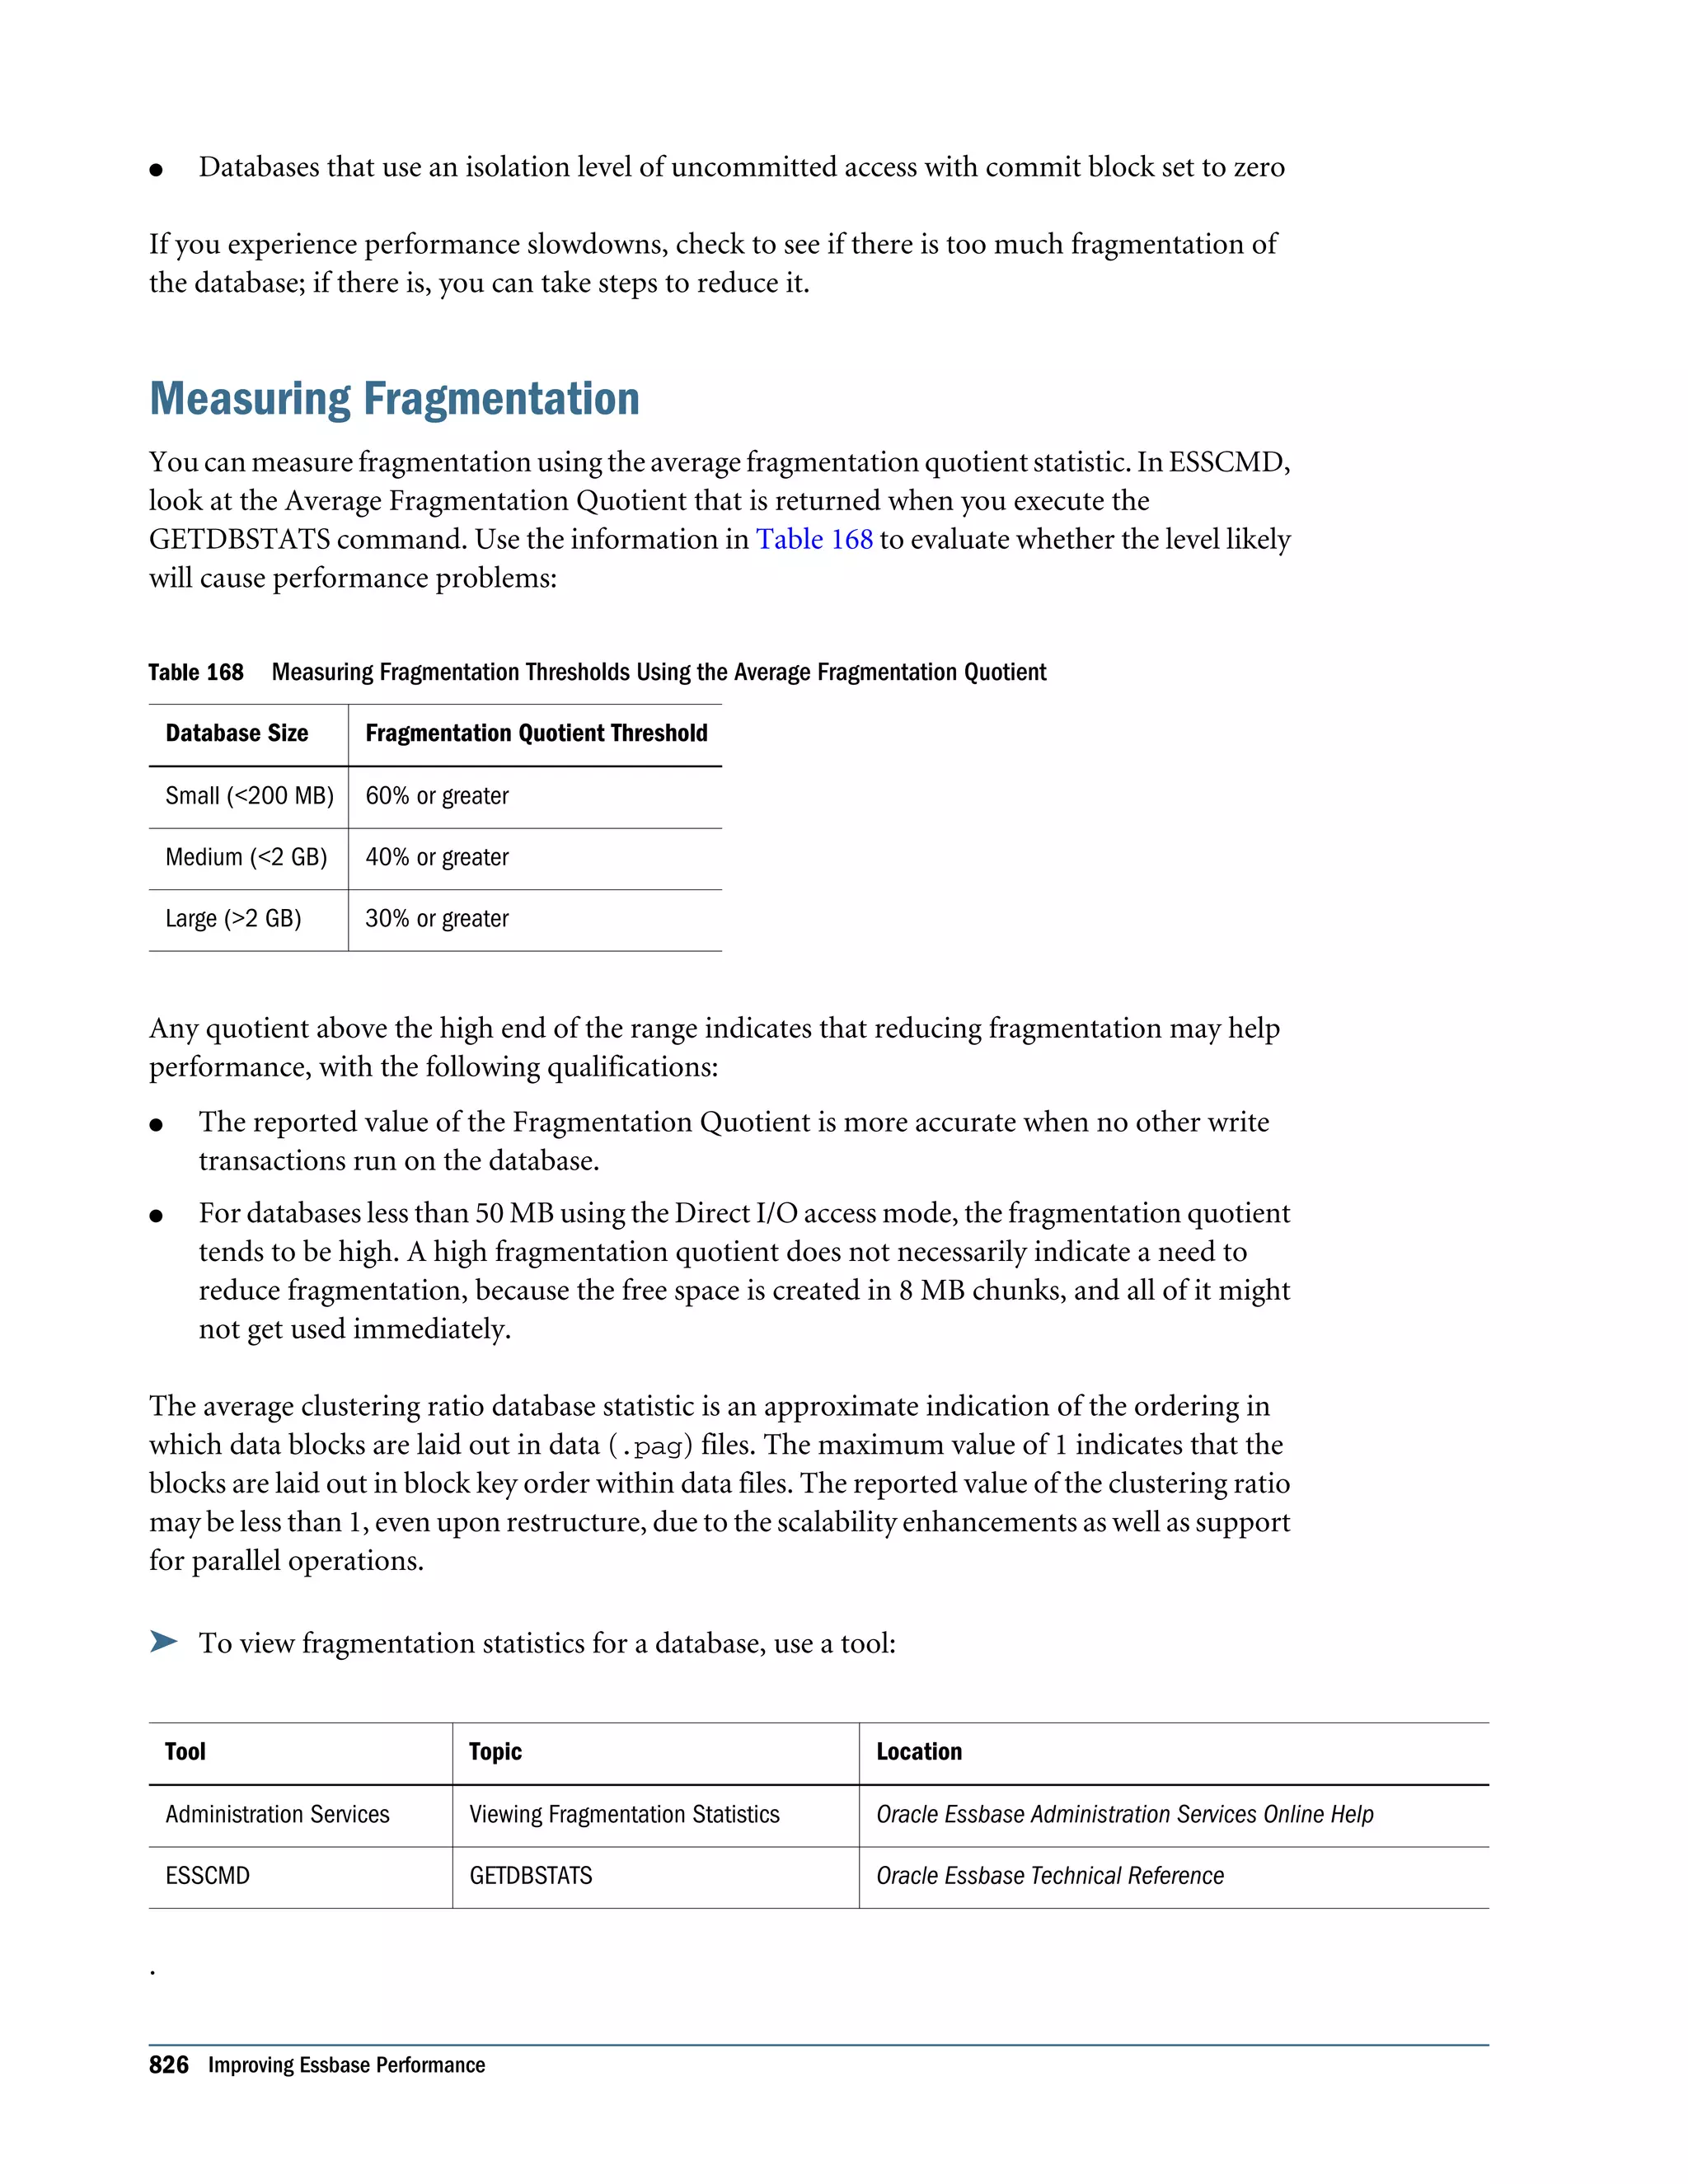
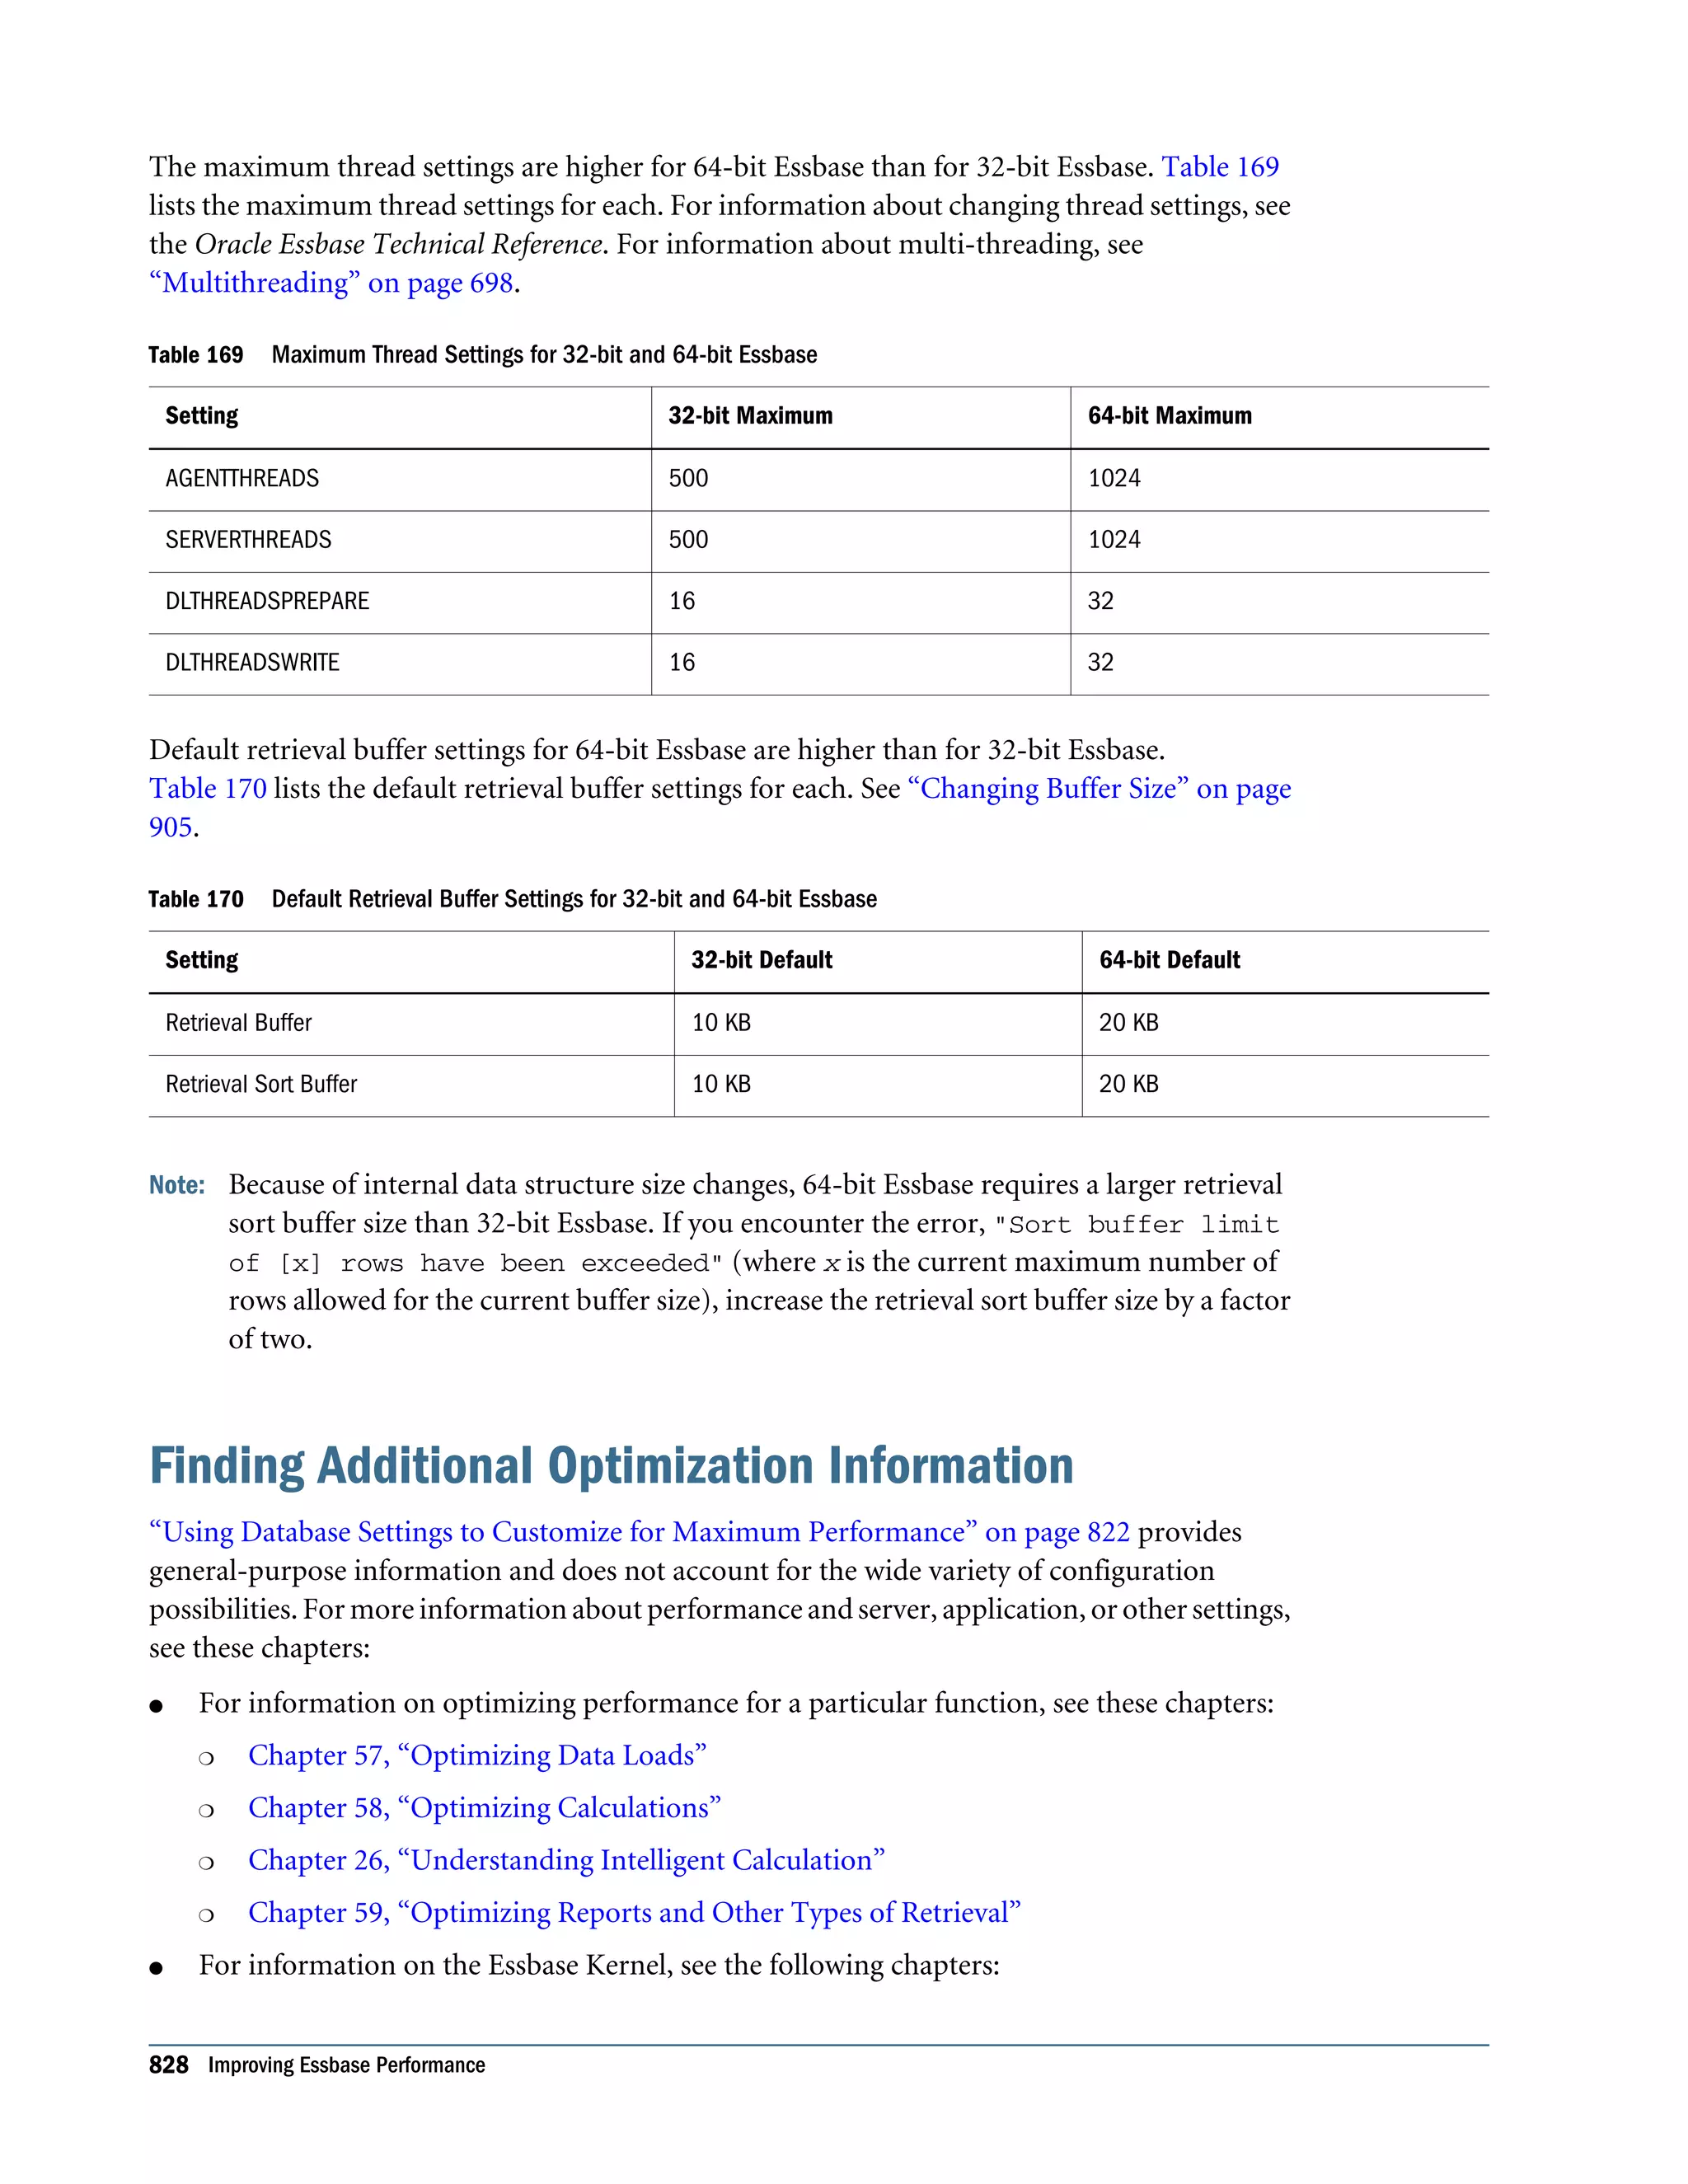
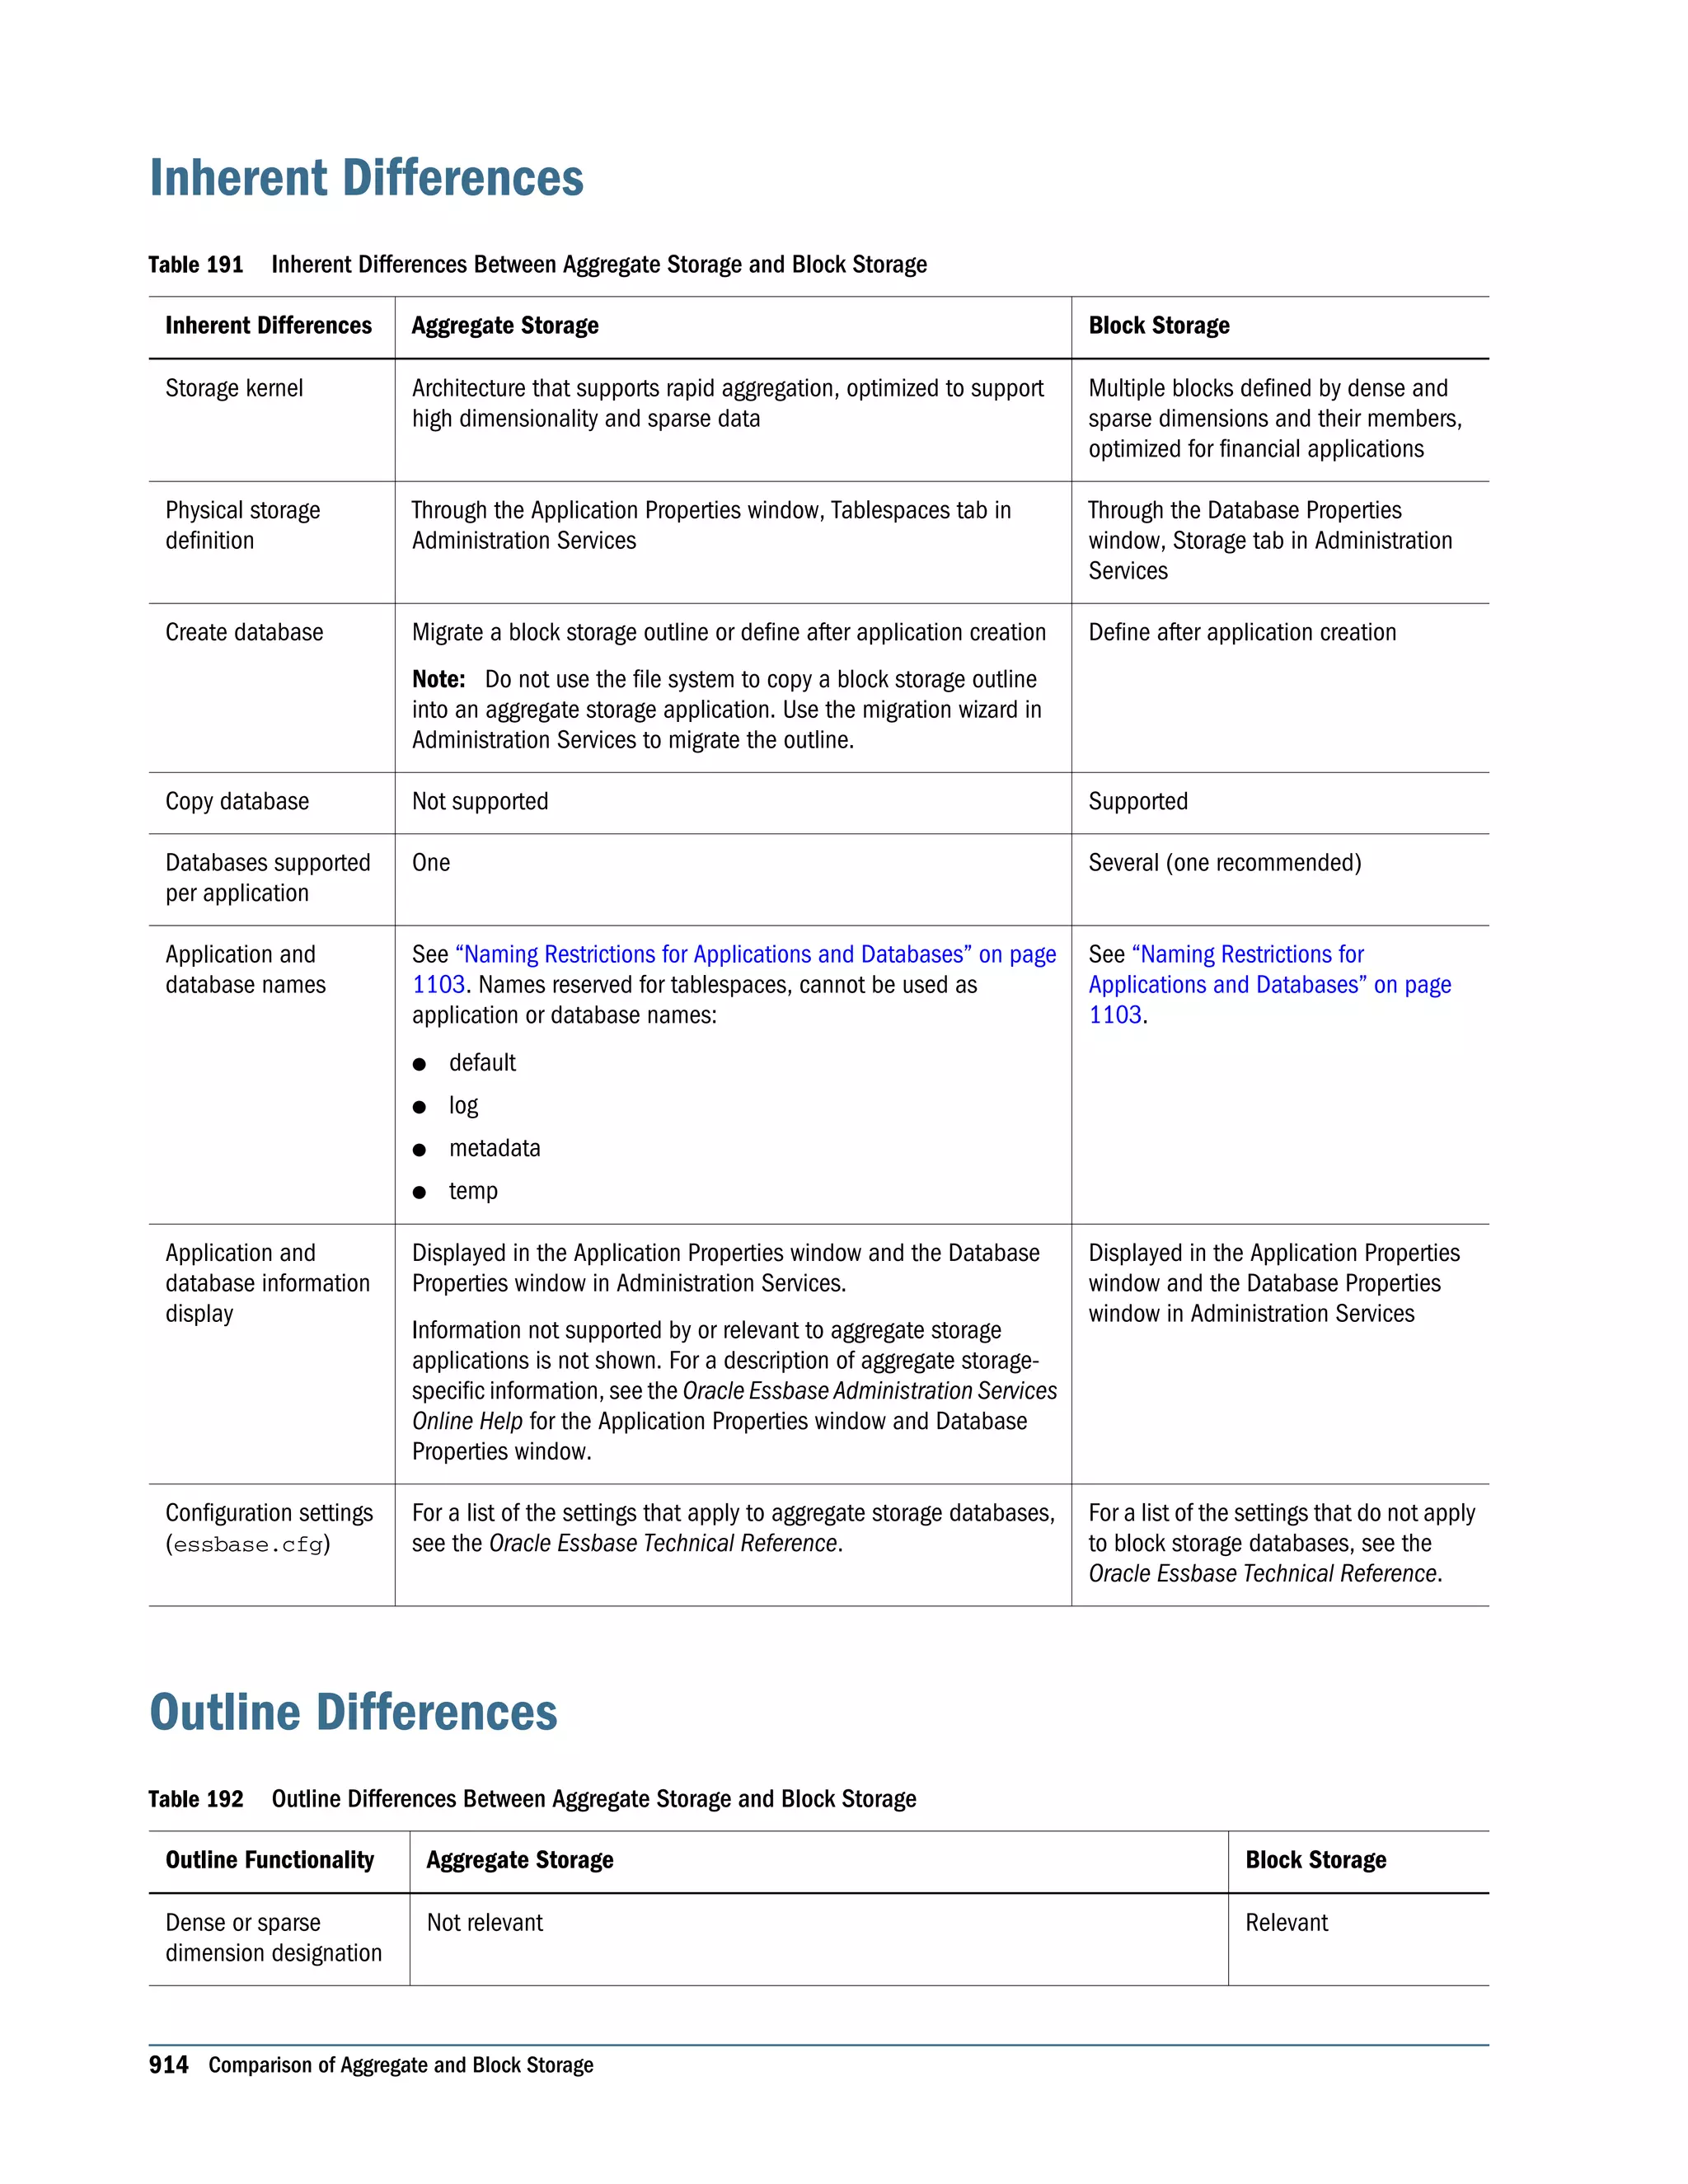
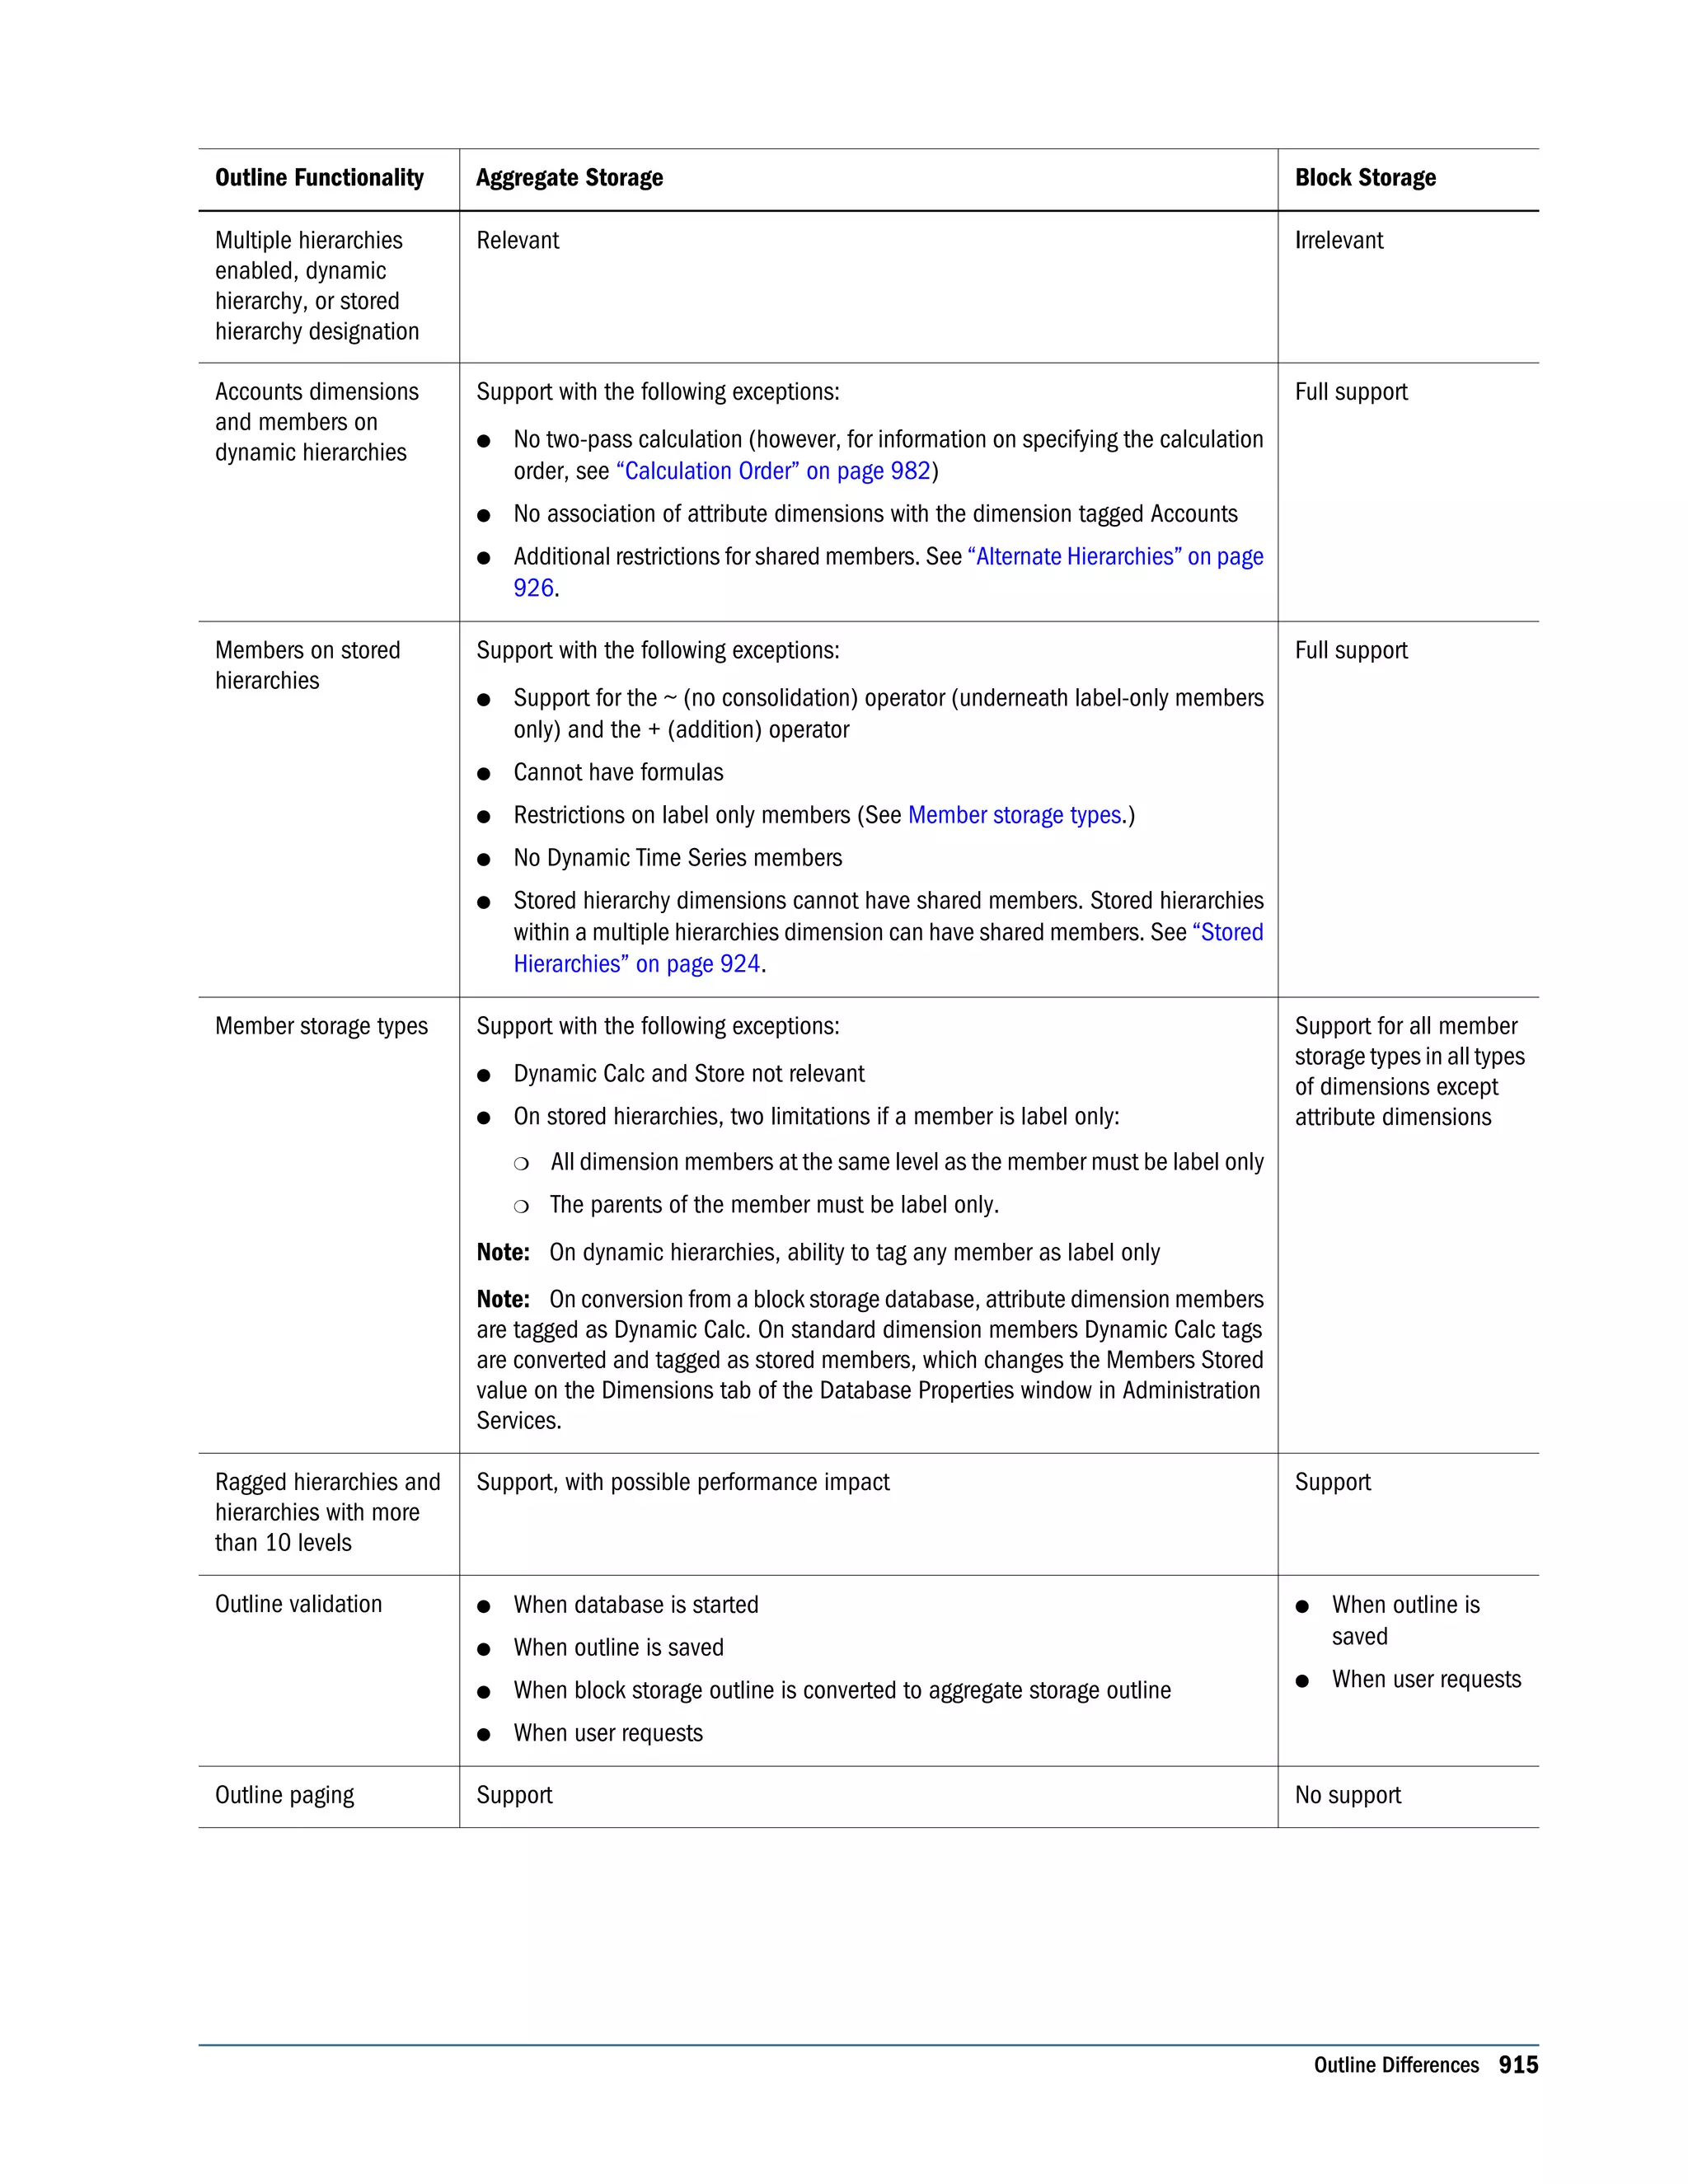
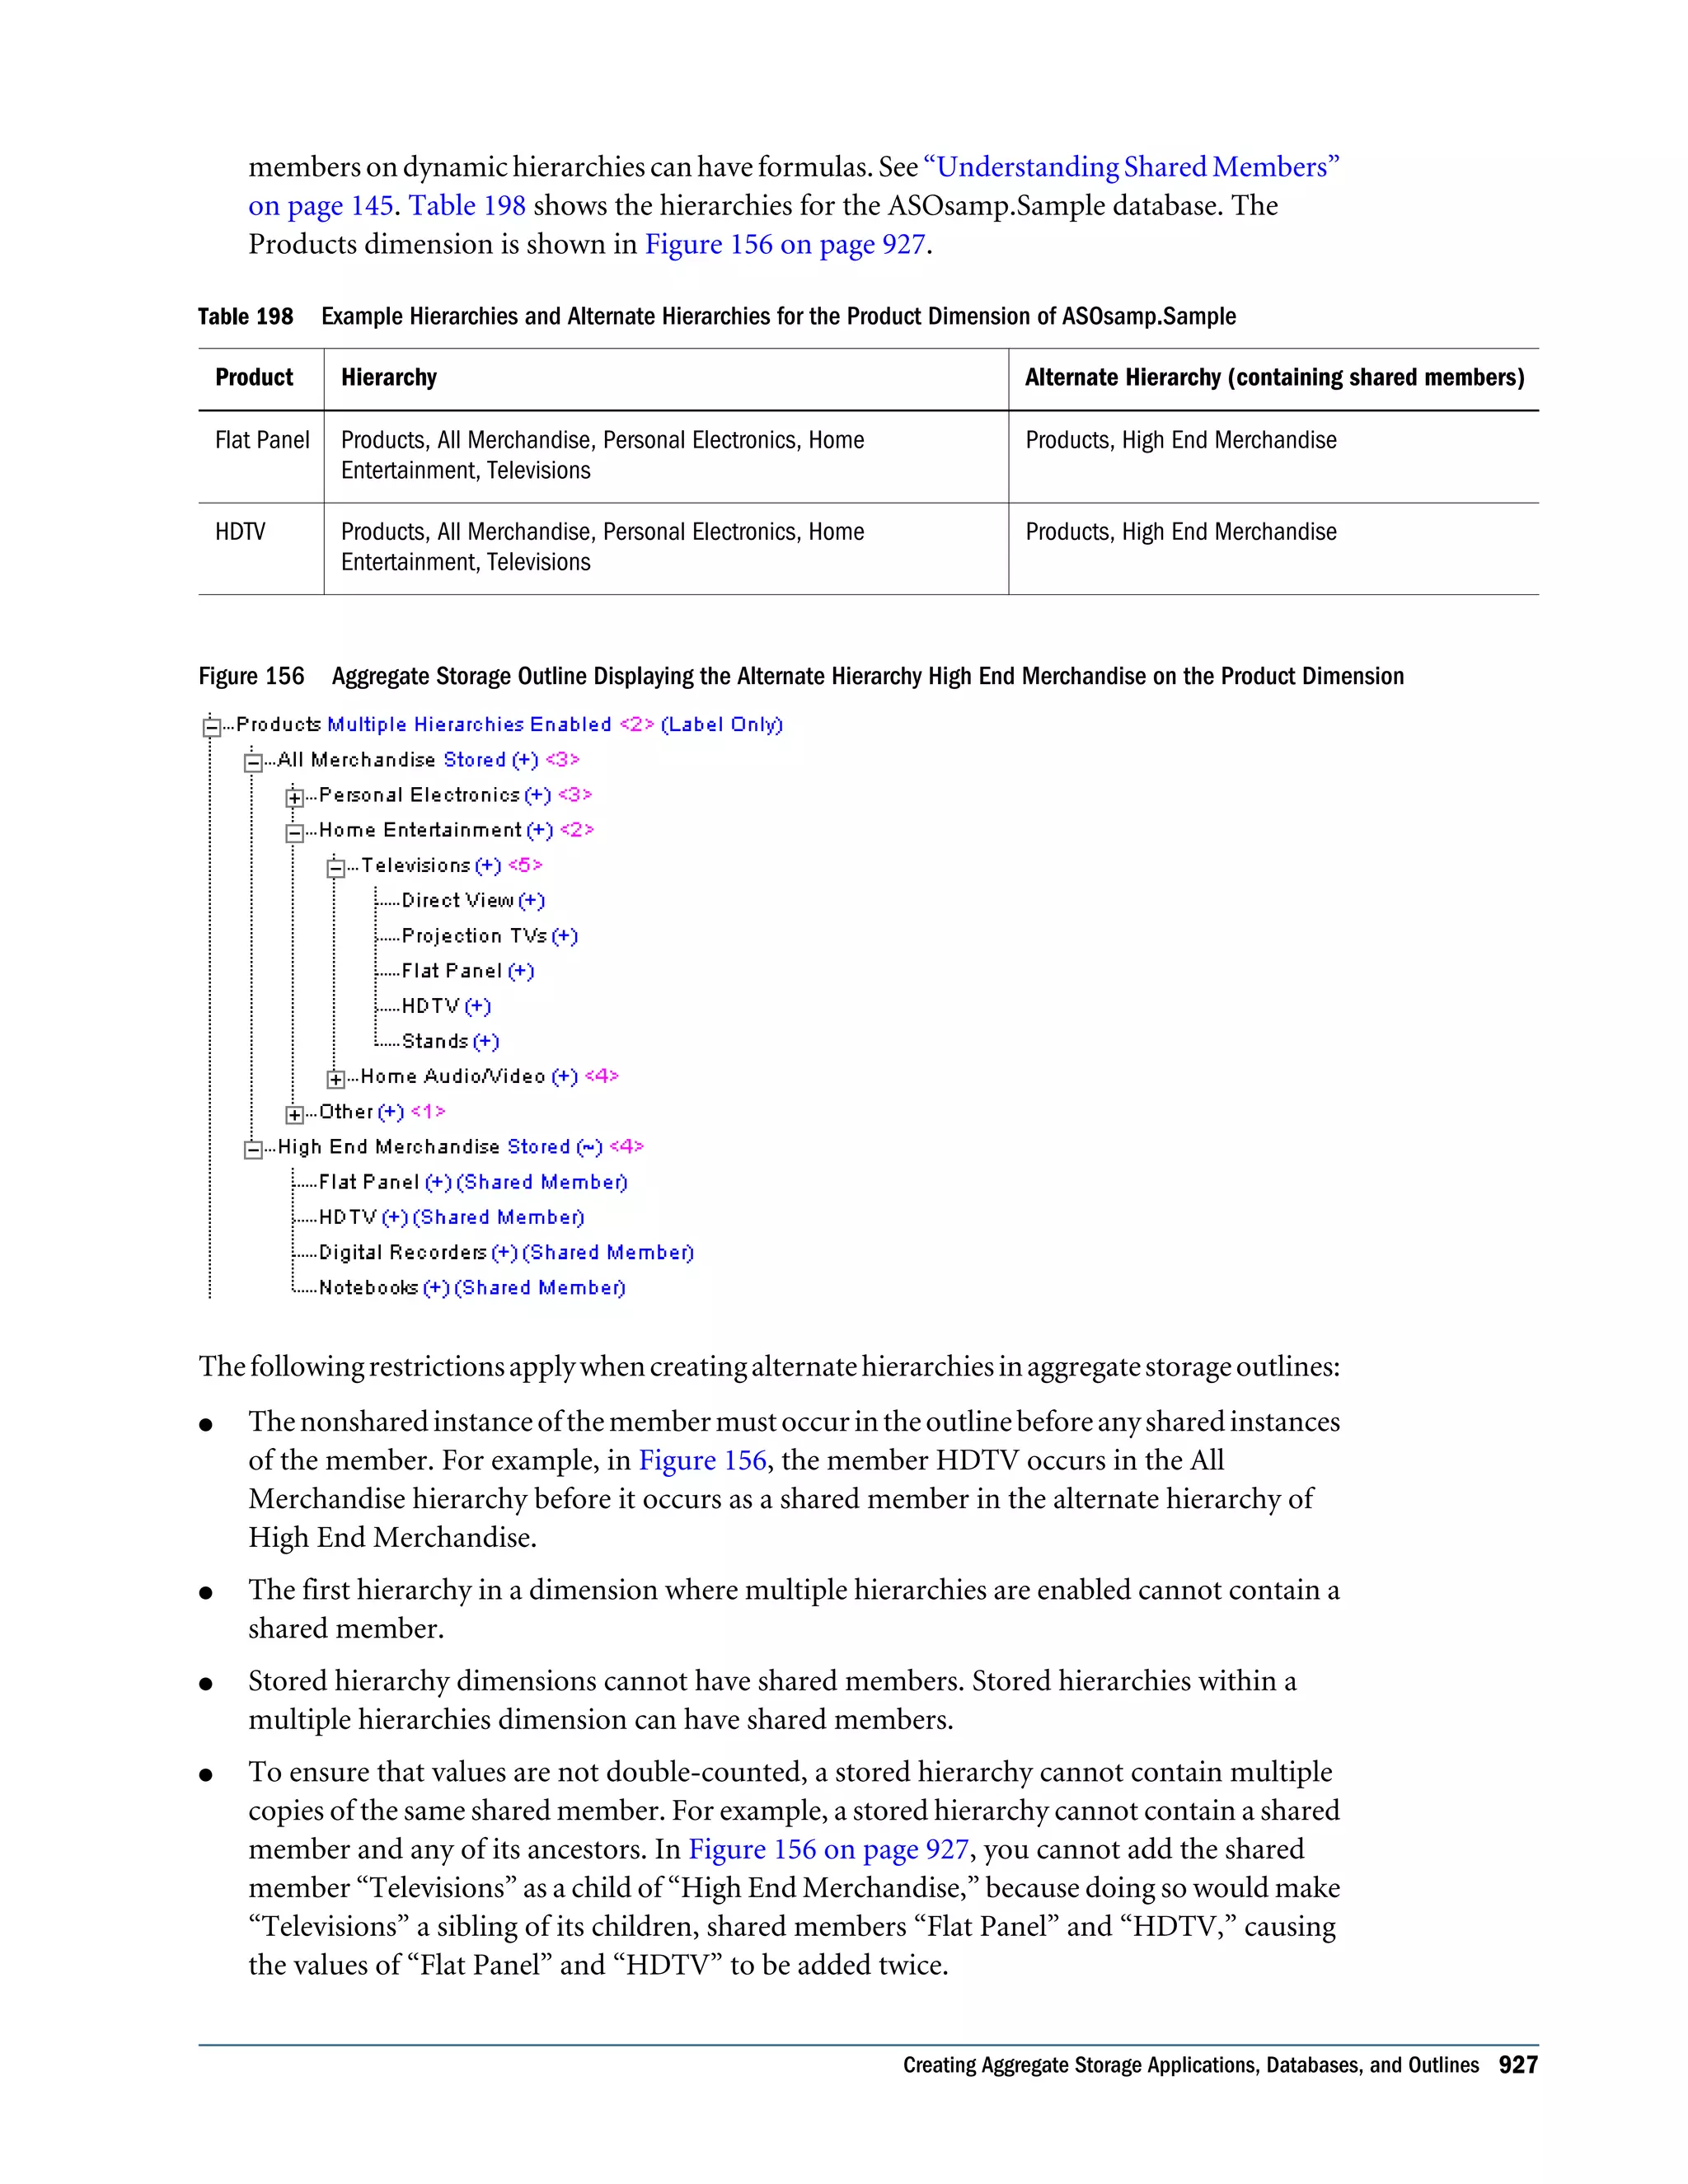
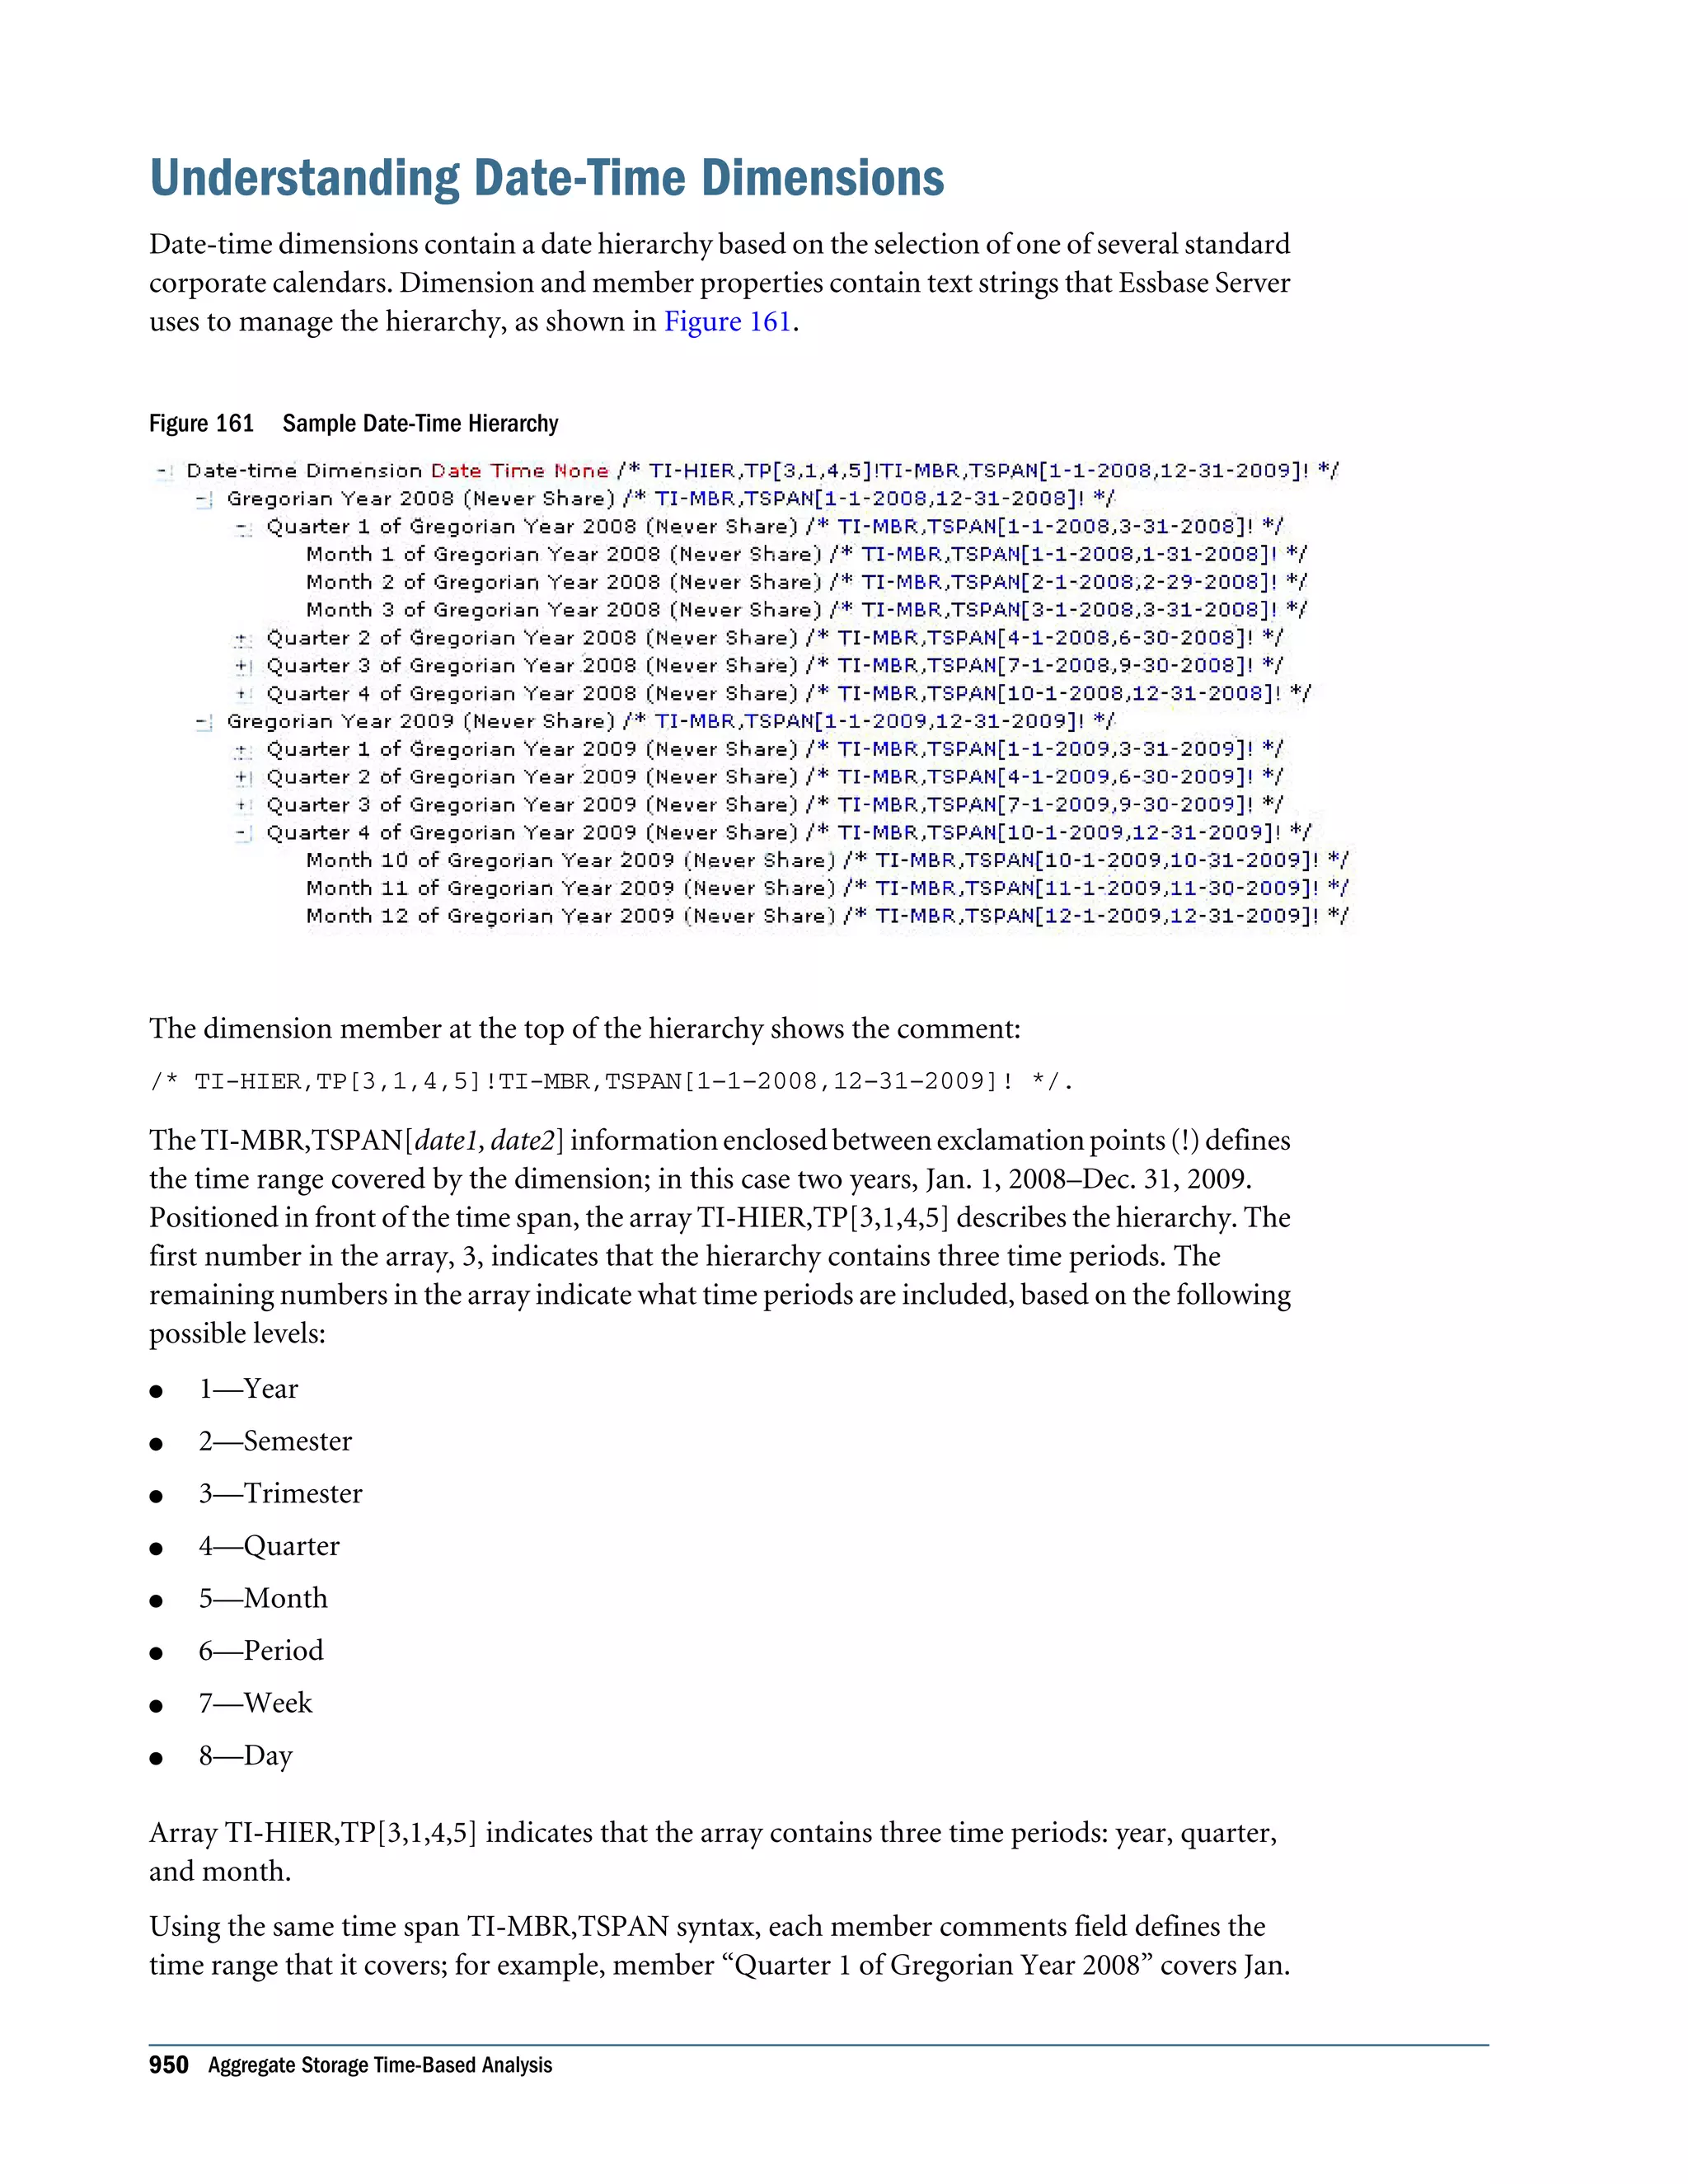
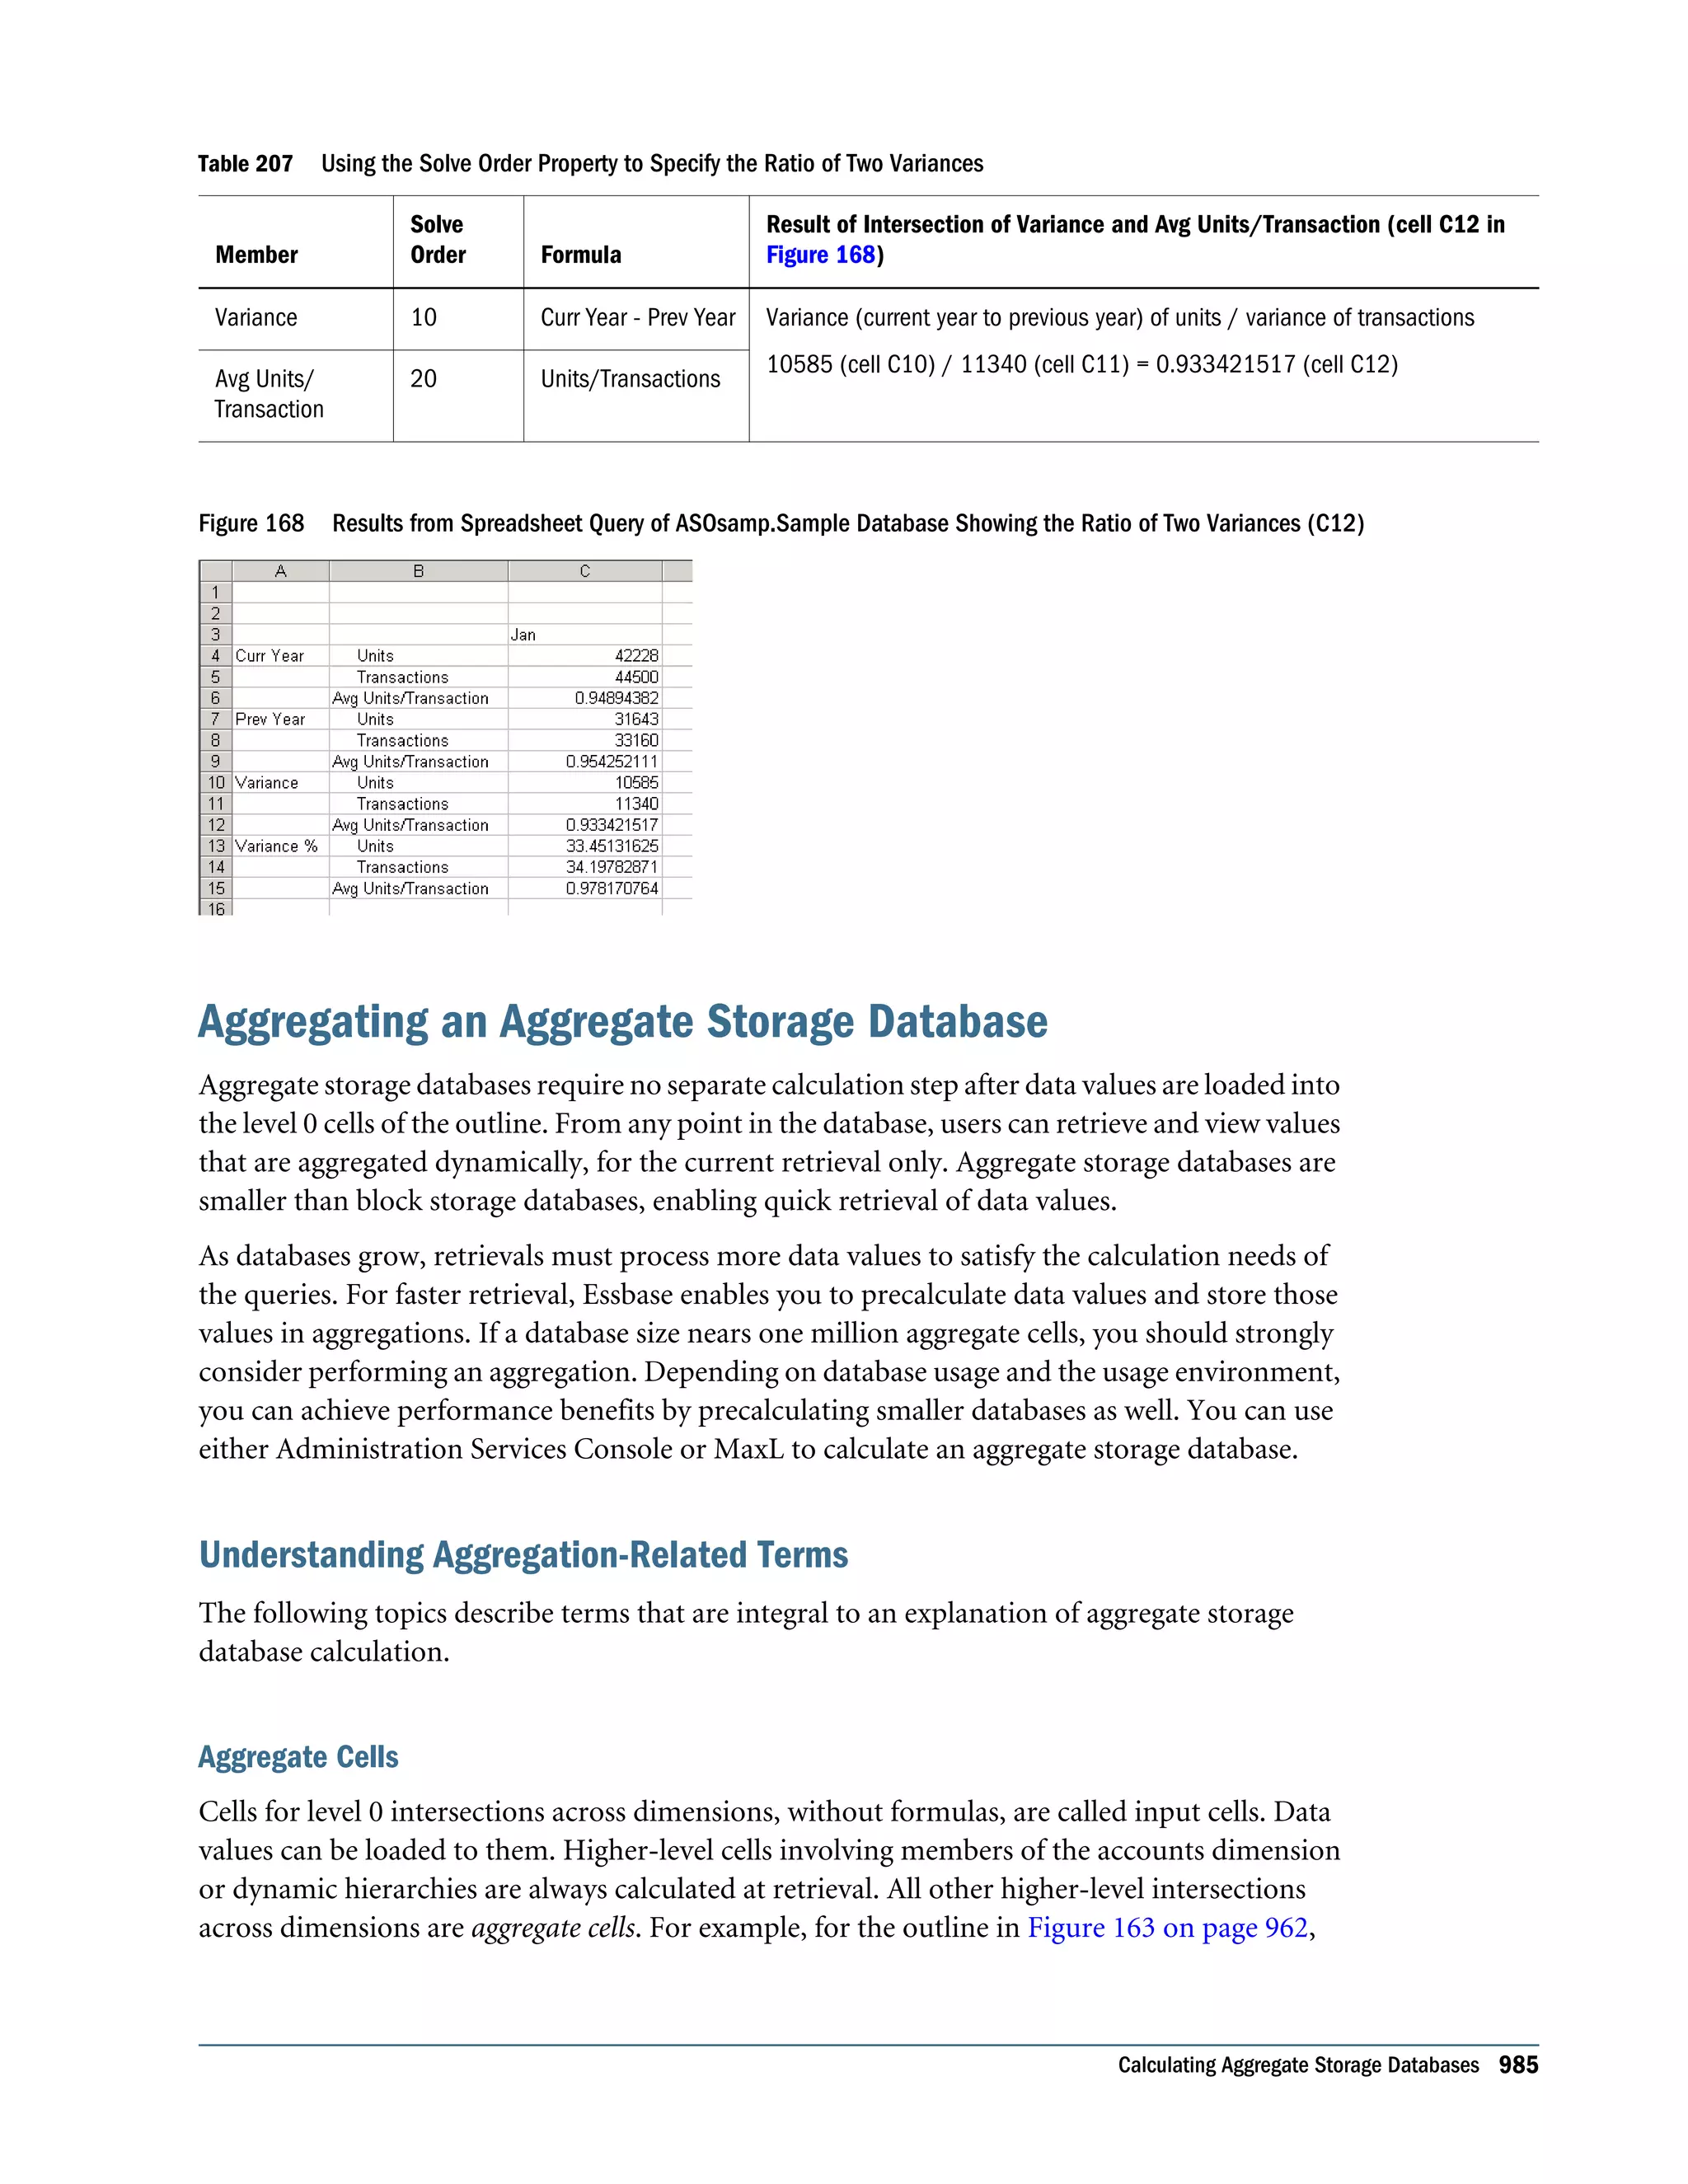
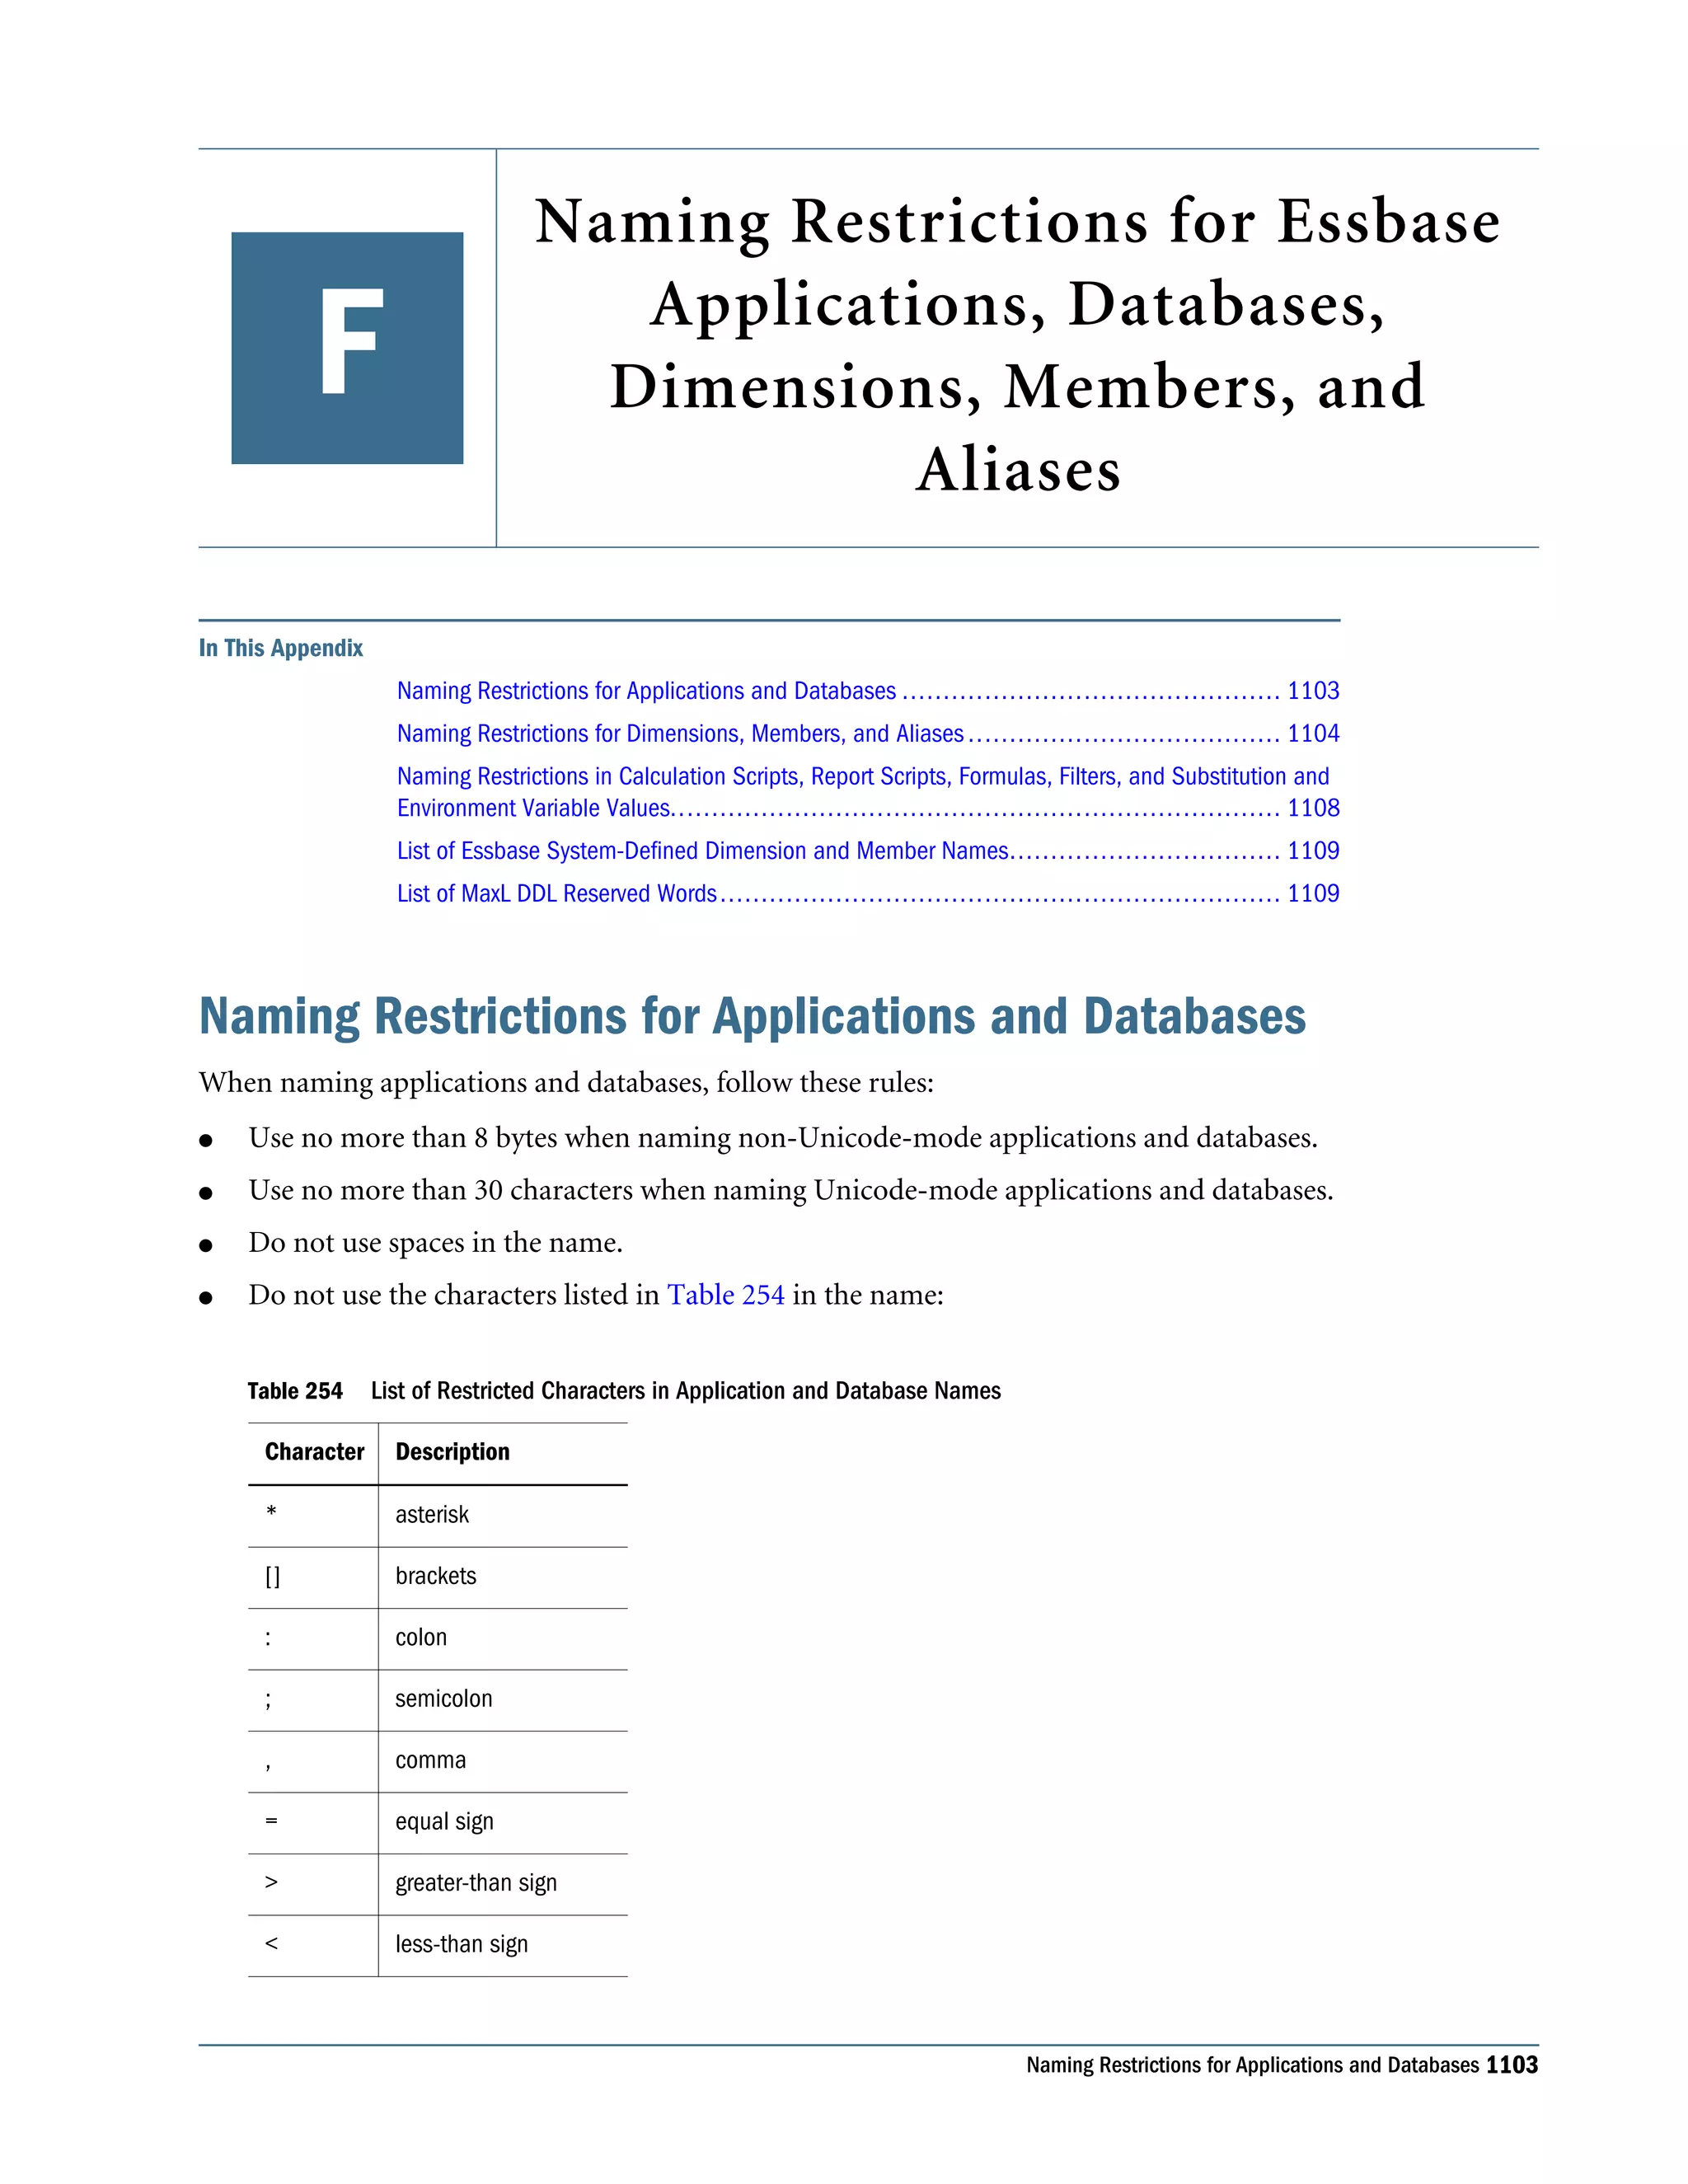
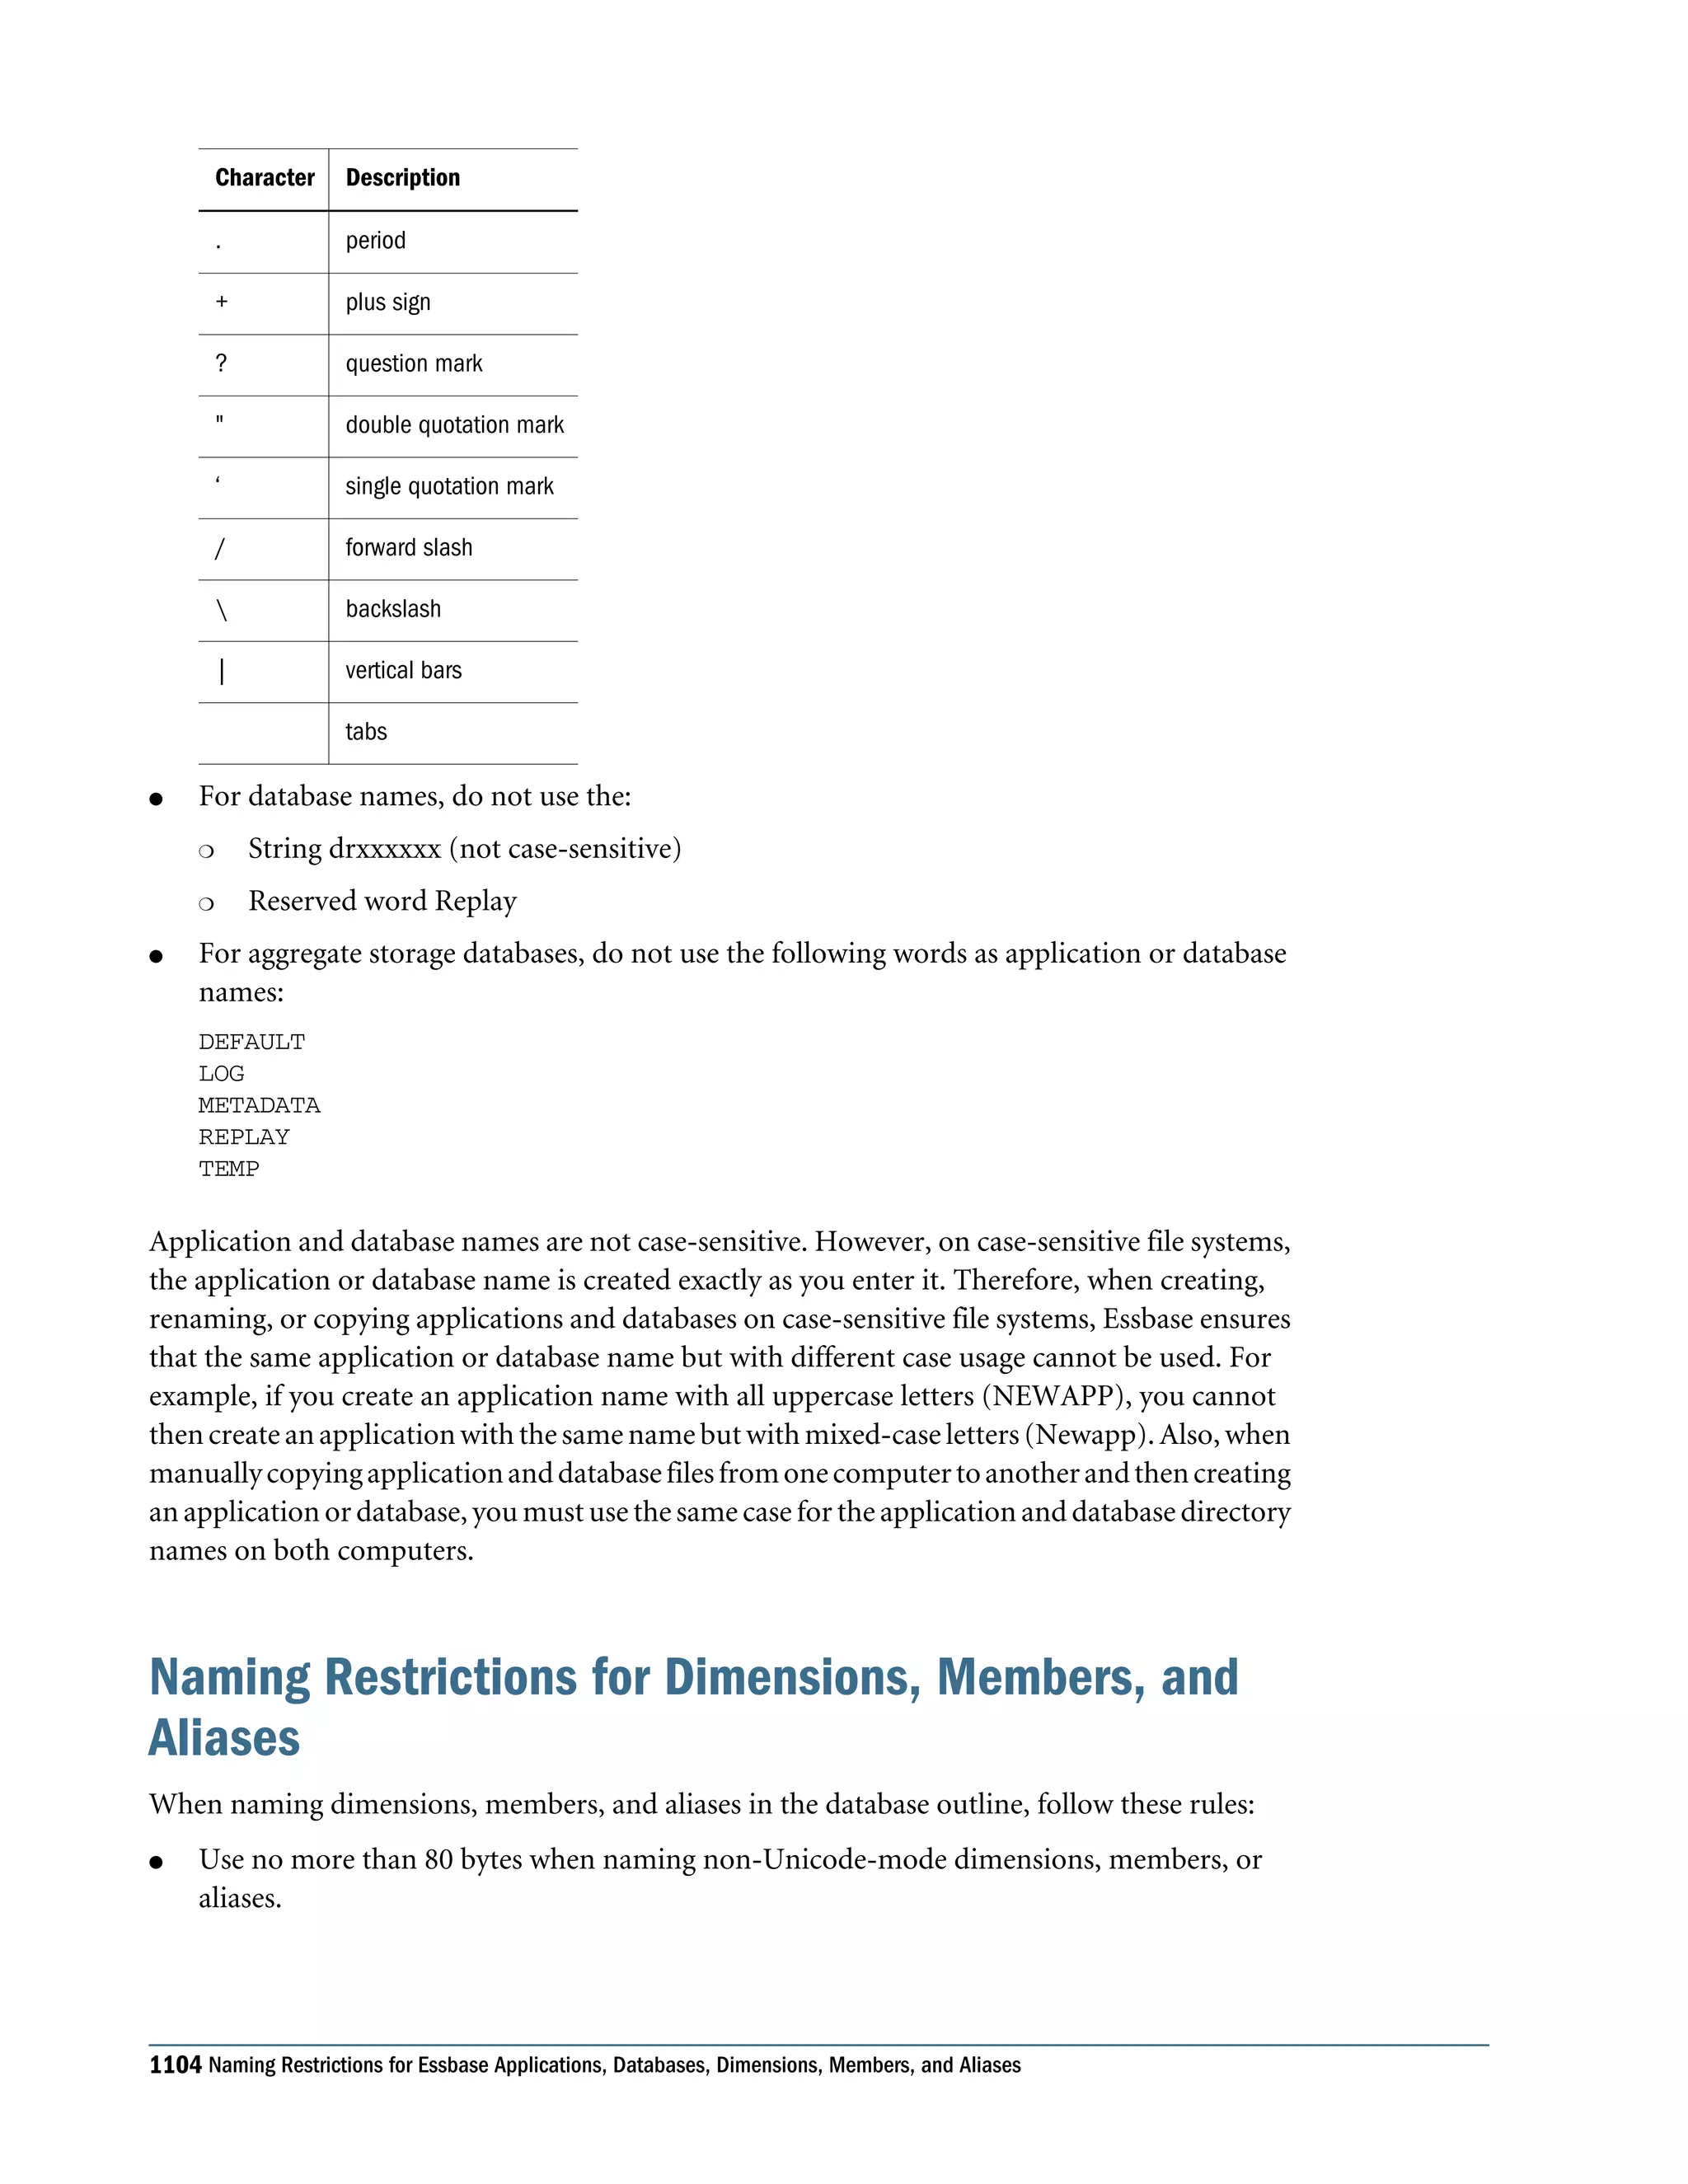
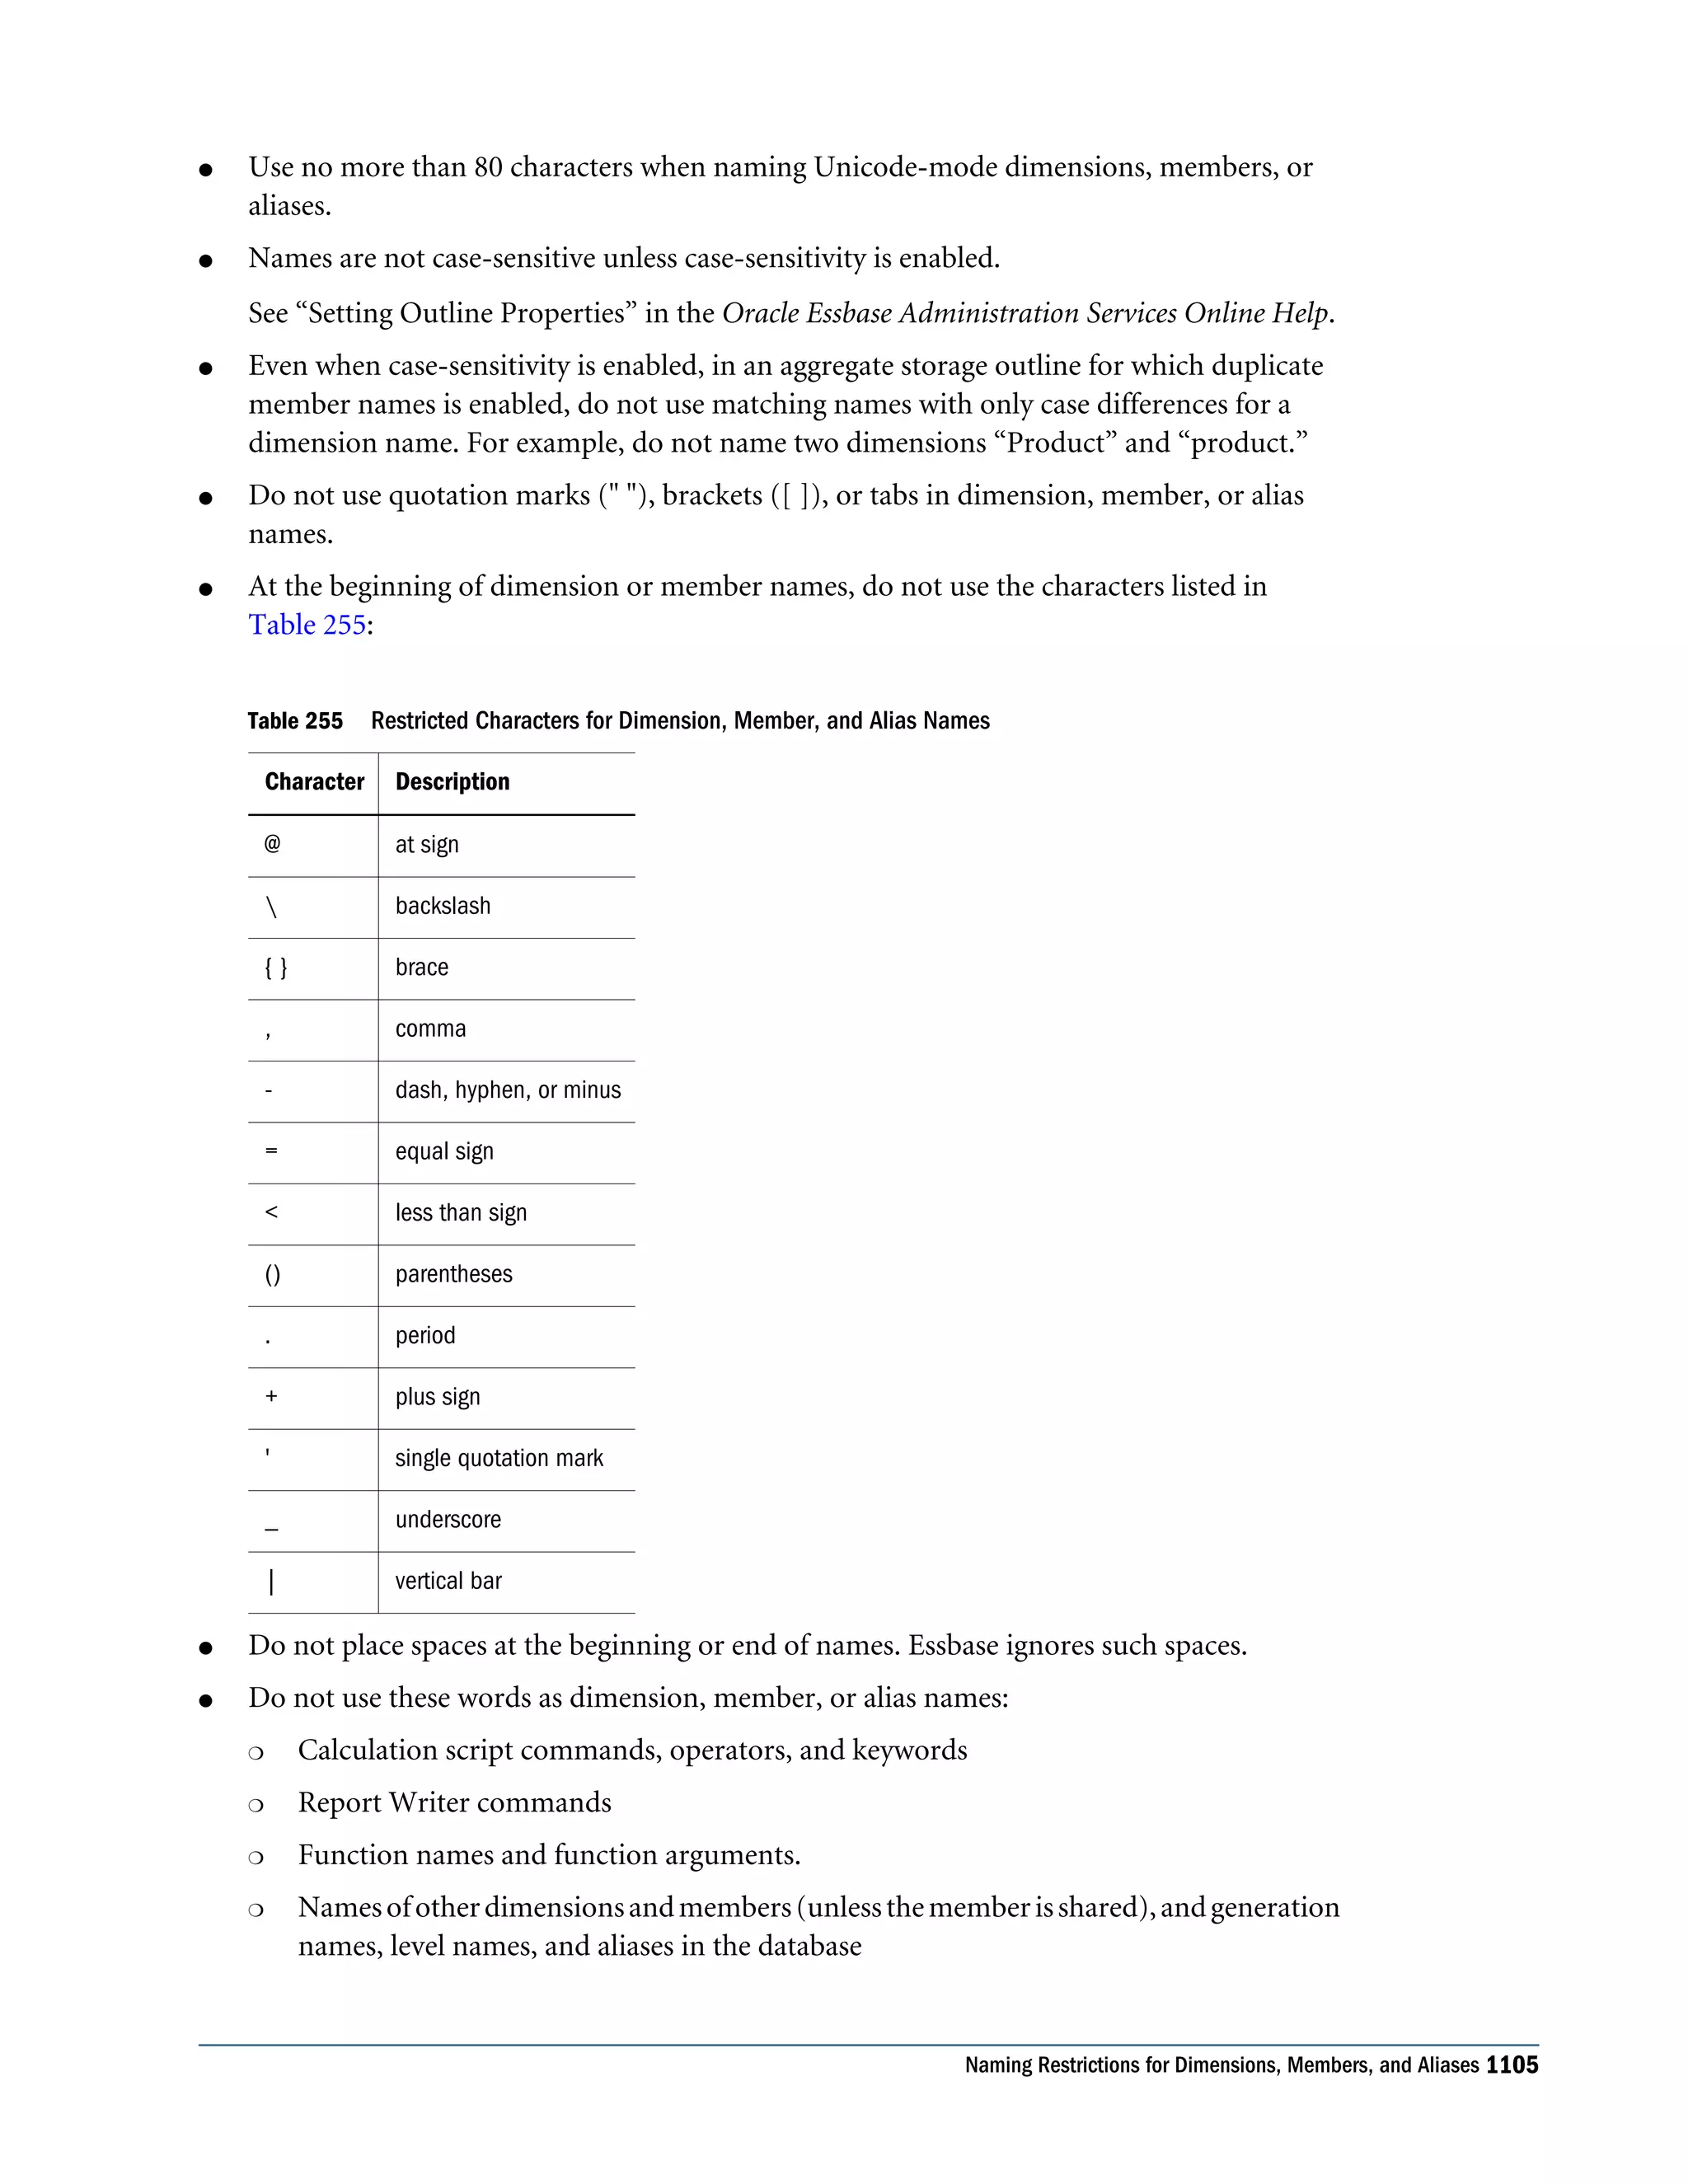
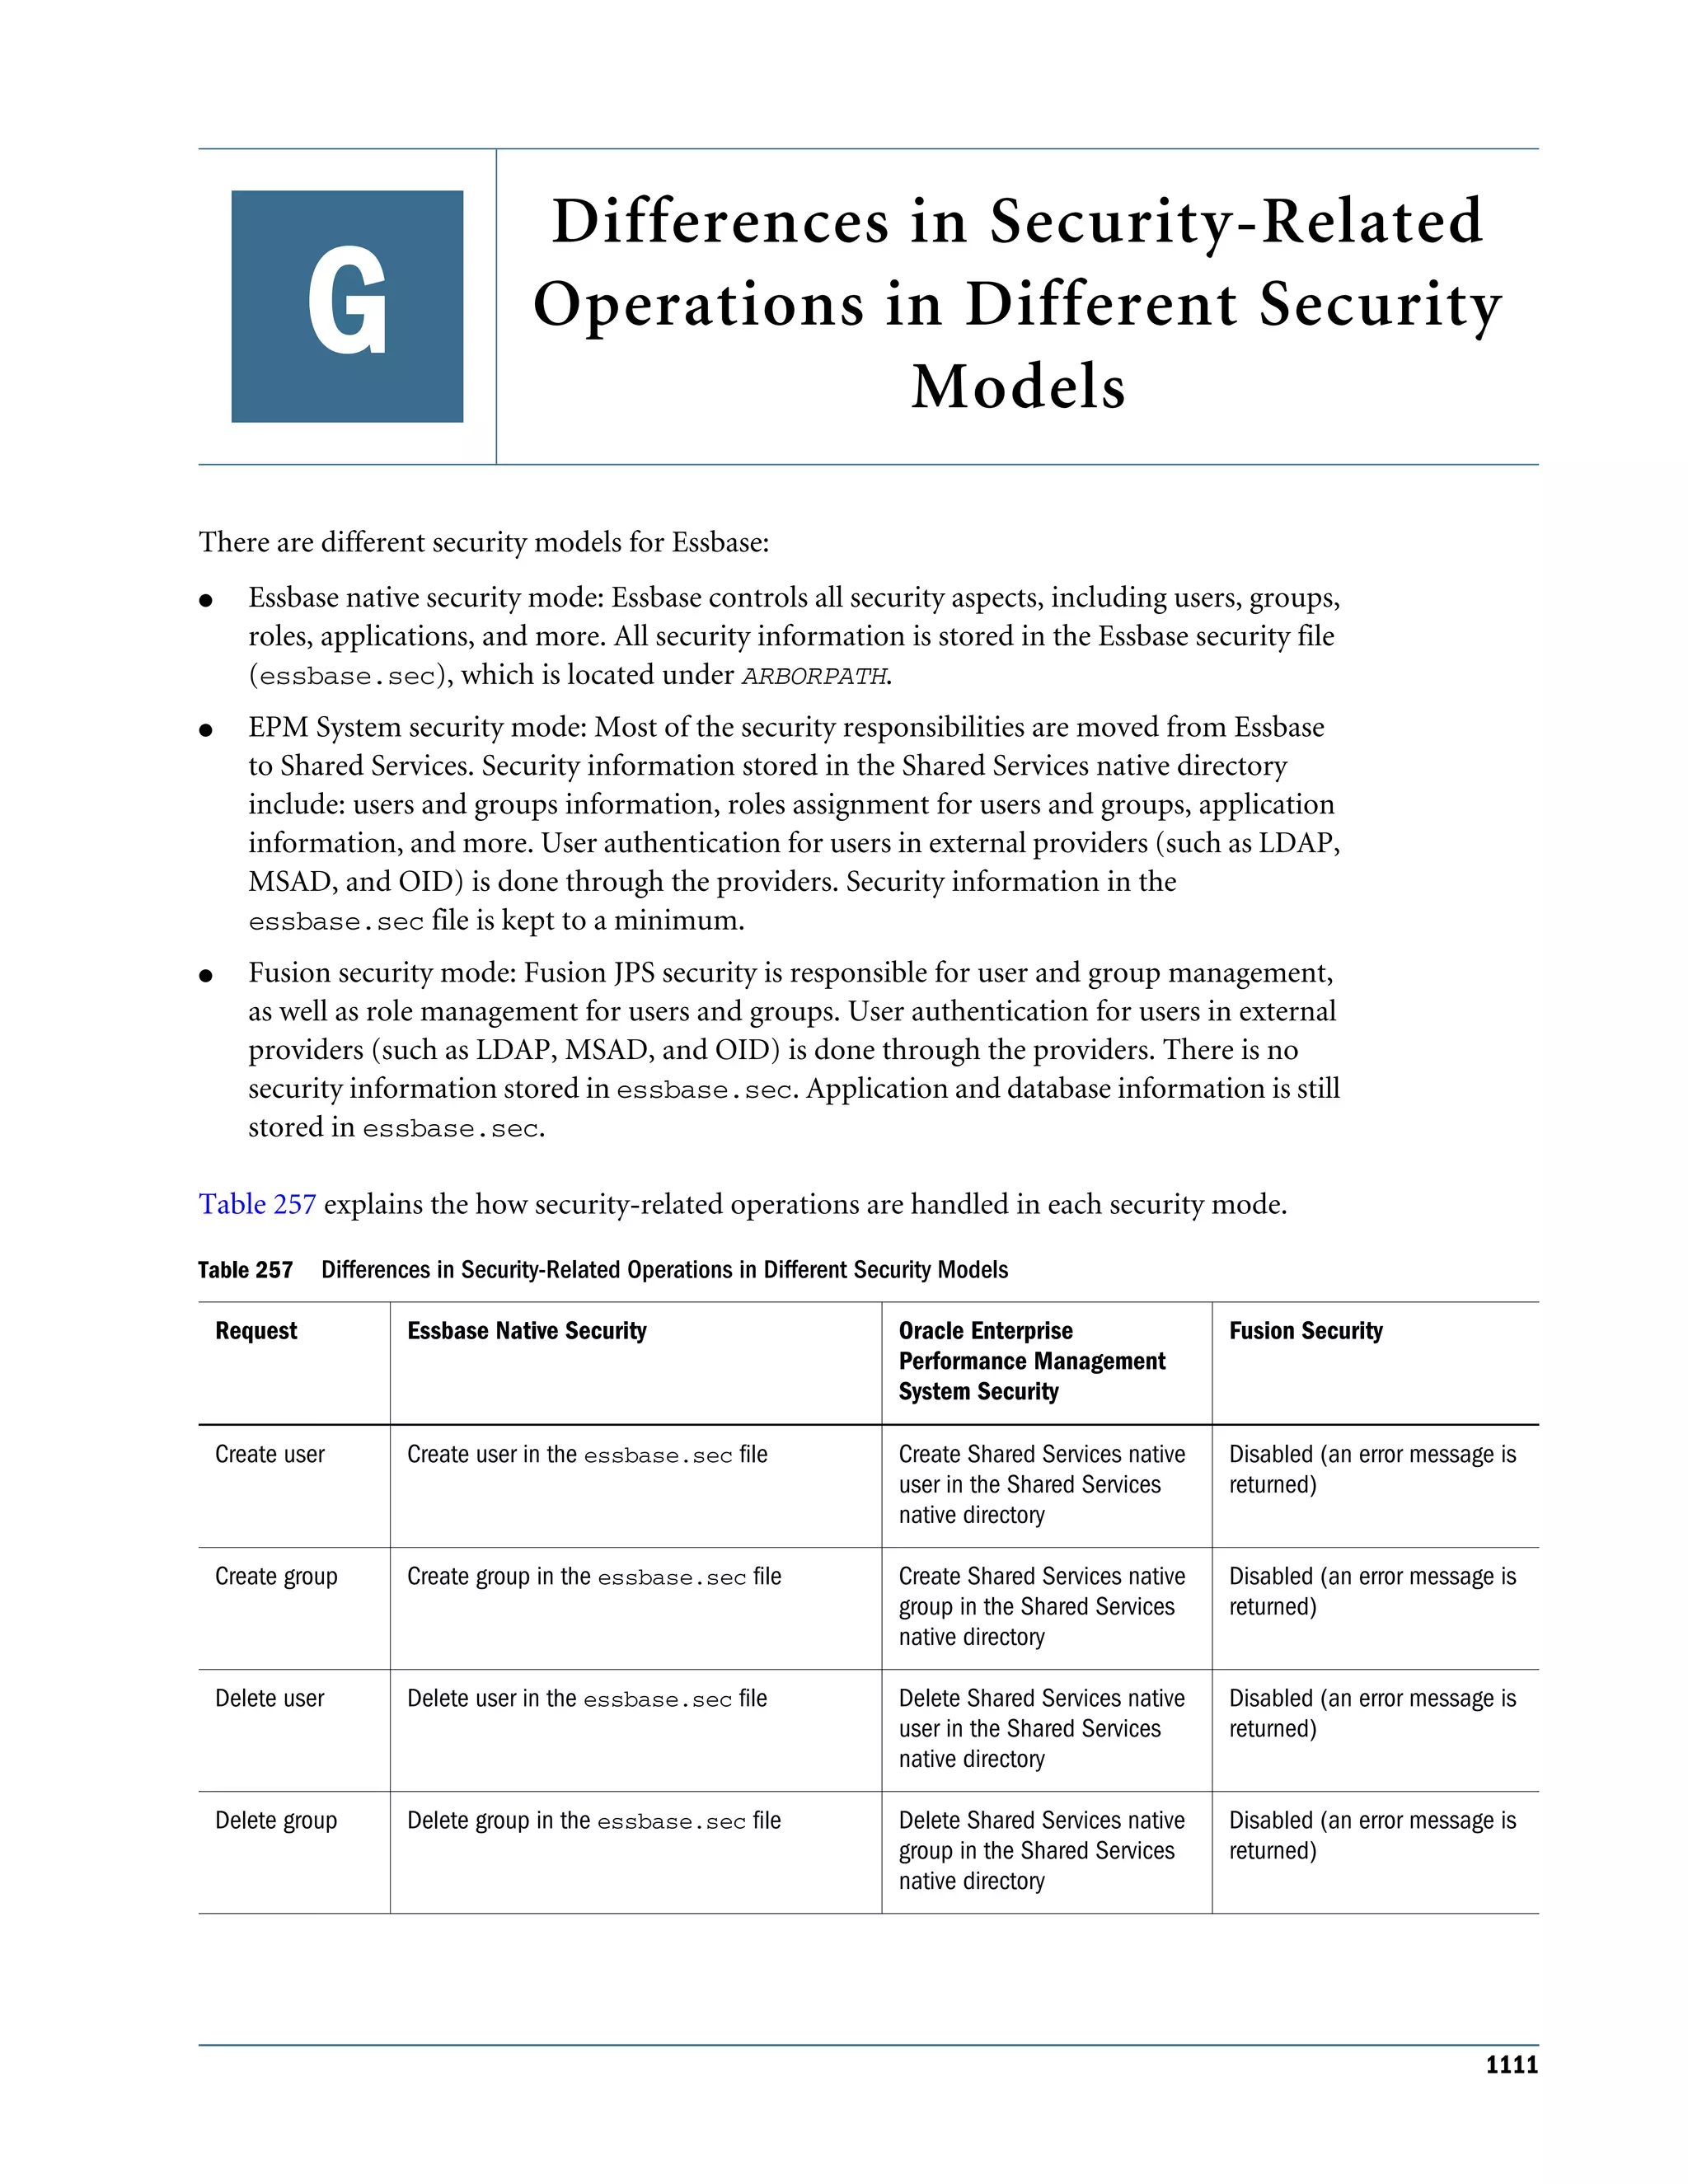
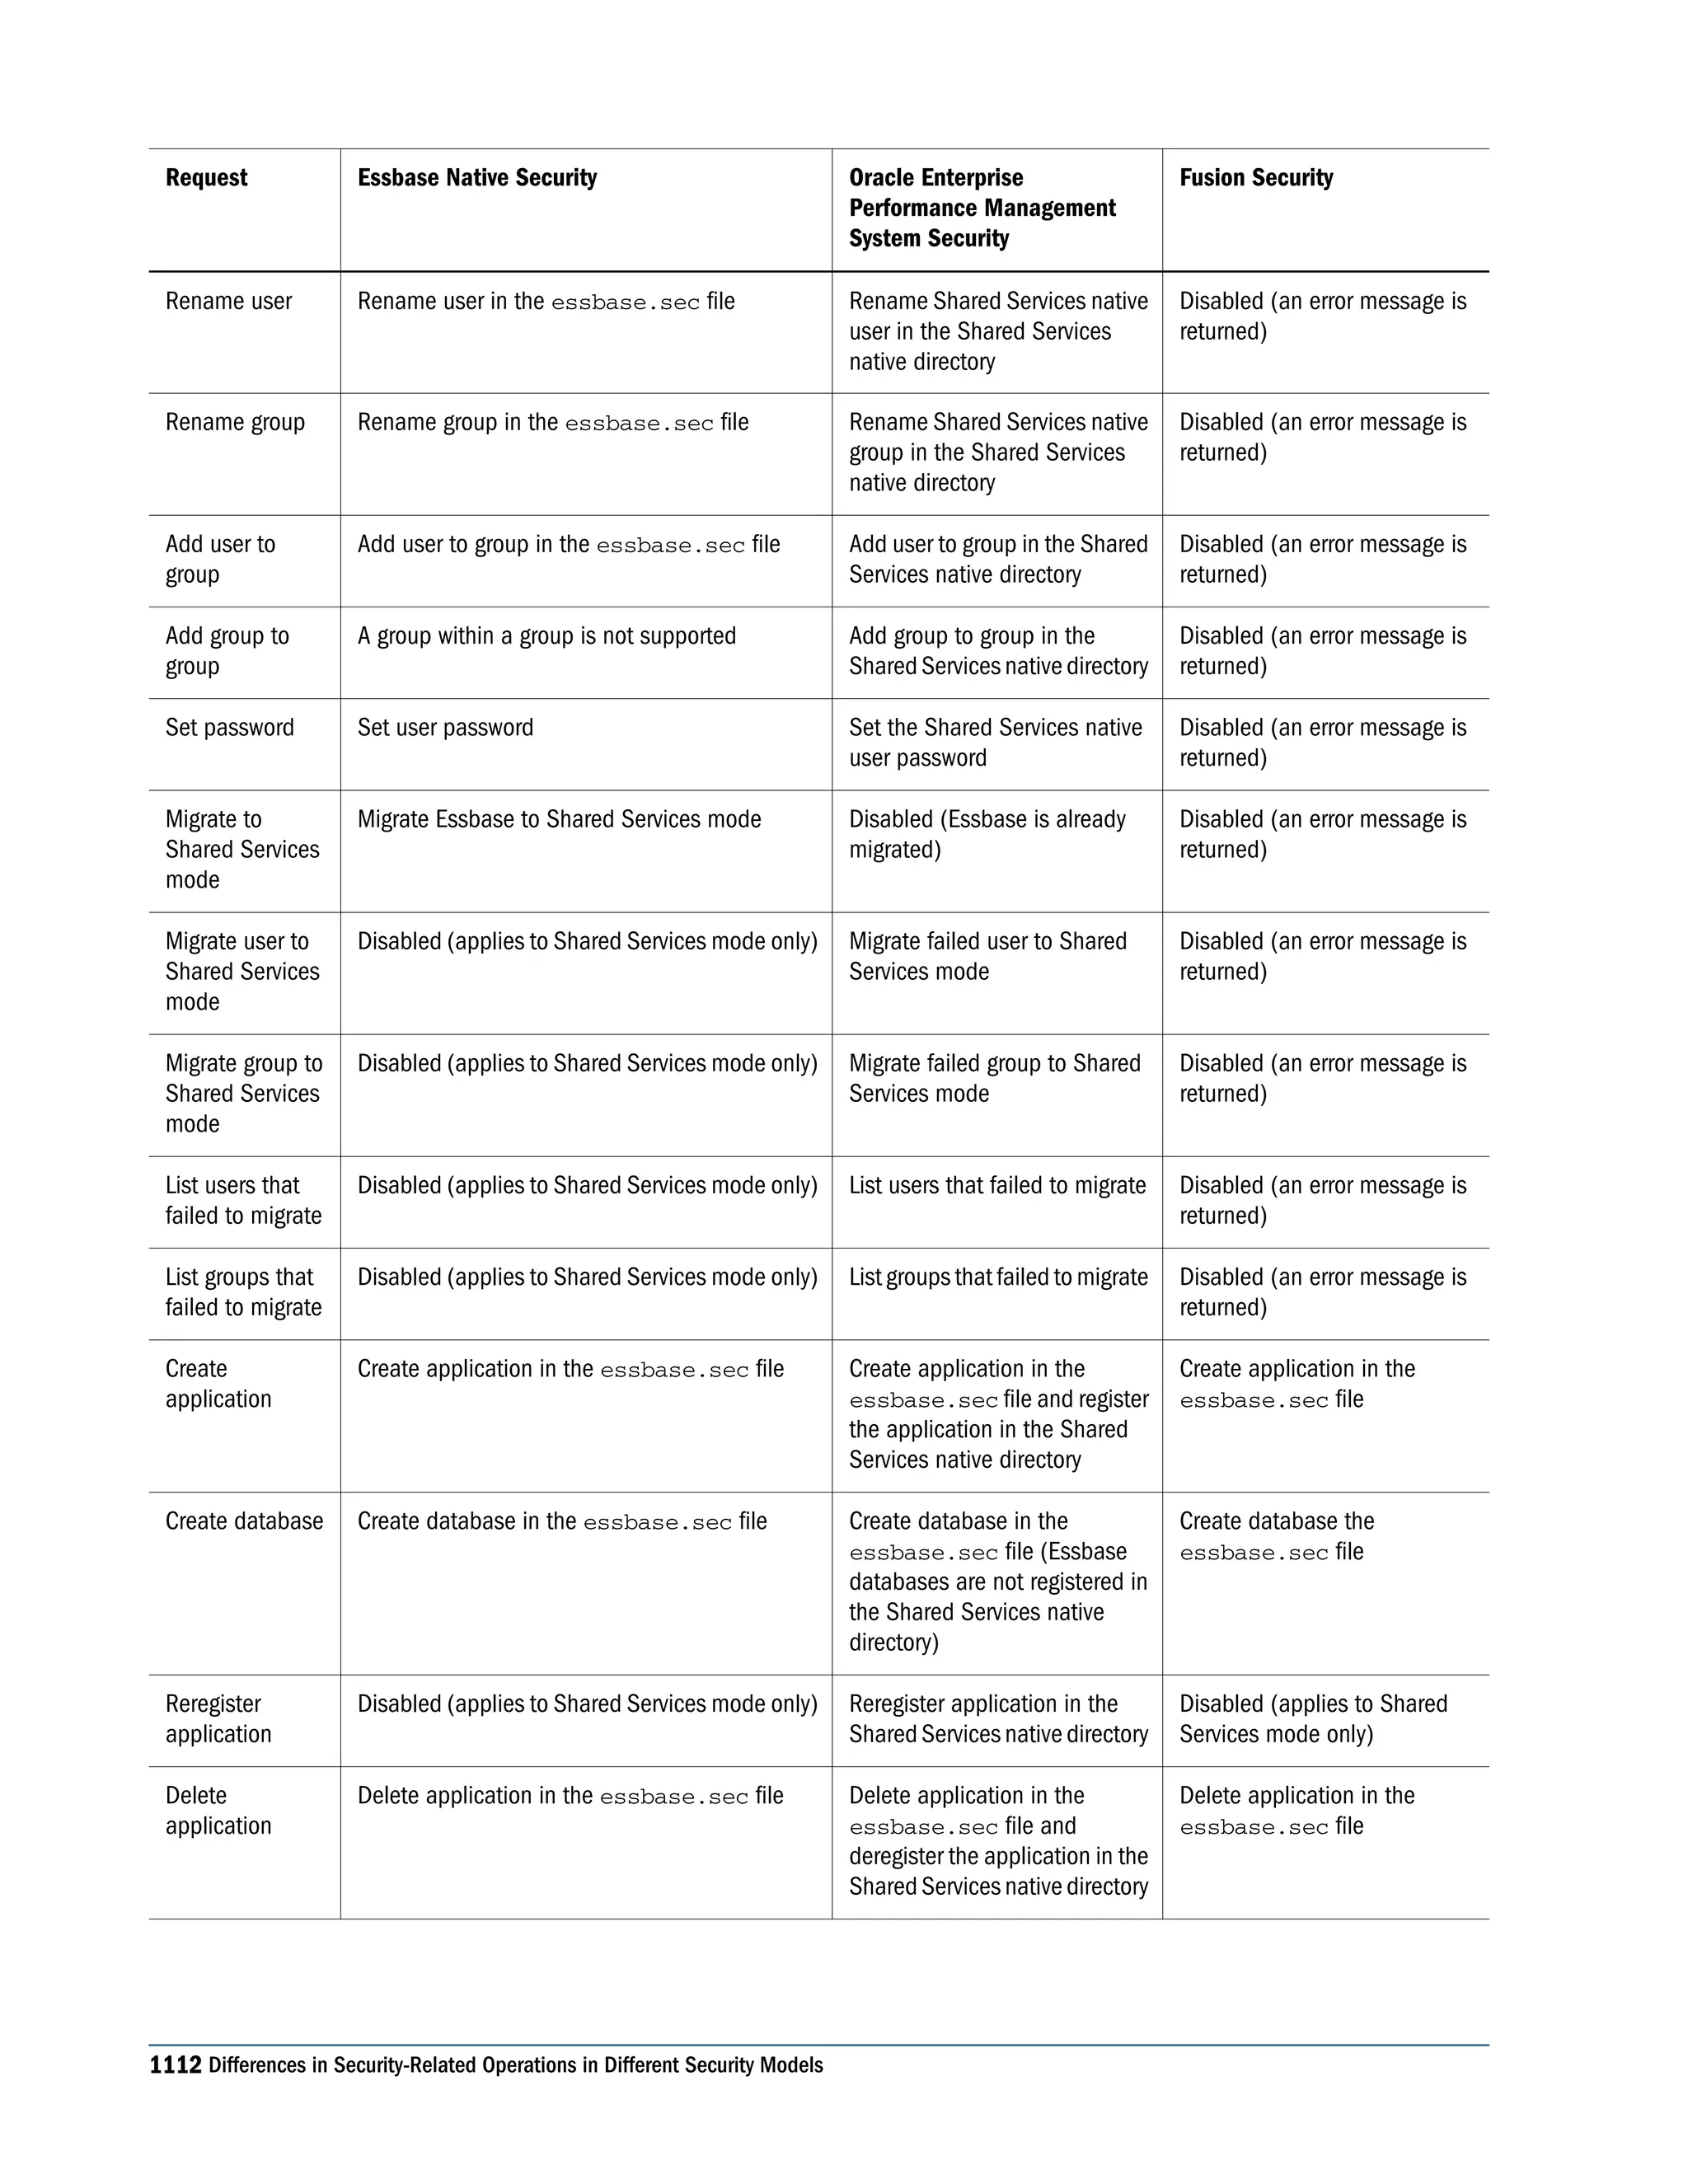
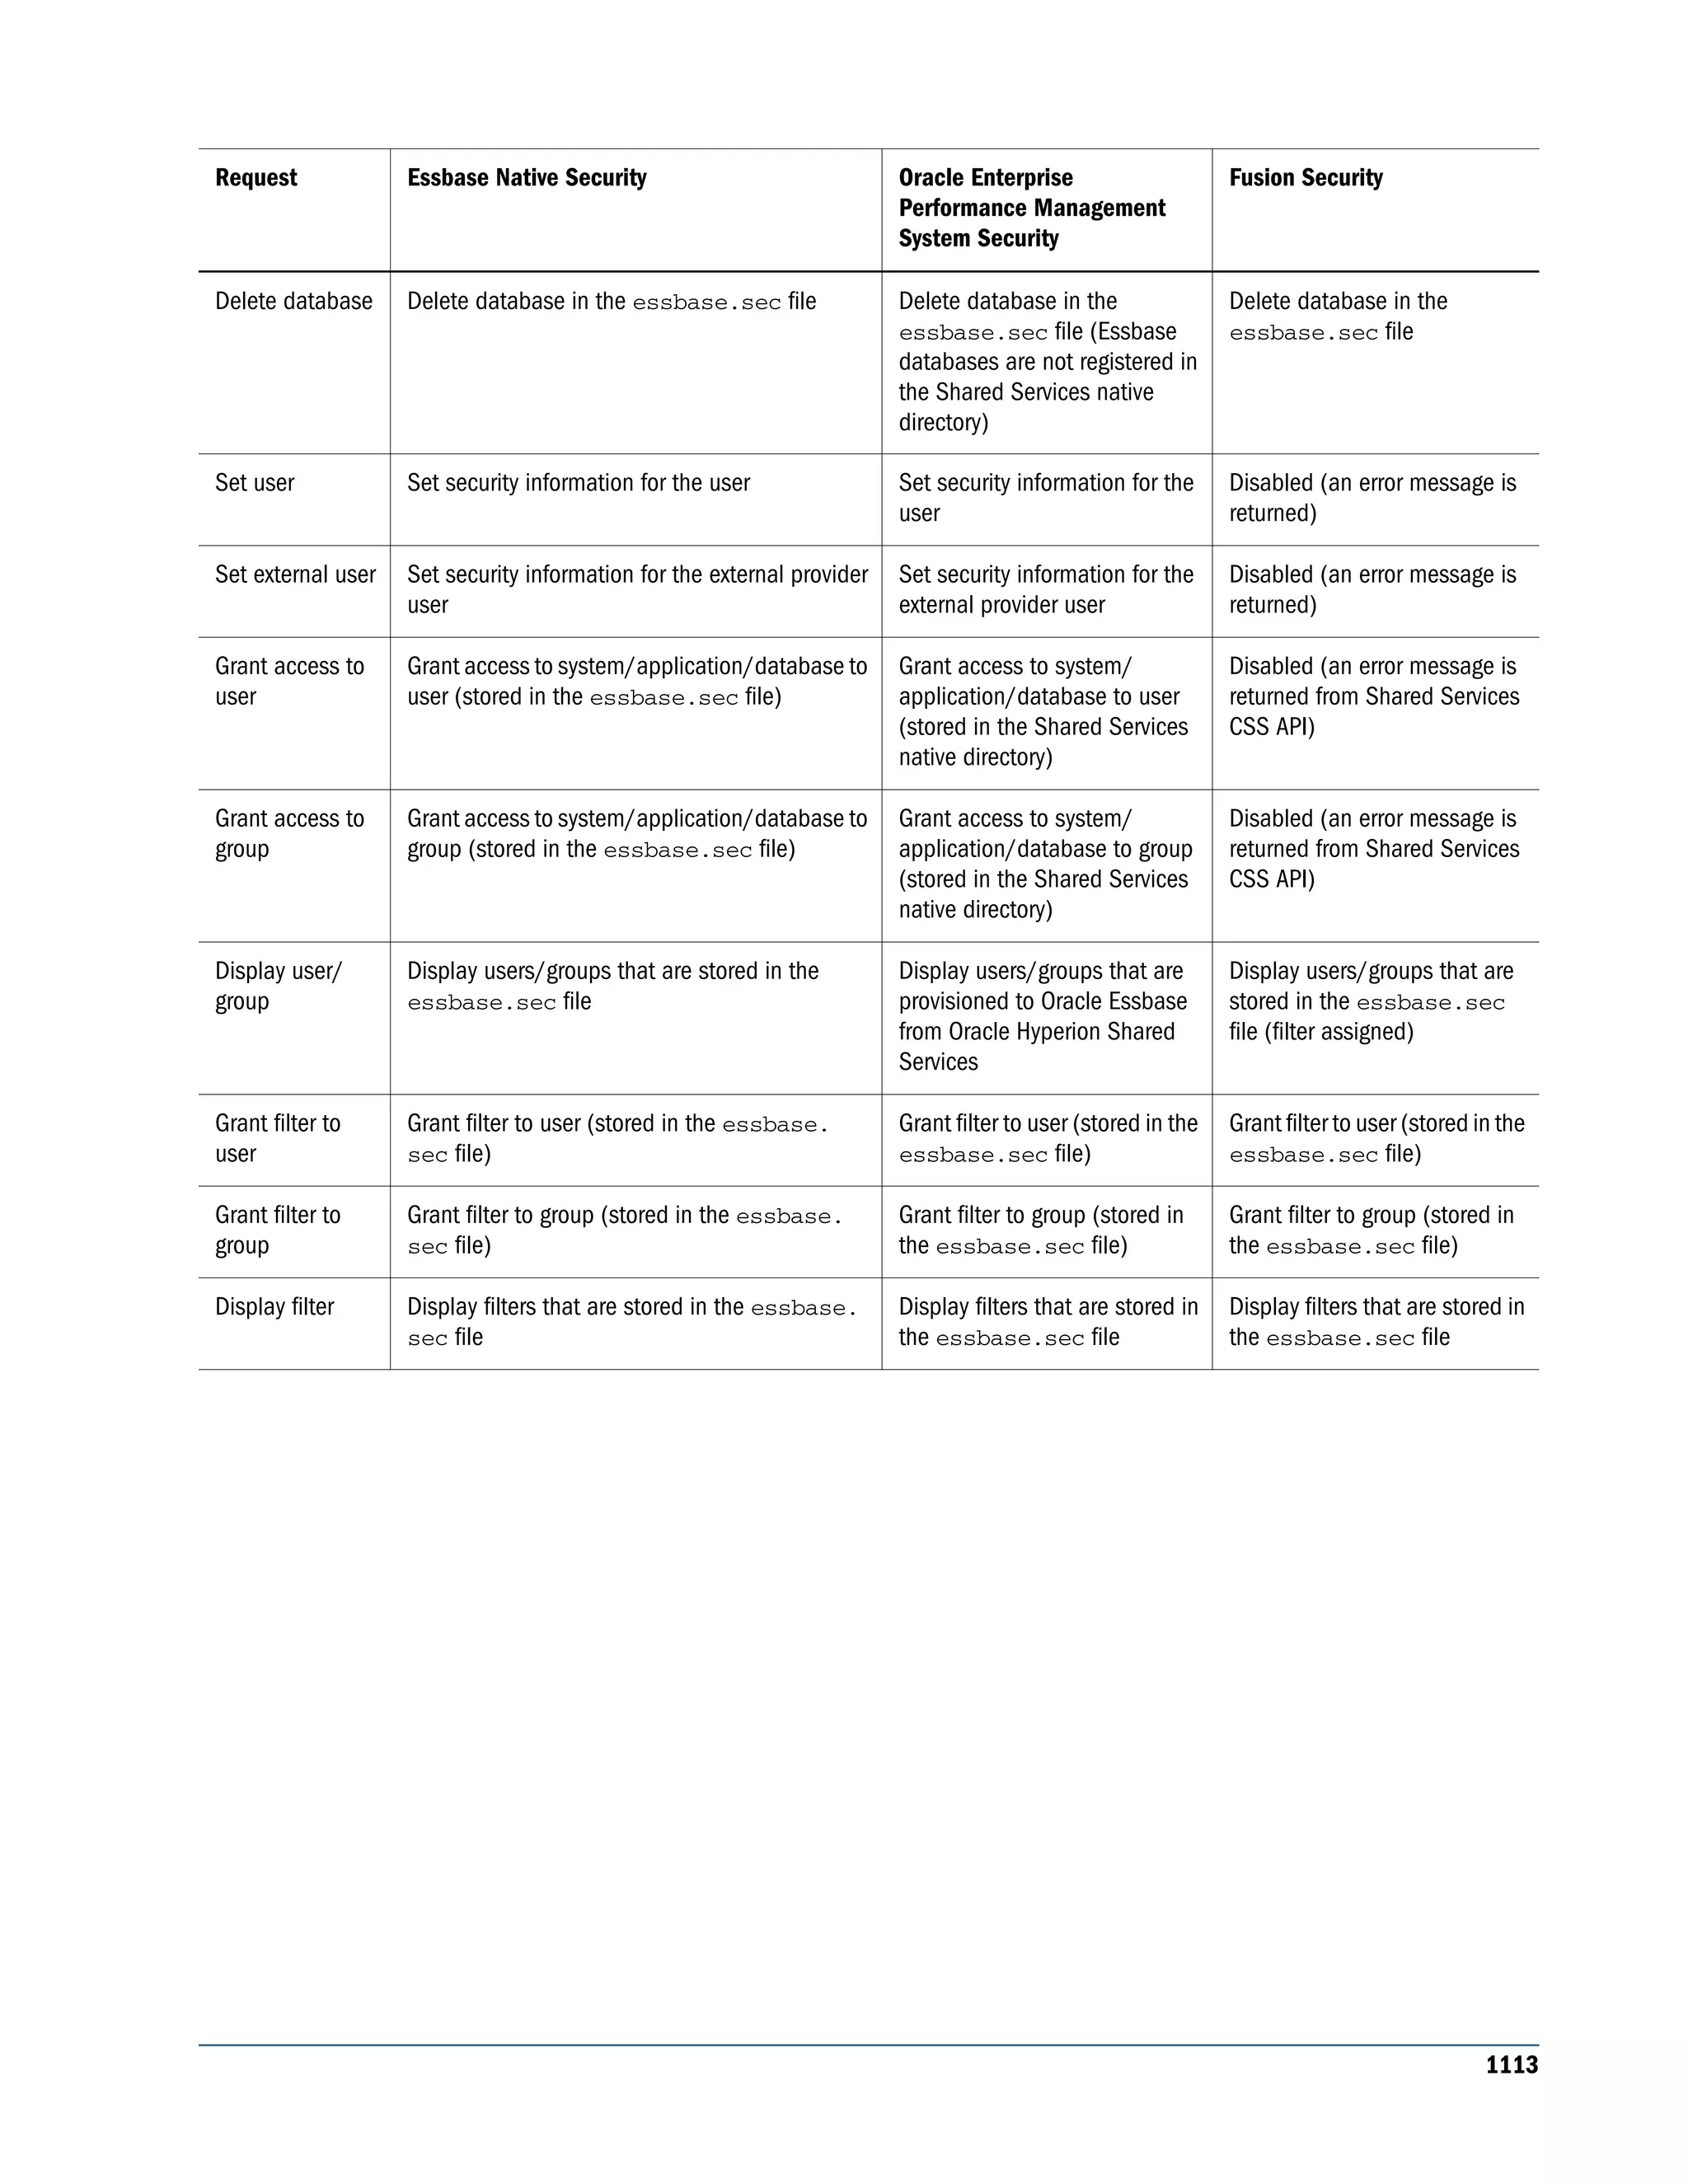
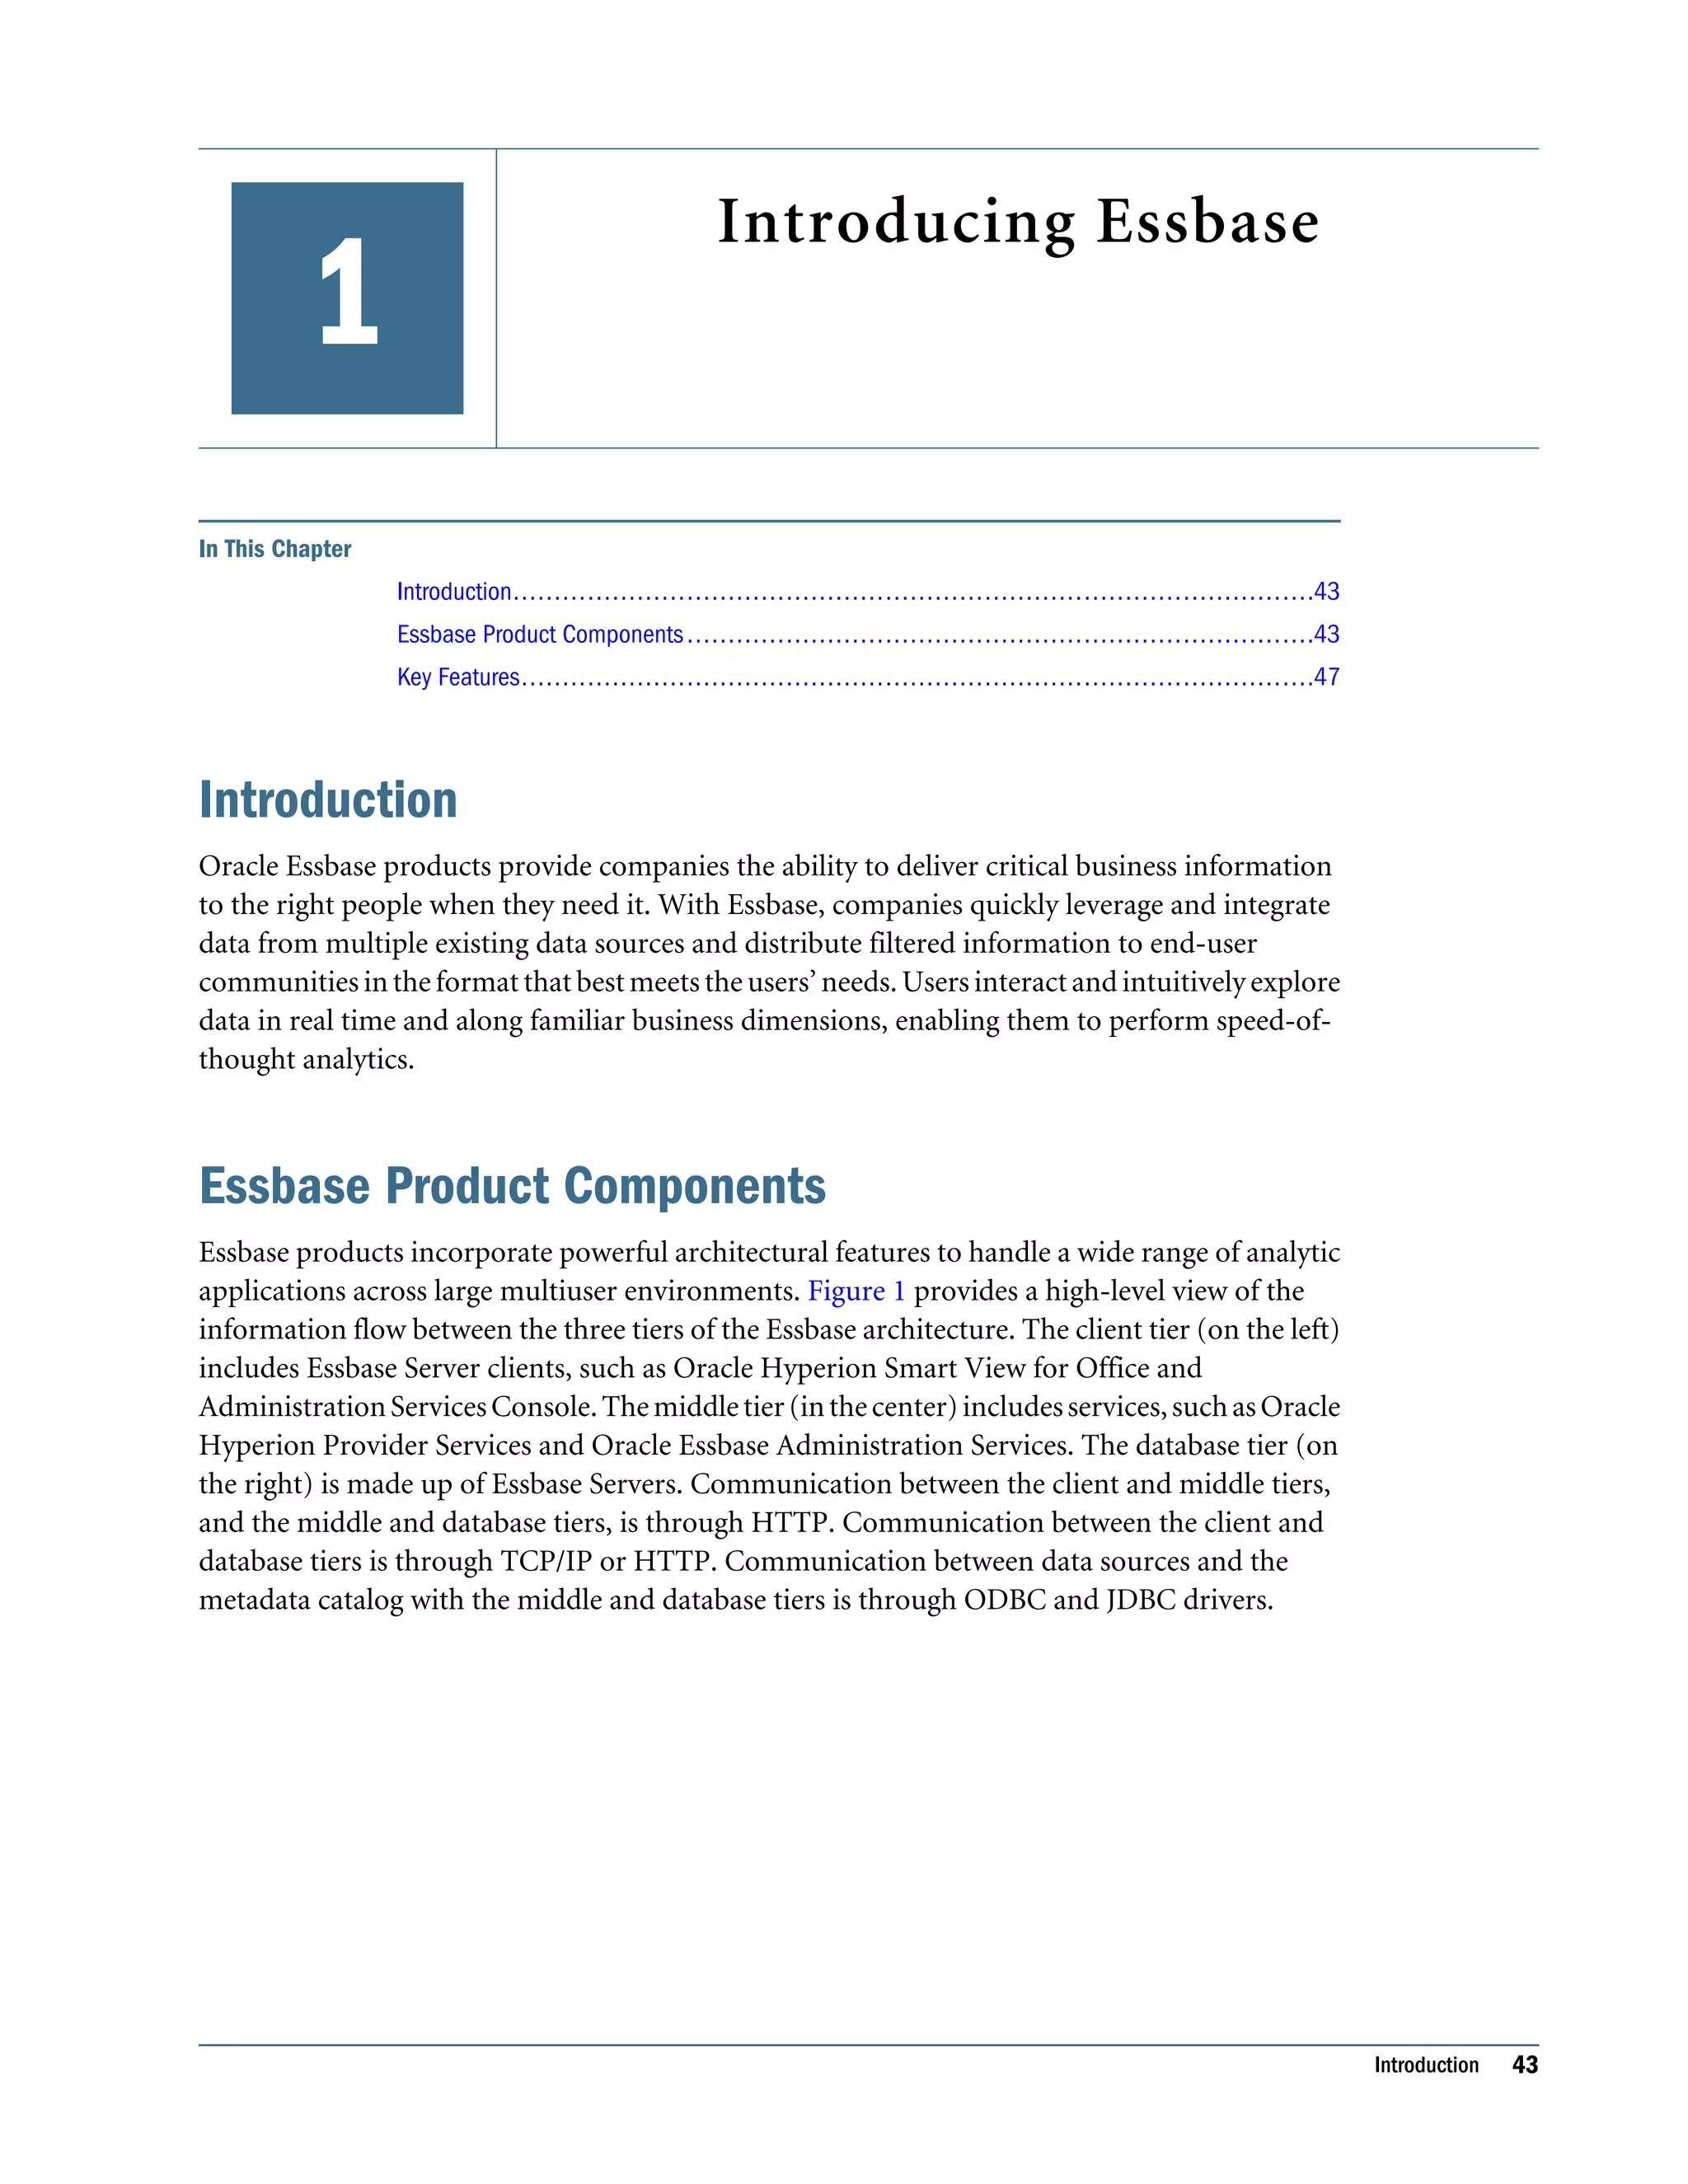
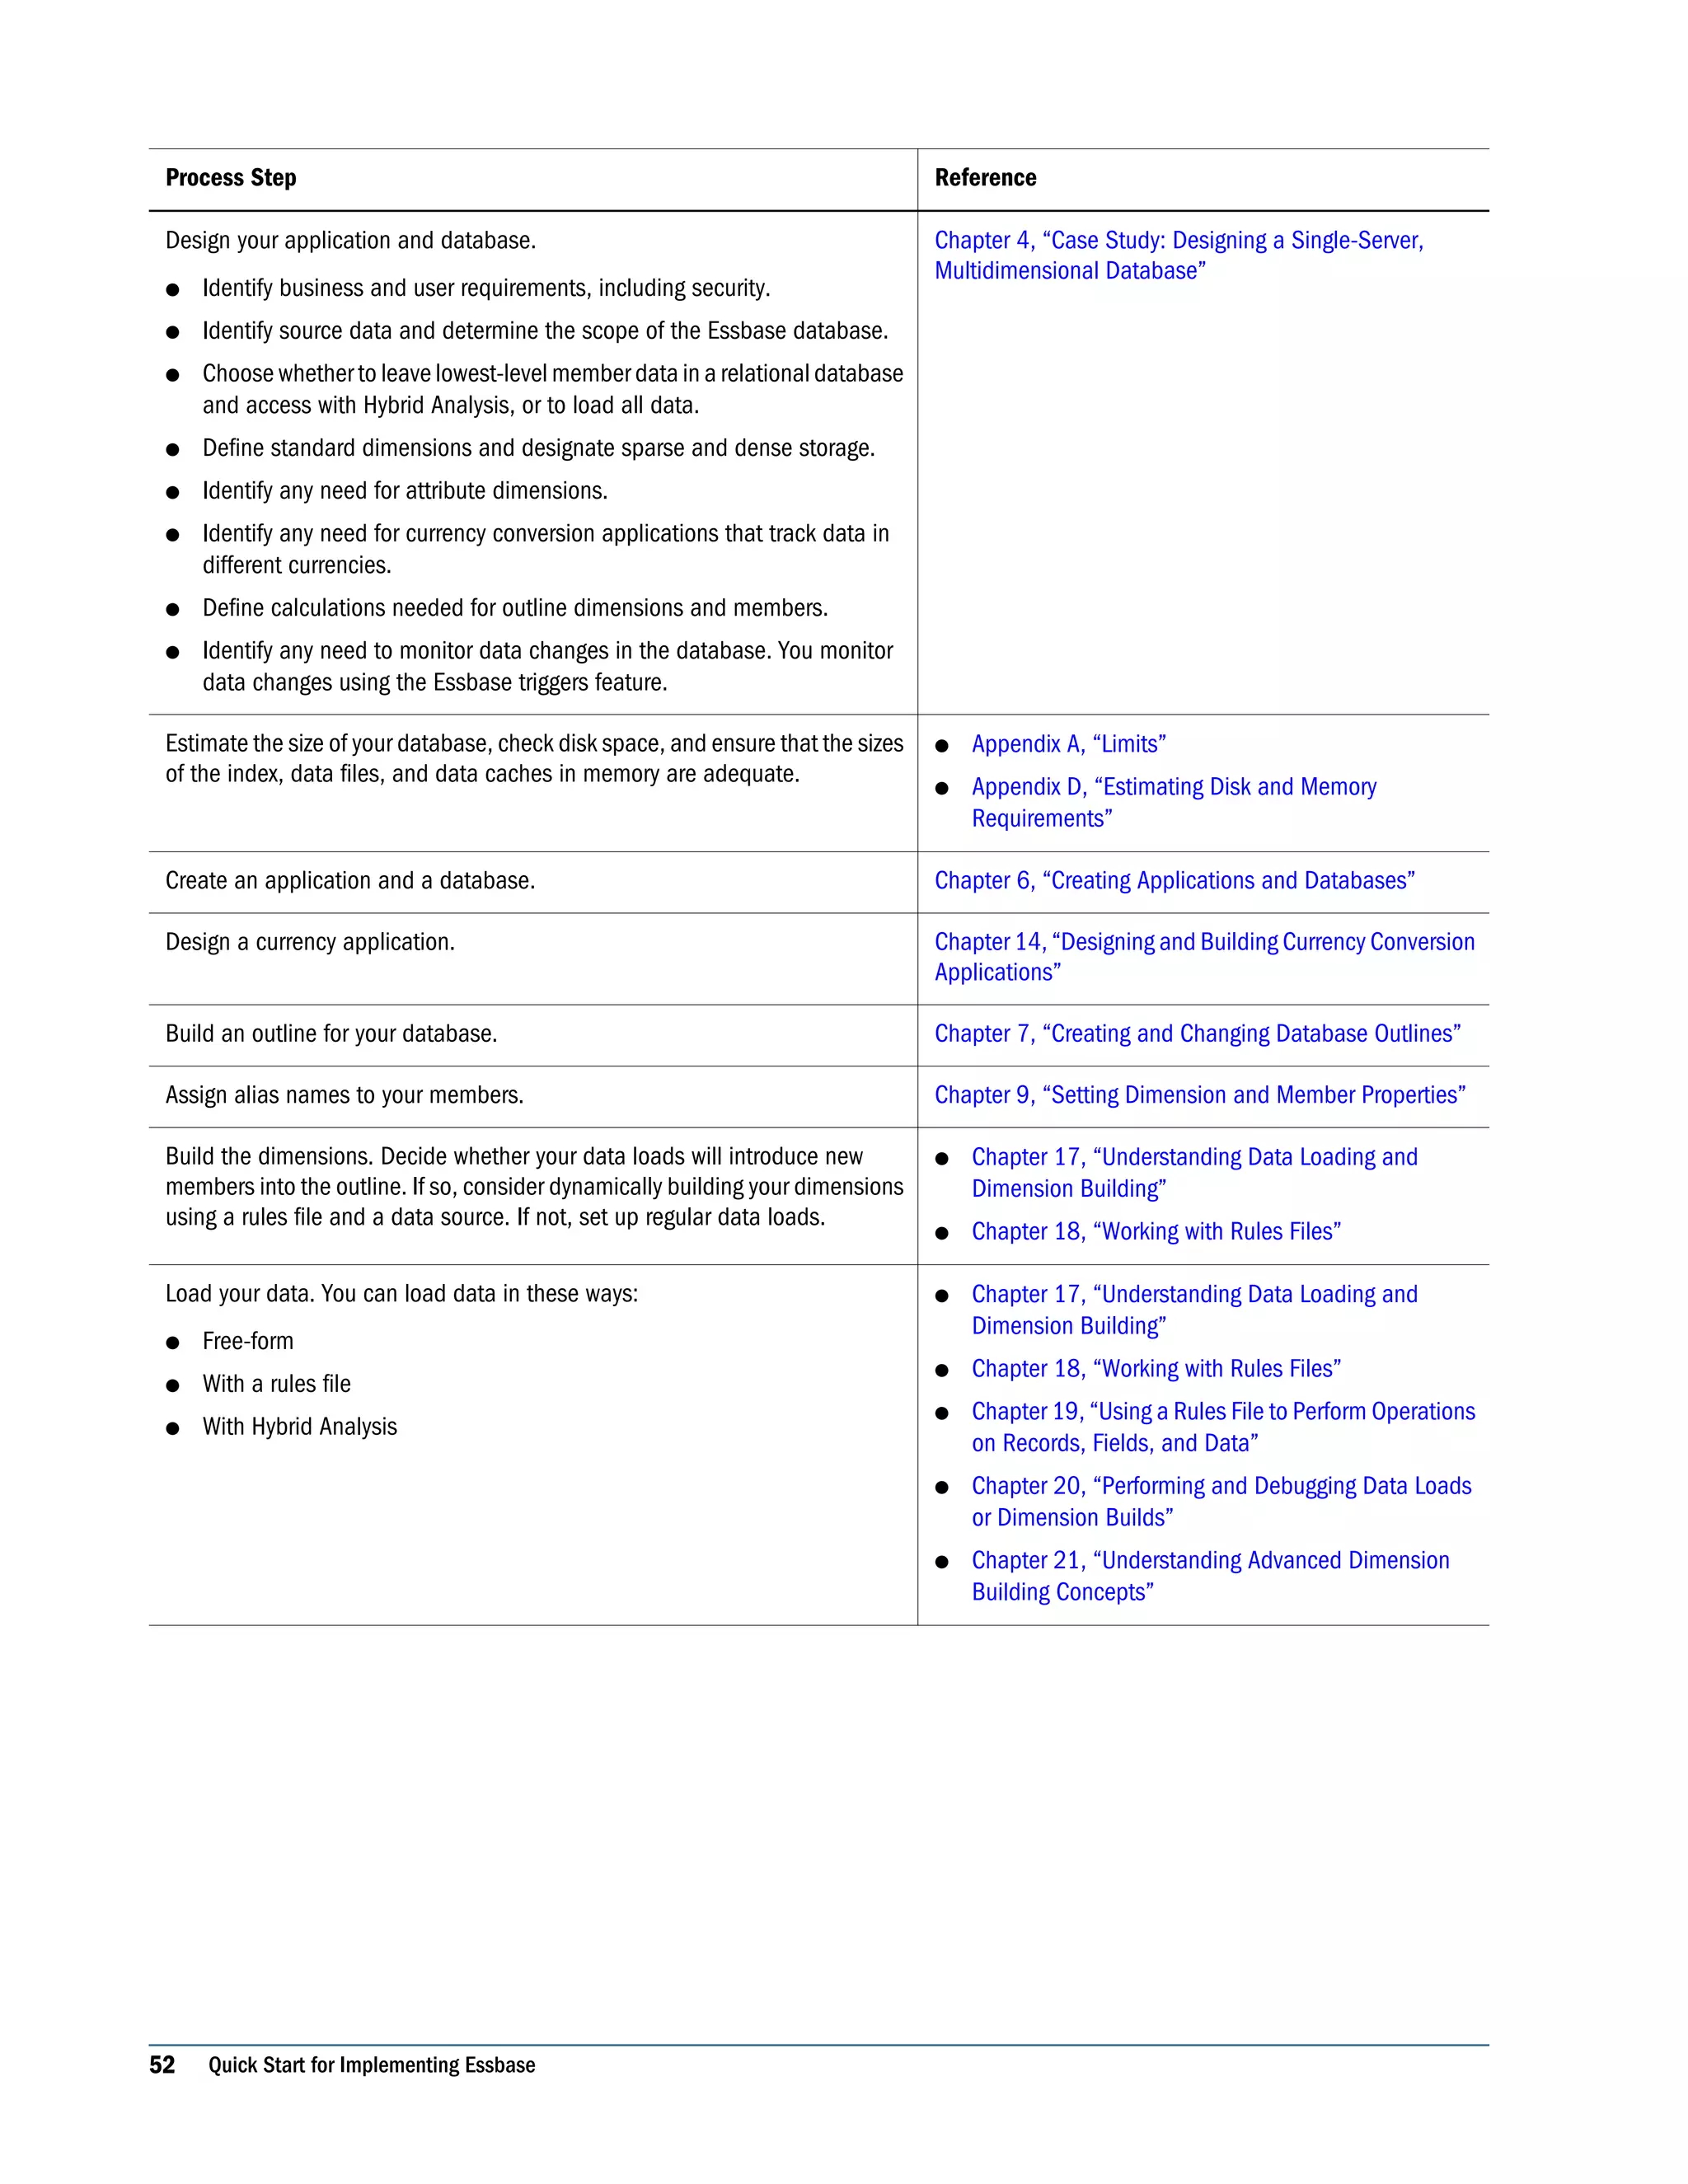
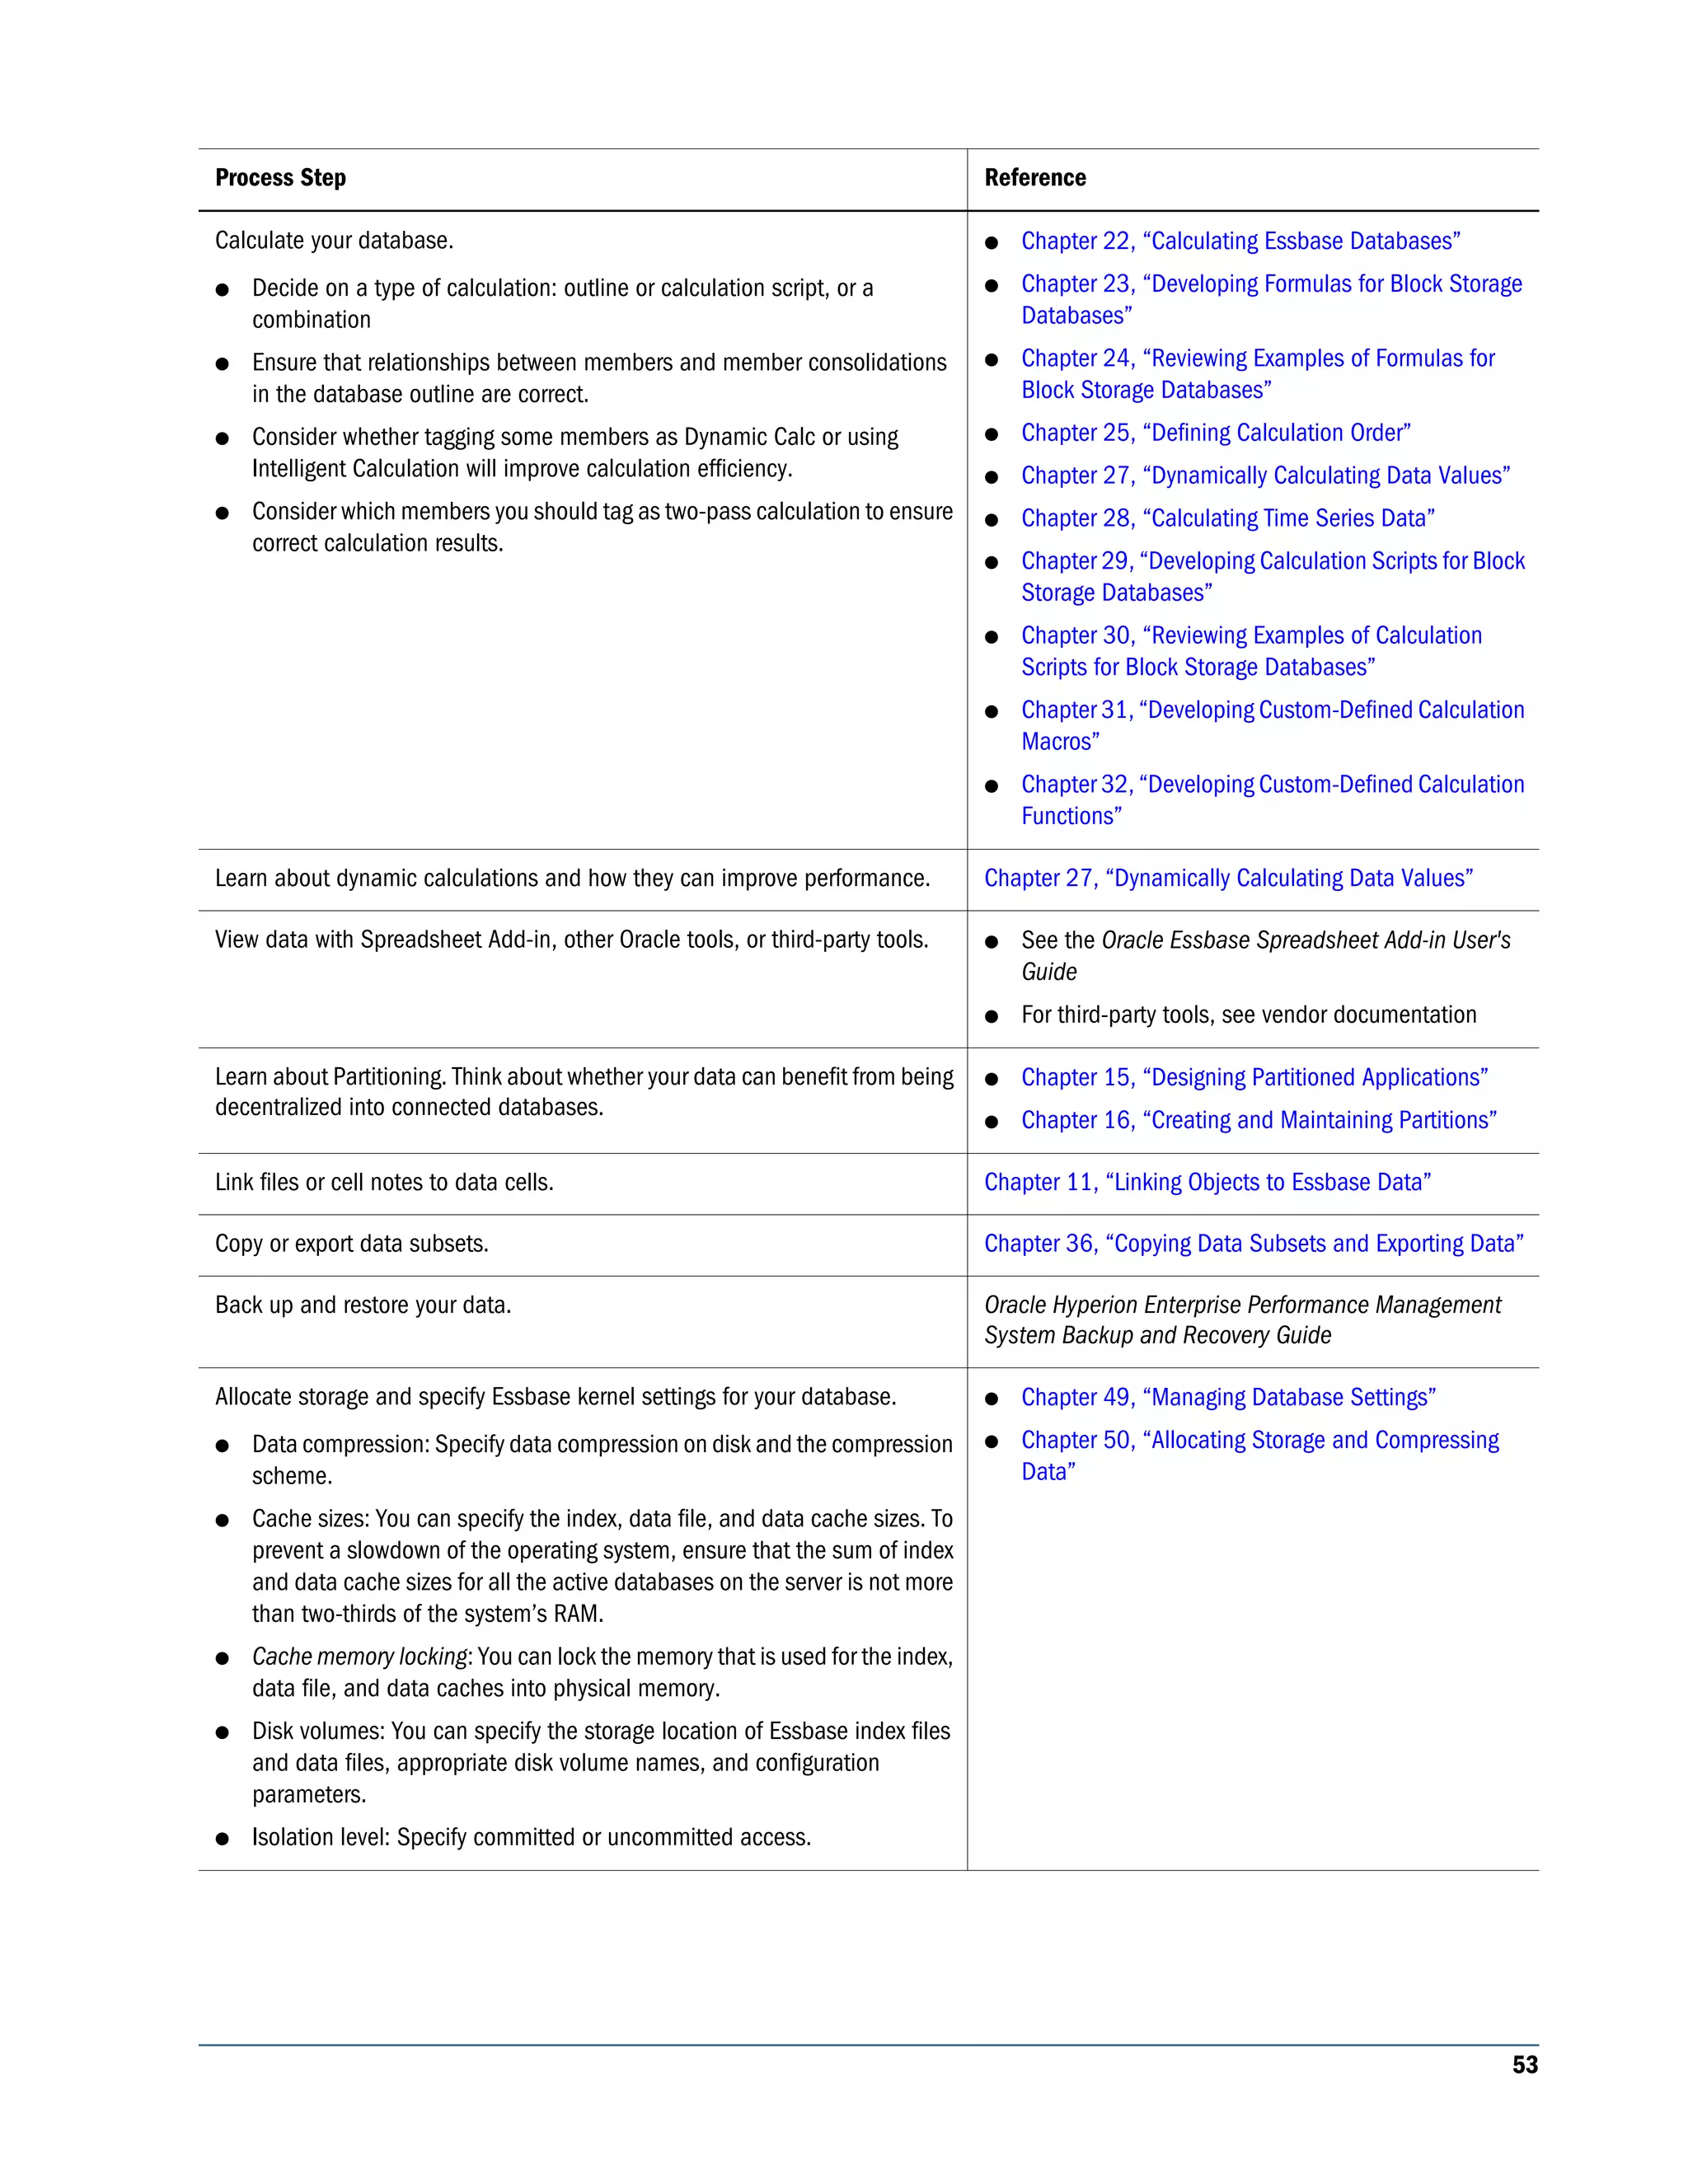
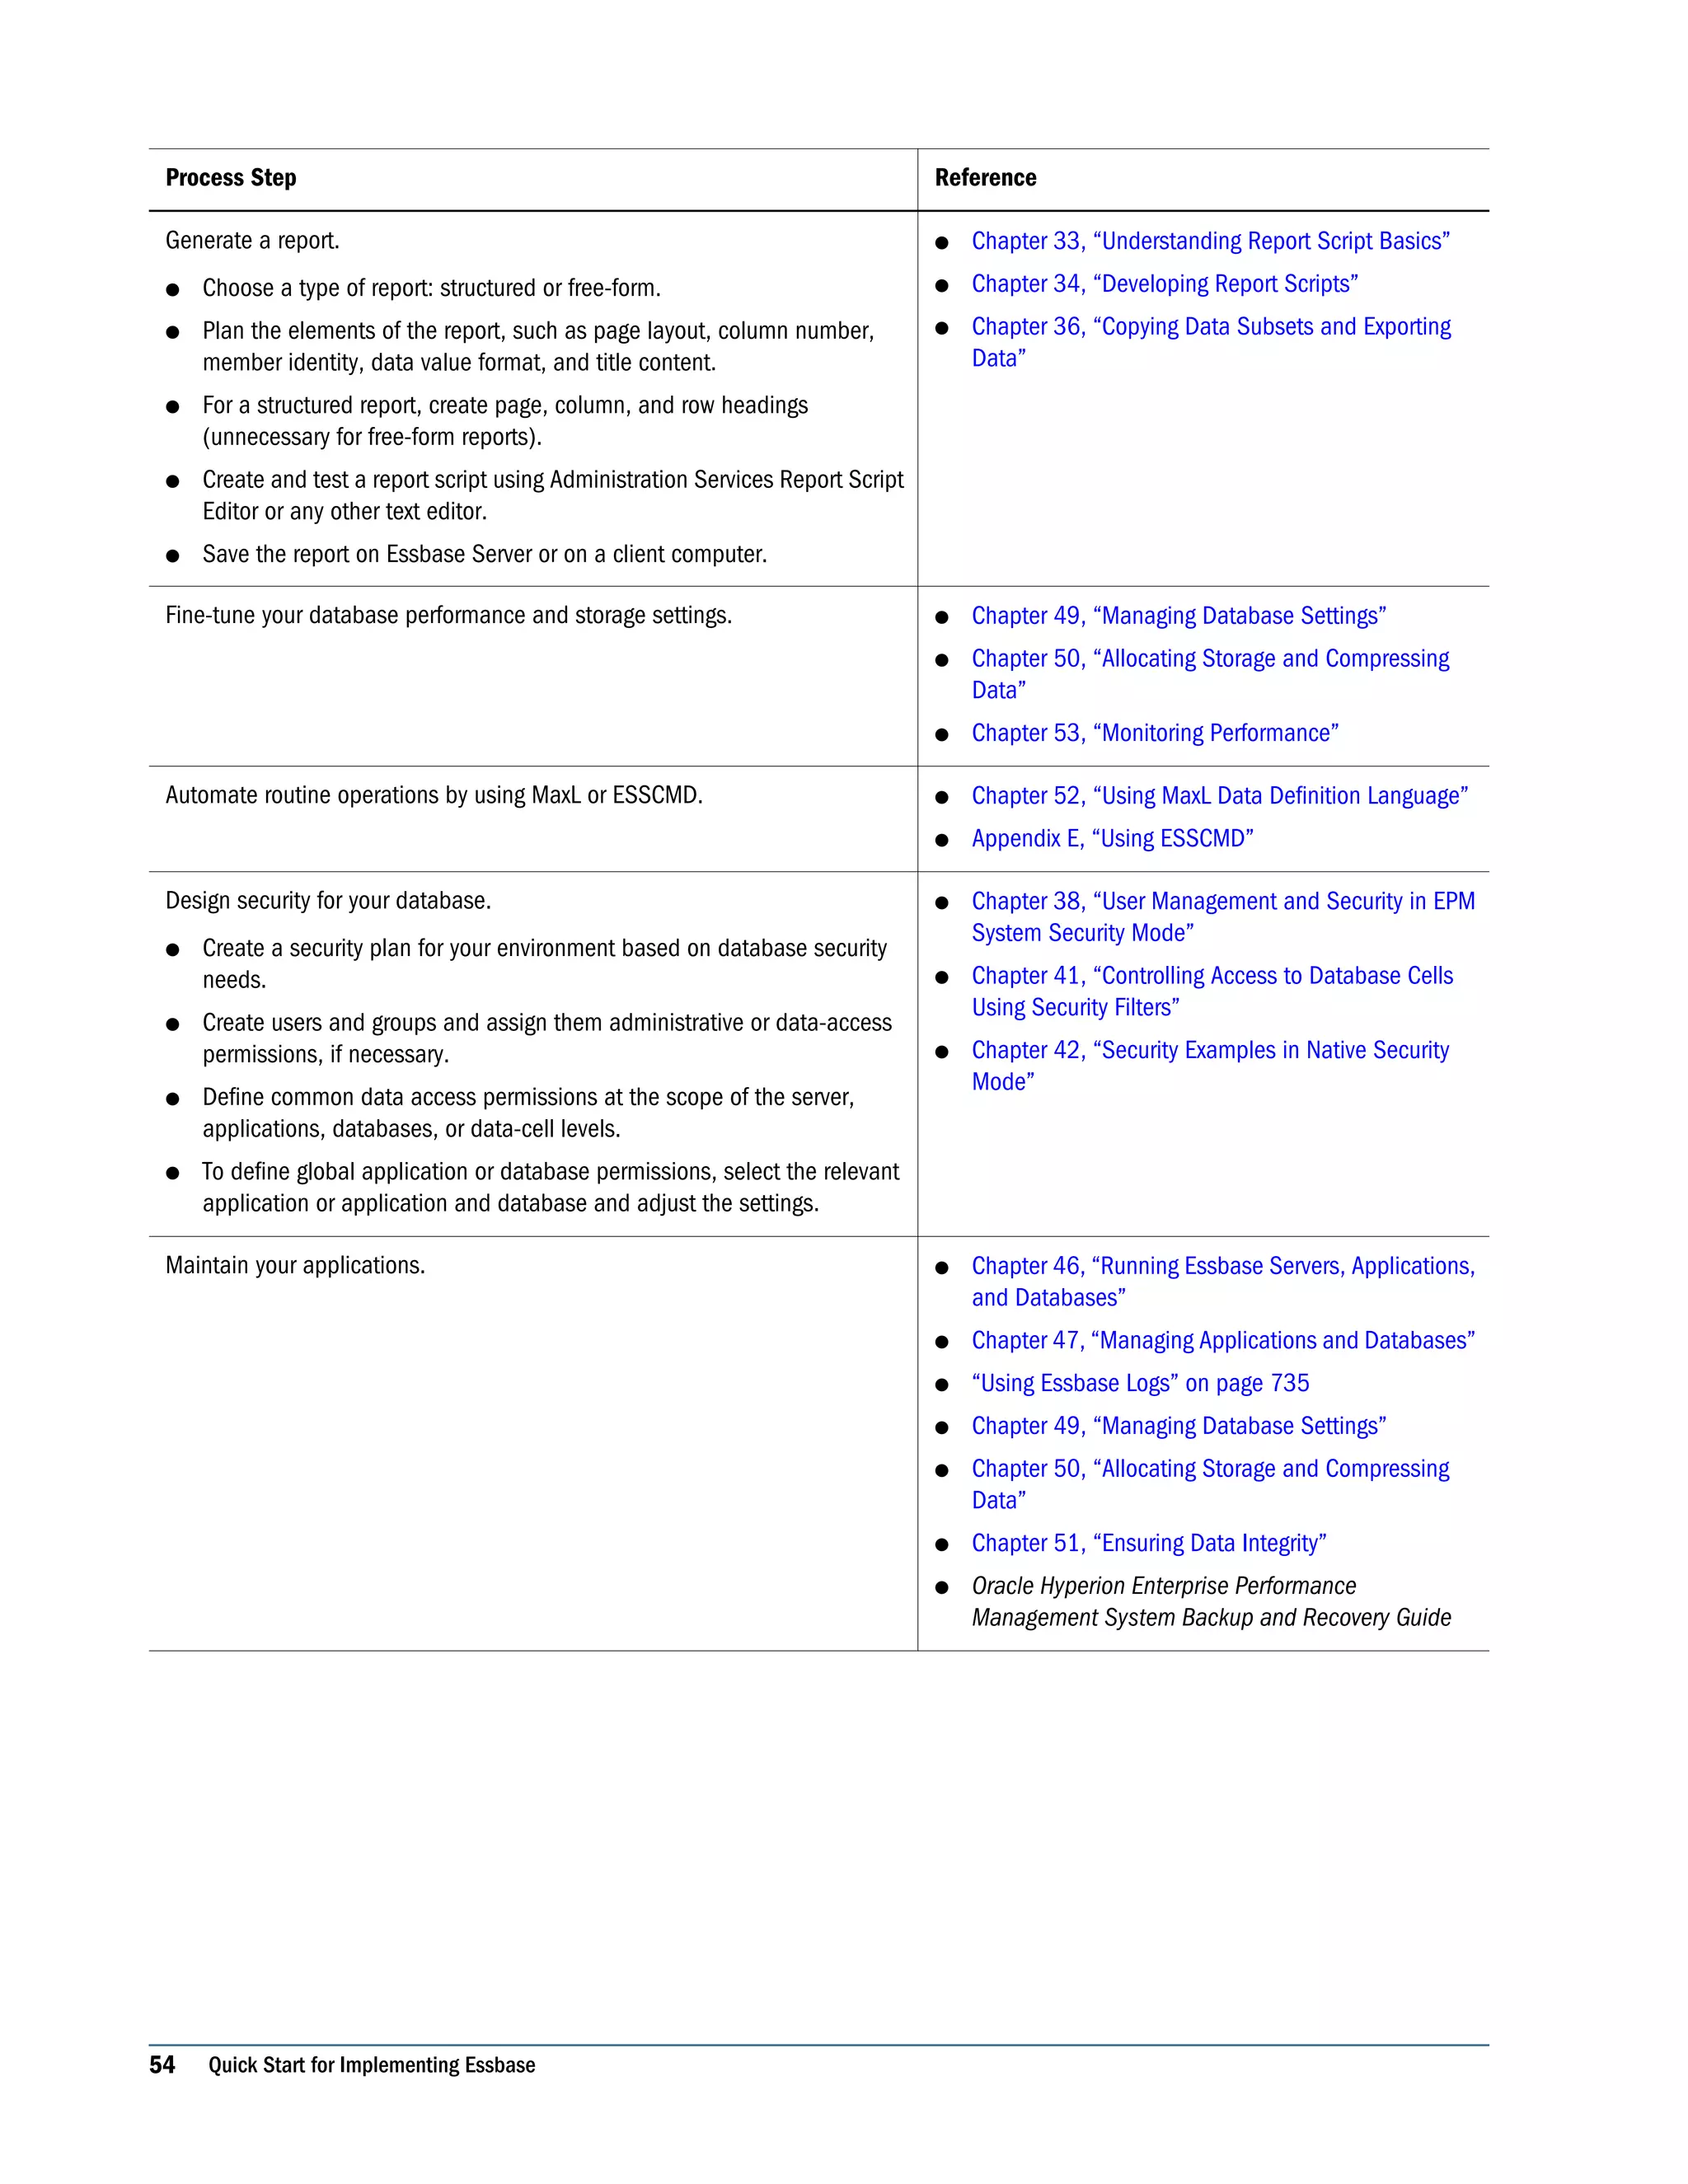
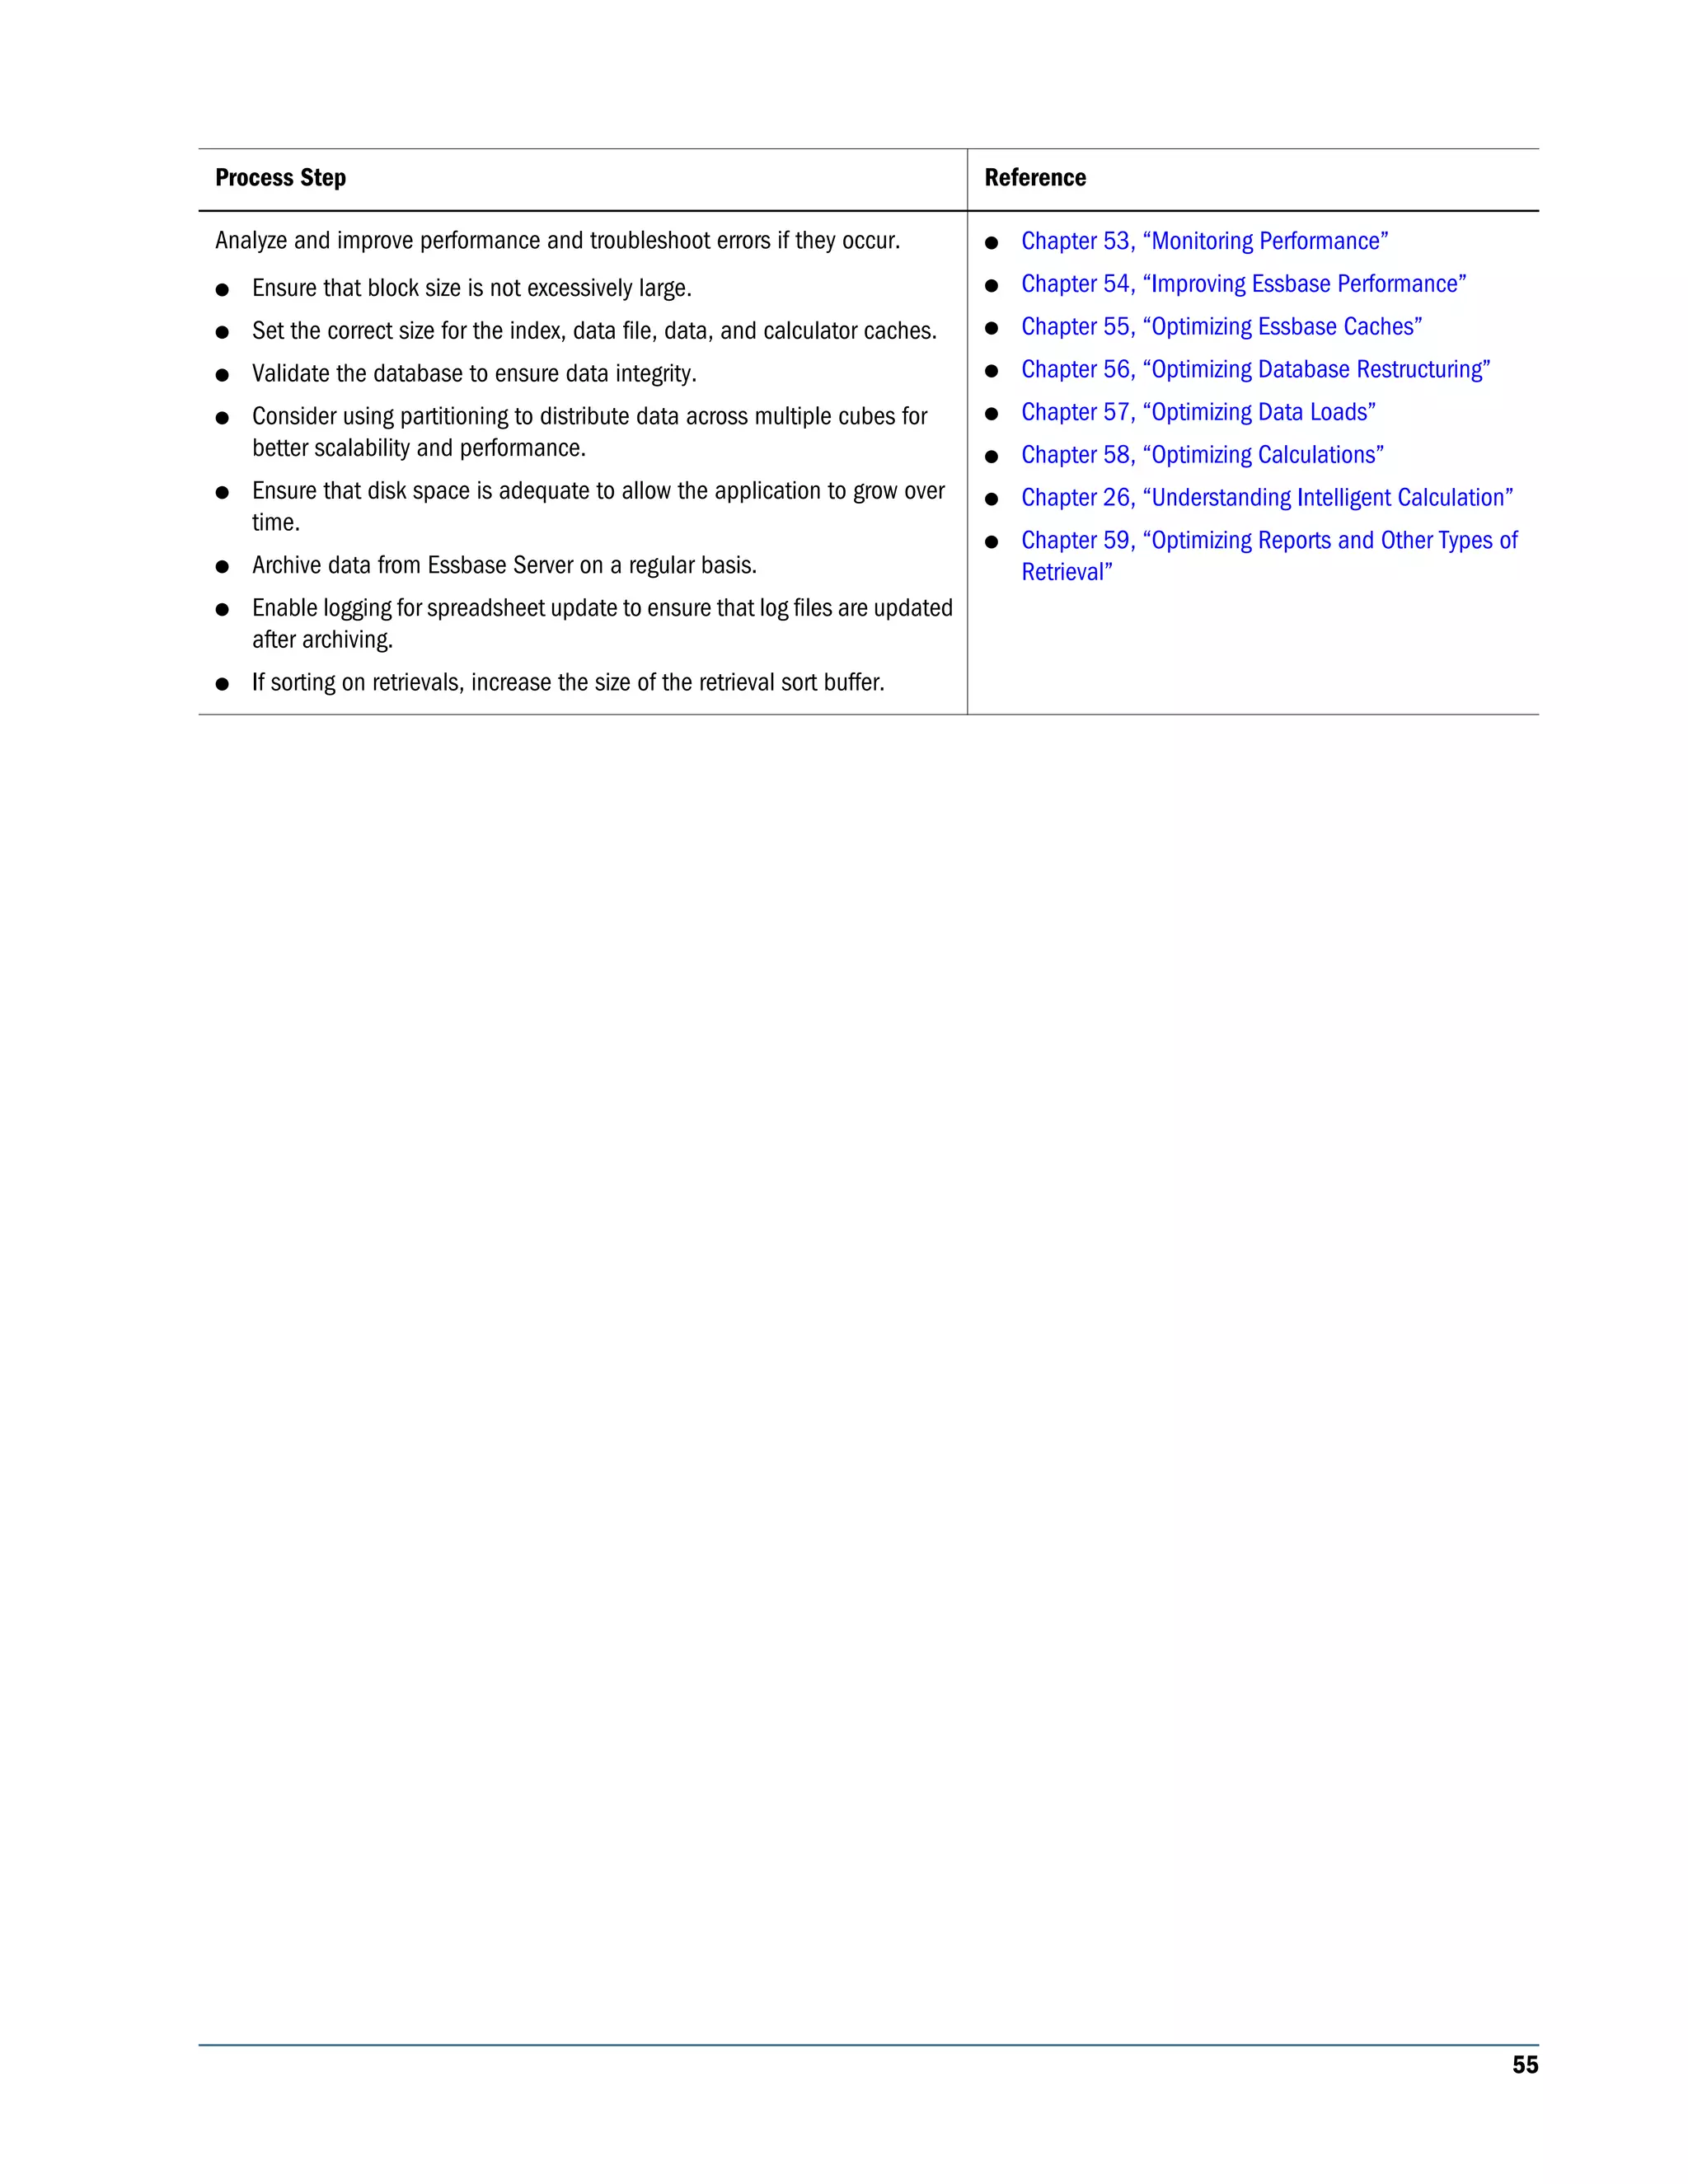
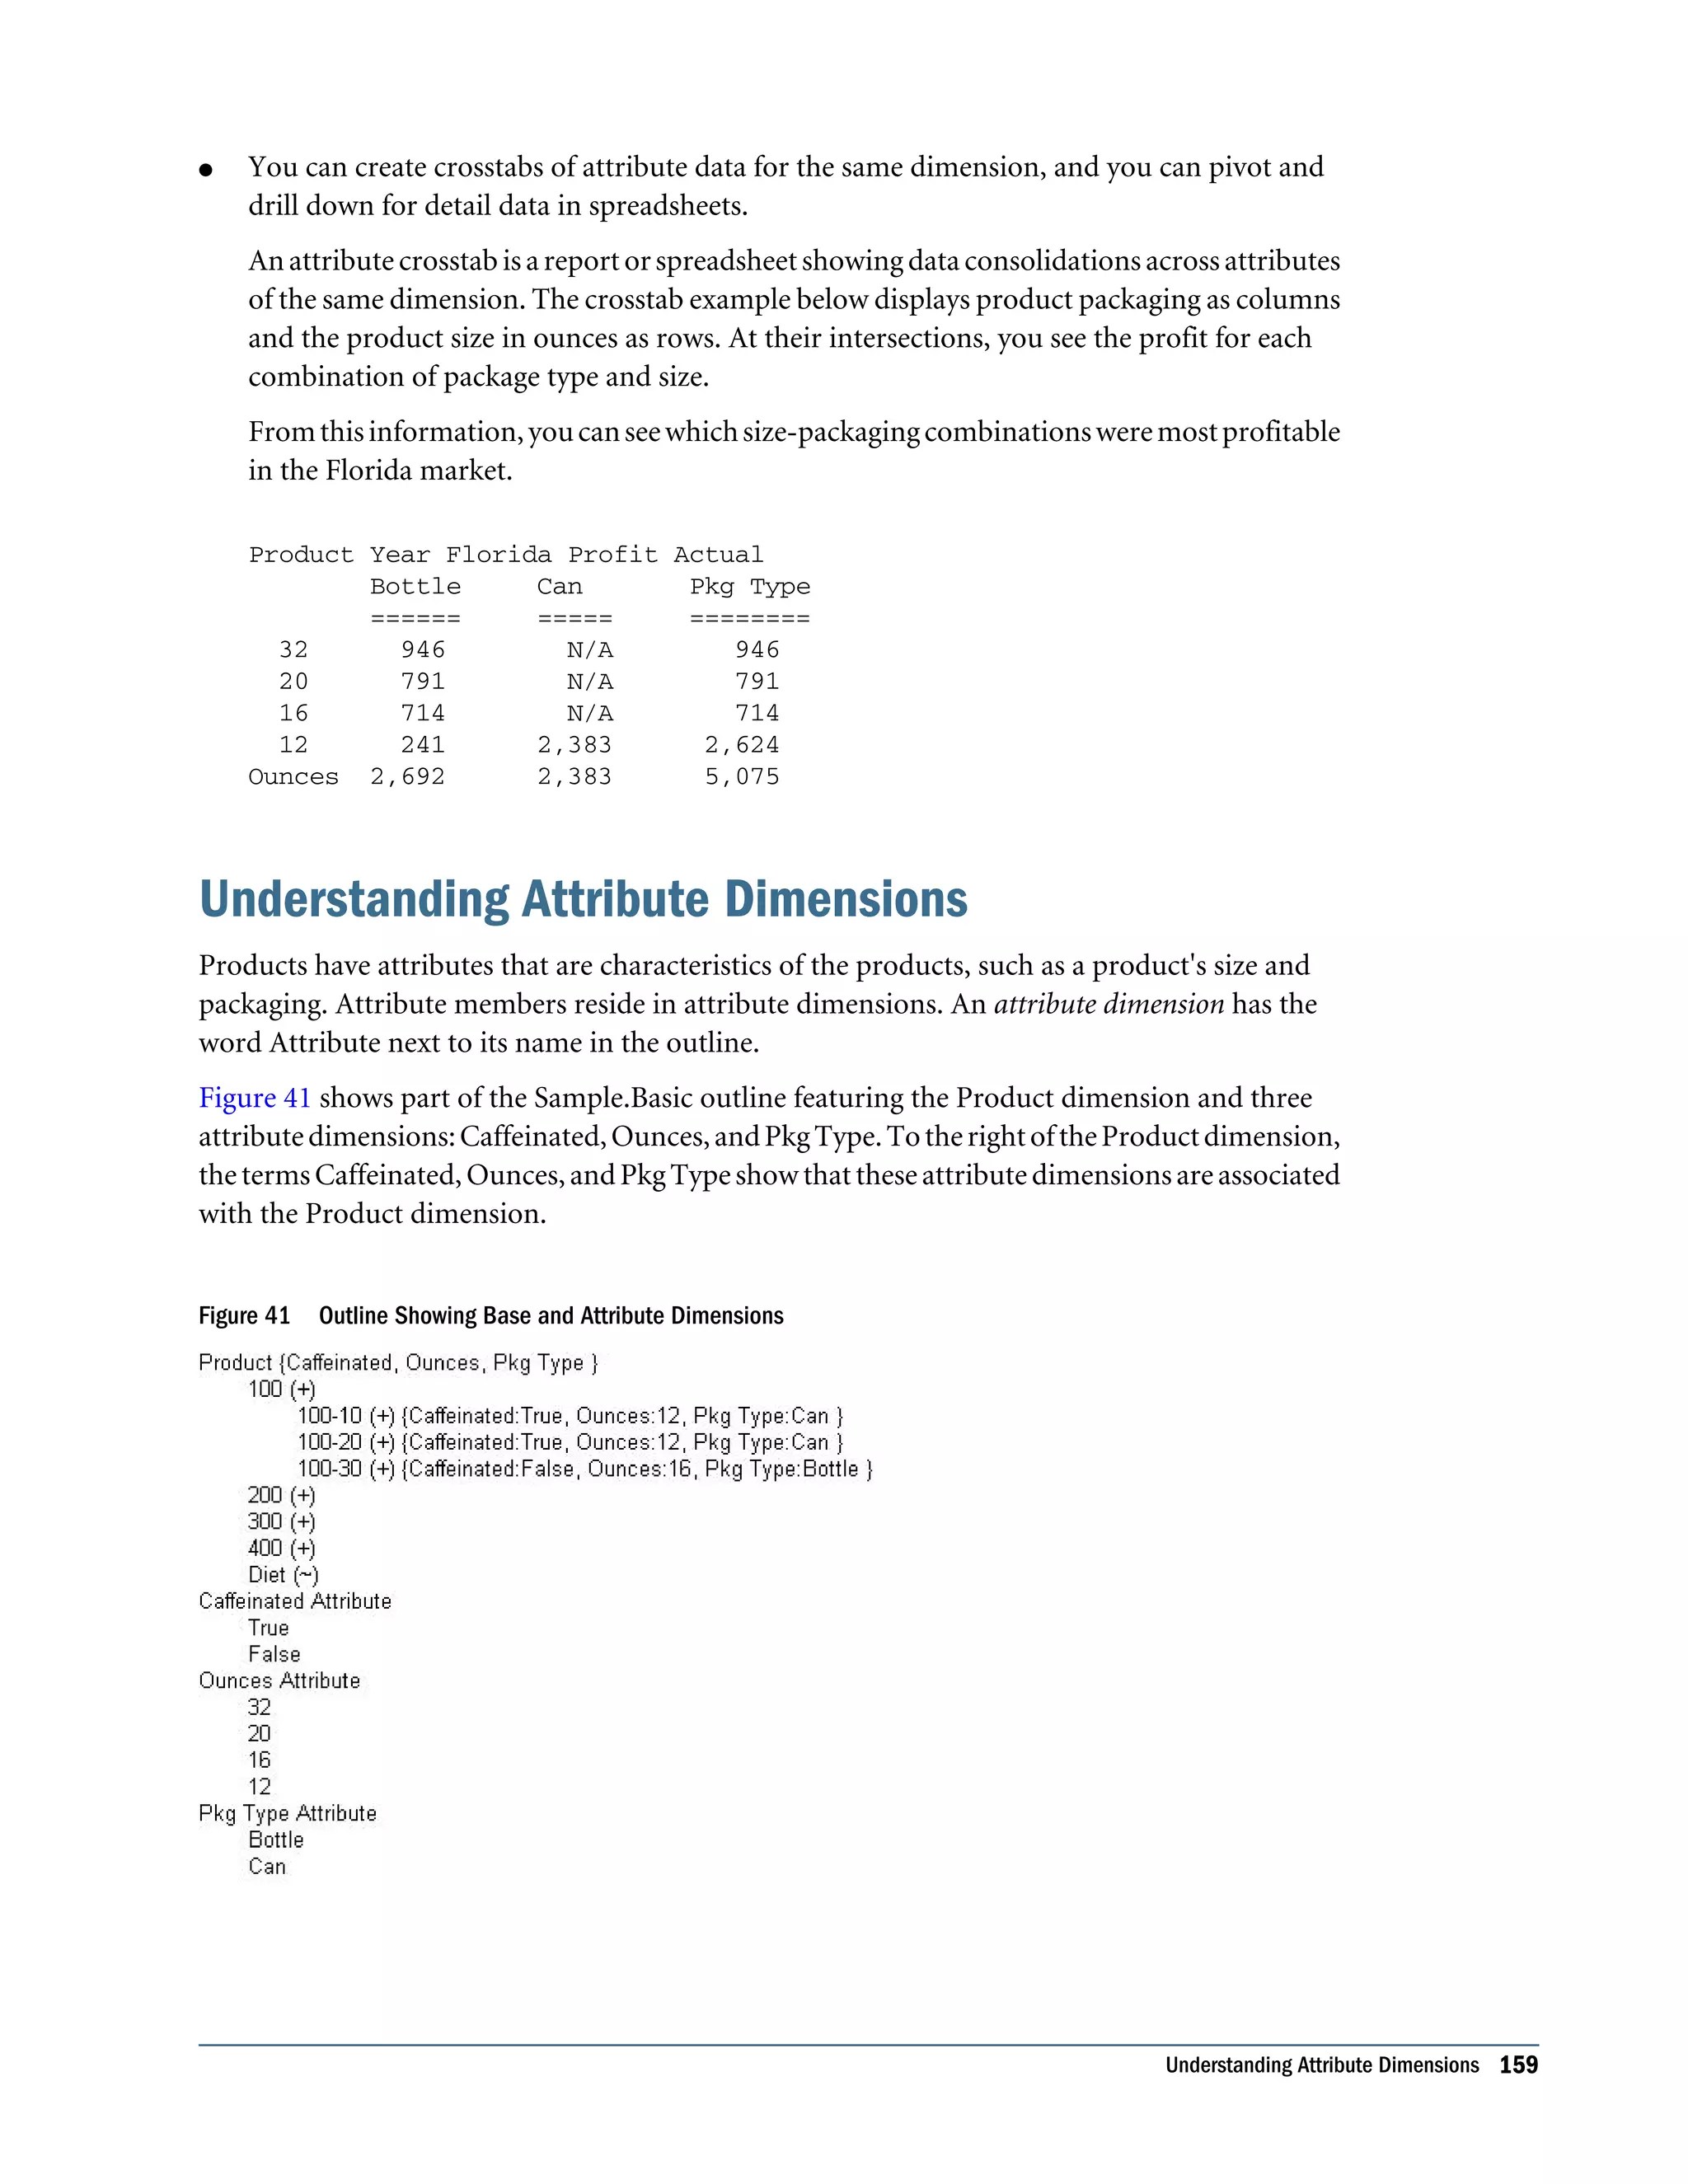
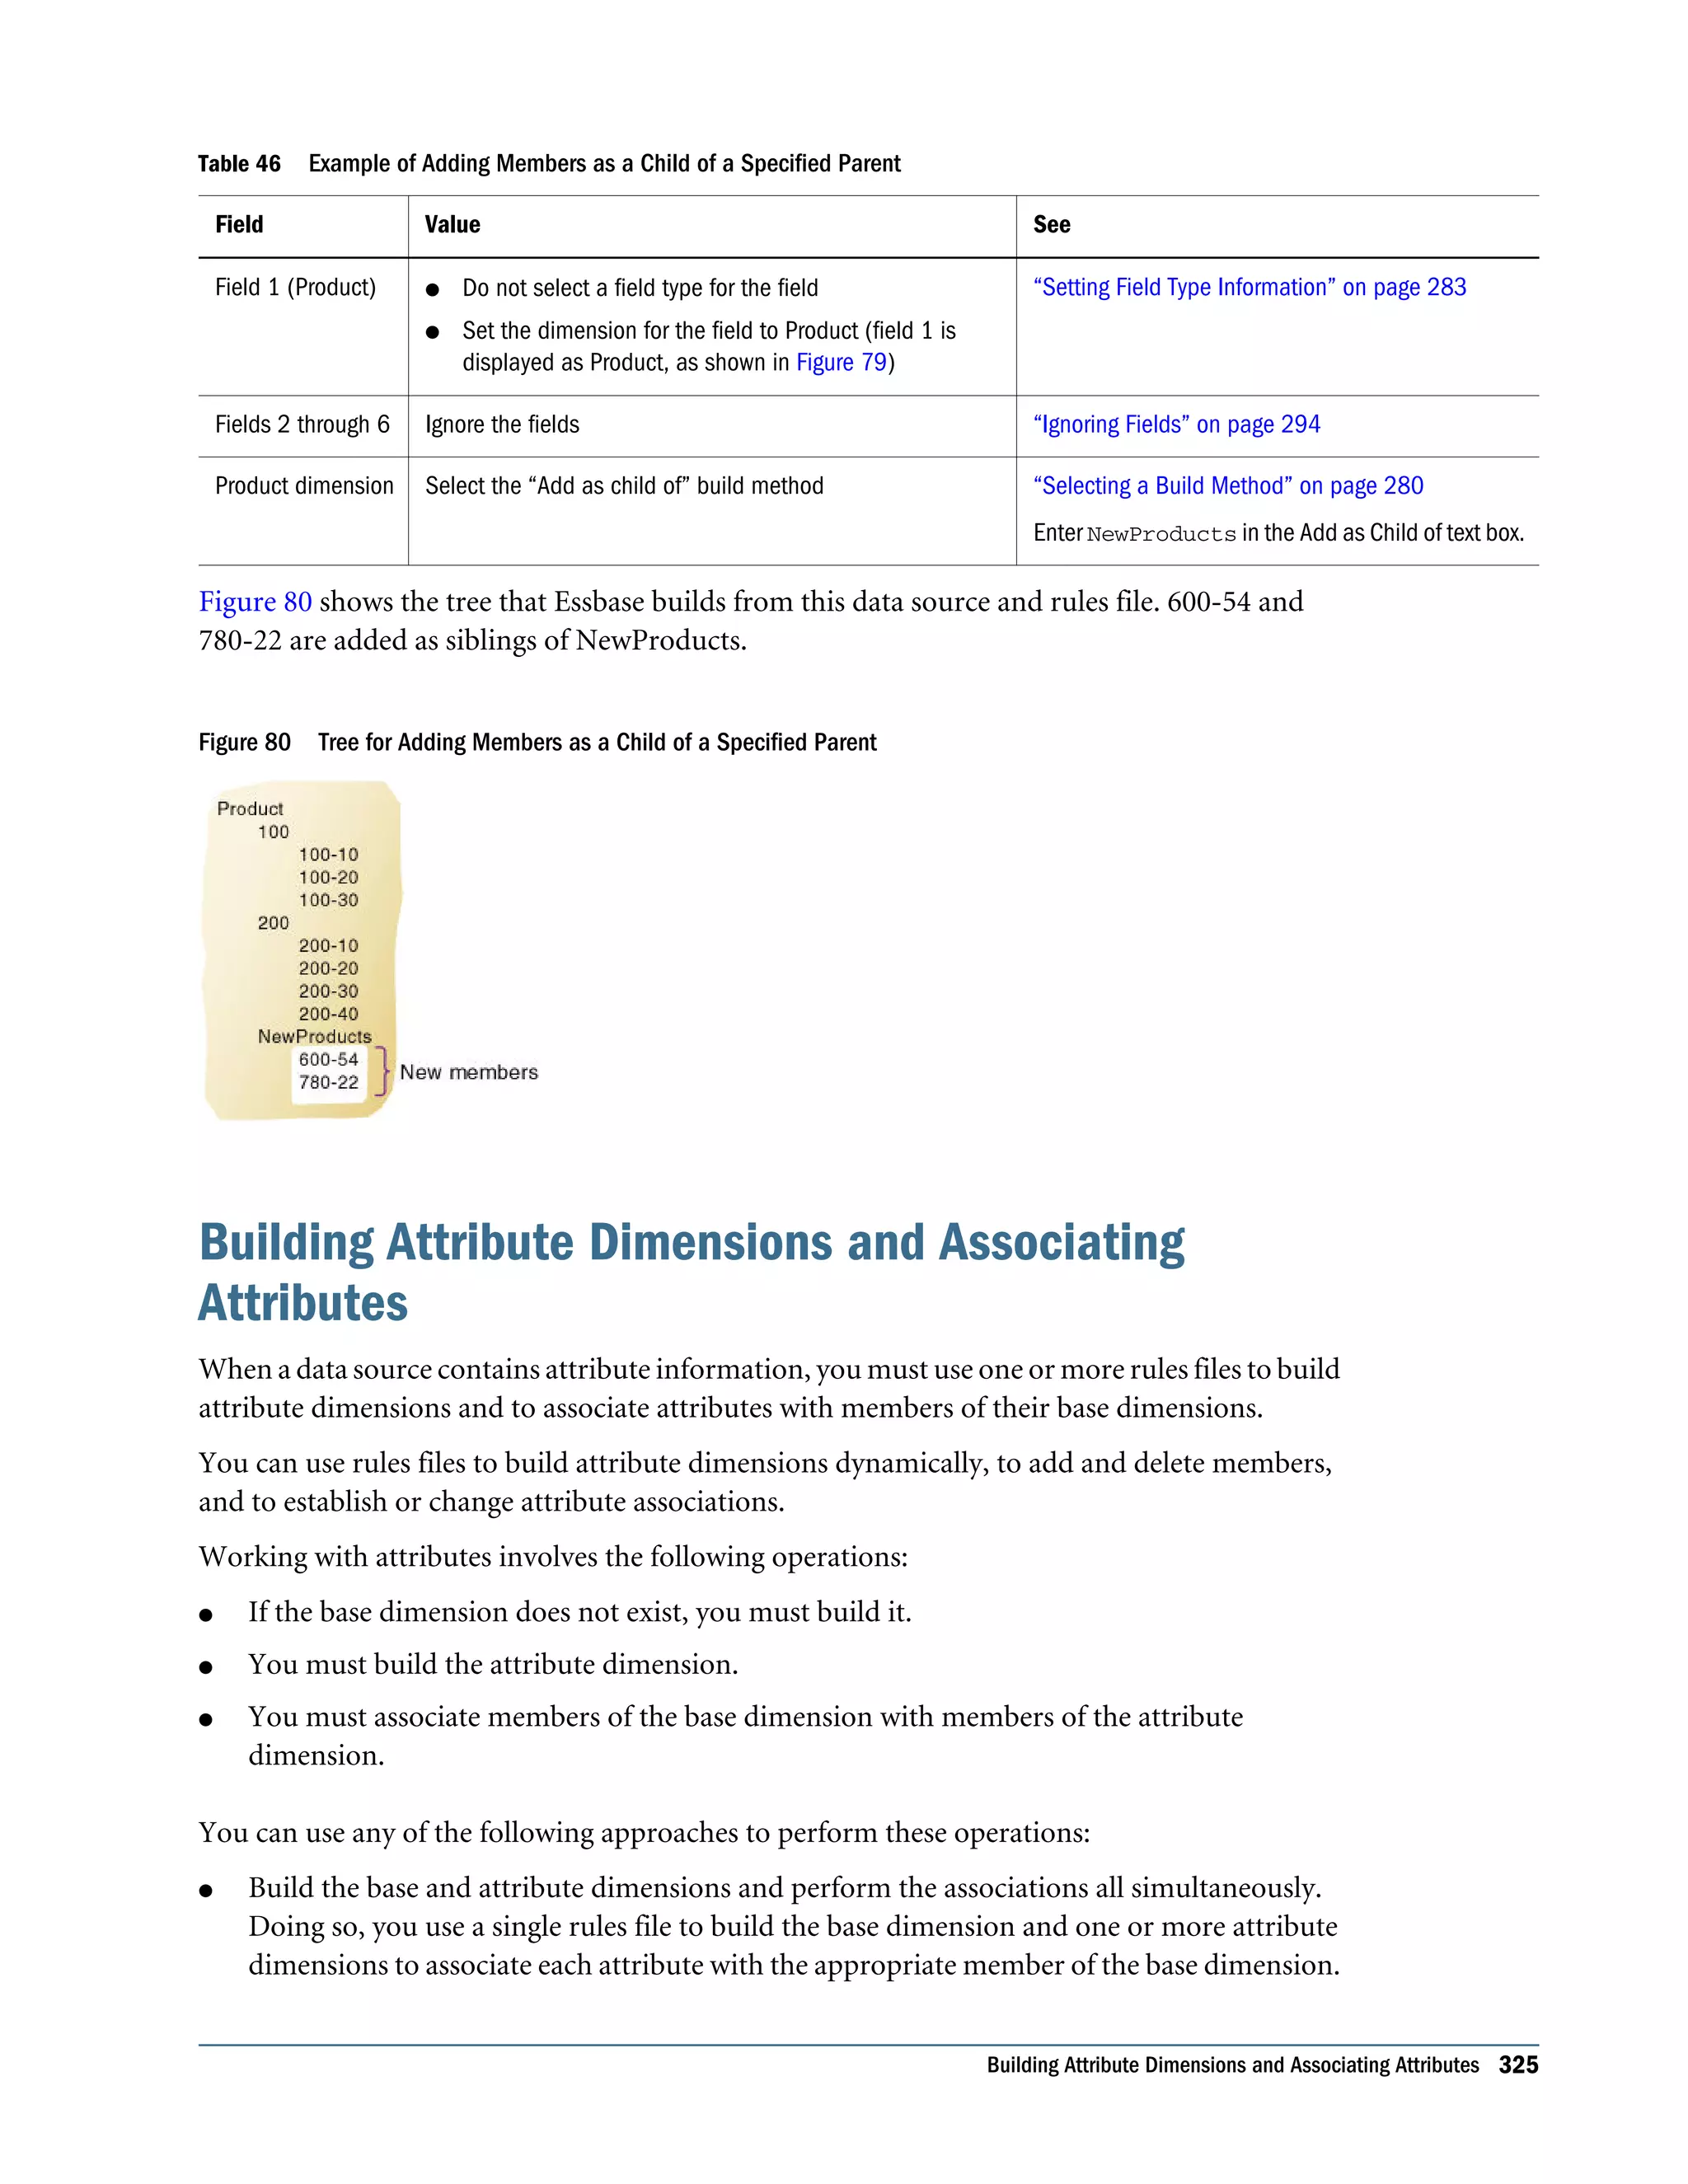
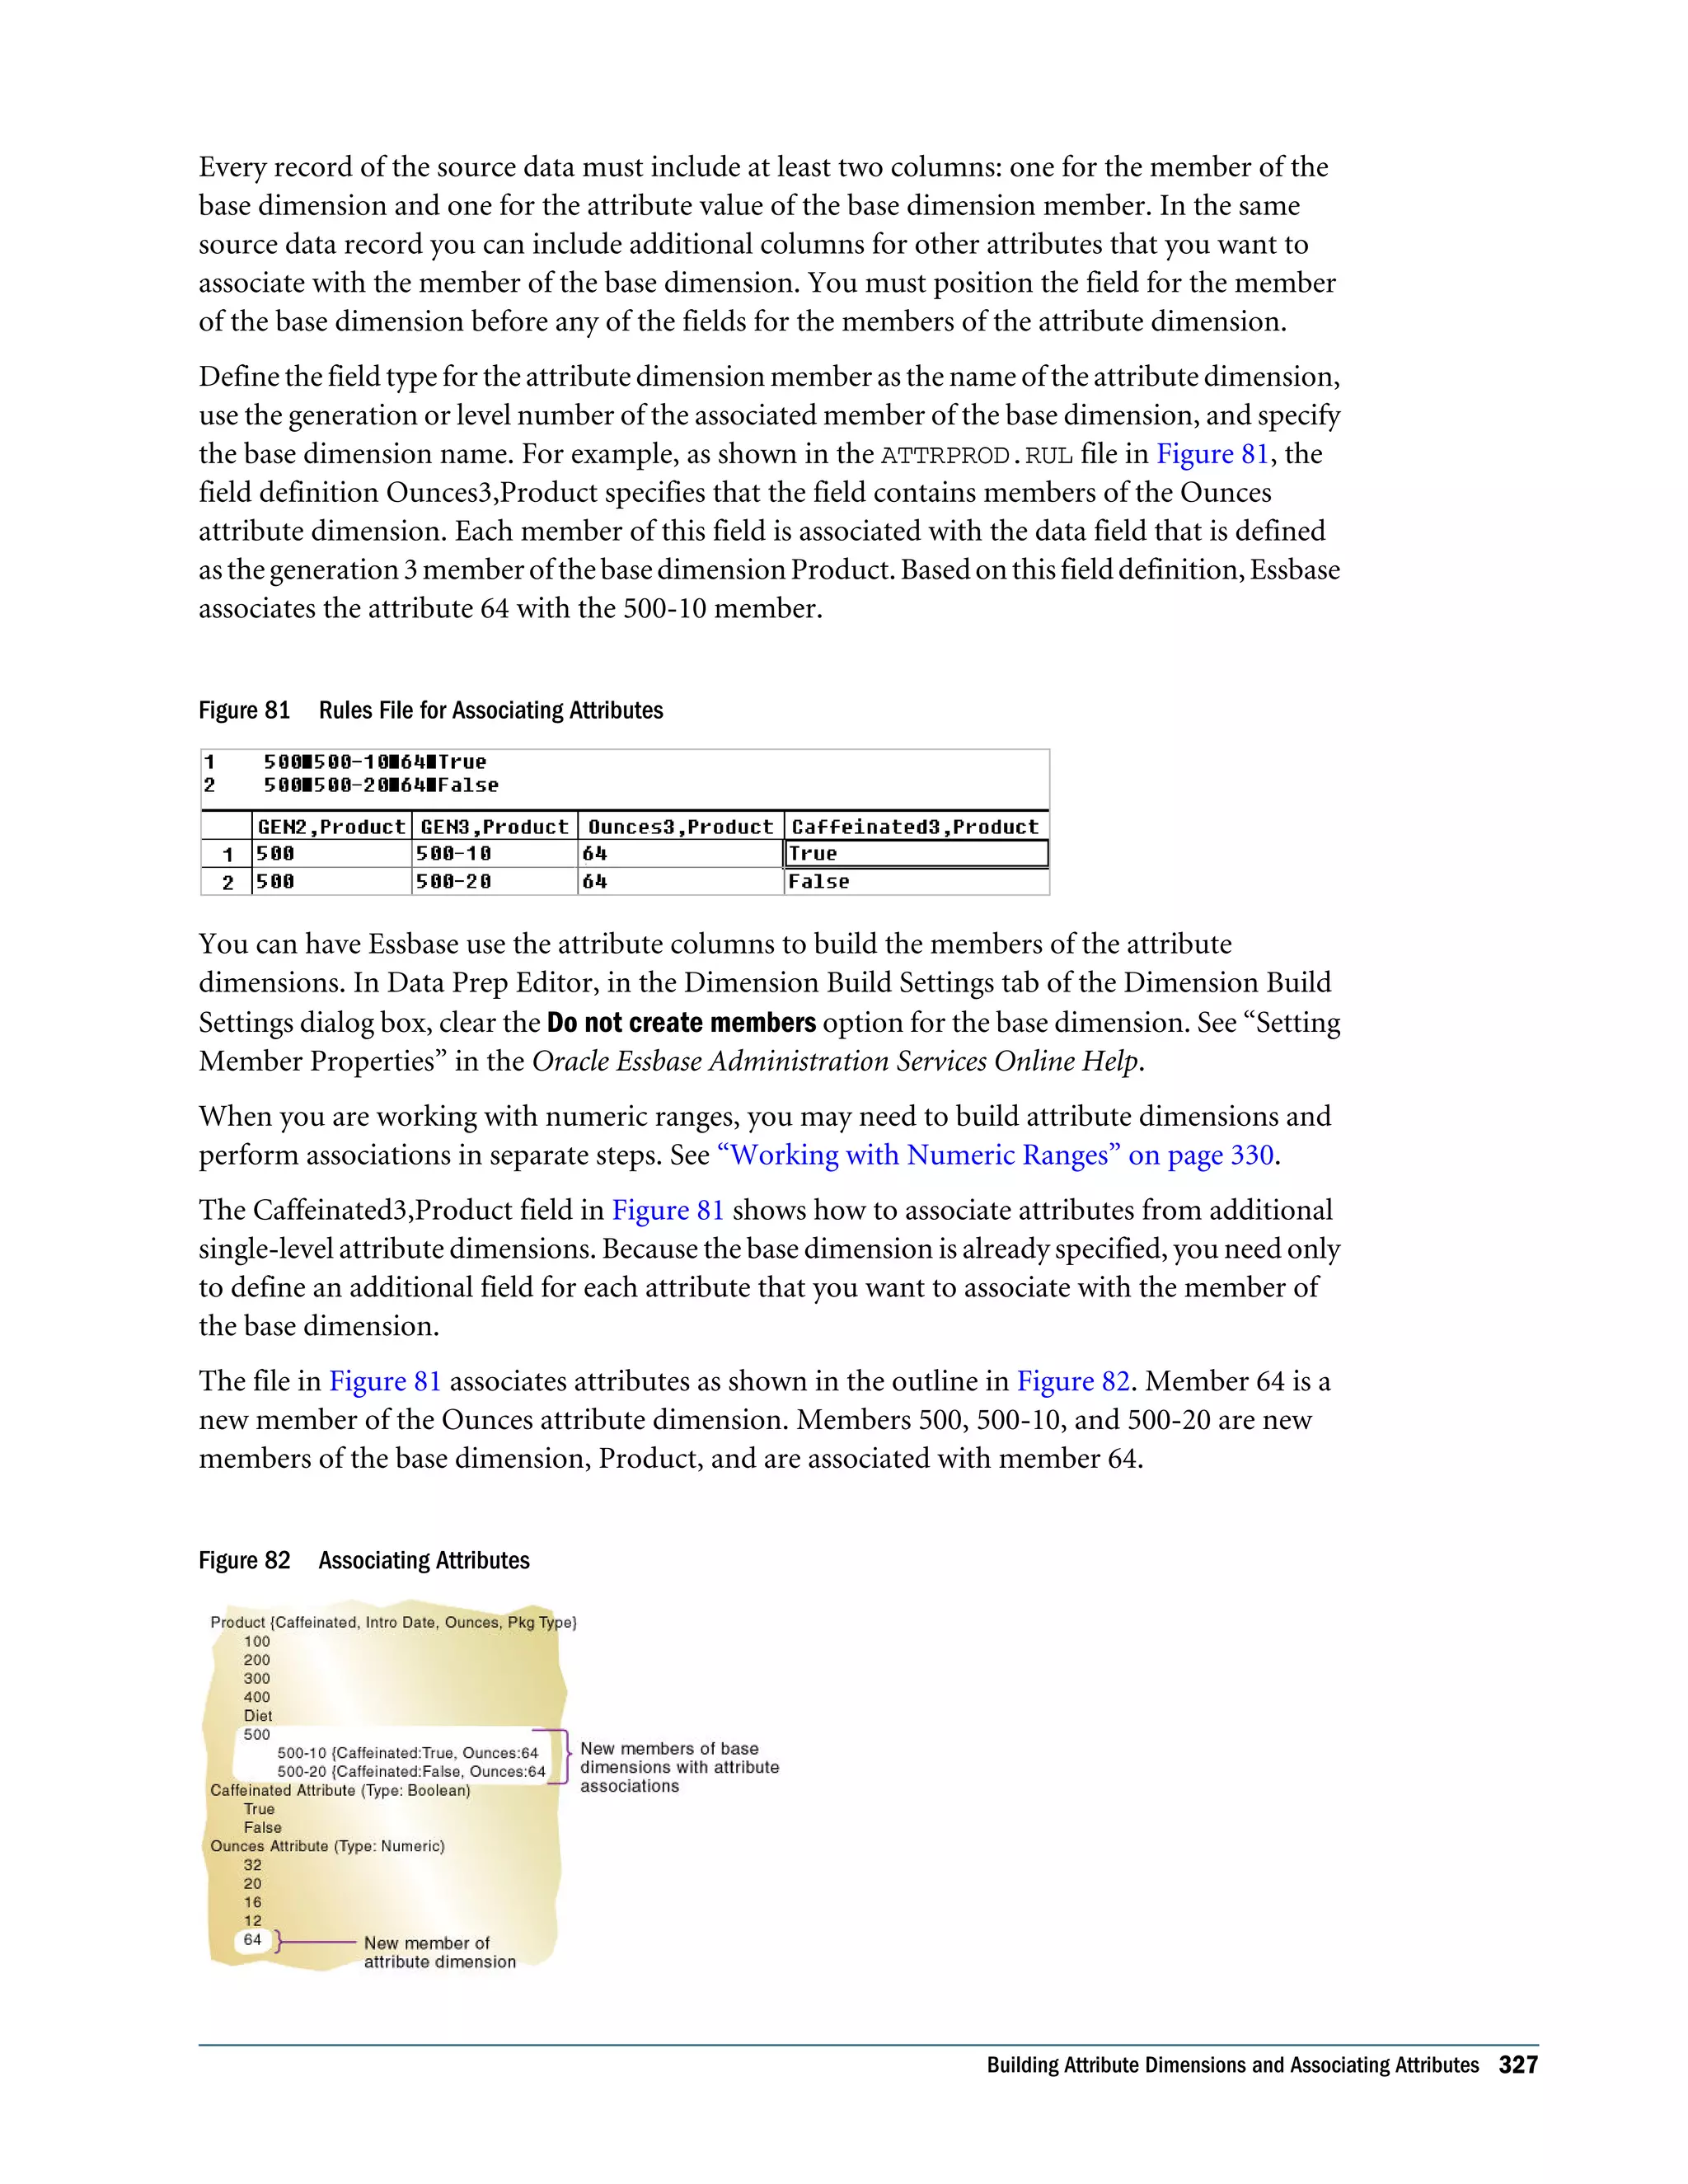
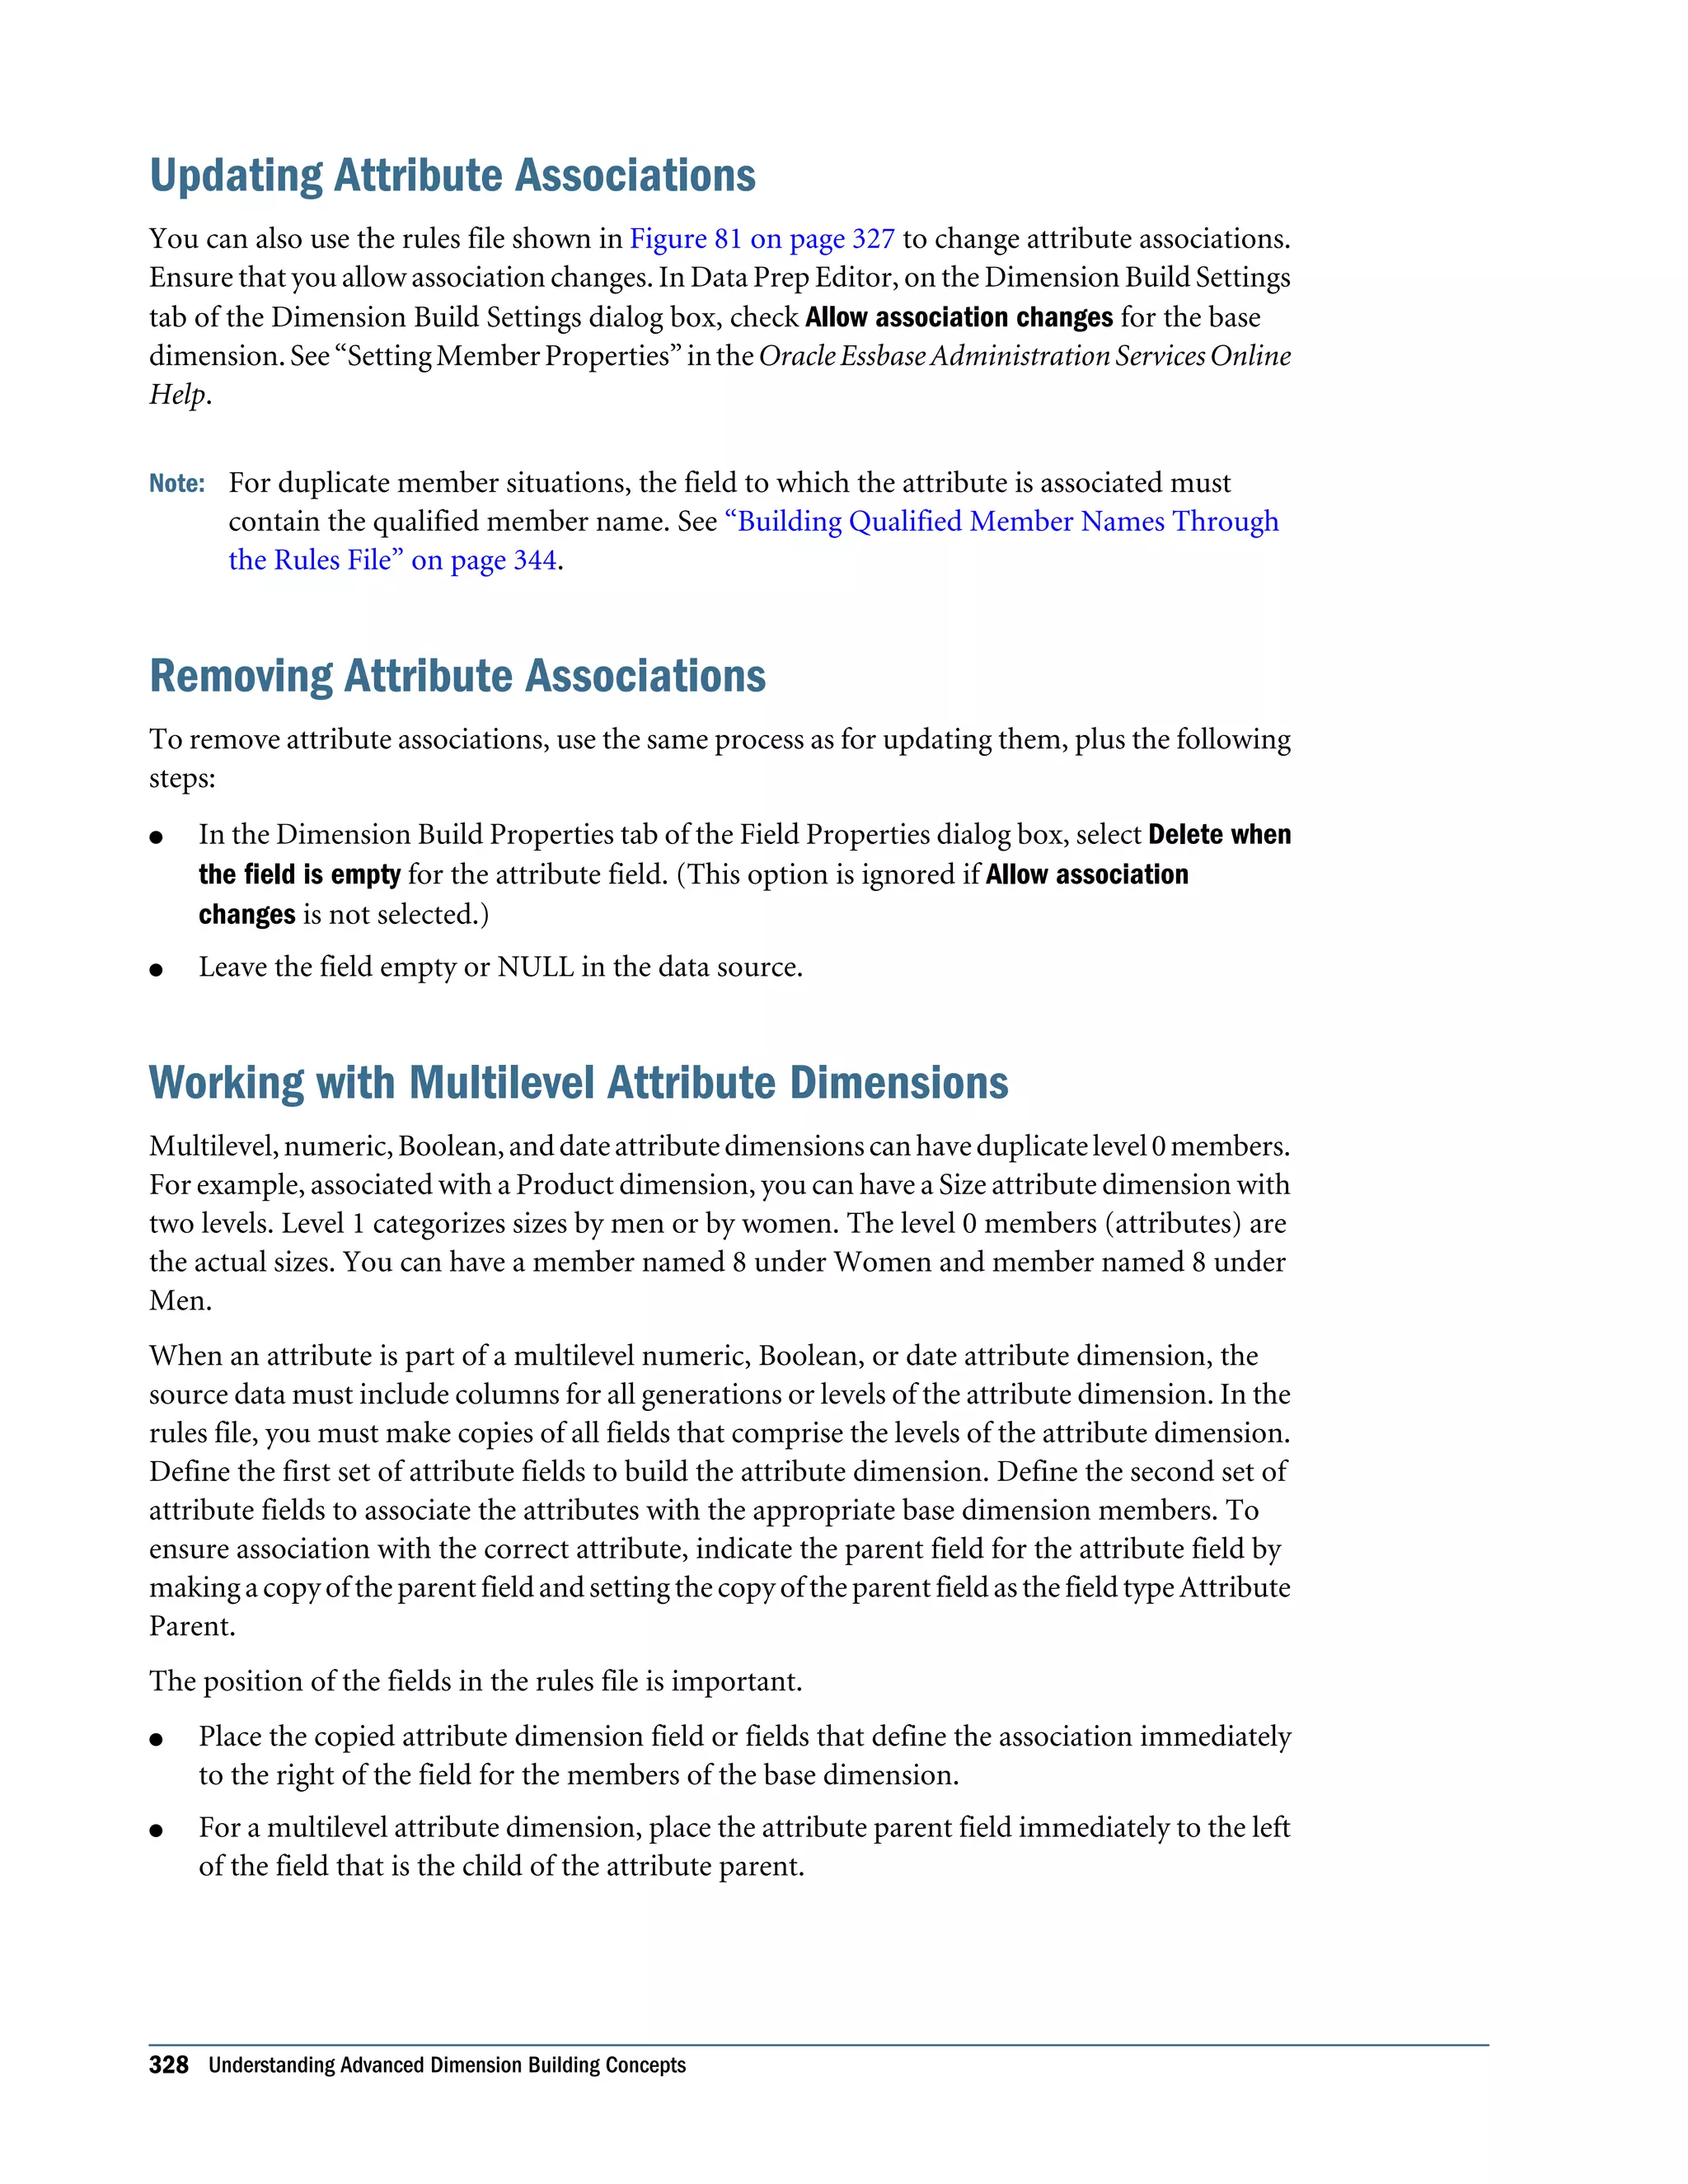
This document is the Oracle Essbase Database Administrator's Guide, which provides information about installing, configuring, and managing Oracle Essbase multidimensional databases. It describes Essbase components like the database server, Studio modeling tool, and APIs. The guide also covers key Essbase features such as integration with other systems, data storage and querying capabilities, calculations, security, and ease of development. Finally, it includes a case study example of designing a sample Essbase database for a beverage company.


![l Data load rules file header definitions and field definitions. You can enter variable names for dimension and member names. See these Oracle Essbase Administration Services Online Help topics: “Setting Headers in the Rules File” and “Mapping Field Names.” l Partition definitions See “Substitution Variables in Partition Definitions” on page 221. l Data source name (DSN) specifications in rules files for SQL data sources See Oracle Essbase SQL Interface Guide. l SELECT, FROM, or WHERE clauses in rules files for SQL data sources See Oracle Essbase SQL Interface Guide. l Security filters See “Filtering Using Substitution Variables” on page 651. l MDX statements See “Using Substitution Variables in MDX Queries” on page 578. l Spreadsheet Add-in. See the Oracle Essbase Spreadsheet Add-in User's Guide. You can set substitution variables on the Essbase Server using Administration Services, MaxL, or ESSCMD. Set the variable at any of the following levels: l Essbase Server—providing access to the variable from all applications and databases on the Essbase Server l Application—providing access to the variable from all databases within the application l Database—providing access to the variable within the specified database Rules for Setting Substitution Variable Names and Values The following rules apply to substitution variable names and values: l The substitution variable name must comprise alphanumeric characters or underscores ( _ ) and cannot exceed the limit specified in Appendix A, “Limits.” l The substitution variable name cannot include nonalphanumeric characters, such as hyphens (-), asterisks (*), and slashes (/). Do not use spaces, punctuation marks, or brackets ([ ]) in substitution variable names used in MDX. l If substitution variables with the same name exist at server, application, and database levels, the order of precedence for the variables: a database-level substitution variable supersedes an application-level variable, which supersedes a server-level variable. l The substitution variable value may contain any character except a leading ampersand (&). The substitution variable value cannot exceed the limit specified in Appendix A, “Limits.” Using Substitution Variables 117](https://image.slidesharecdn.com/essbasedatabaseadministratorsguide-160425204626/75/Essbase-database-administrator-s-guide-117-2048.jpg)
![l To set a substitution variable value to a duplicate member name, use the qualified member name enclosed in double quotation marks; for example, a value for &Period could be “[2006].[Qtr1]”. l When specifying use of a substitution variable, do not insert a substitution variable as a part of a qualified name. For example, it is invalid to specify “[2004].[&CurrentQtr]”. l If a substitution variable value is a member name that begins with a numeral or contains spaces or any of the special characters listed in “Naming Restrictions in Calculation Scripts, Report Scripts, Formulas, Filters, and Substitution and Environment Variable Values” on page 1108, different rules apply for how you enter the variable: m Enclose the member-name value in brackets ([ ]) if it is used in MDX statements. m Enclose the member-name value in quotation marks (“ ”) if it is not used in MDX statements. l If a substitution variable value is numeric, different rules apply for how you enter the variable: m If it is not used in MDX statements, enclose a substitution variable value in quotation marks; for example, if the variable name is Month, and its corresponding value is 01 (corresponding to January), place quotation marks around 01 (“01”). Substitution variables usually are used with block storage databases; they are not used in MDX statements. m If it is used in MDX statements only, such as in formulas in aggregate storage outlines, and the value is numeric or a member name, do not enclose the value in quotation marks. Note: If a substitution variable value is numeric or a member name starting with a numeral or containing the special characters referred to above is to be used both in MDX and non-MDX situations, create two substitution variables, one without the value enclosed in quotation marks and one with the value in quotation marks. Setting Substitution Variables You can set substitution variables on the Essbase Server at the server, application, or database level. Before setting a substitution variable, see “Rules for Setting Substitution Variable Names and Values” on page 117. ä To set a substitution variable, use a tool: Tool Topic Location Administration Services Managing Substitution Variables Oracle Essbase Administration Services Online Help MaxL alter system alter application alter database Oracle Essbase Technical Reference 118 Creating Applications and Databases](https://image.slidesharecdn.com/essbasedatabaseadministratorsguide-160425204626/75/Essbase-database-administrator-s-guide-118-2048.jpg)


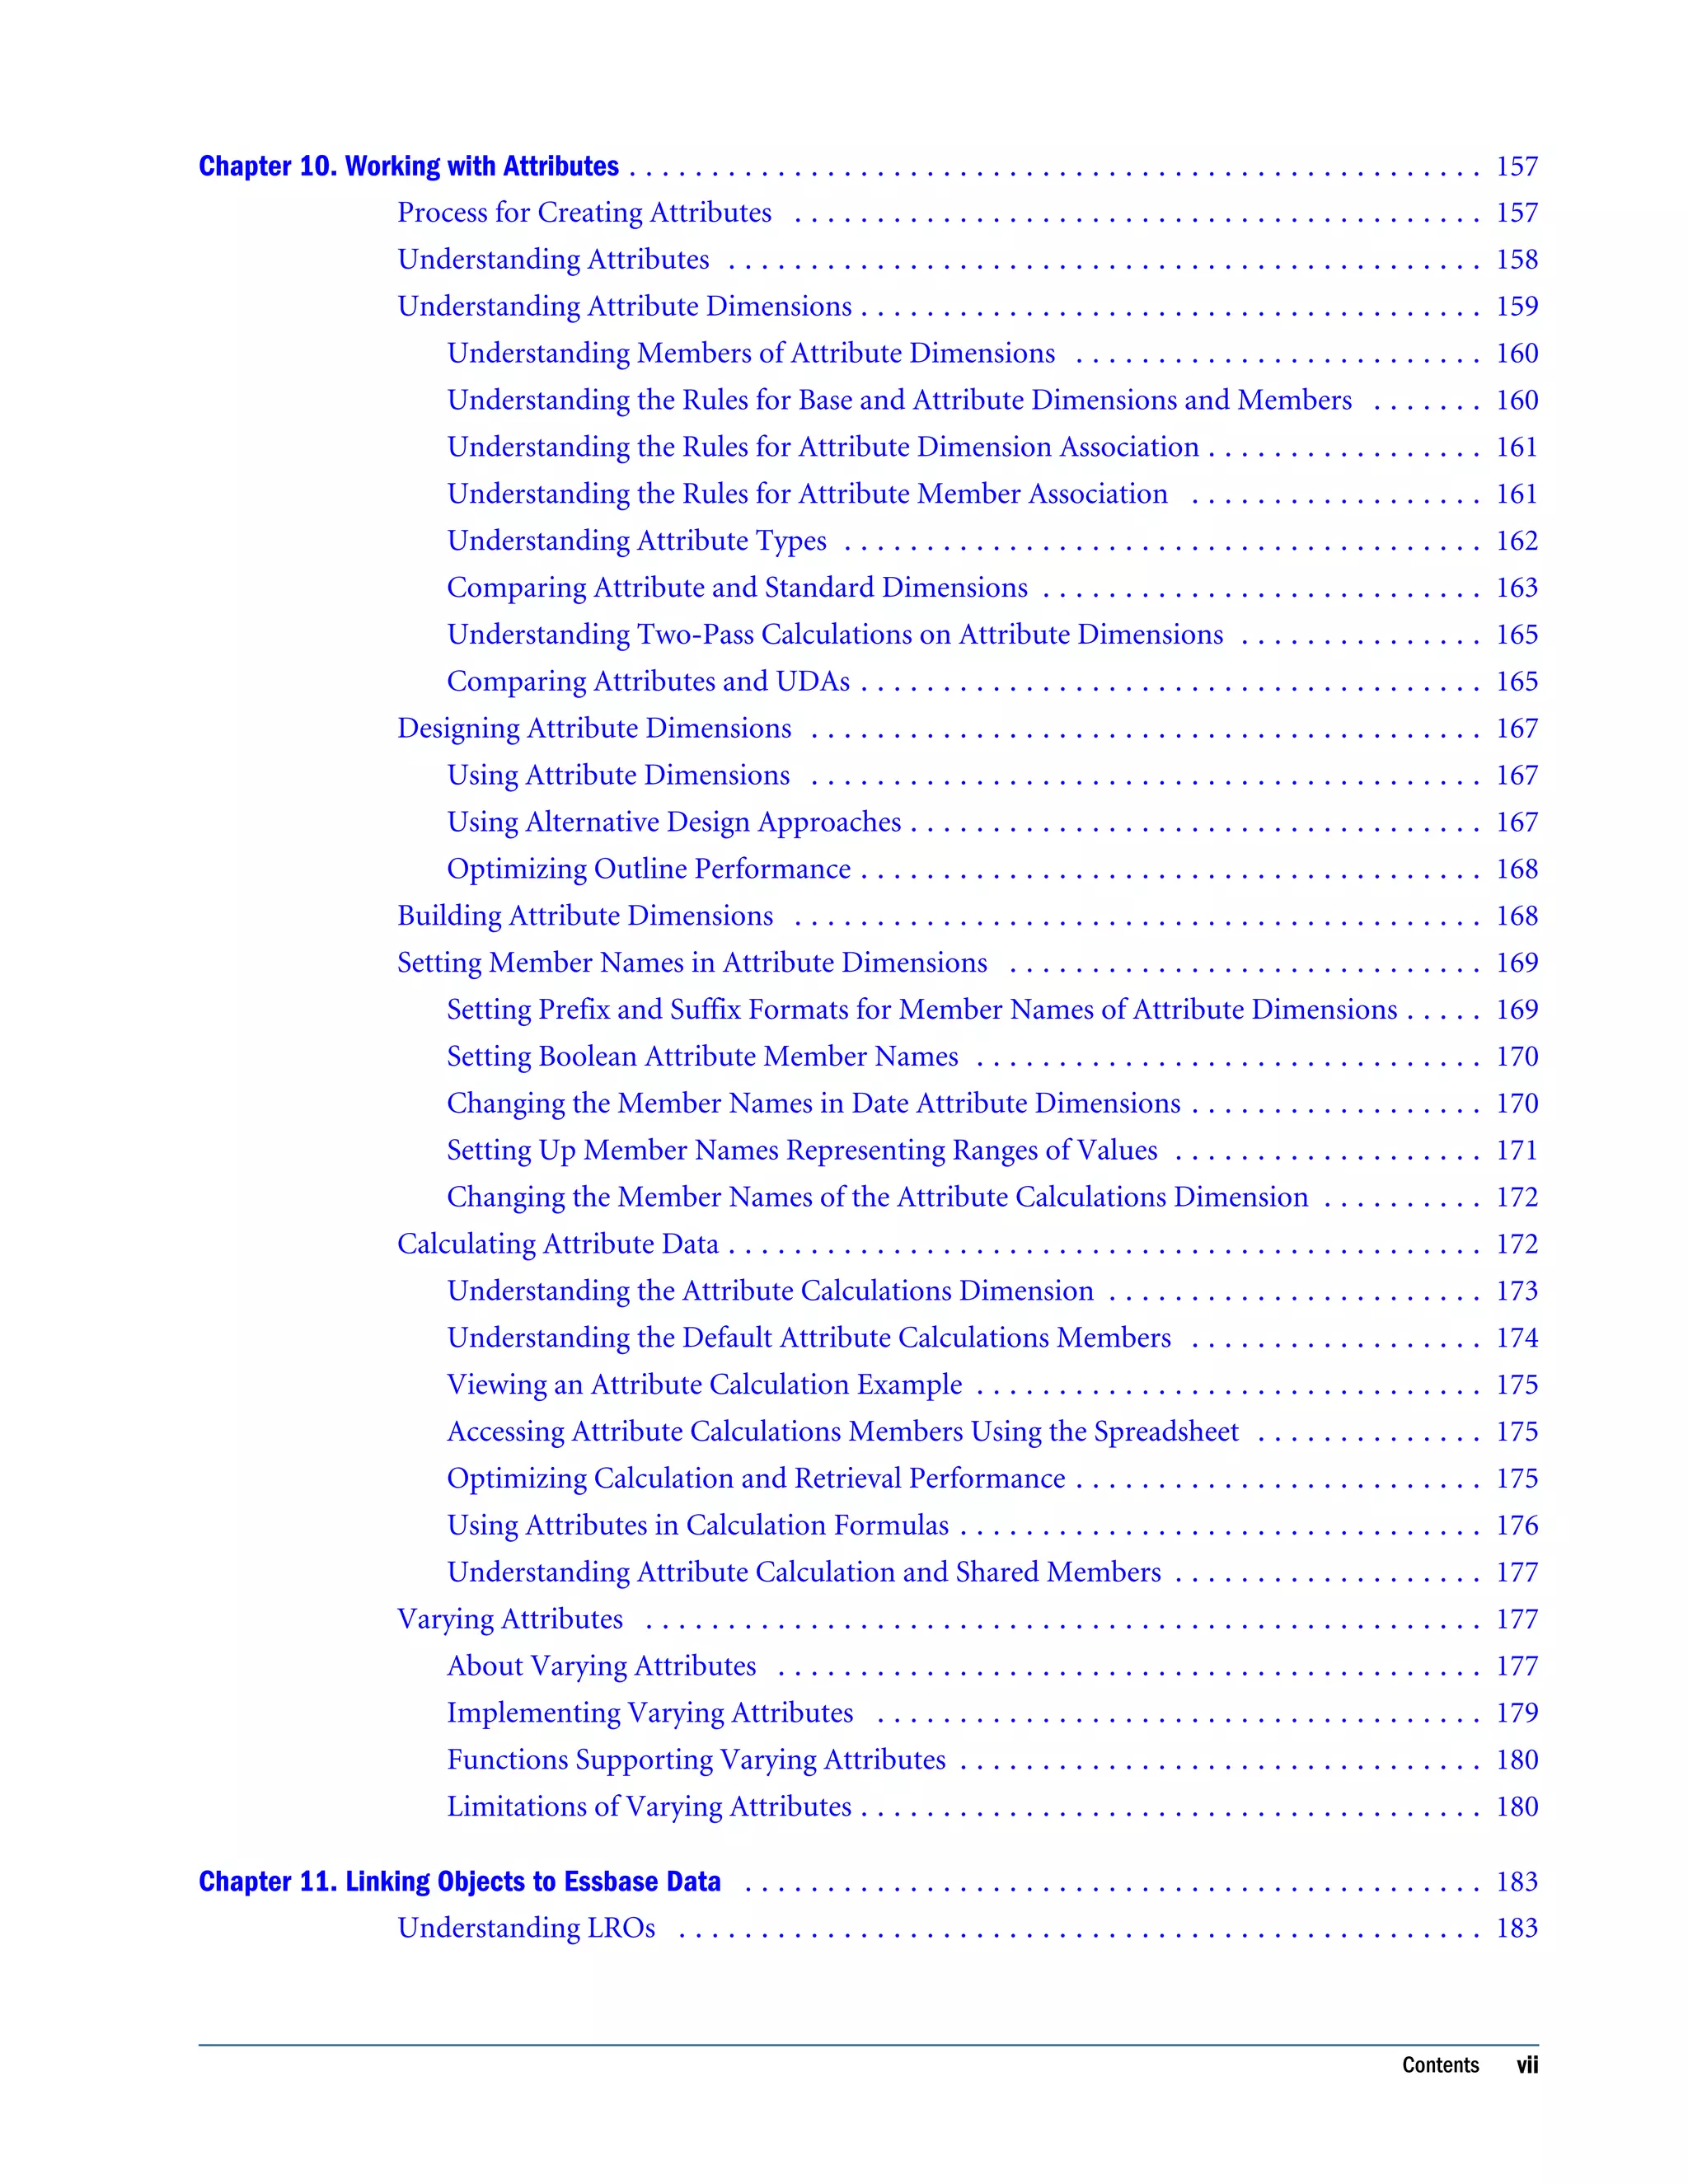
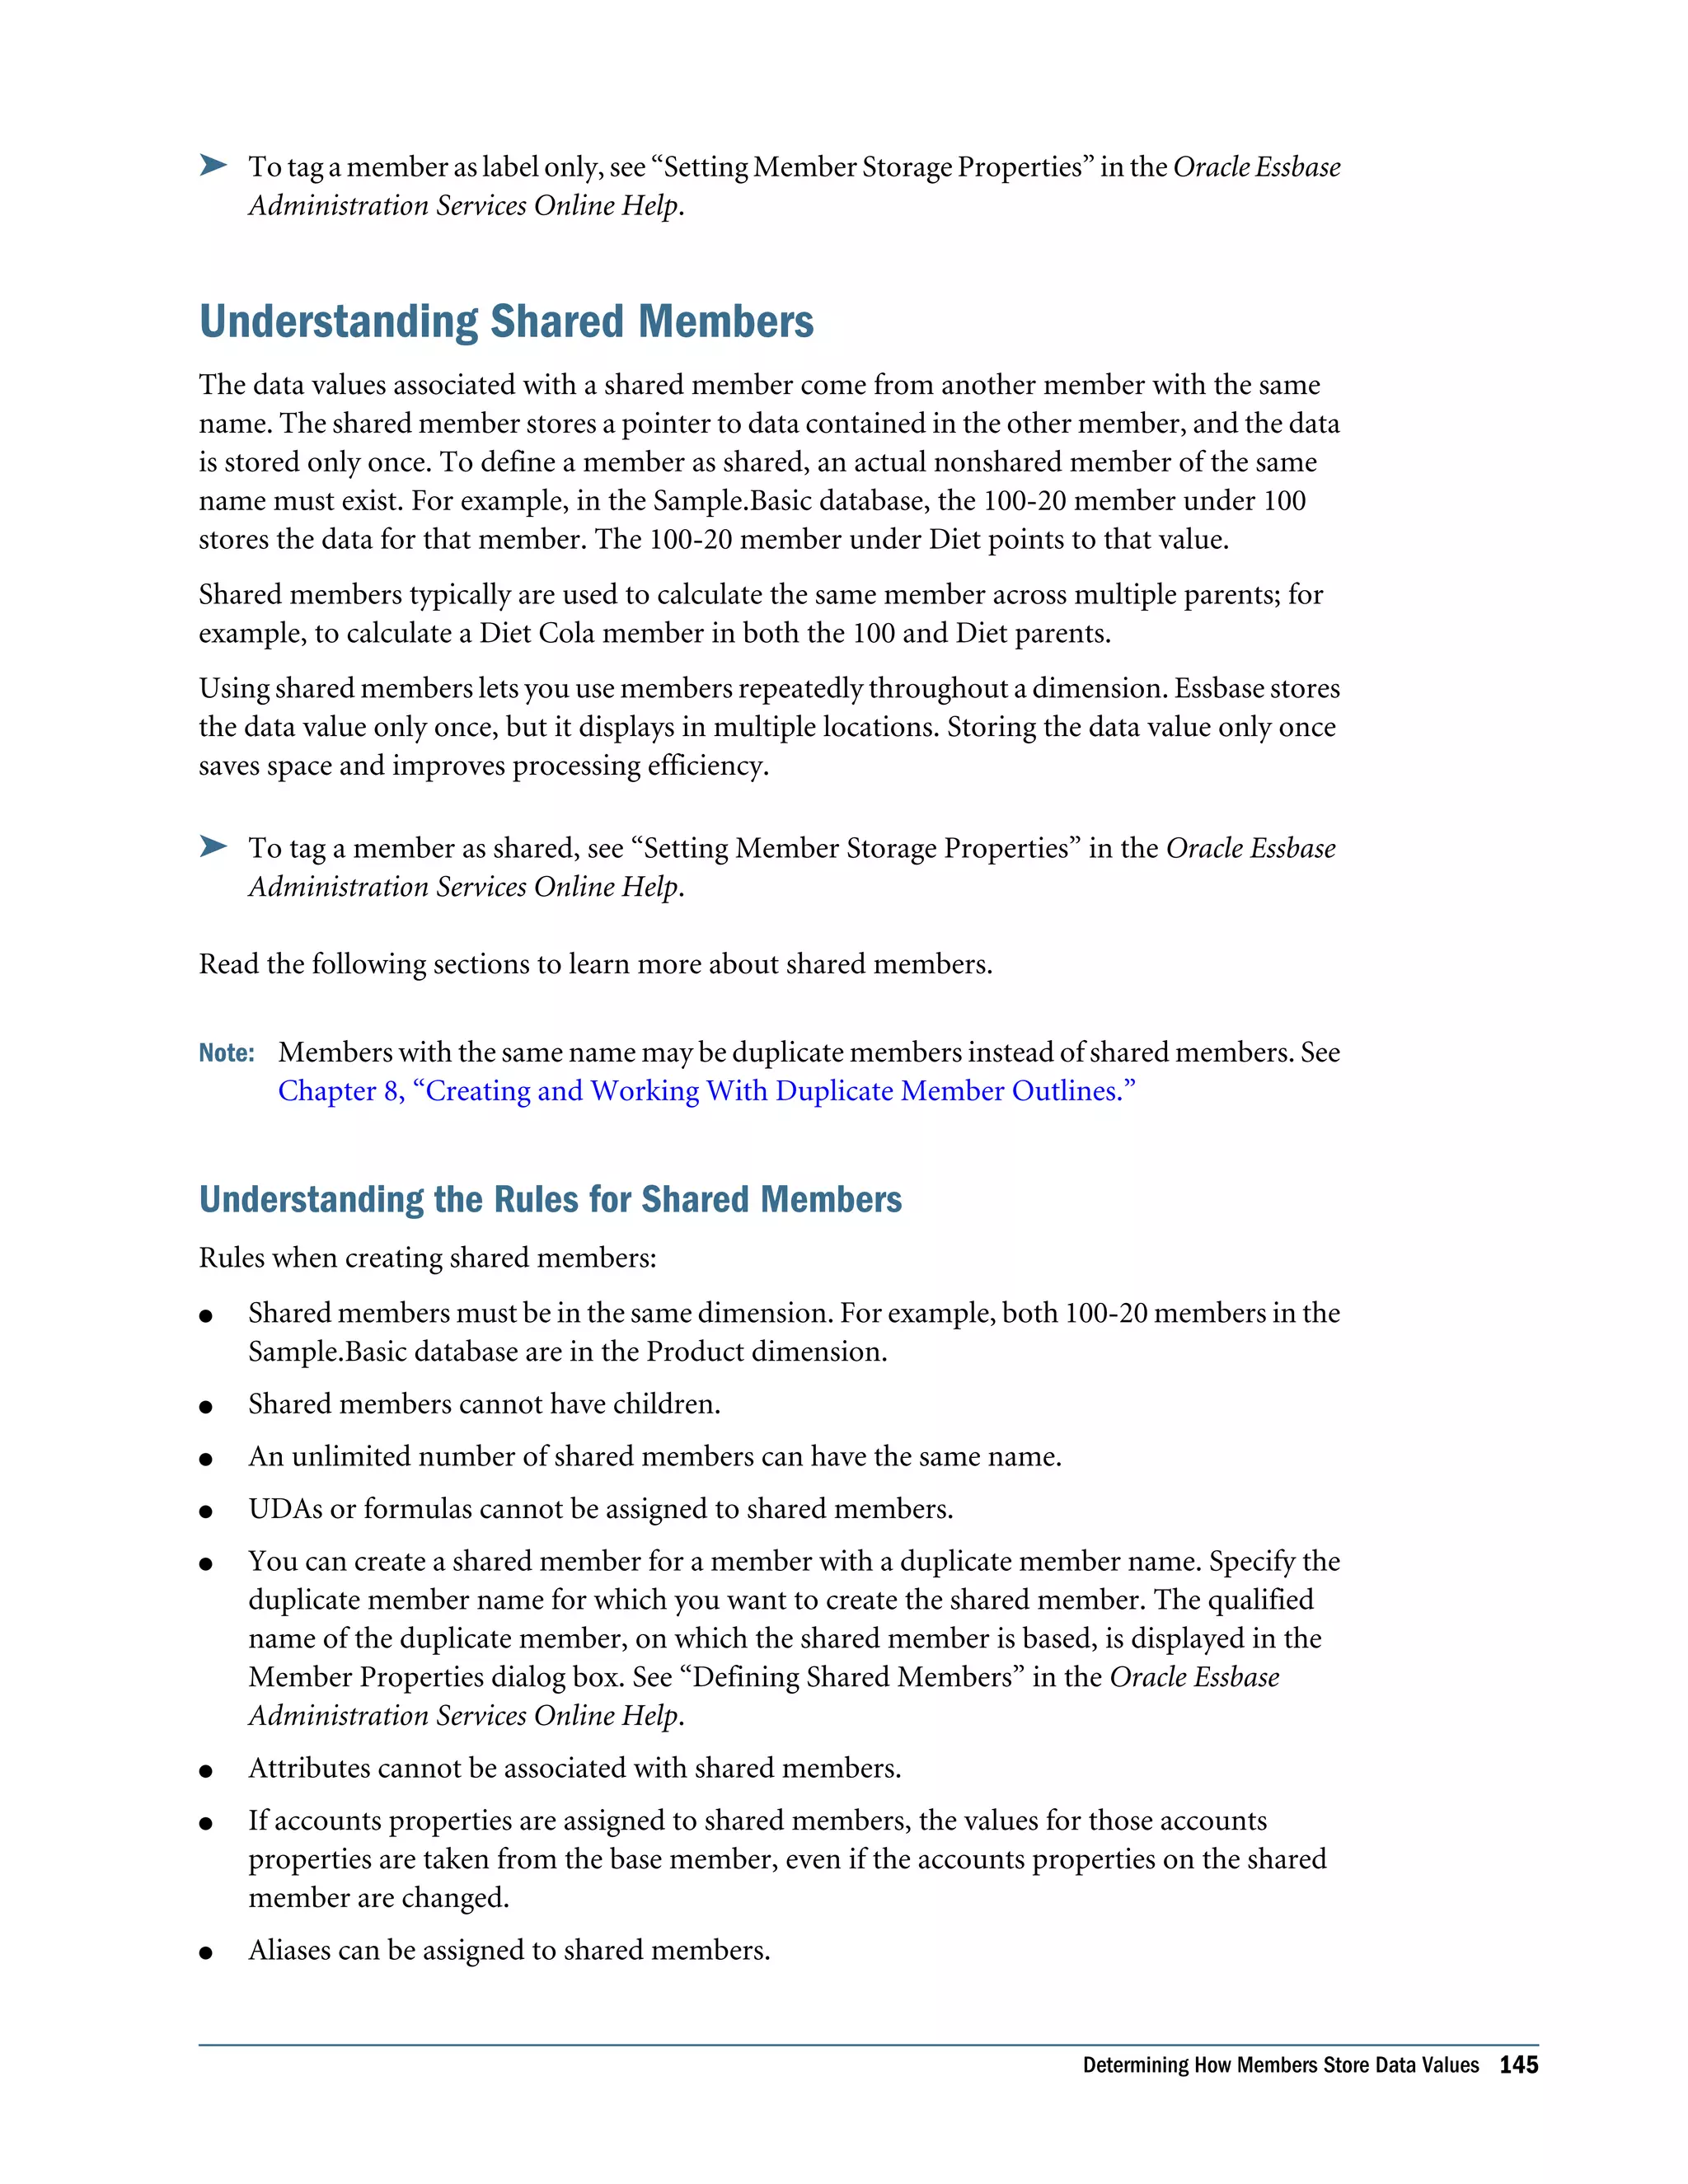
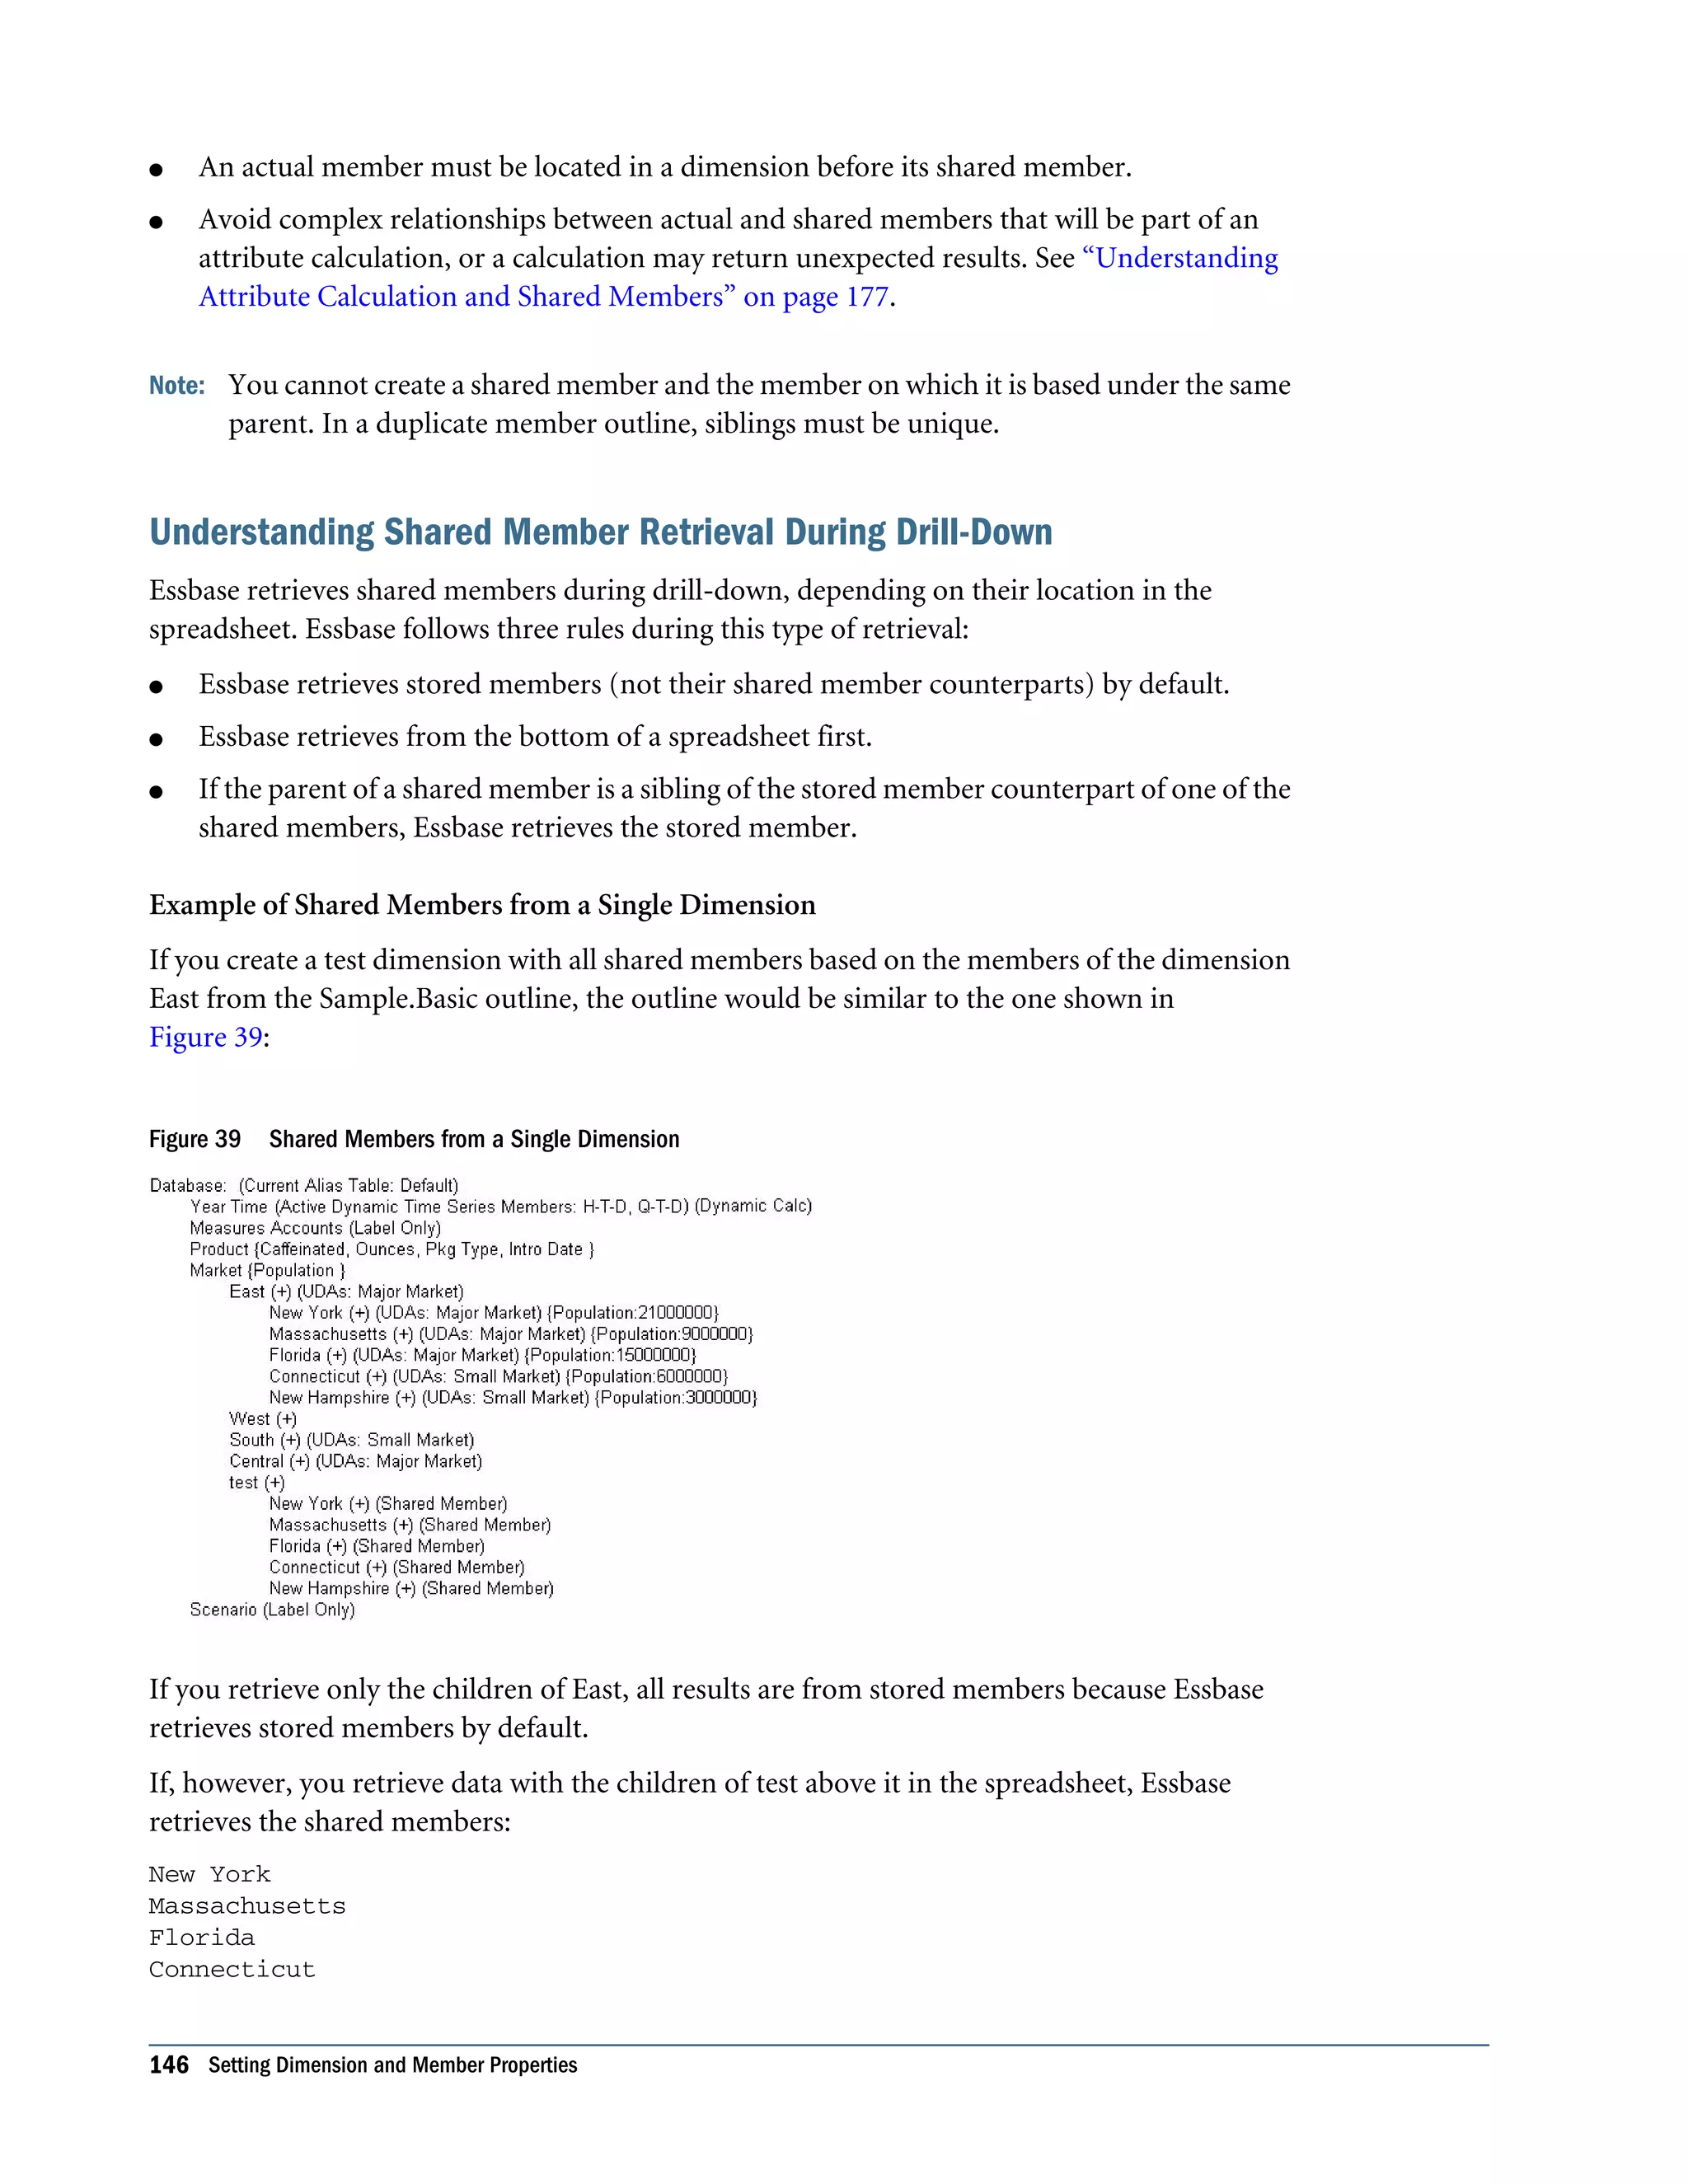
![8 Creating and Working With Duplicate Member Outlines In This Chapter Creating Duplicate Member Names in Outlines.......................................................131 Restrictions for Duplicate Member Names and Aliases in Outlines.................................132 Syntax for Specifying Duplicate Member Names and Aliases .......................................133 Working with Duplicate Member Names...............................................................135 The information in this chapter applies to block storage and aggregate storage databases. Also see: l Chapter 6, “Creating Applications and Databases” l Chapter 7, “Creating and Changing Database Outlines” Creating Duplicate Member Names in Outlines You can use duplicate names in an outline only if the outline has the allow duplicate members option enabled. When you enable duplicate member names in an outline, Essbase displays multiple members in the outline using the same name. Create the names in the usual way. See “Naming Restrictions for Dimensions, Members, and Aliases” on page 1104. When you save the outline, Essbase validates and saves the outline with the duplicate member names. A qualified name format differentiates the duplicate member names. Figure 38 shows an example of a duplicate member outline in which the New York state member and the New York city member appear in the outline as New York. Figure 38 Duplicate Member Name “New York” The qualified member names for the example in Figure 38 are [State].[New York] and [City]. [New York]. See “Syntax for Specifying Duplicate Member Names and Aliases” on page 133. Creating Duplicate Member Names in Outlines 131](https://image.slidesharecdn.com/essbasedatabaseadministratorsguide-160425204626/75/Essbase-database-administrator-s-guide-131-2048.jpg)
![l Generation names and level names l Siblings under a parent member If you are using aliases, this additional restriction applies: an alias table that contains duplicate alias names is valid only with a duplicate member outline. Note: Do not use quotation marks (" "), brackets ([ ]), or tabs in member, dimension, or alias names. For example, you cannot create a member name “[New York].[Area 1]”. Outline verification does not display an error for member names that contain the invalid sequence of characters, and you can save the outline; however, Essbase cannot accurately query the data. Syntax for Specifying Duplicate Member Names and Aliases Although duplicate member names appear in the outline, each nonshared member name uniquely identifies a member in the database. A qualified name format differentiates the duplicate member names. When using Administration Services editors, you can select the qualified member name for an outline tree. You can view the qualified member name for a duplicate member in the Outline Viewer Member Properties dialog box in Administration Services. A qualified name must be used to specify a duplicate member name. A qualified member or alias name can be specified in any of the following formats: l Fully qualified member name l Member name qualified by differentiating ancestor l Shortcut qualified member name Note: A qualified name must comprise all alias names or all member names. You cannot mix member names and alias names in a qualified name. Using Fully Qualified Member Names A fully qualified member name comprises the duplicate member or alias name and all ancestors up to and including the dimension name. Each name must be enclosed in brackets ([ ]) and separated by a period (.). The syntax is as follows: [DimensionMember].[Ancestors...].[DuplicateMember] For example: [Market].[East].[State].[New York] [Market].[East].[City].[New York] Syntax for Specifying Duplicate Member Names and Aliases 133](https://image.slidesharecdn.com/essbasedatabaseadministratorsguide-160425204626/75/Essbase-database-administrator-s-guide-133-2048.jpg)
![Qualifying Members by Differentiating Ancestor A member name qualified by differentiating ancestor uses the member or alias name and all ancestors up to and including the ancestor that uniquely identifies the duplicate member or alias. The top ancestor in the path will always be a unique member name. Each name must be enclosed in brackets ([ ]) and separated by a period (.). The syntax is as follows: [DifferentiatingAncestor].[Ancestors...].[DuplicateMember] For example: [State].[New York] [City].[New York] Using Shortcut Qualified Member Names Essbase internally constructs shortcut qualified names for members in duplicate member outlines. These can be inserted into scripts using Administration Services by right-clicking the member and selecting Insert member name. You can also manually insert shortcut qualified names into scripts, spreadsheets, or MDX queries. Essbase uses the syntax shown in Table 14 to construct shortcut qualified names. Using the same syntax that Essbase uses when you reference members in scripts, spreadsheets, and MDX queries is optimal but not required. Table 14 Shortcut Qualified Name Syntax Scenario Qualified Name Syntax Example Duplicate member names exist at generation 2 [DimensionMember].[DuplicateMember] [Year].[Jan] [Product].[Jan] Duplicate member names exist in an outline but are unique within a dimension [DimensionMember]@[DuplicateMember] [Year]@[Jan] Duplicate member names have a unique parent [ParentMember].[DuplicateMember] [East].[New York] Duplicate member names exist at generation 3 [DimensionMember].[ParentMember]. [DuplicateMember] [Products].[Personal Electronics]. [Televisions] Duplicate member names exist at a named generation or level, and the member is unique at its generation or level [DimensionMember]@[GenLevelName]| [DuplicateMember] [2006]@[Gen1]|[Jan] In some scenarios, the differentiating ancestor method is used as a shortcut. [DifferentiatingAncestor].[Ancestors...]. [DuplicateMember] [2006].[Qtr1].[Jan] 134 Creating and Working With Duplicate Member Outlines](https://image.slidesharecdn.com/essbasedatabaseadministratorsguide-160425204626/75/Essbase-database-administrator-s-guide-134-2048.jpg)
![Working with Duplicate Member Names This topic describes the syntax for defining duplicate member names in Administration Services. To specify duplicate member names in: l Smart View, see the Oracle Hyperion Smart View for Office User's Guide Help l Spreadsheet Add-in, see the Oracle Essbase Spreadsheet Add-in User's Guide l API, see the Oracle Essbase API Reference To use duplicate member names in MaxL and MDX, see the Oracle Essbase Technical Reference. Note: If an alias name and member name are the same but do not represent the same member, searching by alias name is not supported in clients (for example Spreadsheet Add-in, Administration Services, or the API). In Administration Services, if you use the member selection tool to insert a duplicate member name from the outline tree, the qualified member name is inserted automatically. If you type a duplicate member name directly into an editor, type the qualified member name and enclose the qualified name in double quotation marks (" "). For example, "[State].[New York]" In MDX and MaxL qualified member names are not enclosed in quotation marks. See “Inserting Dimension and Member Names in MDX Scripts” in the Oracle Essbase Administration Services Online Help. The Administration Services Data Preview feature does not support duplicate member outlines. Working with Duplicate Member Names 135](https://image.slidesharecdn.com/essbasedatabaseadministratorsguide-160425204626/75/Essbase-database-administrator-s-guide-135-2048.jpg)


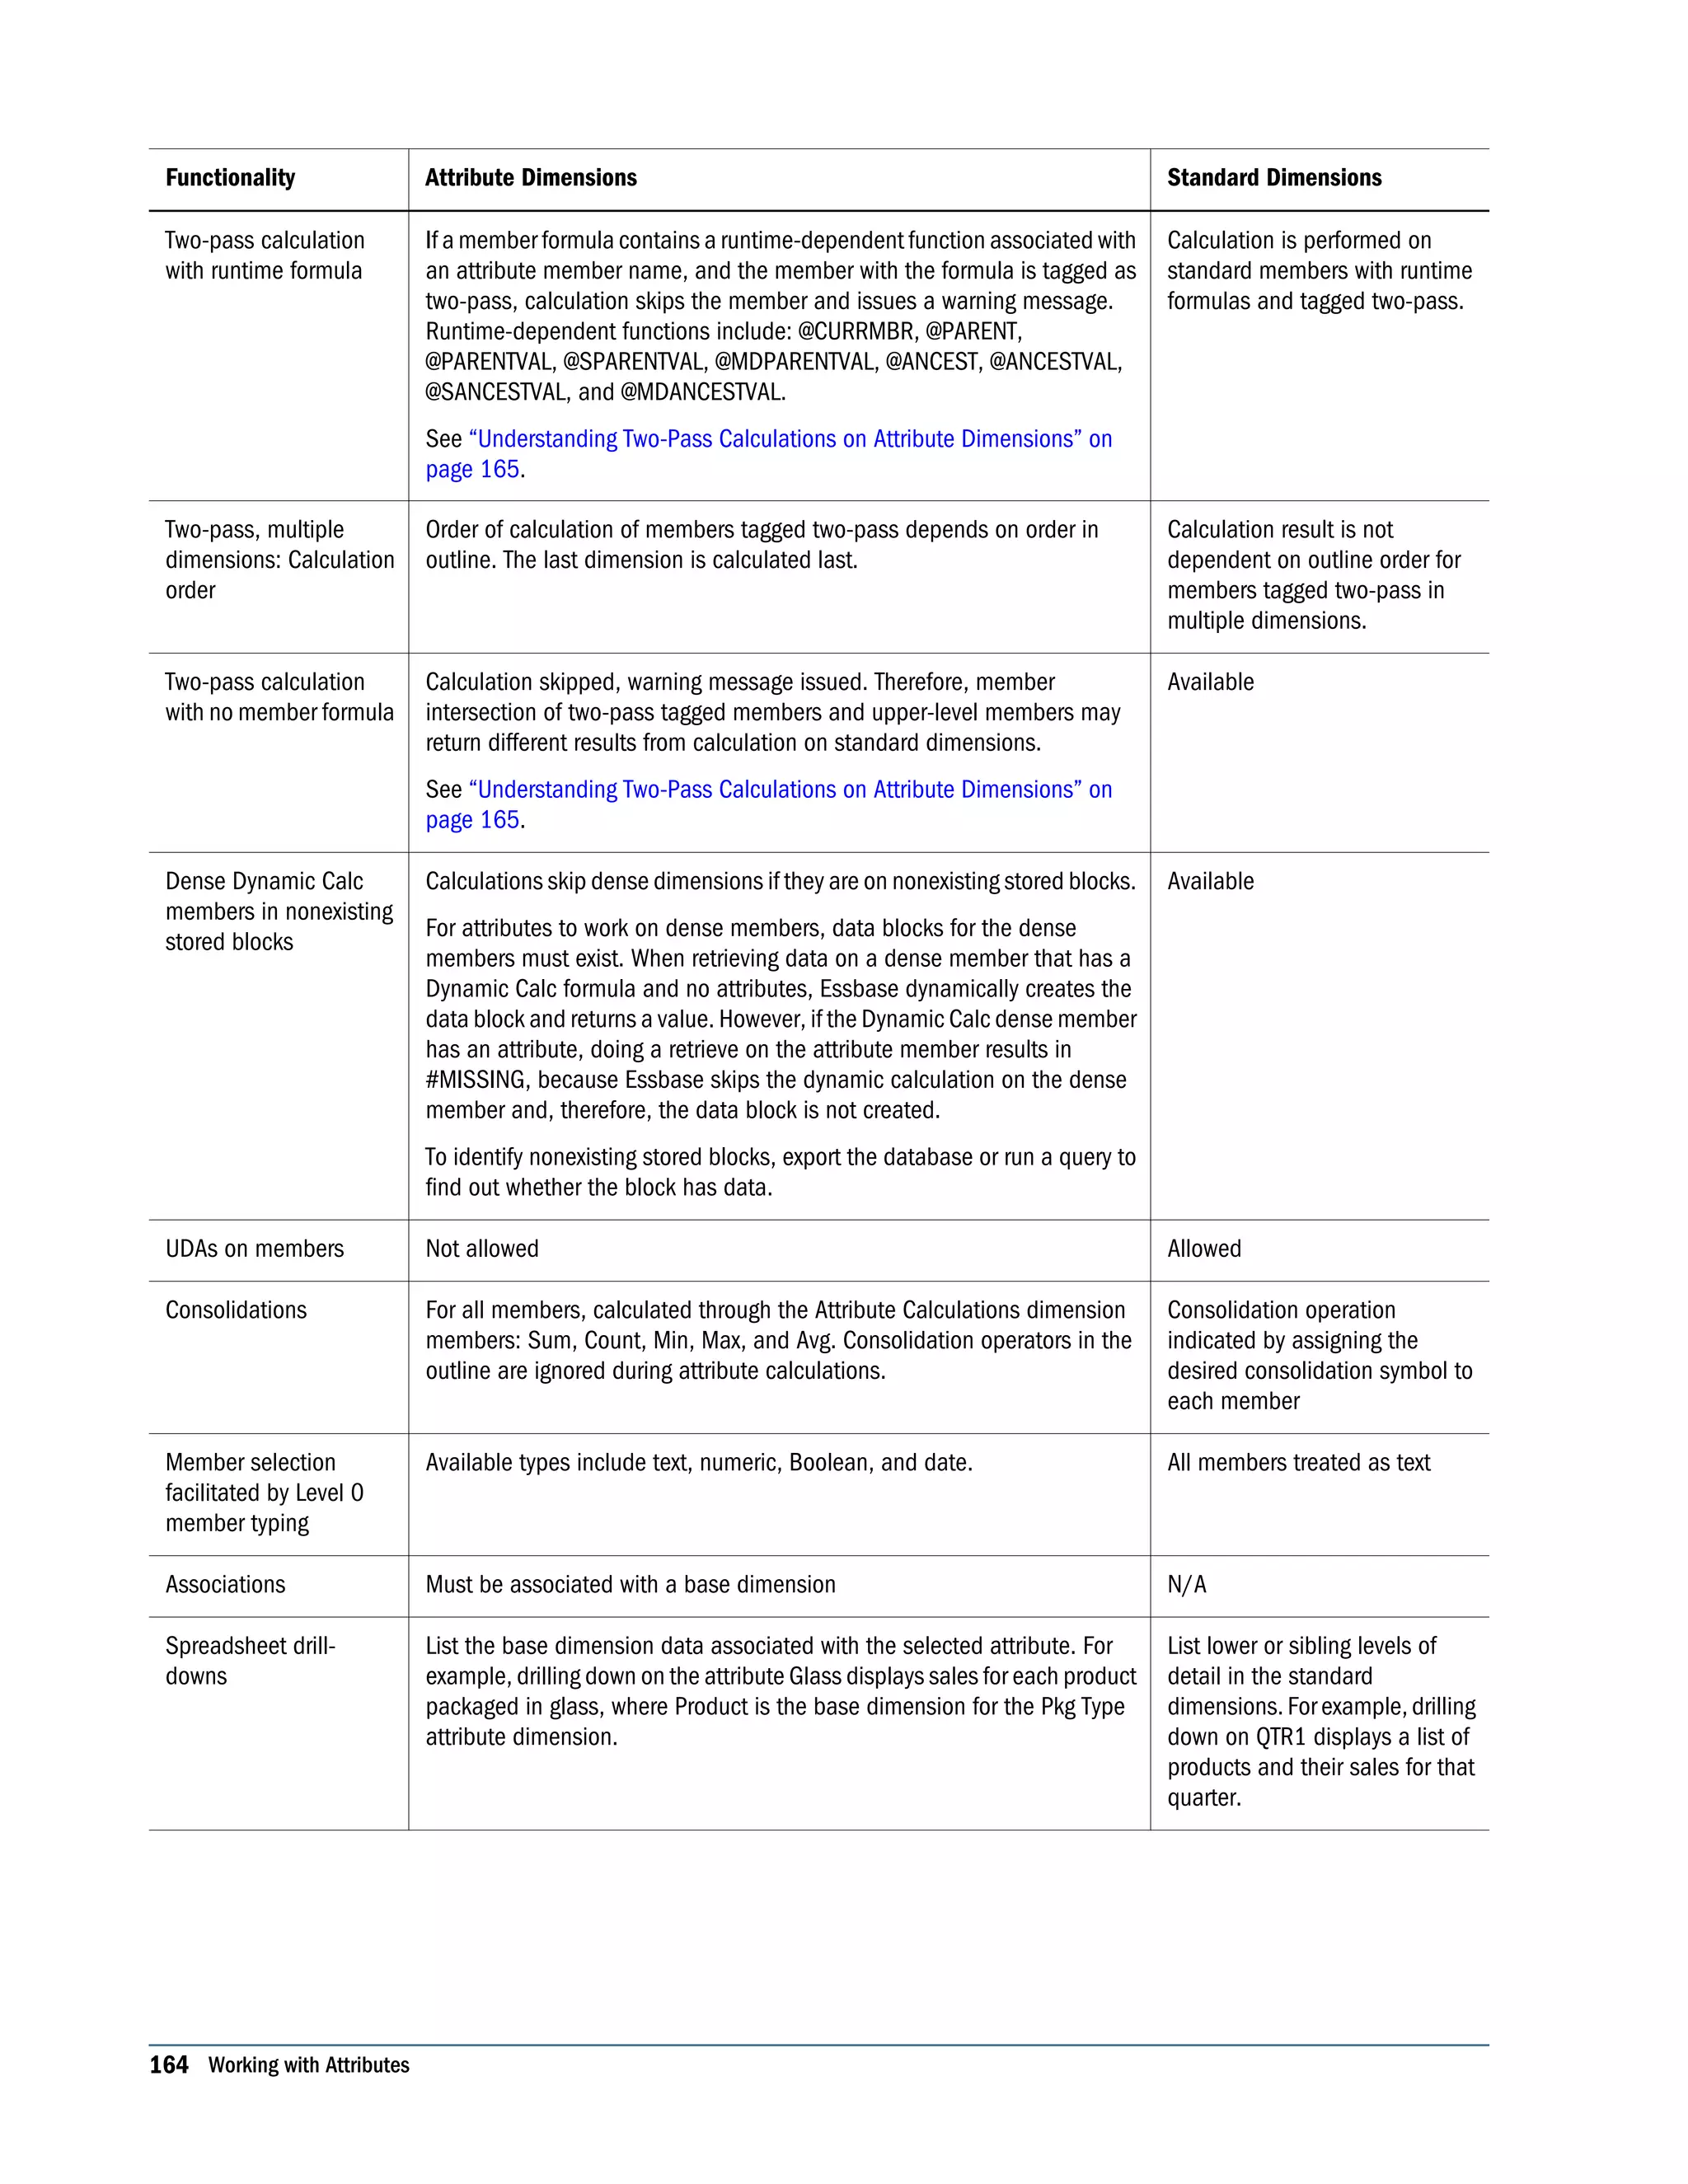
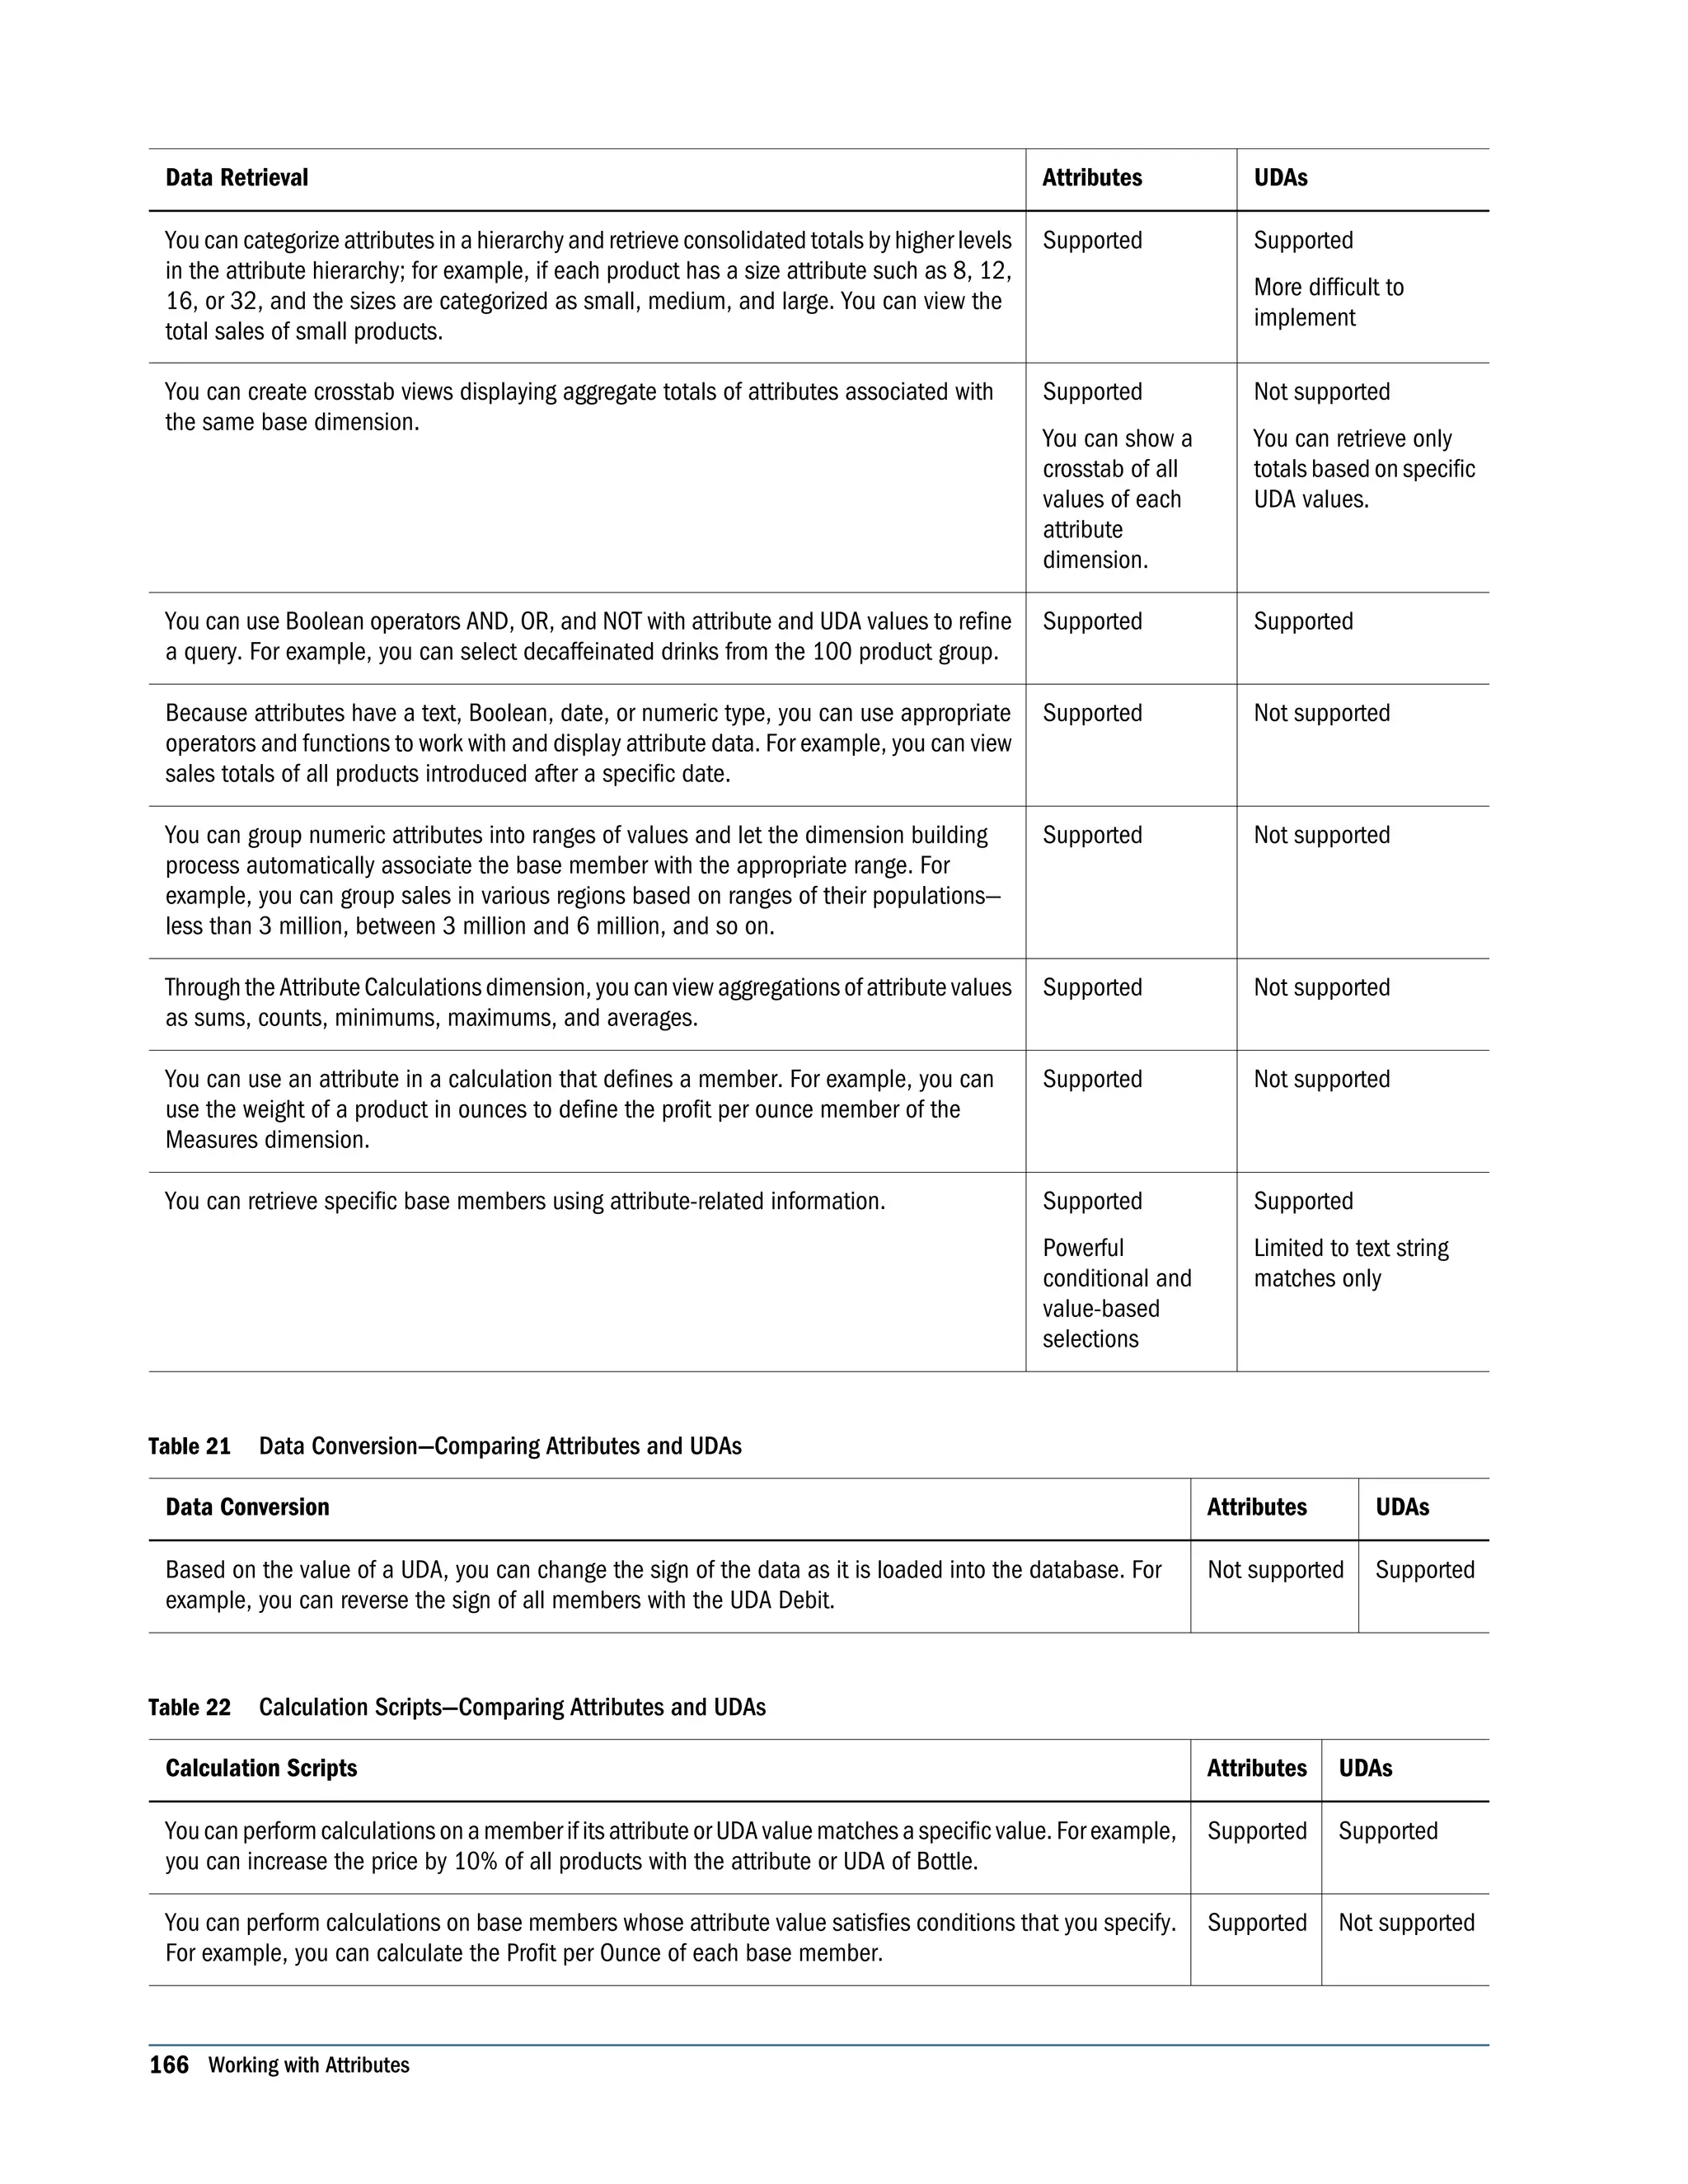
![Understanding Two-Pass Calculations on Attribute Dimensions Thefollowingexample,basedontheProductdimensionintheSample.Basicdatabase,illustrates how two-pass calculations work on attribute dimensions. Assume member “400–30” is tagged as two-pass. If member “400-30” has the following member formula: =”400–10”; Essbase executes the formula when performing a retrieve on “400-30.” If “400-30” has the following member formula: =@CURRMBR("Market"); Essbase skips the calculation because the formula includes the @CURRMBR runtime function, which is not allowed, and issues the following error message: Two-pass calc skipped on member [400-30] in attribute calc” If “400-30” does not have a member formula, the same error message is generated because a member tagged as two-pass must have a formula. Comparing Attributes and UDAs Attributes and UDAs enable analysis based on characteristics of the data. Attributes provide greater capability than UDAs. The tables in this topic describe the differences between attributes and UDAs in these areas of functionality: l Data storage (Table 19 on page 165) l Data retrieval (Table 20 on page 165) l Data conversion (Table 21 on page 166) l Calculation scripts (Table 22 on page 166) Table 19 Data Storage—Comparing Attributes and UDAs Data storage Attributes UDAs You can associate with sparse dimensions. Supported Supported You can associate with dense dimensions. Not supported Supported Table 20 Data Retrieval—Comparing Attributes and UDAs Data Retrieval Attributes UDAs You can group and retrieve consolidated totals by attribute or UDA value. For example, associate the value High Focus Item to various members of the Product dimension and use that term to retrieve totals and details for only those members. Supported Simple Supported More difficult to implement, requiring additional calculation scripts or commands Understanding Attribute Dimensions 165](https://image.slidesharecdn.com/essbasedatabaseadministratorsguide-160425204626/75/Essbase-database-administrator-s-guide-165-2048.jpg)


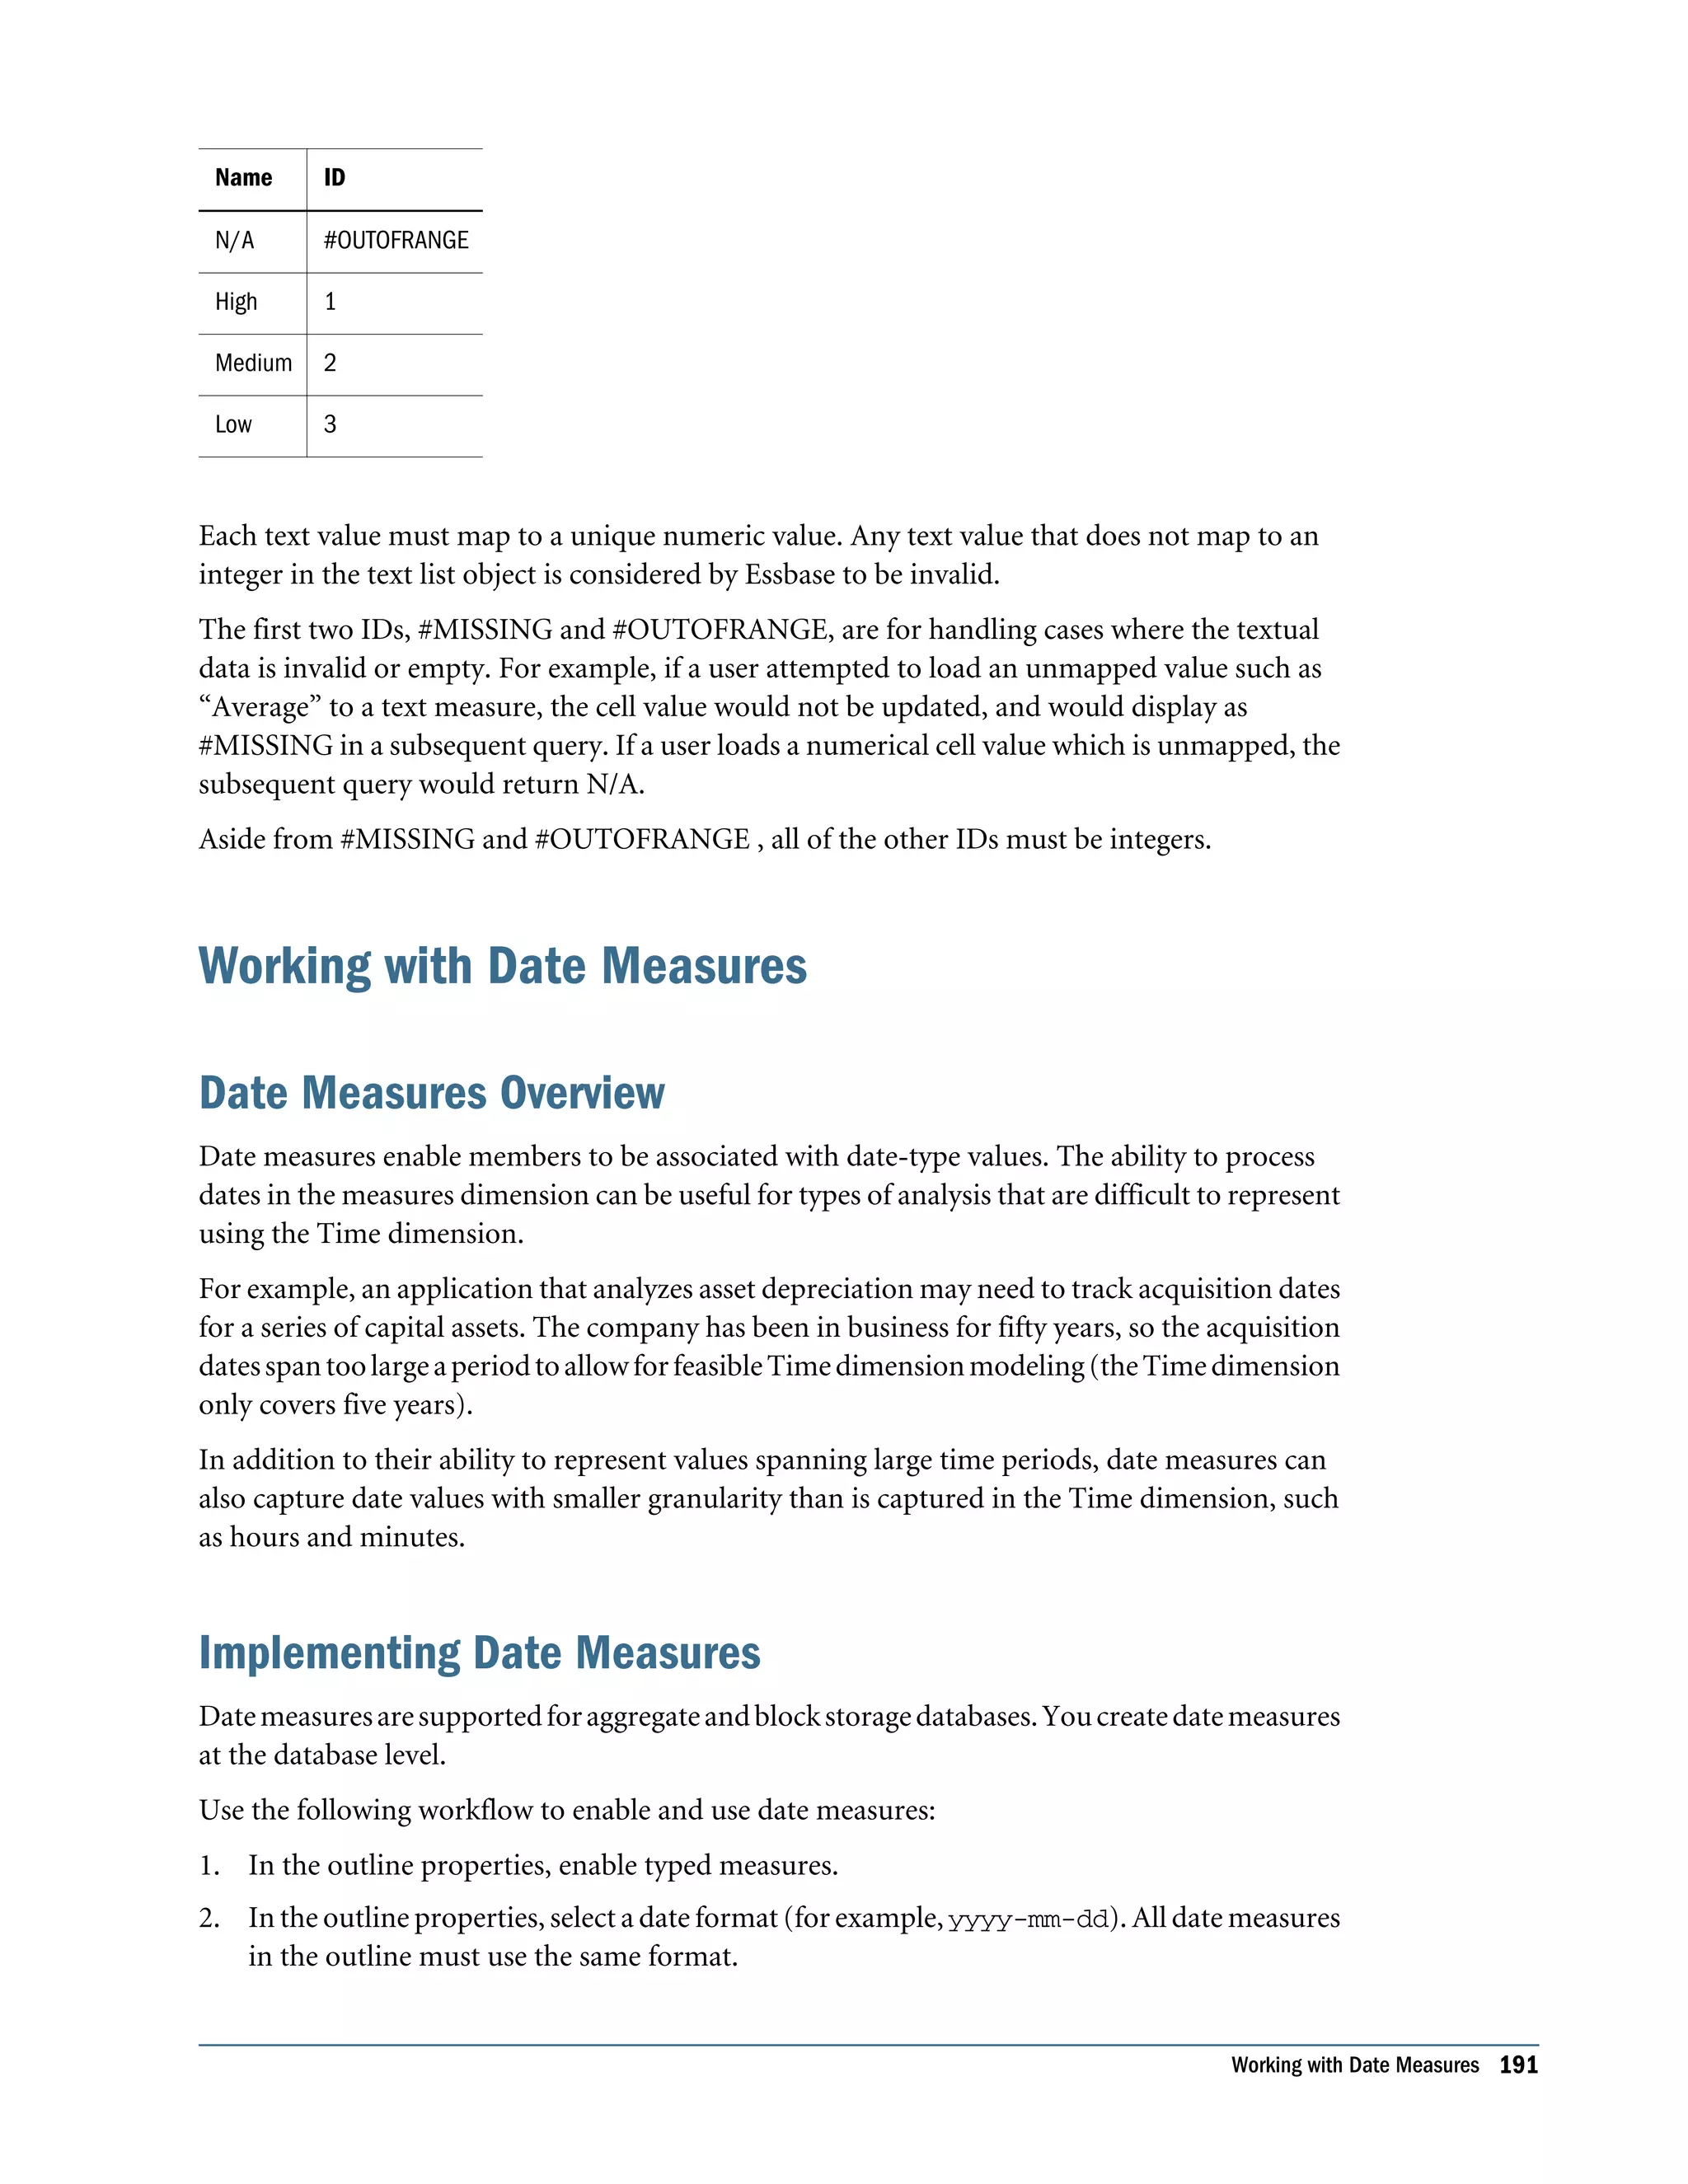


![If mixed (numeric and text or date) data are being loaded, either ensure that Replace mode is sufficient for your numeric data, or create a separate data load process for the numeric data. You can load text or date values with or without rules files. When a rules file is not used, you must distinguish text or date values from member names by enclosing the text values in double quotation marks and prefixing them with the string #Txt:. Here is an example of a line of data in a free-form data load file: "100-10" "New York" "Cust Index" #Txt:"Highly Satisfied" The text value "Highly Satisfied" is pre-fixed with #Txt:to differentiate it from member names such as "New York". The "#Txt" prefix is also required for date measures when a rules file is not used for data load. You can clear, lock and send, and export text or date values just as you perform those operations on numeric values. Consolidating Text and Date Measures By default, text measures are assigned the “^” (never consolidate operator). Text and date measures are not consolidated to higher level members along non Accounts dimensions. If you tag a text or date measure with an operator other than “^”, it will be consolidated along other dimensions based on its internal numeric value. This is not recommended for aggregate storage databases, because only the + operator is supported, and the aggregated values likely will not have any validity for text or date measures. Additionally, Essbase does not translate out-of- range values to #OUTOFRANGE during consolidation. For block storage databases, you can write calculation scripts that consolidate text measures in a custom fashion. You might want to consolidated text measures when they represent ranking measures. For example, consider a text list named "CustomerSatisfaction", which contains mappings such as Excellent=5, Good=4, Fair=3, Poor=2, Bad=1. The values are loaded at level 0. You can consolidate values to parent levels by taking an average of values at child levels. For example, the value of “CustomerSatisfaction” at [Qtr1] is the average of values at [Jan], [Feb], [Mar]. Retrieving Data With Text and Date Measures Text or date measures can be queried in the same way as numerical measures, using Smart View, Grid API clients, Report Writer, and MDX. The corresponding cells are displayed with the appropriate text values or formatted date values. The following Report Writer commands are designed to work with numeric data, and are not supported for text or date measures: l RESTRICT l TOP l BOTTOM 194 Working with Typed Measures](https://image.slidesharecdn.com/essbasedatabaseadministratorsguide-160425204626/75/Essbase-database-administrator-s-guide-194-2048.jpg)


![o Requires that data outside the replicated area be calculated. o Requires calculation scripts from which you cannot extract only the portion to be calculated at the data target. o Is being replicated onto a computer with little processing power, such as a laptop. l To optimize the replication of an aggregate storage database when the aggregate storage database is the target and a block storage database is the source and the two outlines are identical, use one of these methods: m The REPLICATIONASSUMEIDENTICALOUTLINE configuration setting in essbase.cfg. The setting can be enabled at the server, application, or database level. The syntax for the setting is as follows: REPLICATIONASSUMEIDENTICALOUTLINE [appname [dbname]] TRUE | FALSE When updating the essbase.cfg file, you must stop and then restart Essbase Server for the changes to take effect. m The alter database MaxL statement with the replication_assume_identical_outline grammar. The statement can be enabled only at the database level. The syntax for the statement is as follows: alter database appname.dbname enable | disable replication_assume_identical_outline; When using the alter database statement, you do not need to stop and restart the aggregate storage application. Both optimization methods affect only the target aggregate storage application; the source block storage application is not affected. The methods do not apply to block storage replication. l Partitioning along a dense dimension takes longer than partitioning along a sparse dimension.WhenEssbasereplicatesdatapartitionedalongadensedimension,itmustaccess every block in the data source and then create each block in the data target during the replication operation. l You cannot replicate data into a member that is dynamically calculated at the data target. Essbase does not load or replicate into Dynamic Calc and Dynamic Calc and Store members, because these members do not contain data until a user requests it at runtime. Essbase avoids sending replicated data for both dynamic dense and dynamic sparse members on the replication target, because this data is not stored on the data target. To replicate only the data values that have changed instead of the entire partition, see “Populating or Updating Replicated Partitions” on page 257. Replicated Partitions and Port Usage With replicated partitions, users connect to the target database only. When data is updated on the target database, the process of replicating data from the source database to the target database utilizesoneportandthisconnectionisbasedontheusernamedeclaredinthepartitiondefinition (partition user). Replicated Partitions 229](https://image.slidesharecdn.com/essbasedatabaseadministratorsguide-160425204626/75/Essbase-database-administrator-s-guide-229-2048.jpg)
![l Transparent l Linked See “Partition Types” on page 217. Setting up the Data Source and the Data Target Define the data source and data target, including specifying the source application and database, the target application and database, and the location of each. For a list of supported block and aggregate storage data source and data target combinations for each partition type, see “Data Sources and Data Targets” on page 219. ä To set up the data source and the data target: 1 Specify the names of the application and database for the data source and data target. See“SpecifyingConnectionInformationforPartitions”intheOracleEssbaseAdministration Services Online Help. 2 Specify the locations of the Essbase Servers on which the data source and data target reside. See“SpecifyingConnectionInformationforPartitions”intheOracleEssbaseAdministration Services Online Help. If you want to use network aliases for the data source or data target names, ensure that the aliases are propagated to all computers on your system. Otherwise, use the full server name. To propagate an alias to all the computers on your system, edit the hosts file (you need root or administrative privileges) for the operating system you are using: l Windows: %WINDIR%/system32/drivers/etc/hosts l UNIX: /etc/hosts In the hosts file, add an entry using the following syntax: IP_address hostname.domainname alias [alias] The following example specifies one alias: 172.234.23.1 myhost.mydomain abcdefg.hijk.123 This example specifies multiple aliases: 172.234.23.1 myhost.mydomain abcdefg.hijk.123 lmnopqrs.tuvw.456 Note: Do not use localhost as an alias to specify source and target server names. 3 Optional: Enter a note to describe the data source or data target. See“SpecifyingConnectionInformationforPartitions”intheOracleEssbaseAdministration Services Online Help. 4 Optional: Specify the outline to which you can make changes. 244 Creating and Maintaining Partitions](https://image.slidesharecdn.com/essbasedatabaseadministratorsguide-160425204626/75/Essbase-database-administrator-s-guide-244-2048.jpg)
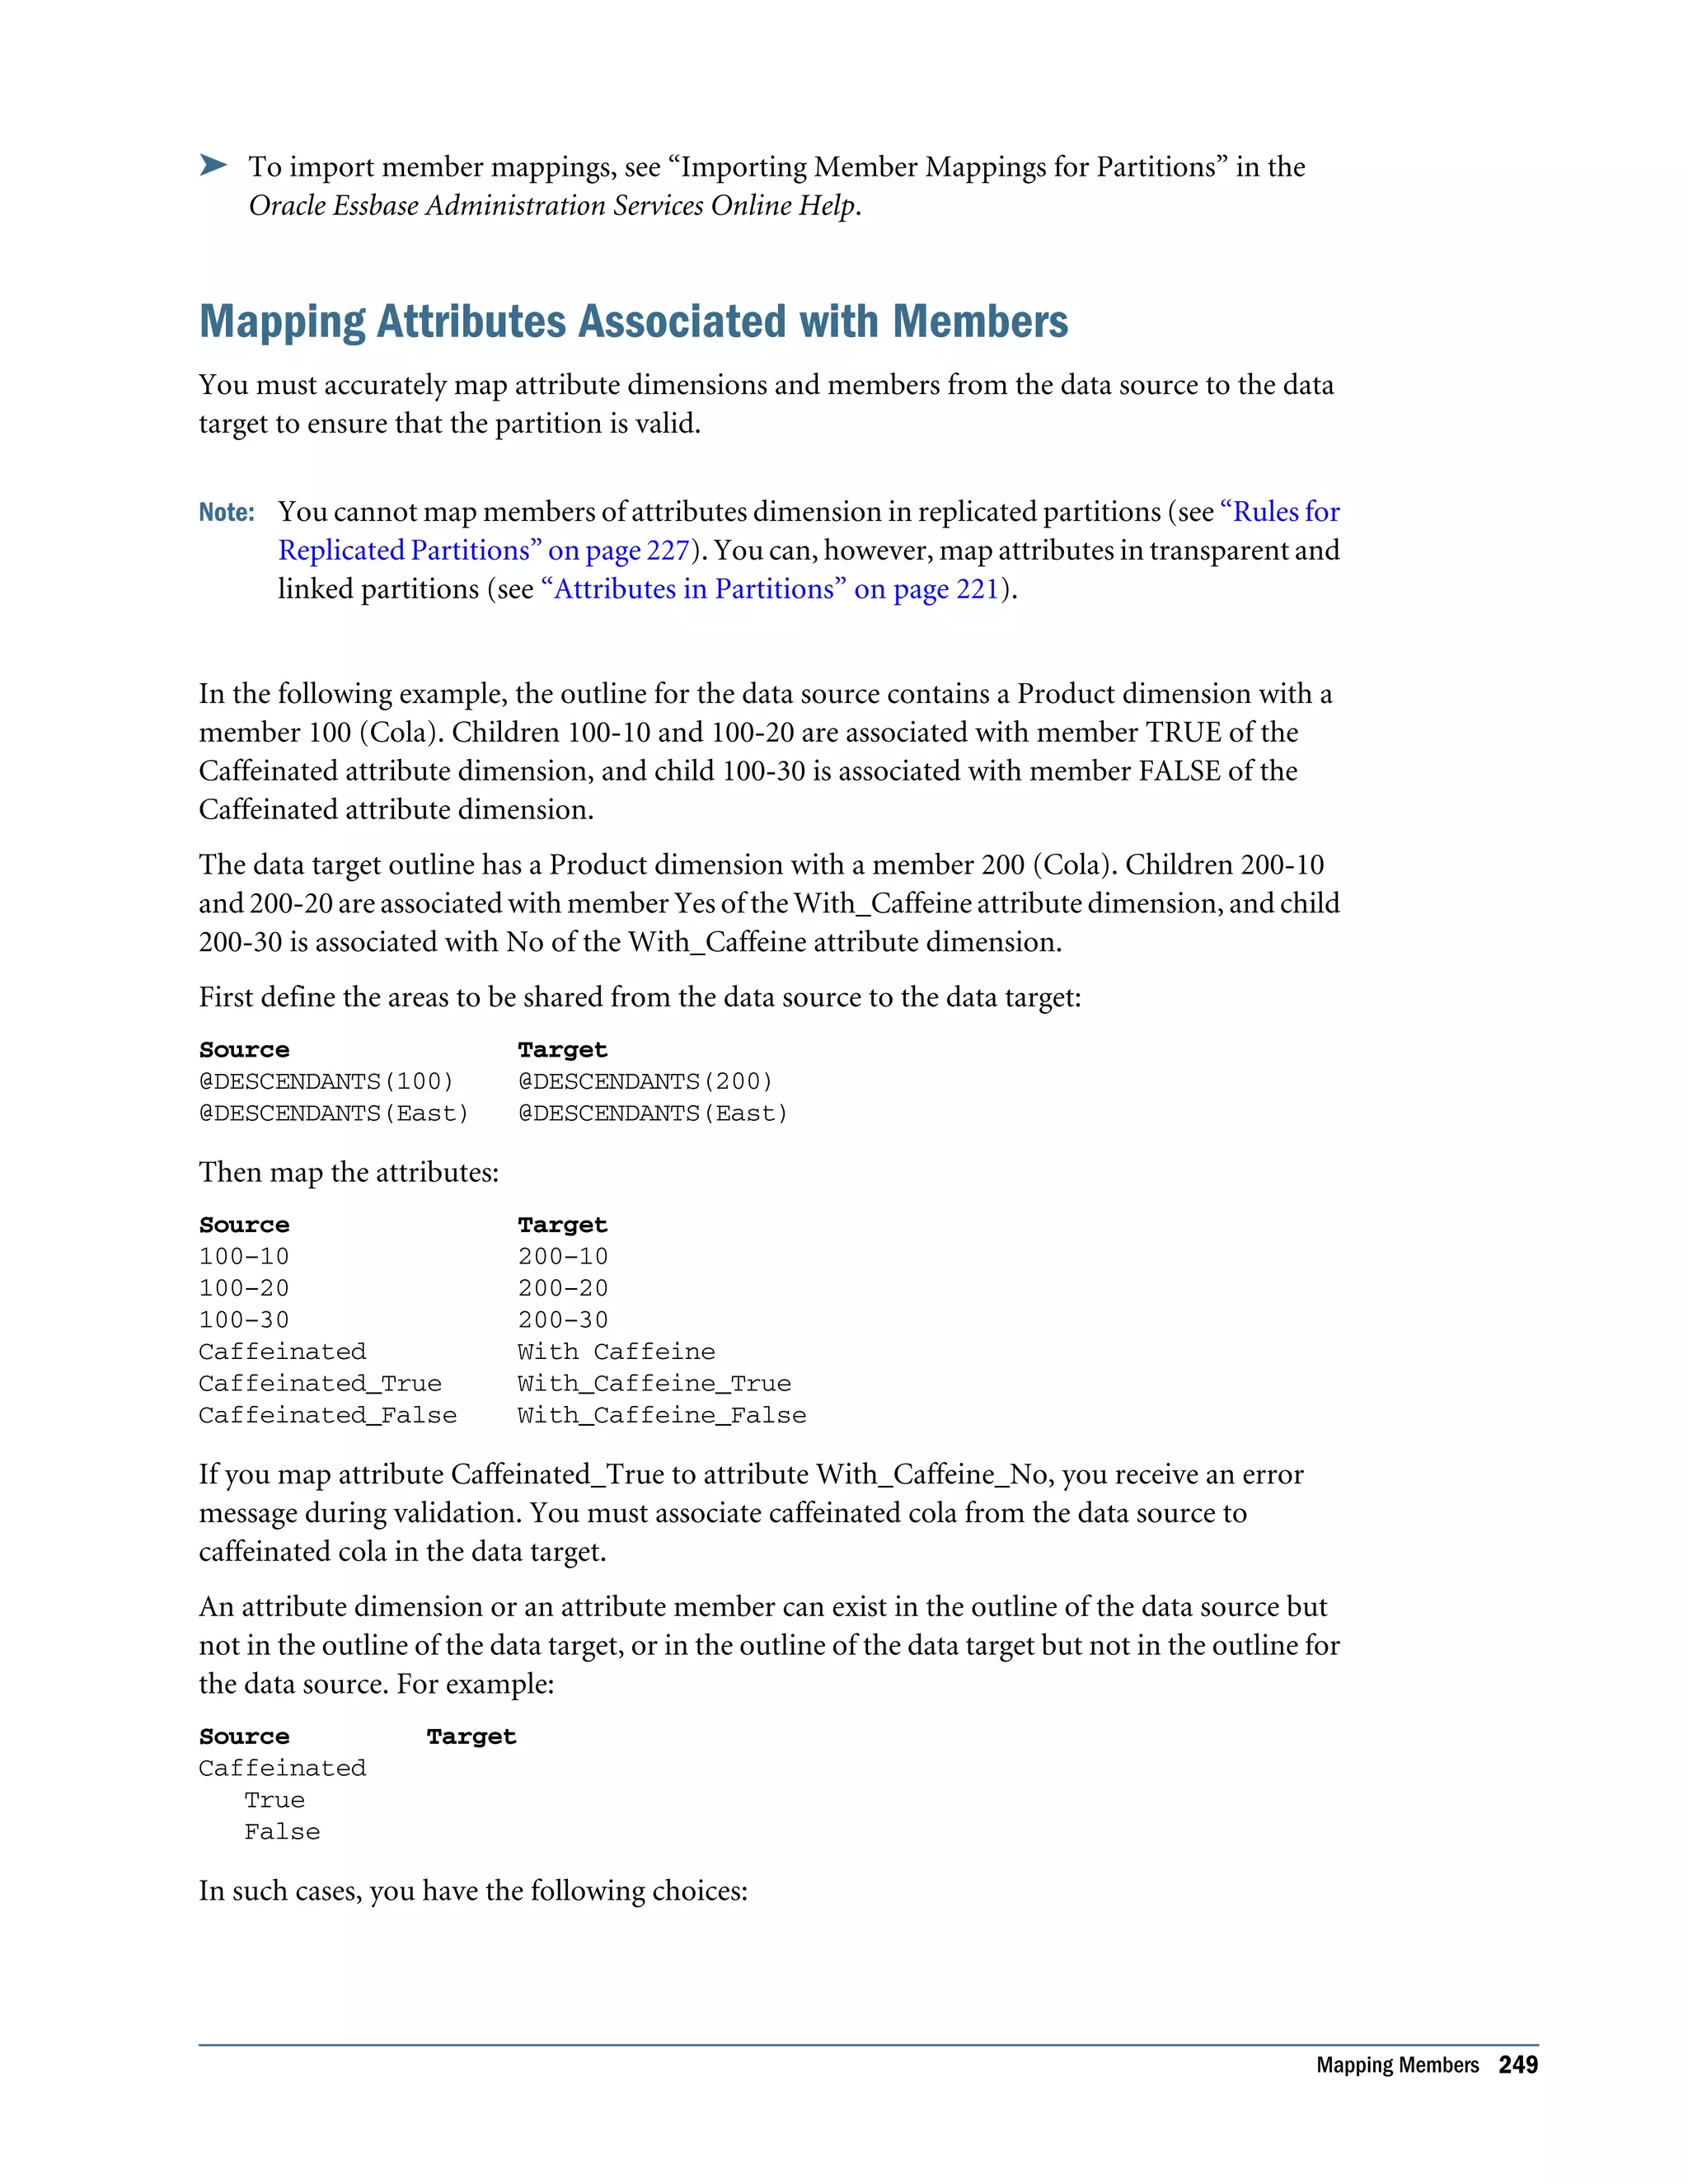
![ä To define a partition area, see “Defining Areas in Partitions” in the Oracle Essbase Administration Services Online Help. Mapping Members To create a partition, Essbase must be able to map all shared data source members to data target members. Oracle recommends that data source member names and data target member names are the same to reduce maintenance requirements for the partition, especially when the partition is based on member attributes. Ifthedatasourceanddatatargetcontainthesamenumberofmembersandusethesamemember names, Essbase automatically maps the members. You need only validate, save, and test the partitions. If Essbase cannot map automatically, you must map manually. Map data source members to data target members in any of the following ways: l Enter or select member names manually. (When you type a duplicate member name, type the qualified member name and enclose it in double quotation marks; for example, “[State].[New York]” l Import the member mappings from an external data file. l Create area-specific mappings. Note: You can use substitution variables for member names in mapping specifications. See “Substitution Variables in Partition Definitions” on page 221. To map members, see “Defining Global Mappings in Partitions” in the Oracle Essbase Administration Services Online Help. Mapping Members with Different Names If the data source outline and data target outline contain different members, or if the members have different names in each outline, you must map the data source members to the data target members. In the following example, the first two member names are identical, but the third member name is different: Source Target Product Product Cola Cola Year Year 1998 1998 Market Market East East_Region Because you know that East in the data source corresponds to East_Region in the data target, map East to East_Region. Then, all references to East_Region in the data target point to East in 246 Creating and Maintaining Partitions](https://image.slidesharecdn.com/essbasedatabaseadministratorsguide-160425204626/75/Essbase-database-administrator-s-guide-246-2048.jpg)


![m ].[ m ].[ m ] l Using Move operations, move the fields to the following sequence: 1 2 3 4 5 6 7 8 [ Central ].[ Kansas ].[ Kansas City ] 706010 l Using Join operations, join together fields 1 2 3 4 5 6 7 to create the single field to which the attributes are to be associated: [Central].[Kansas].[Kansas City]. The rules file now shows two fields: 1 2 [Central].[Kansas].[Kansas City] 706010 Building Duplicate Member Outlines 345](https://image.slidesharecdn.com/essbasedatabaseadministratorsguide-160425204626/75/Essbase-database-administrator-s-guide-345-2048.jpg)


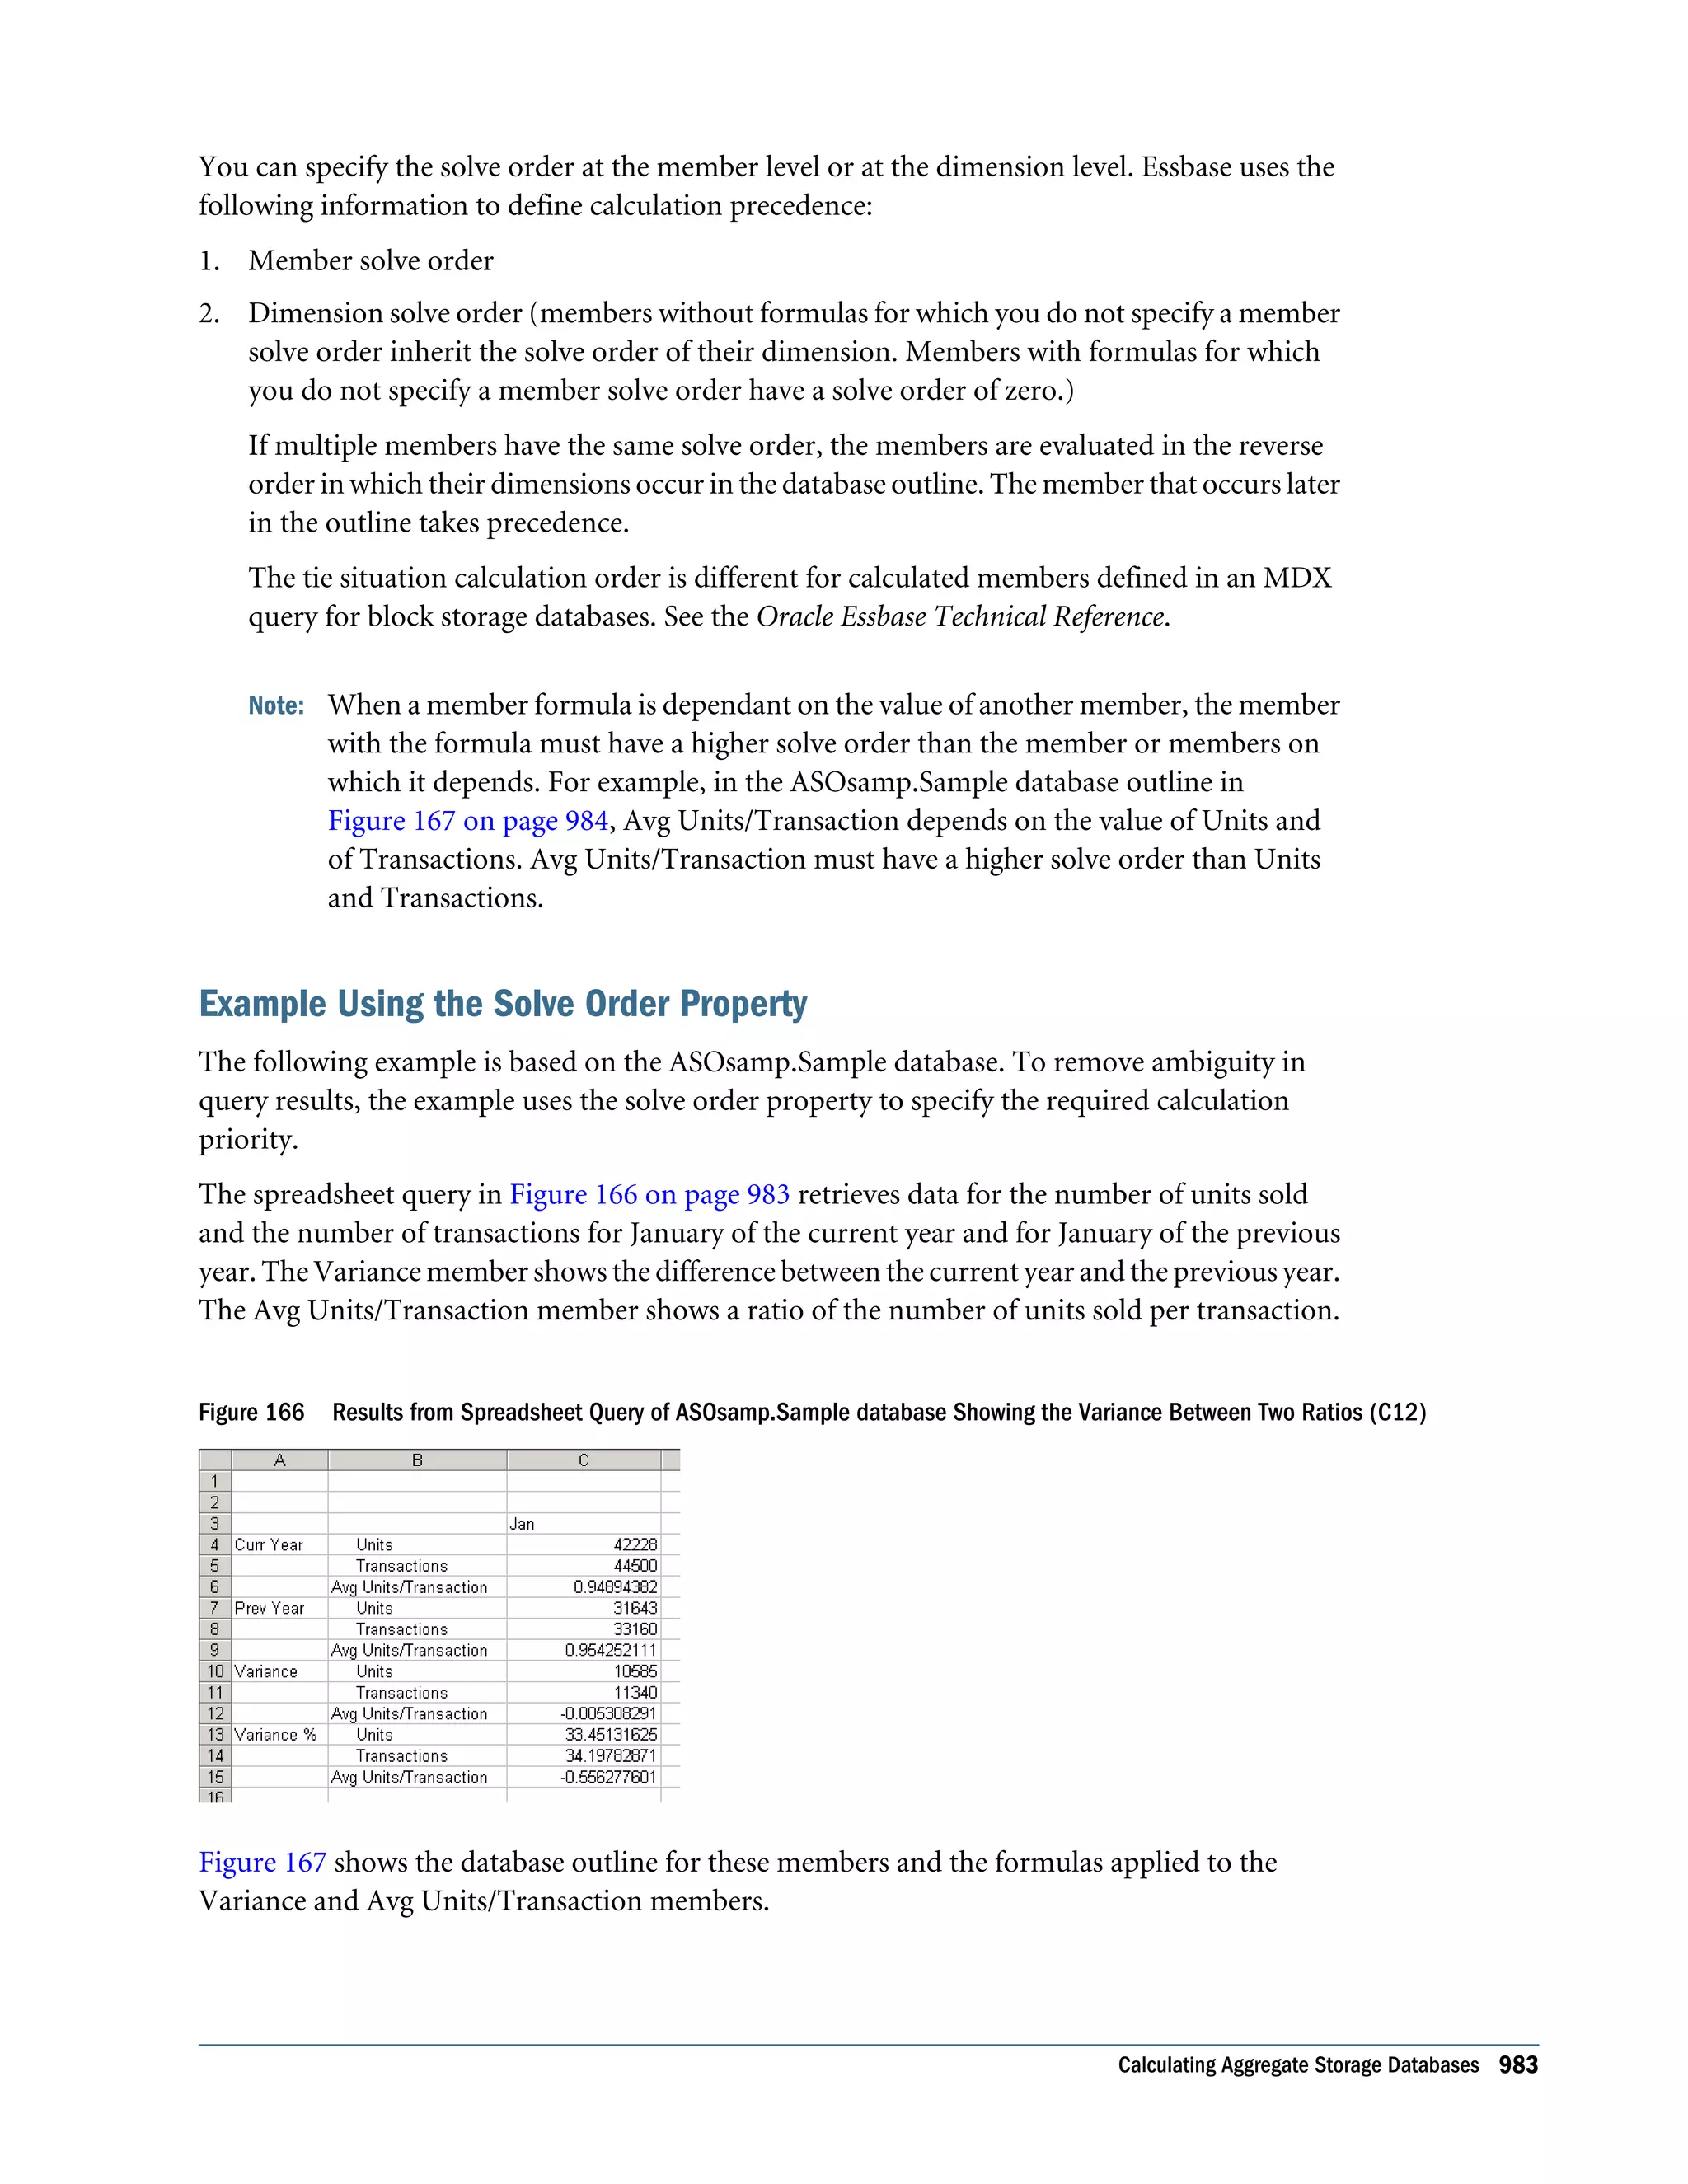
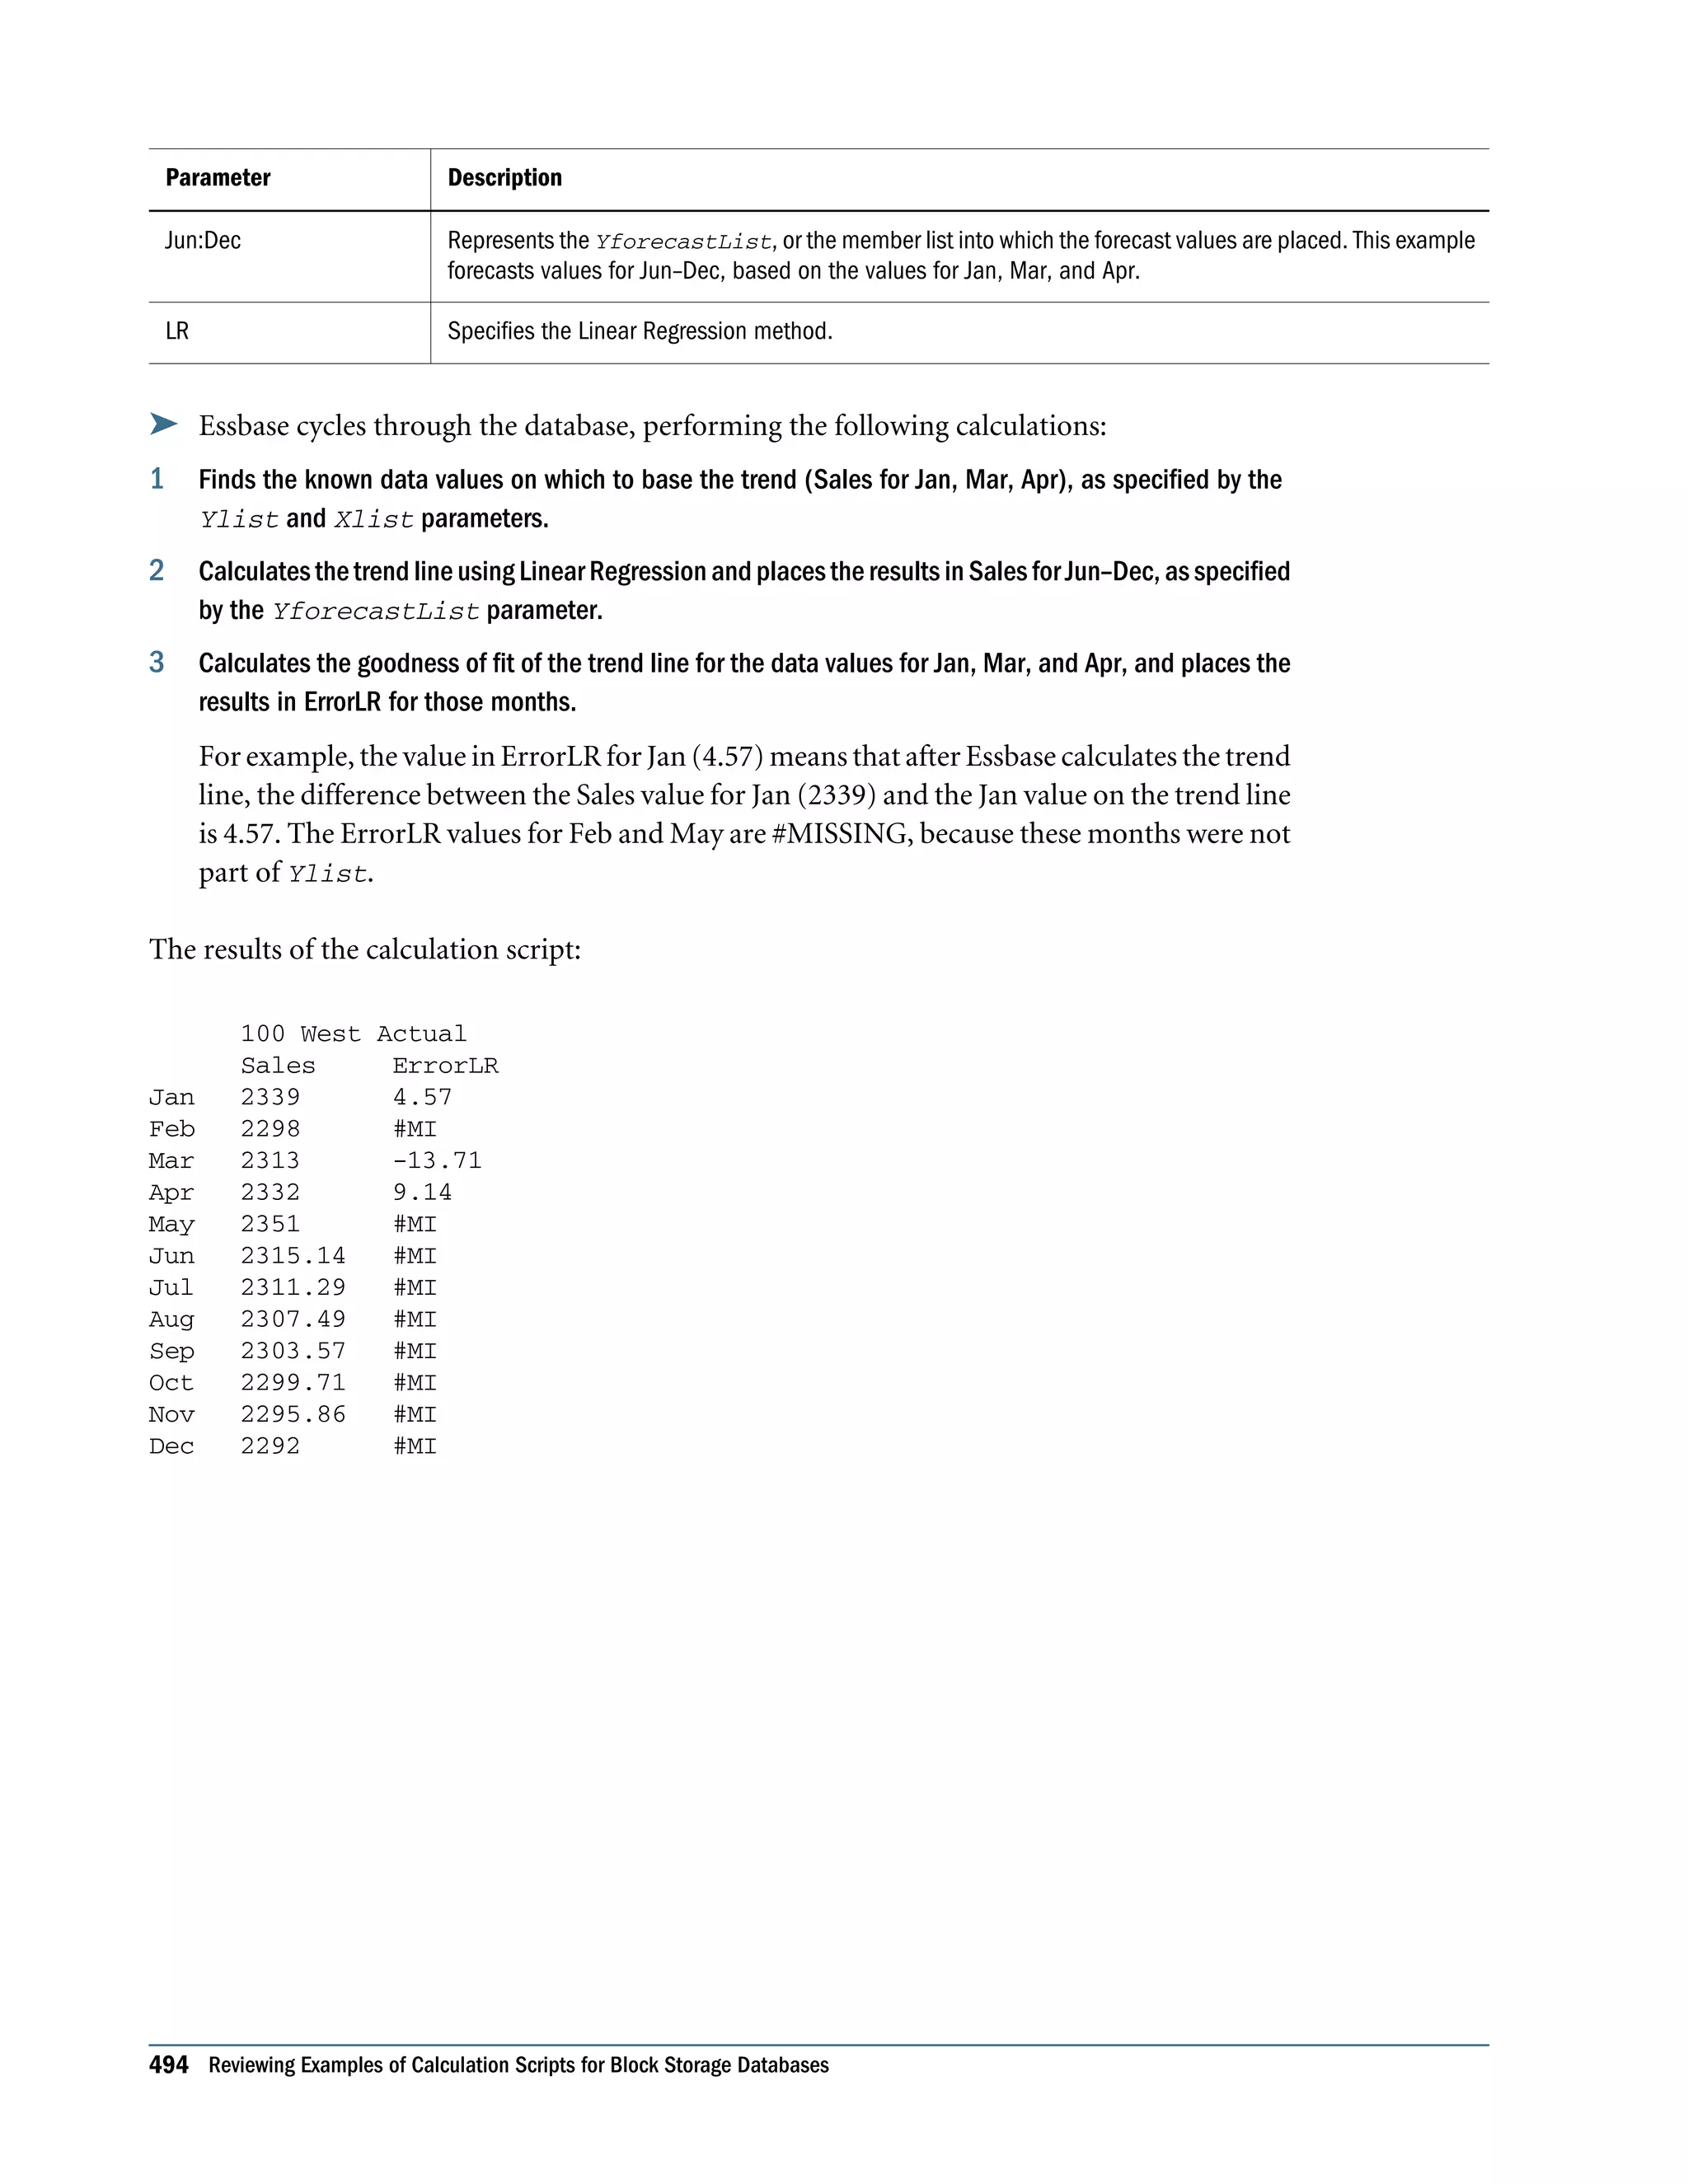
![Note: Foralistoffunctionsthathavethemostsignificanteffectonqueryretrieval,see“Choosing Between Member Set Functions and Performance” on page 900. Displaying a Retrieval Factor To help you estimate any increase in retrieval time, Essbase calculates a retrieval factor for a database outline when you save the outline. Essbase calculates this retrieval factor based on the dynamicallycalculateddatablockthatisthemostexpensiveforEssbasetocalculate.Theretrieval factor takes into account only aggregations. It does not consider the retrieval impact of formulas. The retrieval factor is the number of data blocks that Essbase must retrieve from the disk or from the database to calculate the most expensive block. If the database has Dynamic Calc or Dynamic Calc and Store members in dense dimensions only (no Dynamic Calc or Dynamic Calc and Store members in sparse dimensions), the retrieval factor is 1. An outline with a high retrieval factor (for example, greater than 2000) can cause long delays when users retrieve data. However, the actual impact on retrieval time also depends on how many dynamically calculated data values a user retrieves. The retrieval factor is only an indicator. In some applications, using Dynamic Calc members may reduce retrieval time because the database size and index size are reduced. Essbase displays the retrieval factor value in the application log. ä To view an estimated retrieval factor, see “Viewing the Essbase Server and Application Logs” on page 748. A message similar to this sample indicates a retrieval factor: [Wed Sep 20 20:04:13 2000] Local/Sample///Info (1012710) Essbase needs to retrieve [1] Essbase kernel blocks in order to calculate the top dynamically-calculated block. This message tells you that Essbase needs to retrieve one block to calculate the most expensive dynamically calculated data block. Displaying a Summary of Dynamically Calculated Members When you add Dynamic Calc or Dynamic Calc and Store members to a database outline and save the outline, Essbase provides a summary of how many members are tagged as Dynamic Calc and Dynamic Calc and Store. Essbase displays the summary in the application log. ä To view a summary of dynamically calculated members, see “Viewing the Essbase Server and Application Logs” on page 748. A message similar to this sample is displayed: [Wed Sep 20 20:04:13 2000]Local/Sample///Info(1007125) The number of Dynamic Calc Non-Store Members = [ 8 6 0 0 2] Reducing the Impact on Retrieval Time 435](https://image.slidesharecdn.com/essbasedatabaseadministratorsguide-160425204626/75/Essbase-database-administrator-s-guide-435-2048.jpg)
![[Wed Sep 20 20:04:13 2000]Local/Sample///Info(1007126) The number of Dynamic Calc Store Members = [ 0 0 0 0 0] This message tells you that there are eight Dynamic Calc members in the first dimension of the database outline, six in the second dimension, and two in the fifth dimension. Dynamic Time Series members are included in this count. This example does not include Dynamic Calc and Store members. Increasing Retrieval Buffer Size When you retrieve data into Spreadsheet Add-in or use Report Writer to retrieve data, Essbase uses the retrieval buffer to optimize the retrieval. Essbase processes the data in sections. Increasing the retrieval buffer size can significantly reduce retrieval time because Essbase can process larger sections of data simultaneously. By default, the retrieval buffer size is 10 KB. However, you may speed retrieval time if you set the retrieval buffer size greater than 10 KB. See “Setting the Retrieval Buffer Size” on page 905. ä To set the retrieval buffer size, use a tool: Tool Topic Location Administration Services Setting the Size of Retrieval Buffers Oracle Essbase Administration Services Online Help MaxL alter database Oracle Essbase Technical Reference ESSCMD SETDBSTATEITEM Oracle Essbase Technical Reference Using Dynamic Calculator Caches By default, when Essbase calculates a Dynamic Calc member in a dense dimension (for example, for a query), it writes all blocks needed for the calculation into an area in memory called the dynamic calculator cache. When Essbase writes these blocks into the dynamic calculator cache, it expands them to include all Dynamic Calc members in the dense dimensions. If a query includes a two-pass calculation member in a dense dimension, the query needs one dynamic calculator cache for each block retrieved. Using the Essbase dynamic calculator cache enables centralized control of memory usage for dynamic calculations. Managing data blocks in the dynamic calculator cache also reduces the overall memory space requirement and can improve performance by reducing the number of calls to the operating system to do memory allocations. Note: The dynamic calculator cache and the calculator cache use different approaches to optimizing calculation performance. See “Sizing the Calculator Cache” on page 836. 436 Dynamically Calculating Data Values](https://image.slidesharecdn.com/essbasedatabaseadministratorsguide-160425204626/75/Essbase-database-administrator-s-guide-436-2048.jpg)
![Reviewing Dynamic Calculator Cache Usage Essbase writes two messages to the application log for each data retrieval. In the following example, the first message describes the total time required for the retrieval: [Thu Aug 03 14:33:00 2005]Local/Sample/Basic/aspen/Info(1001065) Regular Extractor Elapsed Time : [0.531] seconds [Thu Aug 03 14:33:00 2005]Local/Sample/Basic/aspen/Info(1001401) Regular Extractor Big Blocks Allocs -- Dyn.Calc.Cache : [30] non-Dyn.Calc.Cache : [0] If a dynamic calculator cache is used, a second message displays the number of blocks calculated within the data calculator cache (Dyn.Calc.Cache: [n]) and the number of blocks calculated in memory outside dynamic calculator cache (non-Dyn.Calc.Cache: [n]). To determine whether the dynamic calculator cache is being used effectively, review both messages and consider your essbase.cfg settings. For example, if the message indicates that blocks were calculated outside and in a dynamic calculator cache, you may increase the DYNCALCCACHEMAXSIZE setting. If the specified maximum size is all that you can afford for all dynamic calculator caches on the server, and if using memory outside the calculator cache to complete dynamically calculated retrievals results in unacceptable delays (for example, because of swapping or paging activity), set DYNCALCCACHEWAITFORBLK to TRUE. You can use the query database MaxL statement with the performance statistics grammar to view a summary of dynamic calculator cache activity. See the Oracle Essbase Technical Reference. Using Dynamic Calculations with Standard Procedures Using dynamic calculations with standard Essbase procedures affects these processes: l Clearing data and data blocks You can use the CLEARBLOCK DYNAMIC command to remove data blocks for Dynamic Calc and Store member combinations. You can use the CLEARDATA command to mark Dynamic Calc and Store data blocks, so that Essbase knows to recalculate the blocks. The CLEARDATA command has no effect on data values for Dynamic Calc members. l Copying data You cannot copy data to a dynamically calculated data value. You cannot specify a Dynamic Calc or Dynamic Calc and Store member as the target for the DATACOPY calculation command. l Converting currencies You cannot specify a Dynamic Calc or Dynamic Calc and Store member as the target for the CCONV command. l Loading data Using Dynamic Calculations with Standard Procedures 437](https://image.slidesharecdn.com/essbasedatabaseadministratorsguide-160425204626/75/Essbase-database-administrator-s-guide-437-2048.jpg)


![if the Scenario dimension has four members, the following command creates an array called Discount with four entries: ARRAY Discount[Scenario]; You can use multiple arrays at a time. Specifying Global Settings for a Database Calculation Table 84 lists the commands that define calculation behavior: Table 84 List of Commands for Defining Calculation Behavior Command Calculation SET AGGMISSG Specify how Essbase treats #MISSING values during a calculation SET CACHE Adjust the default calculator cache size SET CALCPARALLEL Enable parallel calculation (see “Using Parallel Calculation” on page 874) SET CALCTASKDIMS Increase the number of dimensions used to identify tasks for parallel calculation (see “Using Parallel Calculation” on page 874) SET FRMLBOTTOMUP Optimize the calculation of sparse dimension formulas in large database outlines (see “Optimizing Formulas on Sparse Dimensions in Large Database Outlines” on page 885) SET MSG SET NOTICE Display messages to trace a calculation SET UPDATECALC Turn on and turn off Intelligent Calculation (see “Turning Intelligent Calculation On and Off” on page 412) SET CLEARUPDATESTATUS Control how Essbase marks data blocks for Intelligent Calculation (see “Using the SET CLEARUPDATESTATUS Command” on page 413) SET LOCKBLOCK Specify the maximum number of blocks that Essbase can lock concurrently when calculating a sparse member formula SET CREATEBLOCKEQ Turn on and turn off the Create Blocks on Equation setting, which controls the creation of blocks when you assign nonconstant values to members of a sparse dimension (see “Nonconstant Values Assigned to Members in a Sparse Dimension” on page 886) SET CREATENONMISSINGBLK Enable calculations on potential data blocks and save these blocks when the result is not #MISSING SET UPTOLOCAL For currency conversions, restrict consolidations to parents that have the same defined currency (see “Calculating Databases” on page 213) A SET command in a calculation script stays in effect until the next occurrence of the same SET command. In the following calculation script, Essbase displays messages at the detail level (SET MSG DETAIL;) when calculating the Year dimension and displays messages at the summary level (SET MSG SUMMARY;) when calculating the Measures dimension: SET MSG DETAIL; CALC DIM(Year); Using Calculation Commands 459](https://image.slidesharecdn.com/essbasedatabaseadministratorsguide-160425204626/75/Essbase-database-administrator-s-guide-459-2048.jpg)


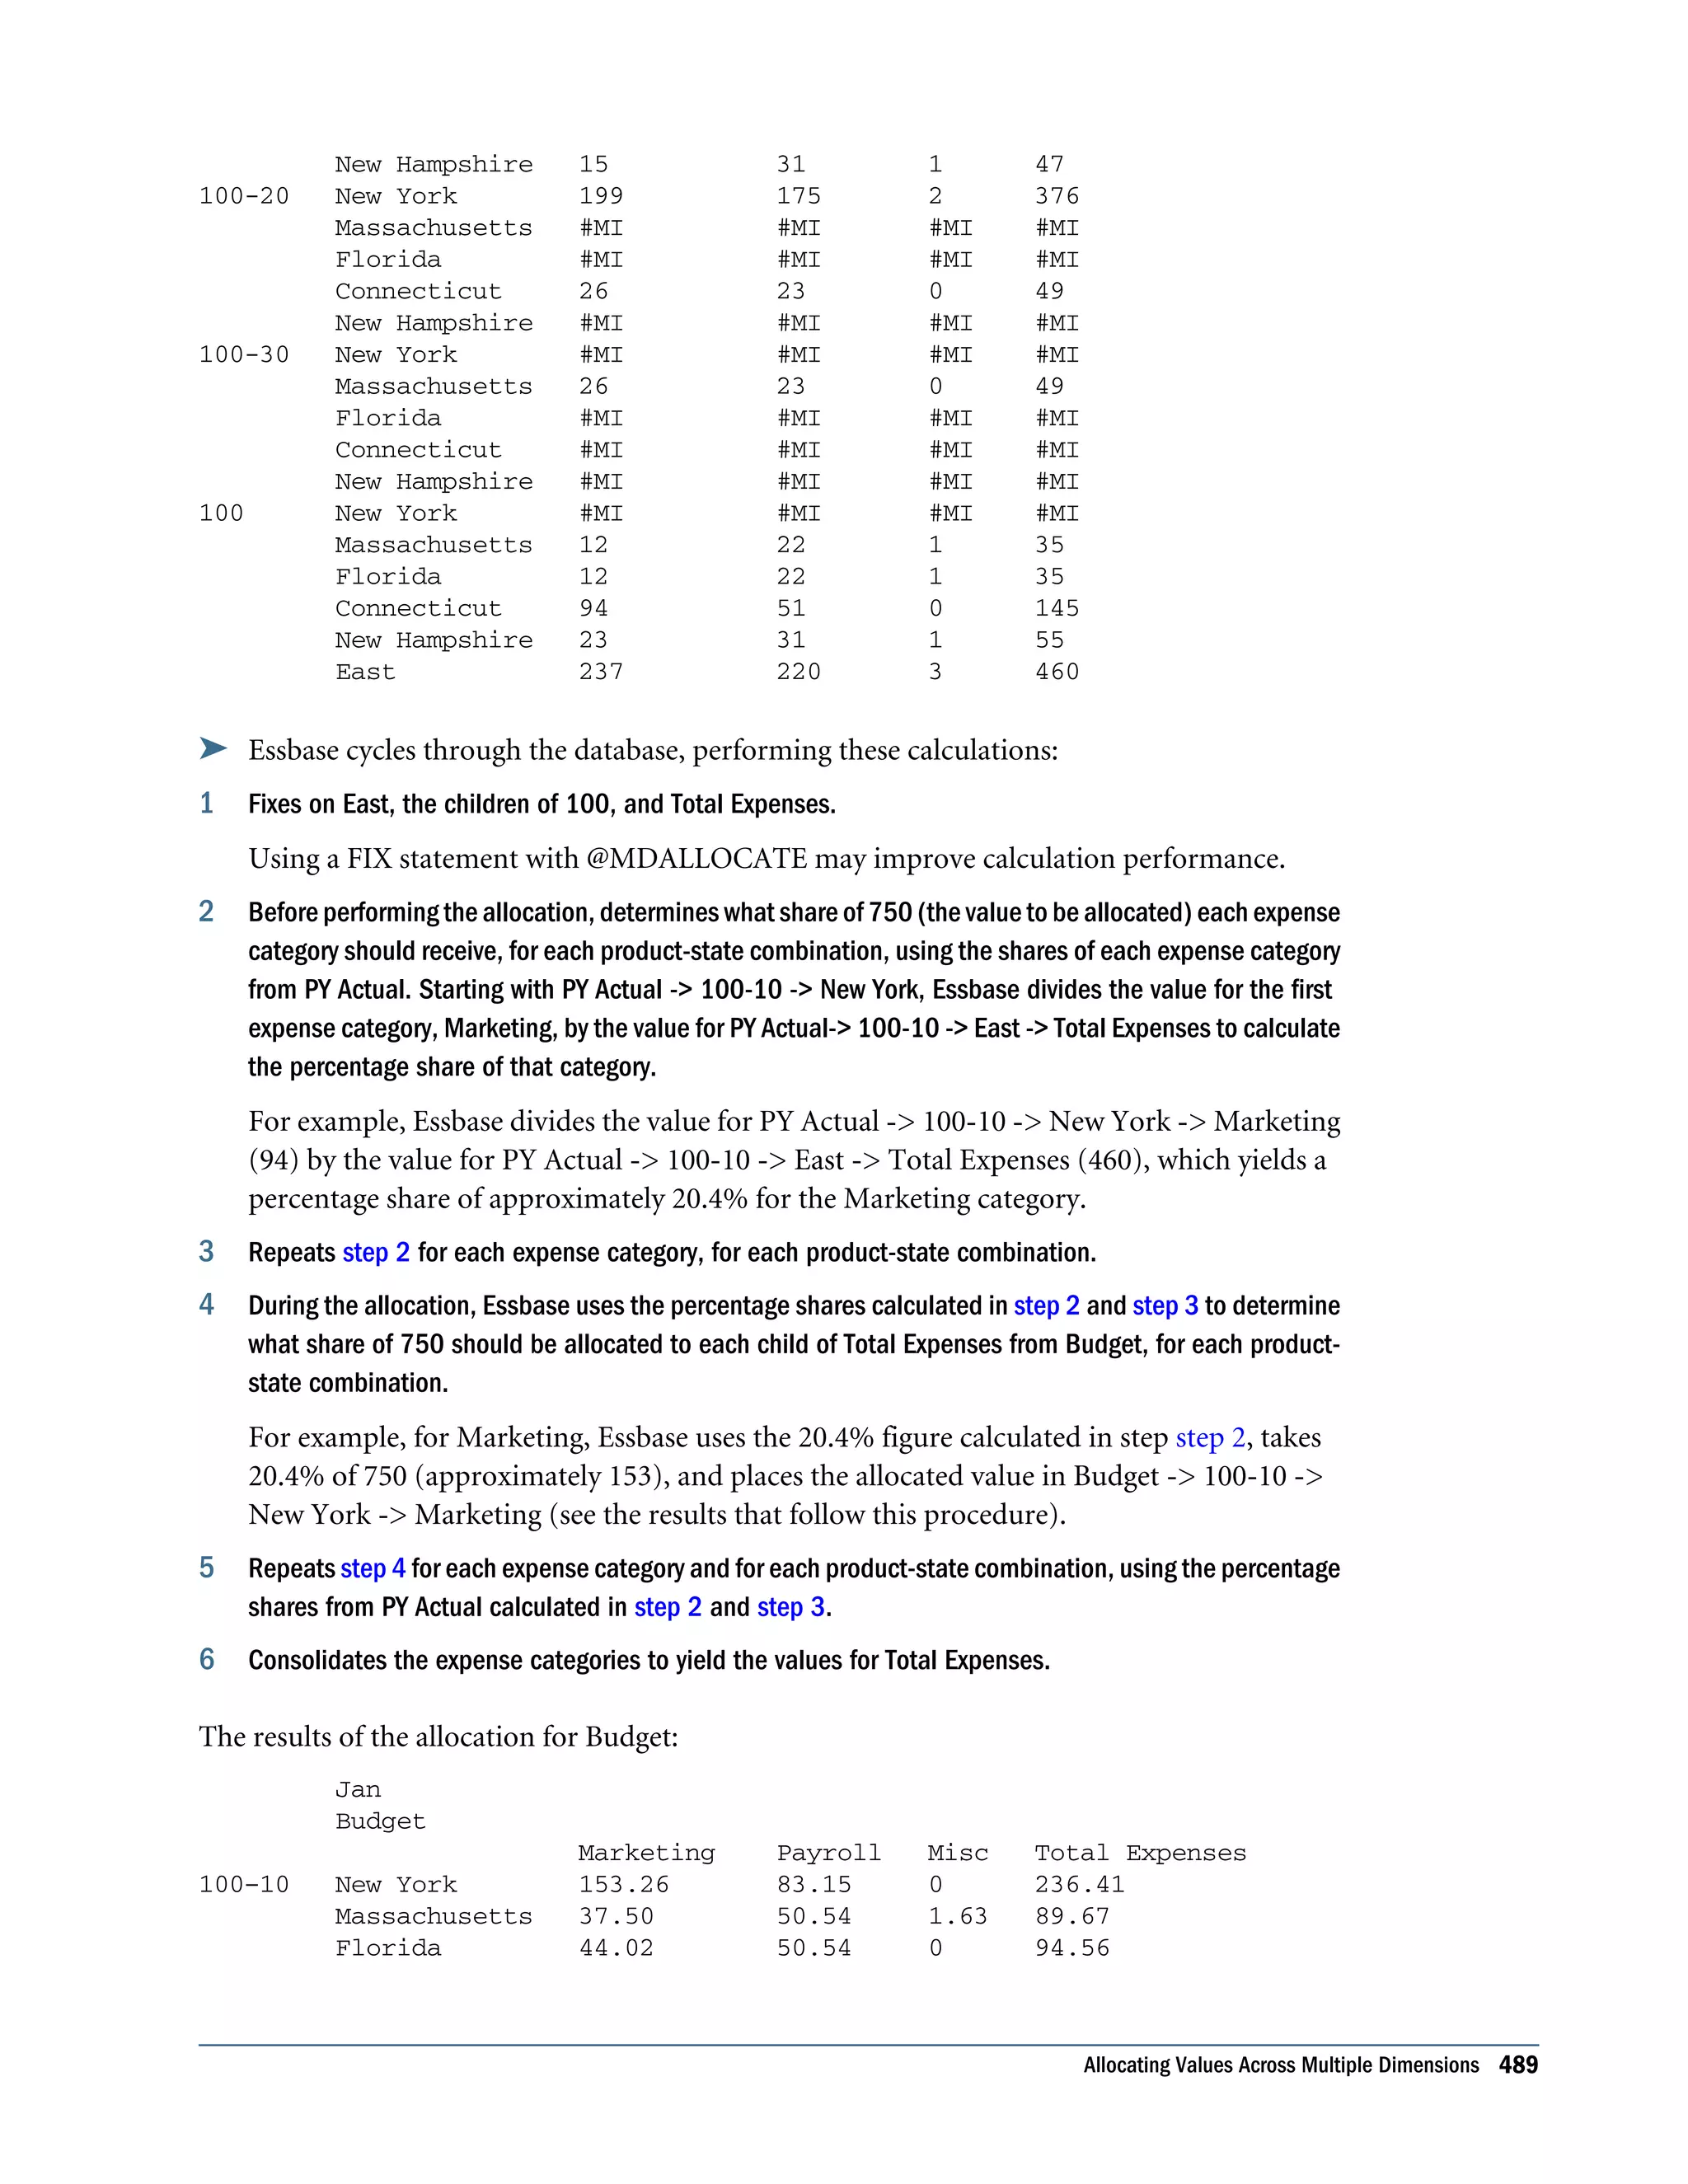
![2. Cycles through the database and calculates Market Share by taking the Sales value for each product in each market for each month and calculating this Sales value as a percentage of total Sales in all markets for each product (Sales -> Market). 3. Calculates Product Share by taking the Sales value for each product in each market for each month and calculating this Sales value as a percentage of total Sales of all products in each market (Sales -> Product). 4. Calculates Market % by taking the Sales value for each product in each market for each month and calculating this Sales value as a percentage of the Sales value of the parent of the current member on the Market dimension. The @PARENTVAL function is used to obtain the Sales value of the parent on the Market dimension. 5. Calculates Product % by taking the Sales value for each product in each market for each month, and calculating this Sales value as a percentage of the Sales value of the parent of the current member on the Product dimension. The @PARENTVAL function is used to obtain the Sales value of the parent on the Product dimension. Allocating Costs Across Products This example allocates overhead costs to each product in each market for each month. Overhead costs are allocated based on each product’s Sales value as a percentage of the total Sales for all products. Assume that you added two members to the Measures dimension: l OH_Costs for the allocated overhead costs l OH_TotalCost for the total overhead costs Example script: /* Declare a temporary array called ALLOCQ based on the Year dimension */ ARRAY ALLOCQ[Year]; /* Turn the Aggregate Missing Values setting off. If this is your system default, omit this line */ SET AGGMISSG OFF; /* Allocate the overhead costs for Actual values */ FIX(Actual) OH_Costs (ALLOCQ=Sales/Sales->Product; OH_Costs = OH_TotalCost->Product * ALLOCQ;); /* Calculate and consolidate the Measures dimension */ CALC DIM(Measures); ENDFIX Allocating Costs Across Products 485](https://image.slidesharecdn.com/essbasedatabaseadministratorsguide-160425204626/75/Essbase-database-administrator-s-guide-485-2048.jpg)
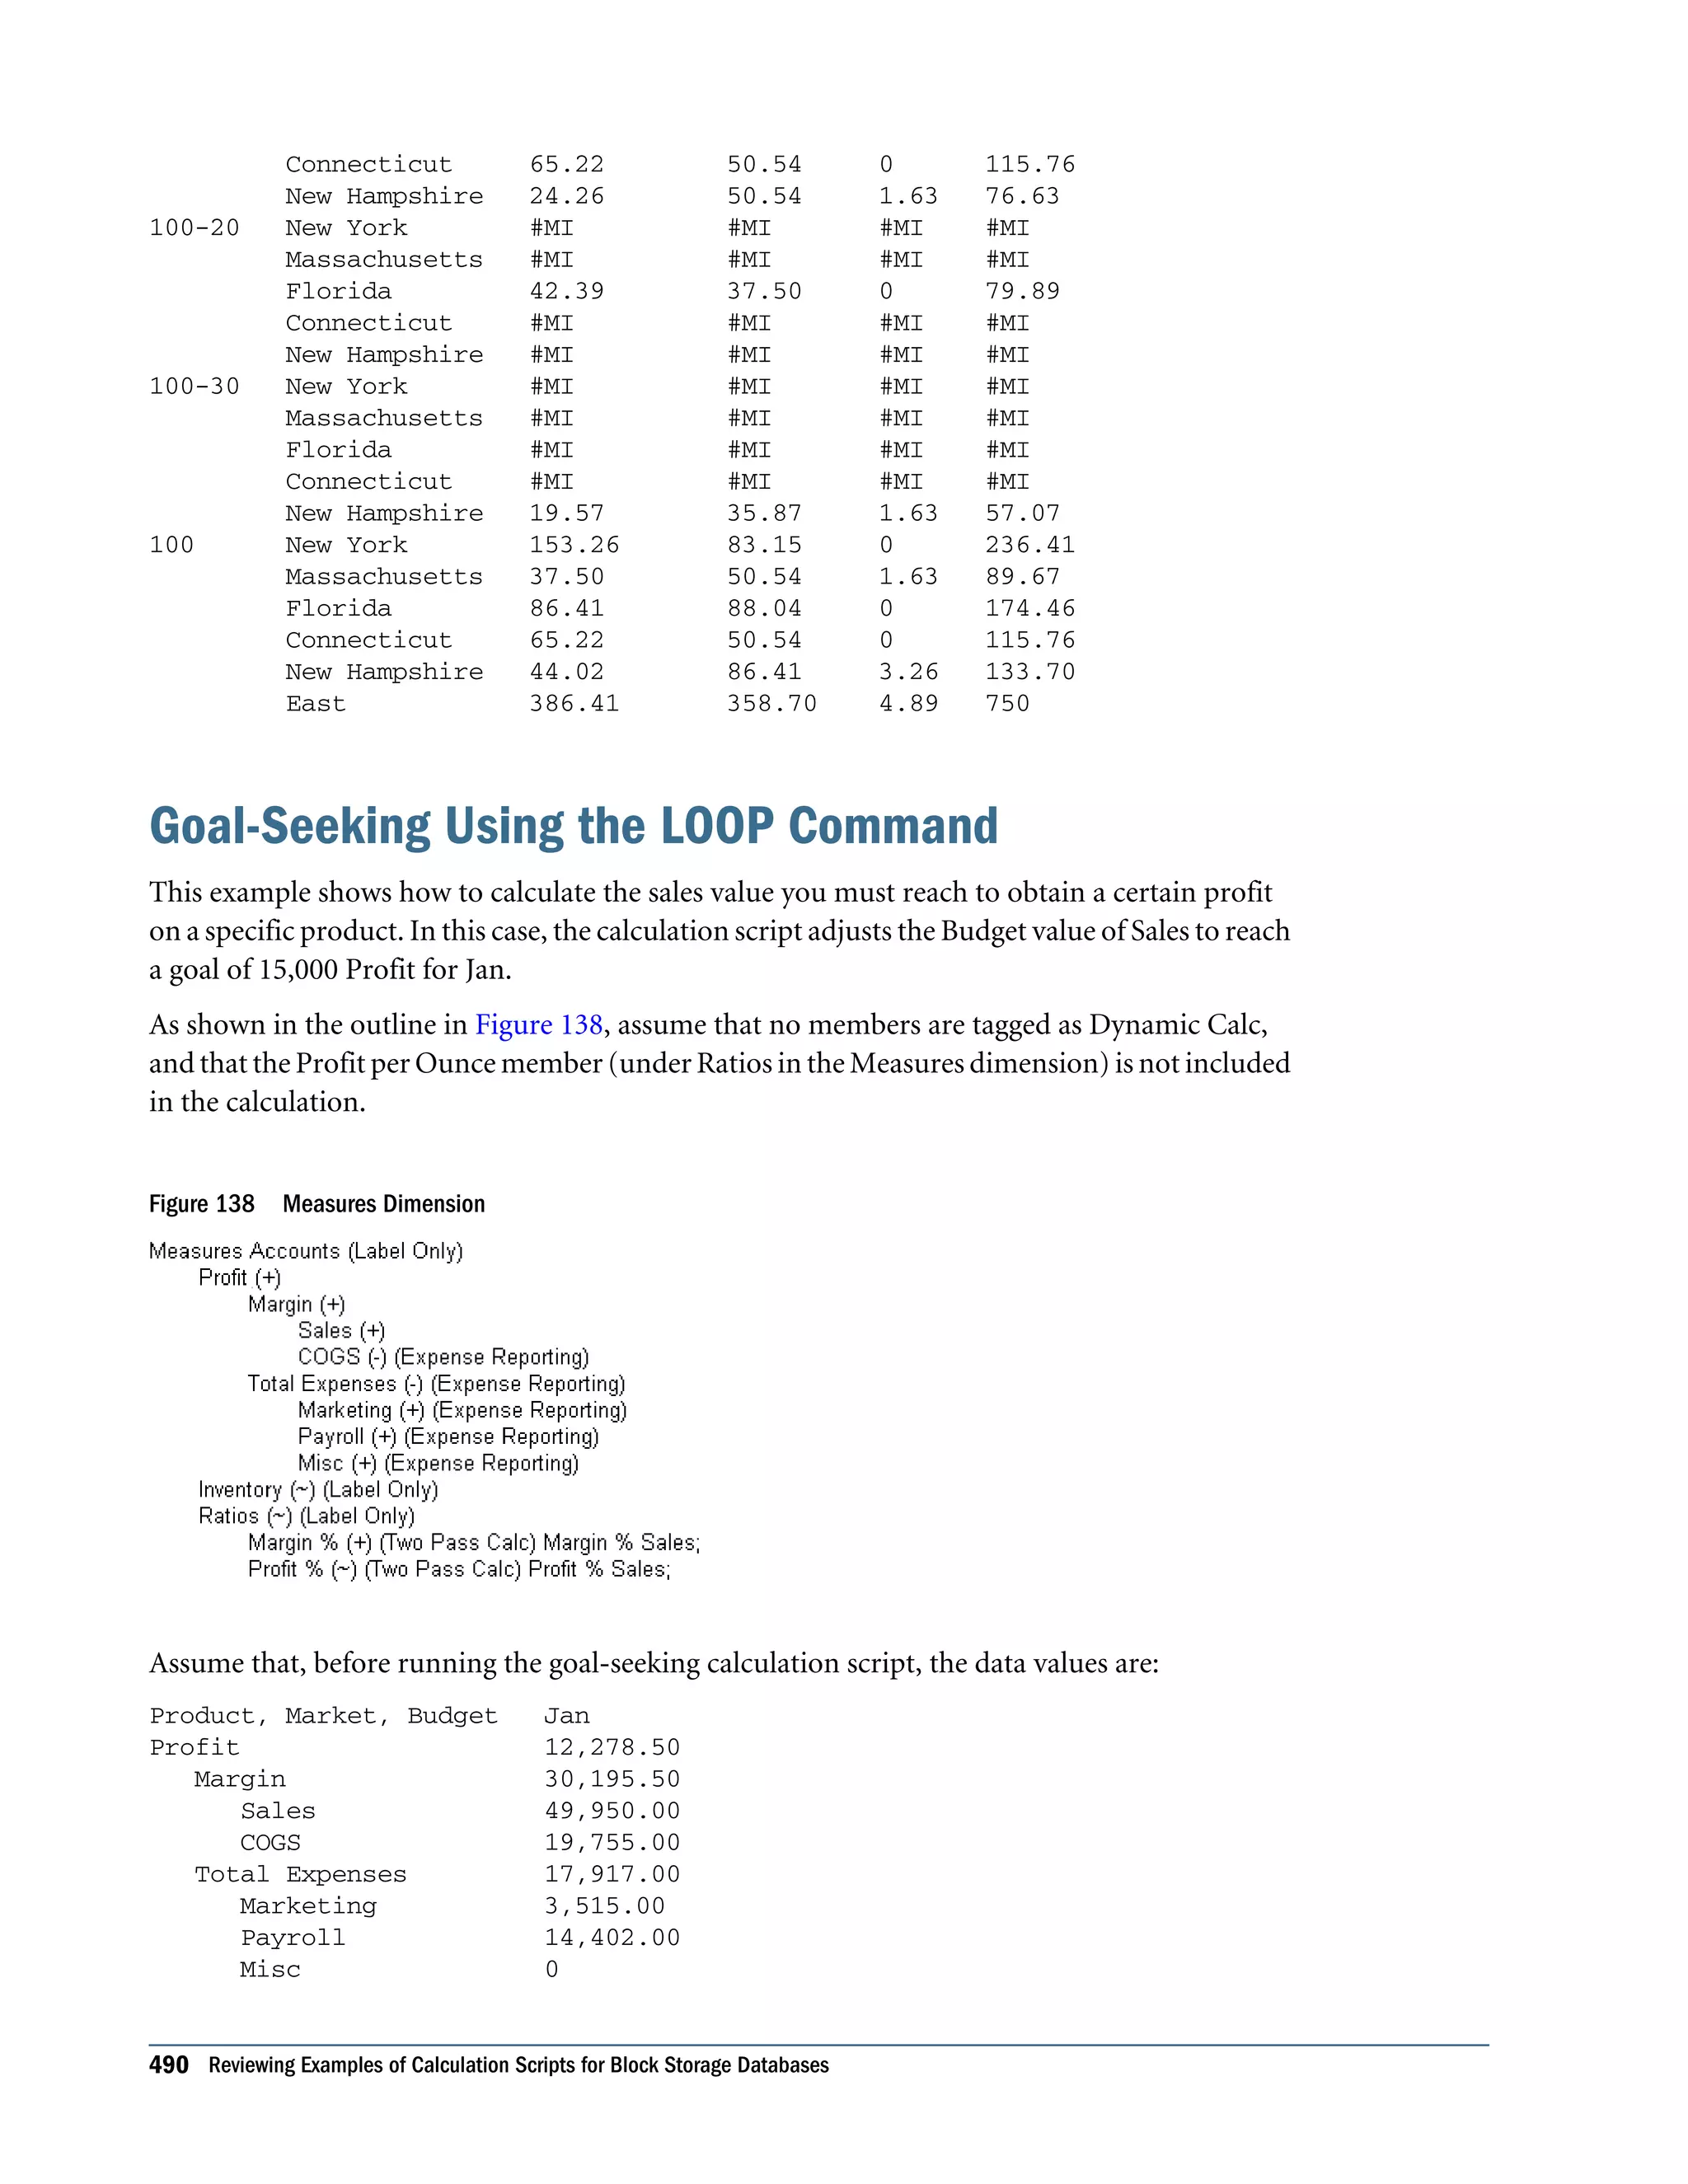
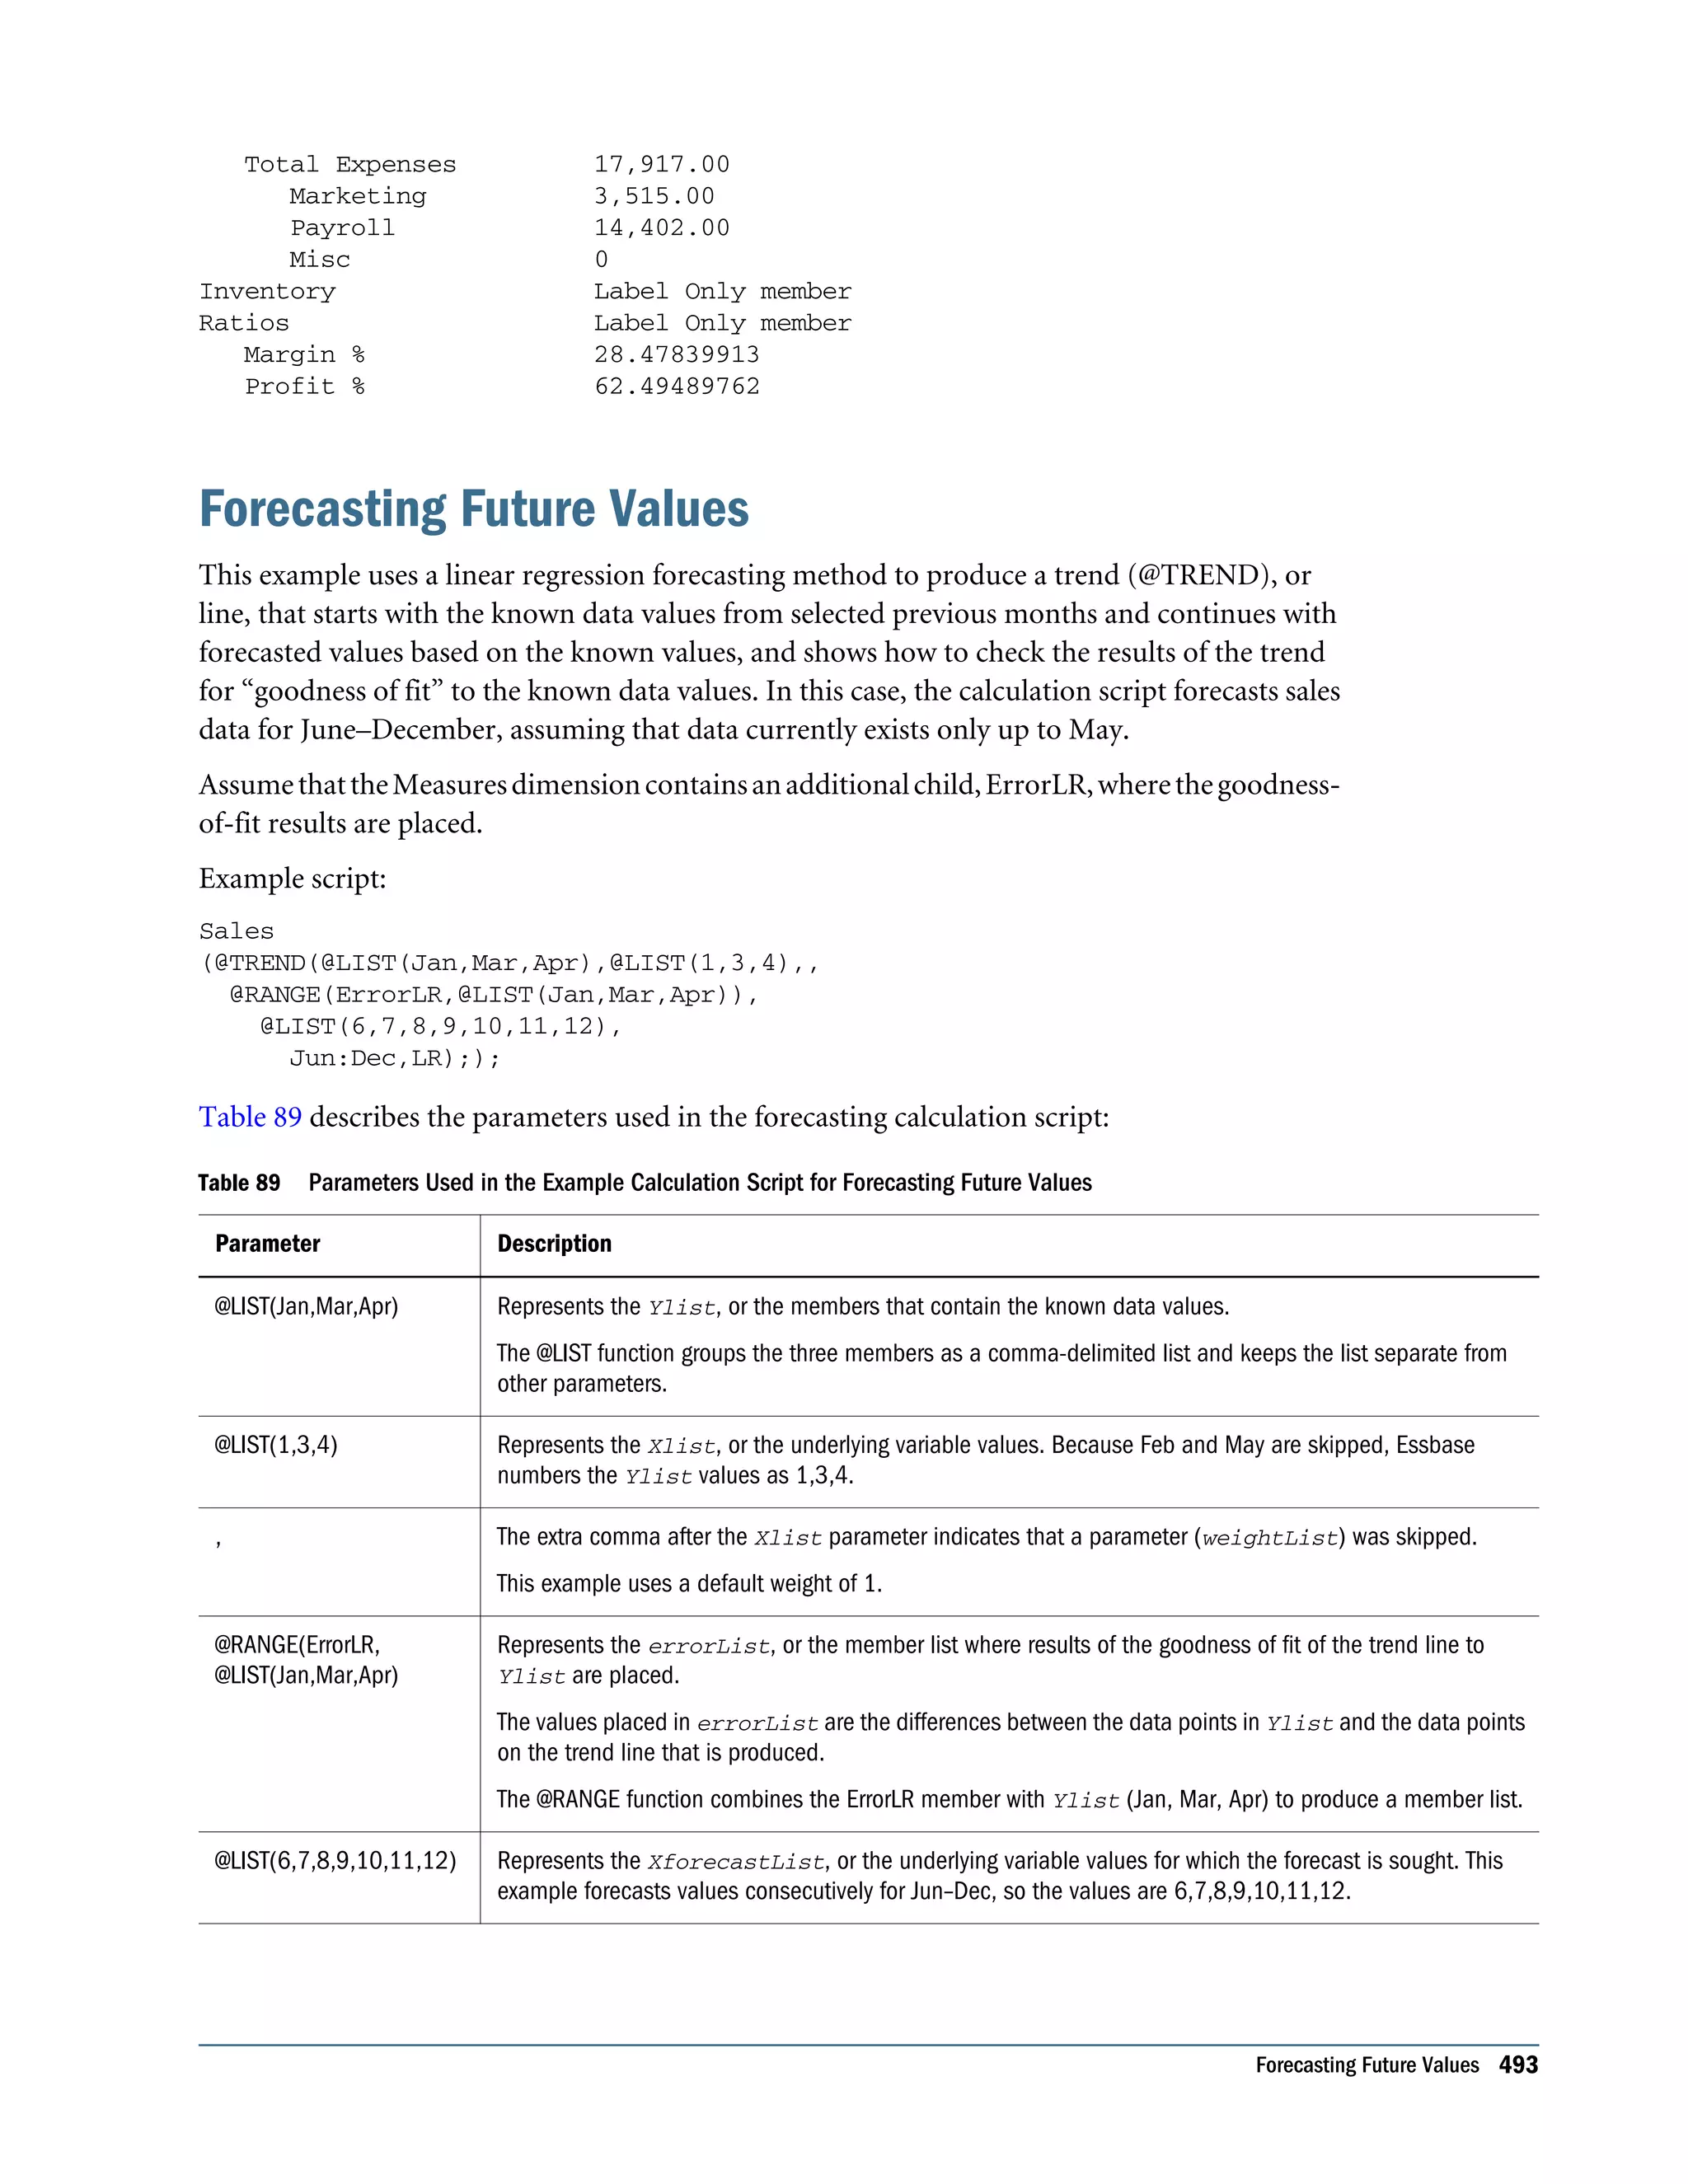
![Inventory Label Only member Ratios Label Only member Margin % 60.45 Profit % 24.58 Example script: /* Declare the temporary variables and set their initial values*/ VAR Target = 15000, AcceptableErrorPercent = .001, AcceptableError, PriorVar, PriorTar, PctNewVarChange = .10, CurTarDiff, Slope, Quit = 0, DependencyCheck, NxtVar; /*Declare a temporary array variable called Rollback based on the Measures dimension */ ARRAY Rollback [Measures]; /* Fix on the appropriate member combinations and perform the goal-seeking calculation*/ FIX(Budget, Jan, Product, Market) LOOP (35, Quit) Sales (Rollback = Budget; AcceptableError = Target * (AcceptableErrorPercent); PriorVar = Sales; PriorTar = Profit; Sales = Sales + PctNewVarChange * Sales;); CALC DIM(Measures); Sales (DependencyCheck = PriorVar - PriorTar; IF(DependencyCheck <> 0) CurTarDiff = Profit - Target; IF(@ABS(CurTarDiff) > @ABS(AcceptableError)) Slope = (Profit - PriorTar) / (Sales - PriorVar); NxtVar = Sales - (CurTarDiff / Slope); PctNewVarChange = (NxtVar - Sales) / Sales; ELSE Quit = 1; ENDIF; ELSE Budget = Rollback; Quit = 1; ENDIF;); ENDLOOP CALC DIM(Measures); ENDFIX ä Essbase performs the following calculations: 1 Declares the required temporary variables using the VAR command. Where appropriate, the initial values are set. Goal-Seeking Using the LOOP Command 491](https://image.slidesharecdn.com/essbasedatabaseadministratorsguide-160425204626/75/Essbase-database-administrator-s-guide-491-2048.jpg)


![Note: EssbasedoesnotsupportdoublevariablesreturnedwithinfiniteorNot-a-Numbervalues. If these values are returned from a Java program, they may not be recorded or displayed correctly in Essbase. Double variables should be checked for infinite or Not-a-Number values and set to finite values before being returned to Essbase. See the entry for the class, Double, in the JDK documentation. For creating, deleting, and managing custom-defined functions, Essbase requires these security permissions: l Local, application-wide, custom-defined functions: Application Manager or higher l Global, server-wide, custom-defined functions: Administrator When you register a custom-defined function in Essbase, you give the function a name, which is used in calculation scripts and formulas and is distinct from the Java class and method name used by the function. Follow these requirements for naming custom-defined functions: l Start the name with the @ symbol. The rest of a function name can contain letters, numbers, and the following symbols: @, #, $, and _. Function names cannot contain spaces. For example: @MYFUNCTION l Start the names of custom-defined functions that are called only by custom-defined macros with “@_”, to distinguish them from general-use functions and macros. For example: @_MYFUNCTION l Custom-definedfunctionsmusthaveuniquenames.Functionnamesmustbedifferentfrom each other, from the names of custom-defined macros, and from the names of existing calculation functions. l If an Essbase application contains a local function that has the same name as a global function, the local function is used for calculation. Creating and Compiling a Java Class To create and compile a Java class, use a text editor and the JDK javac tool. ä To create a Java class for a custom-defined function: 1 In a text editor, create a Java class. For example: public class CalcFunc { public static double sum (double[] data) { int i, n = data.length; double sum = 0.0d; for (i=0; i<n; i++) { double d = data [i]; sum = sum + d; } Creating and Compiling a Java Class 503](https://image.slidesharecdn.com/essbasedatabaseadministratorsguide-160425204626/75/Essbase-database-administrator-s-guide-503-2048.jpg)


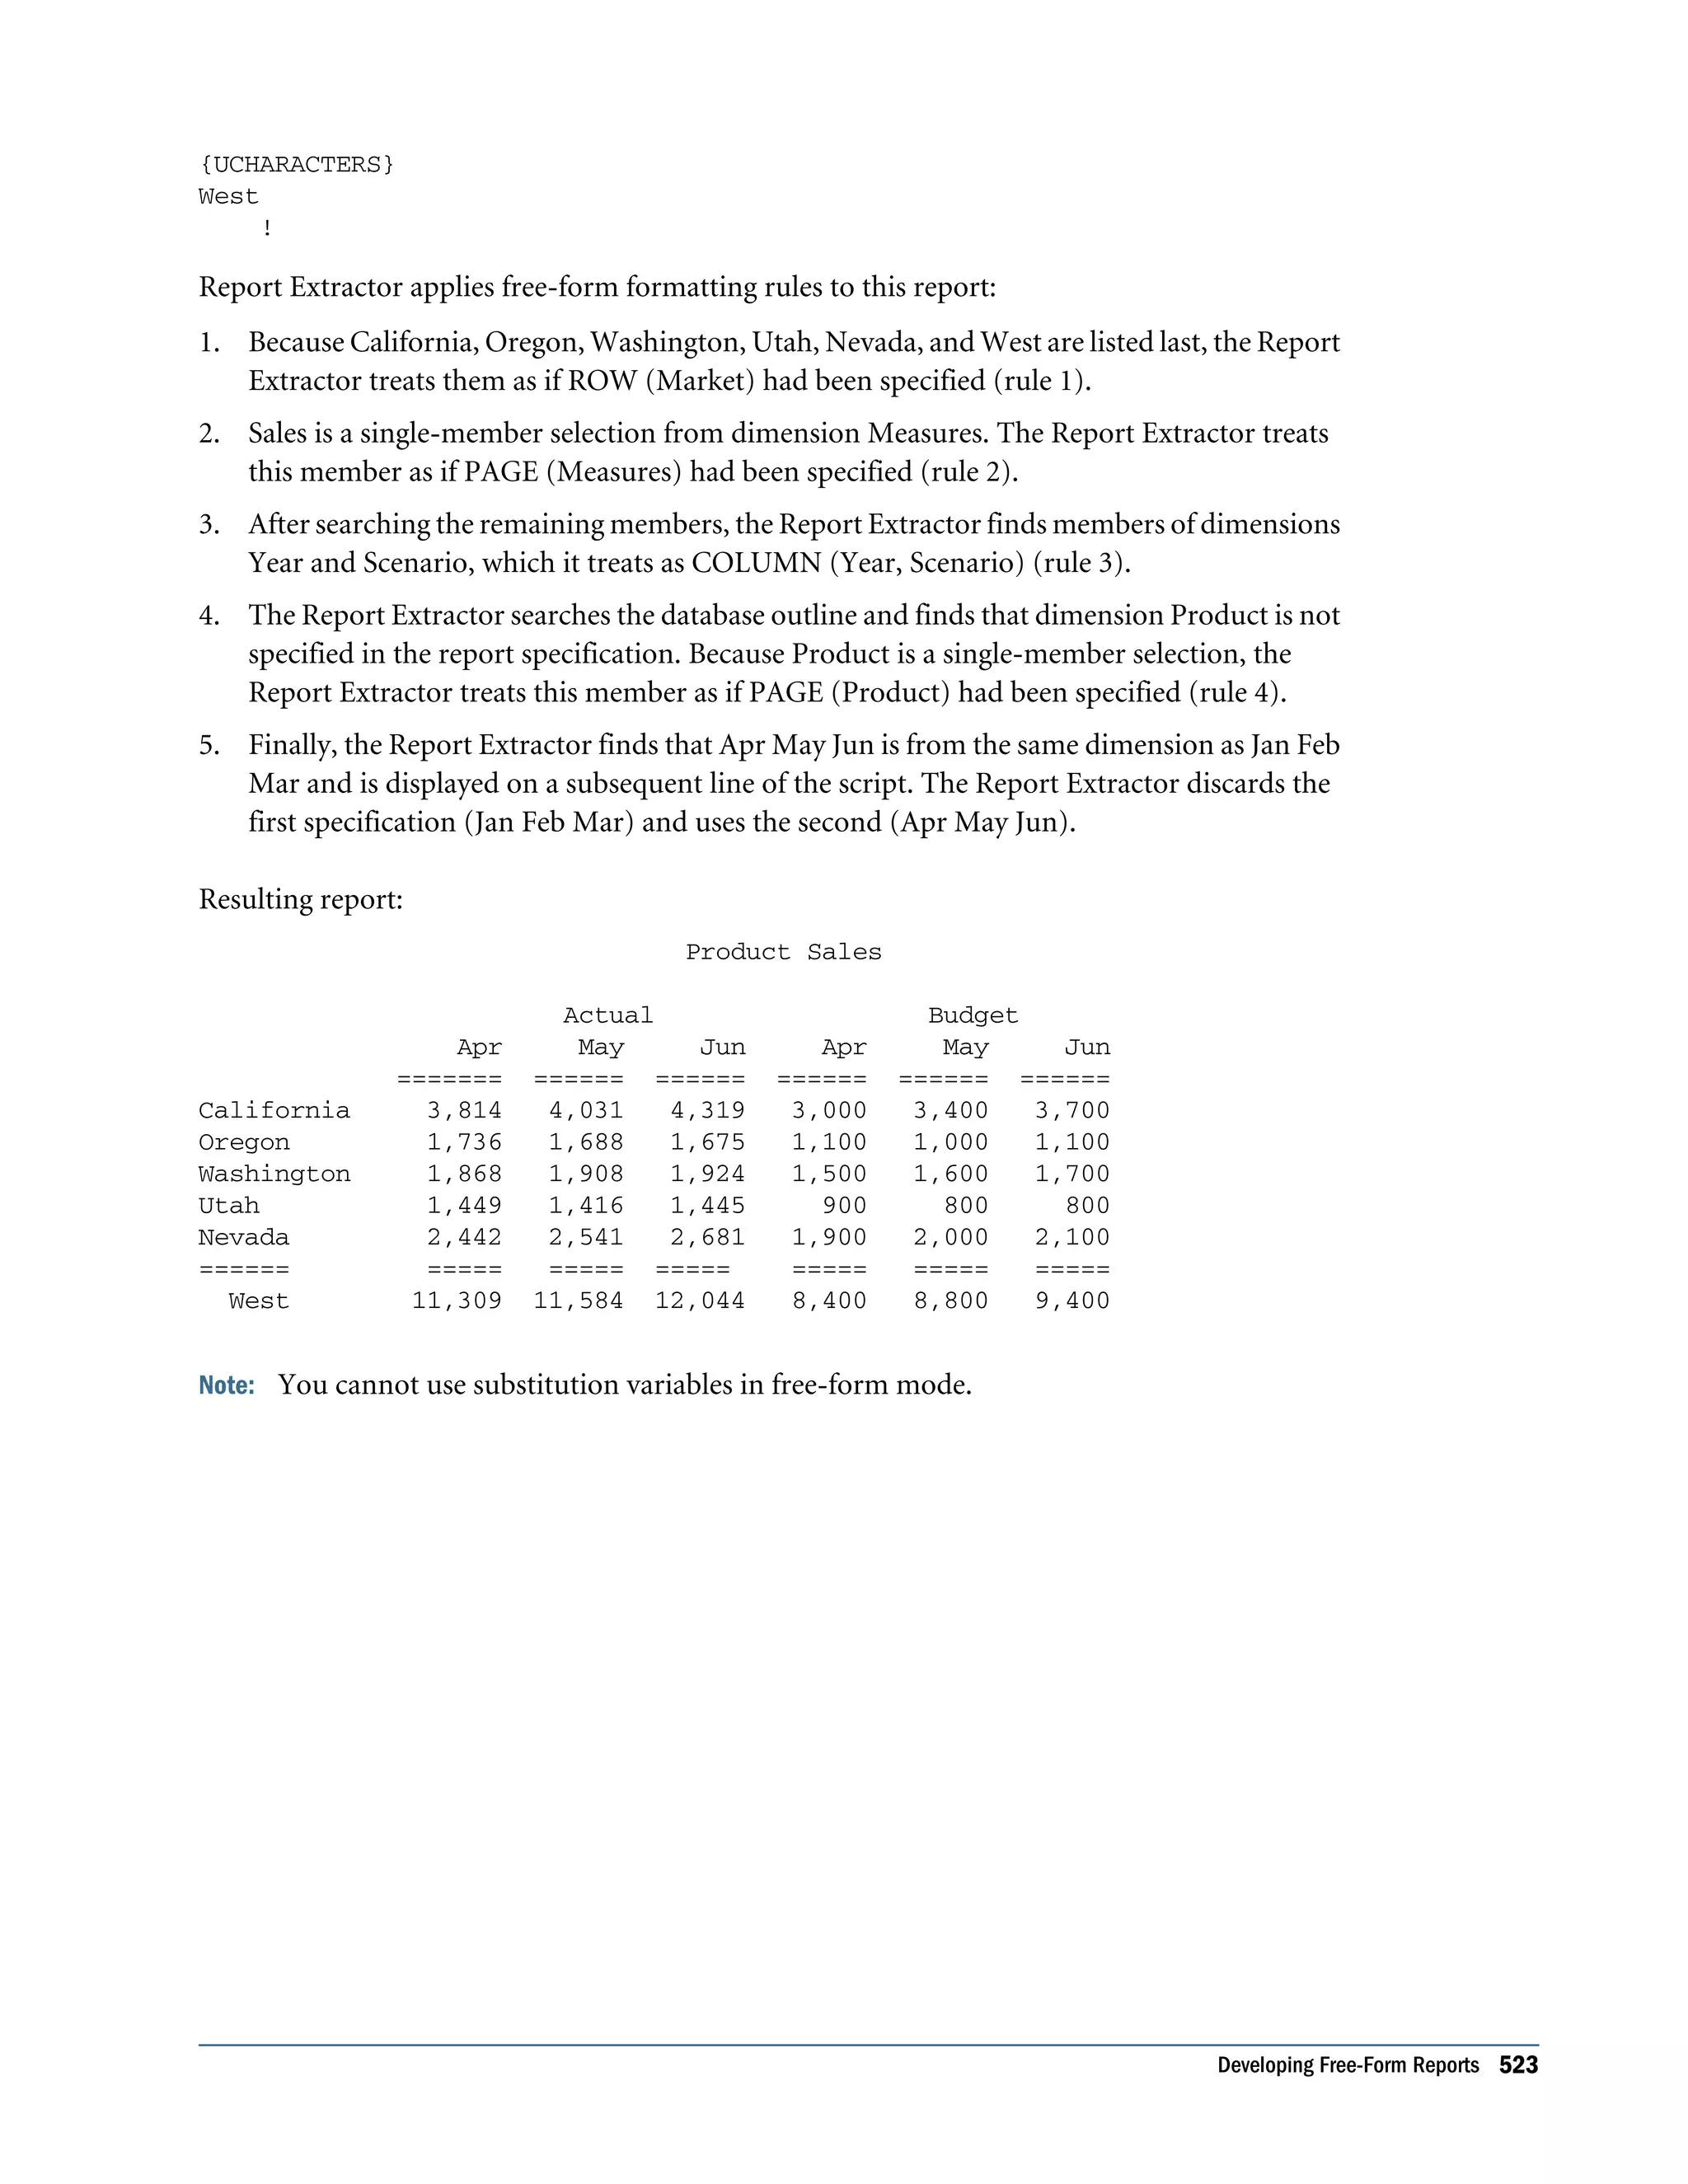

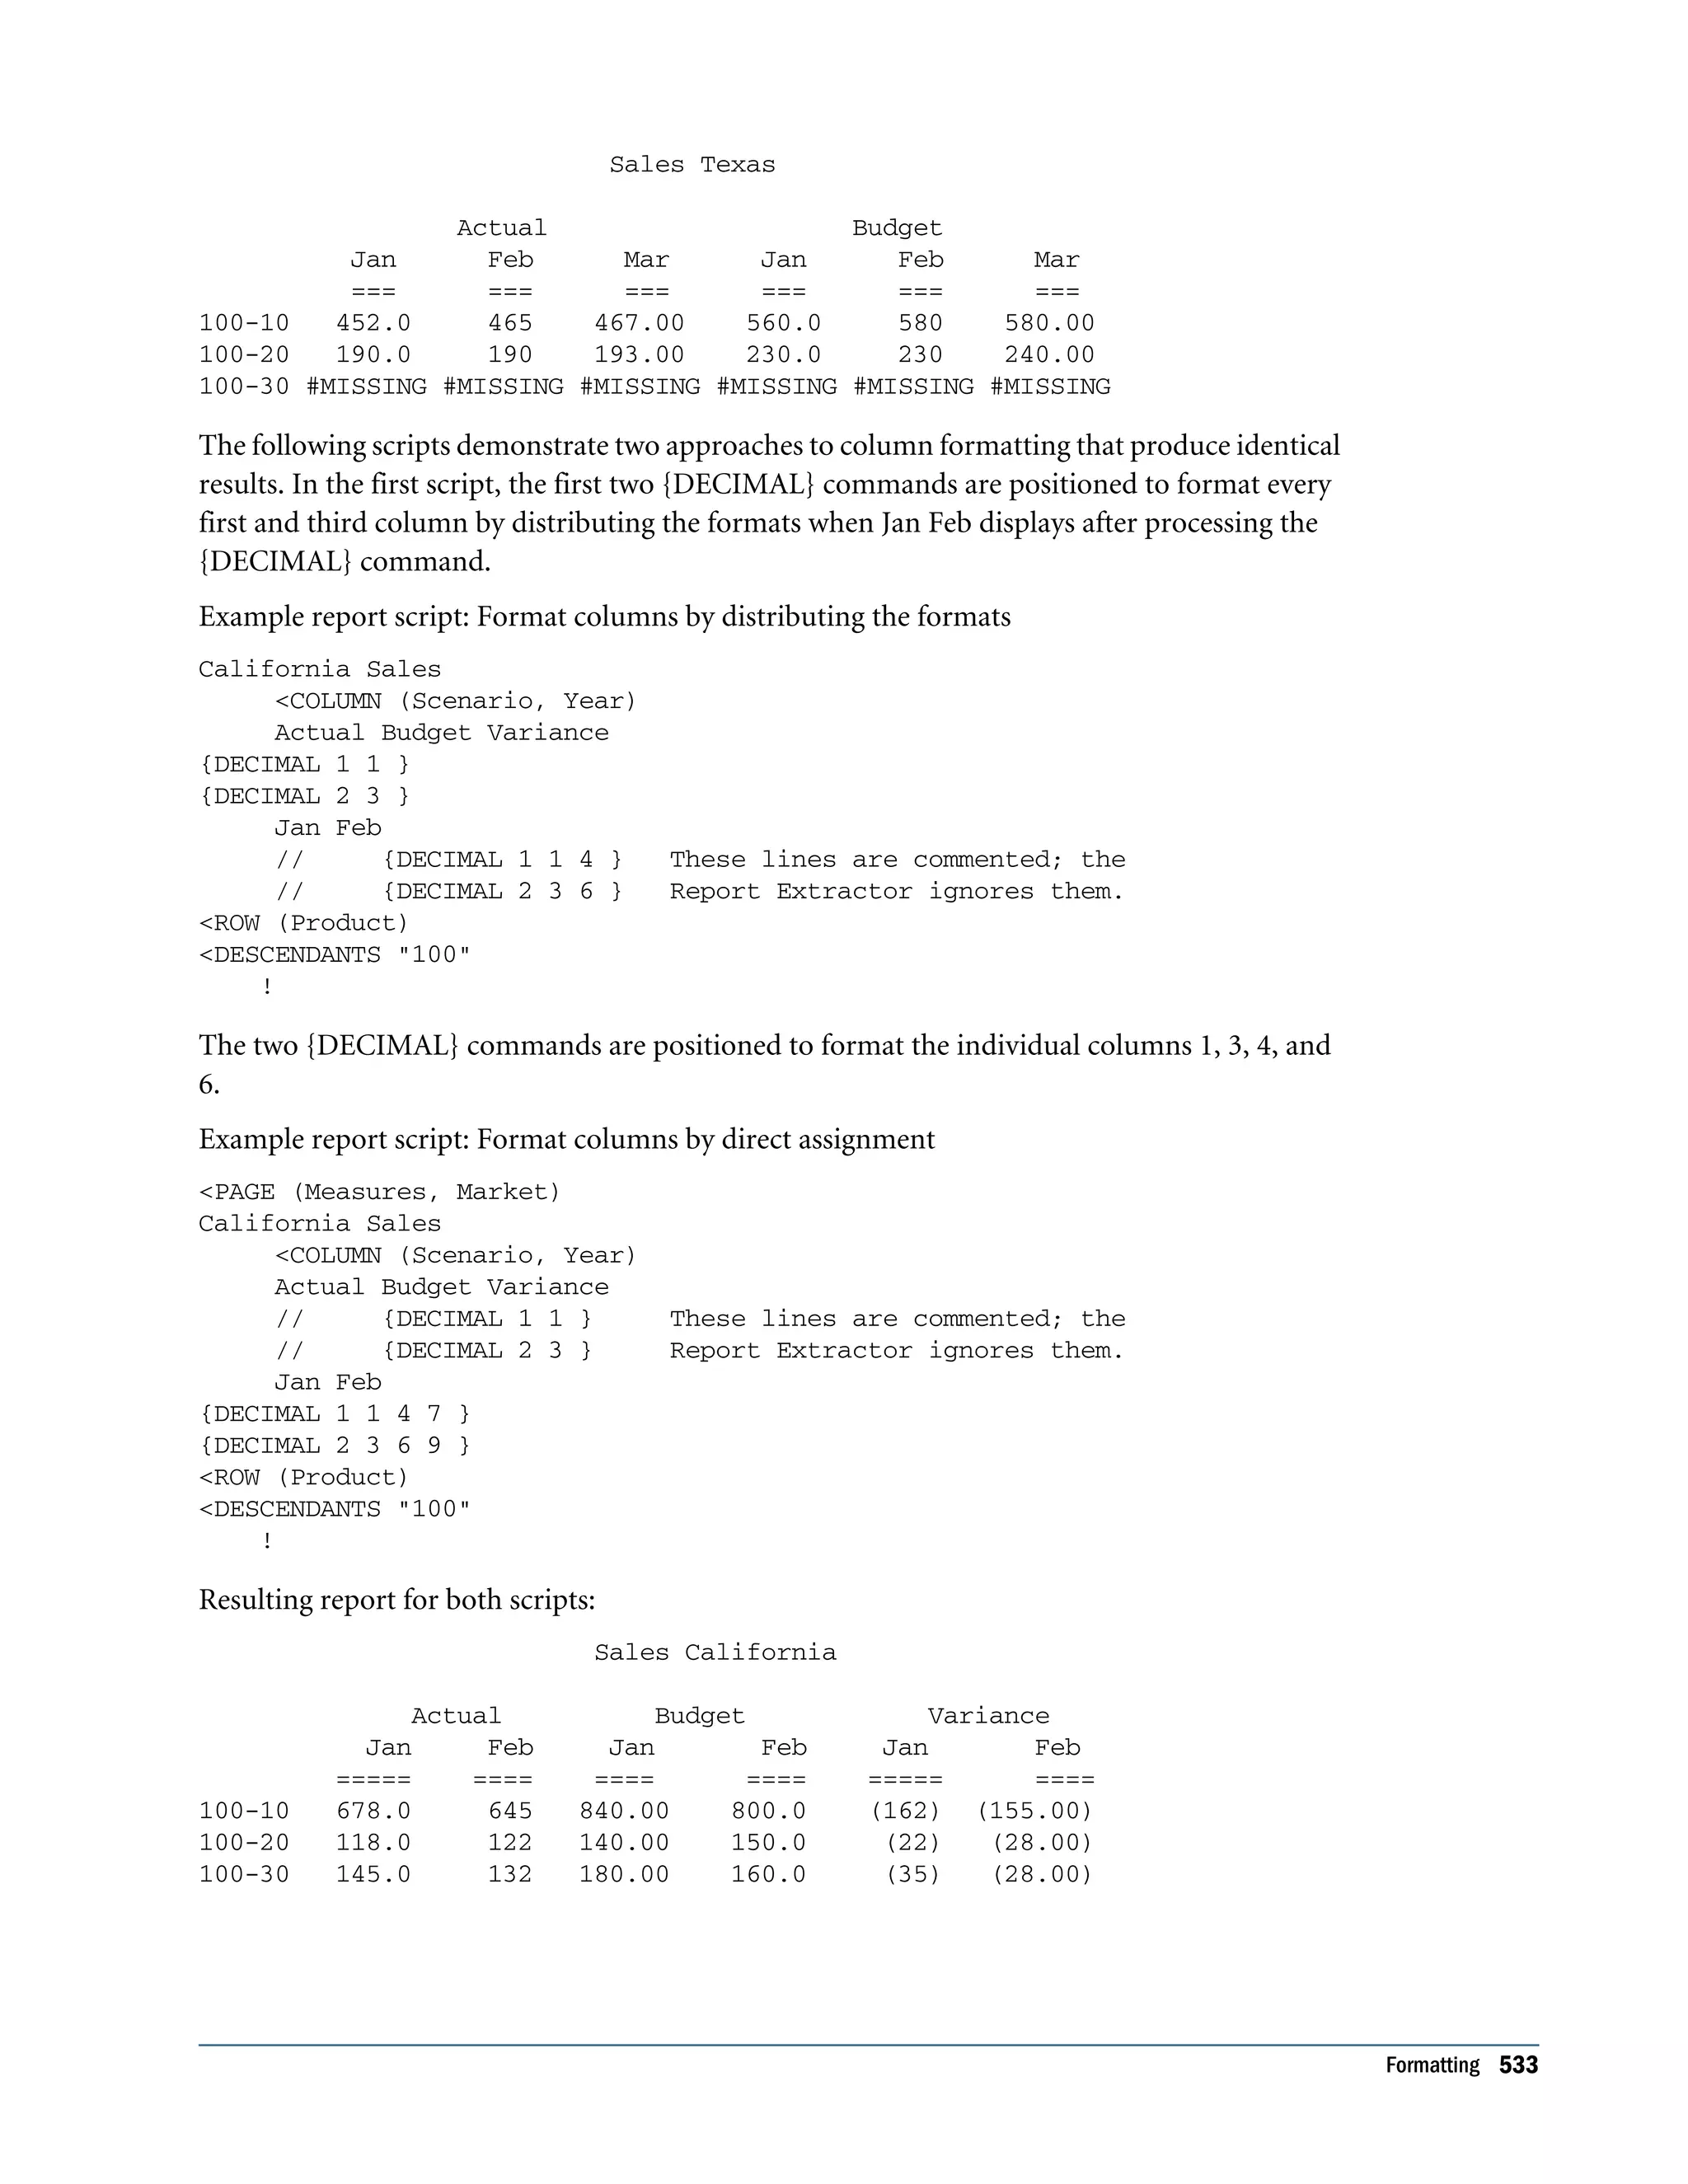
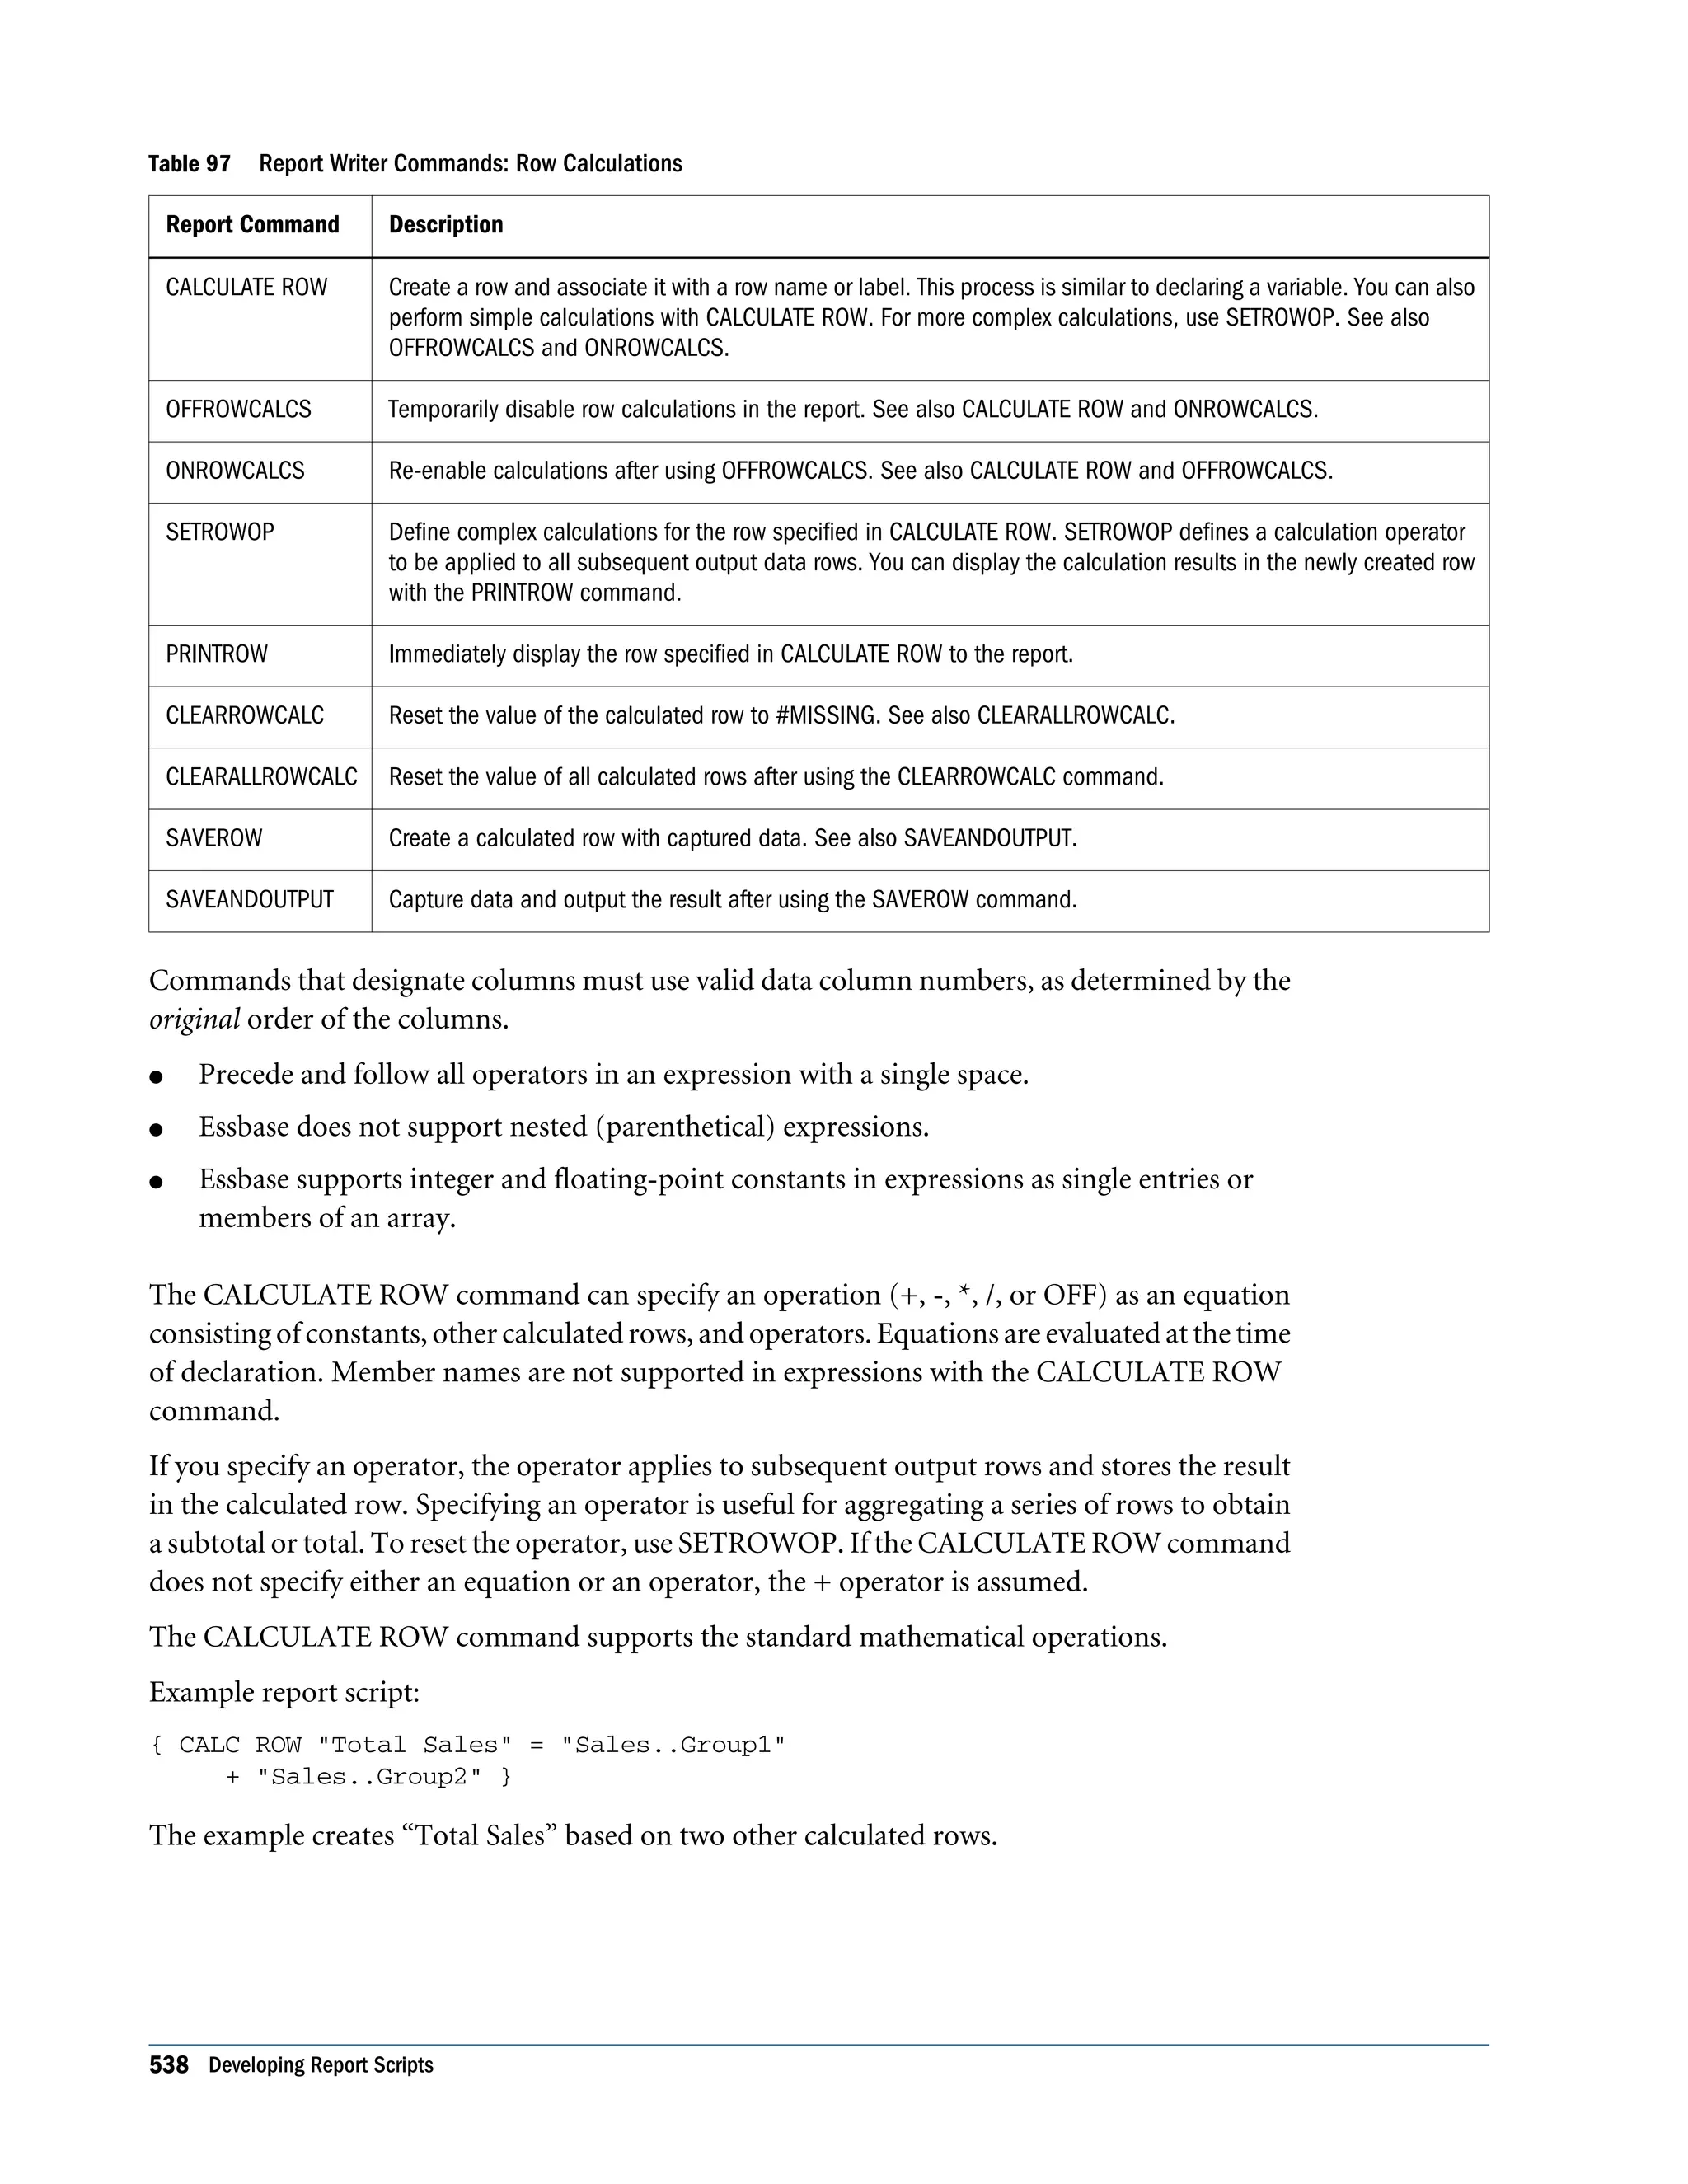
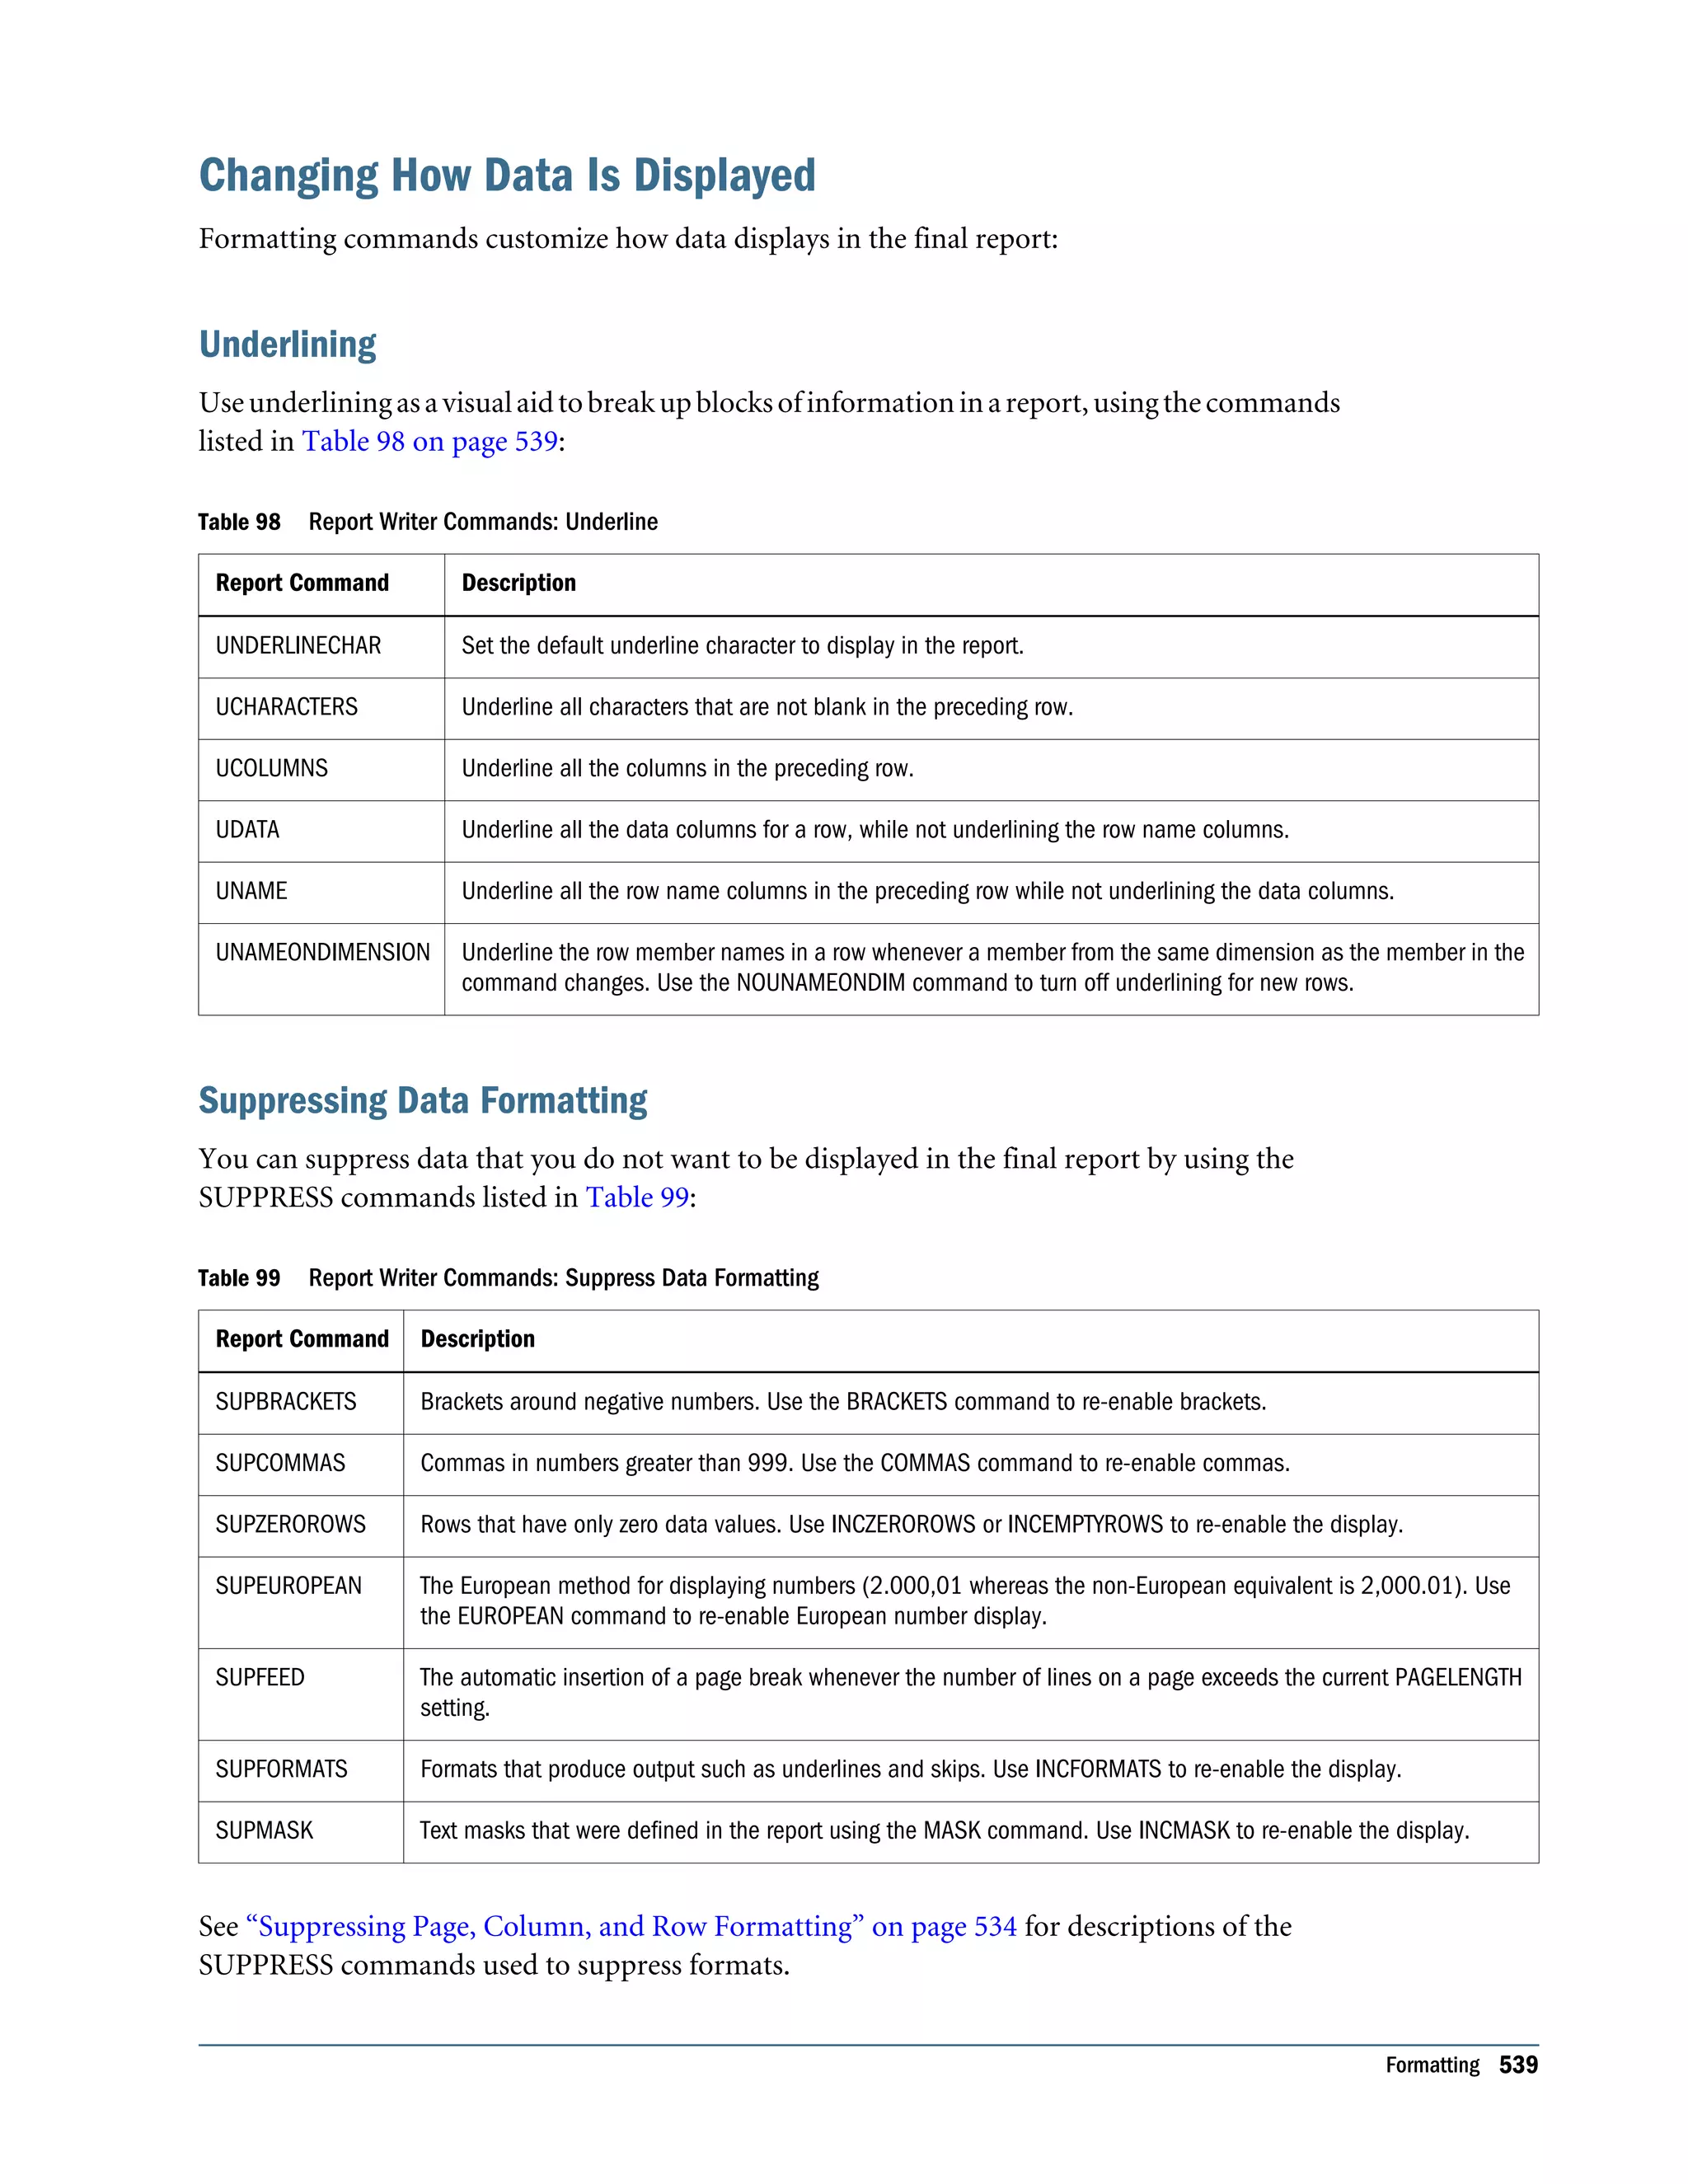
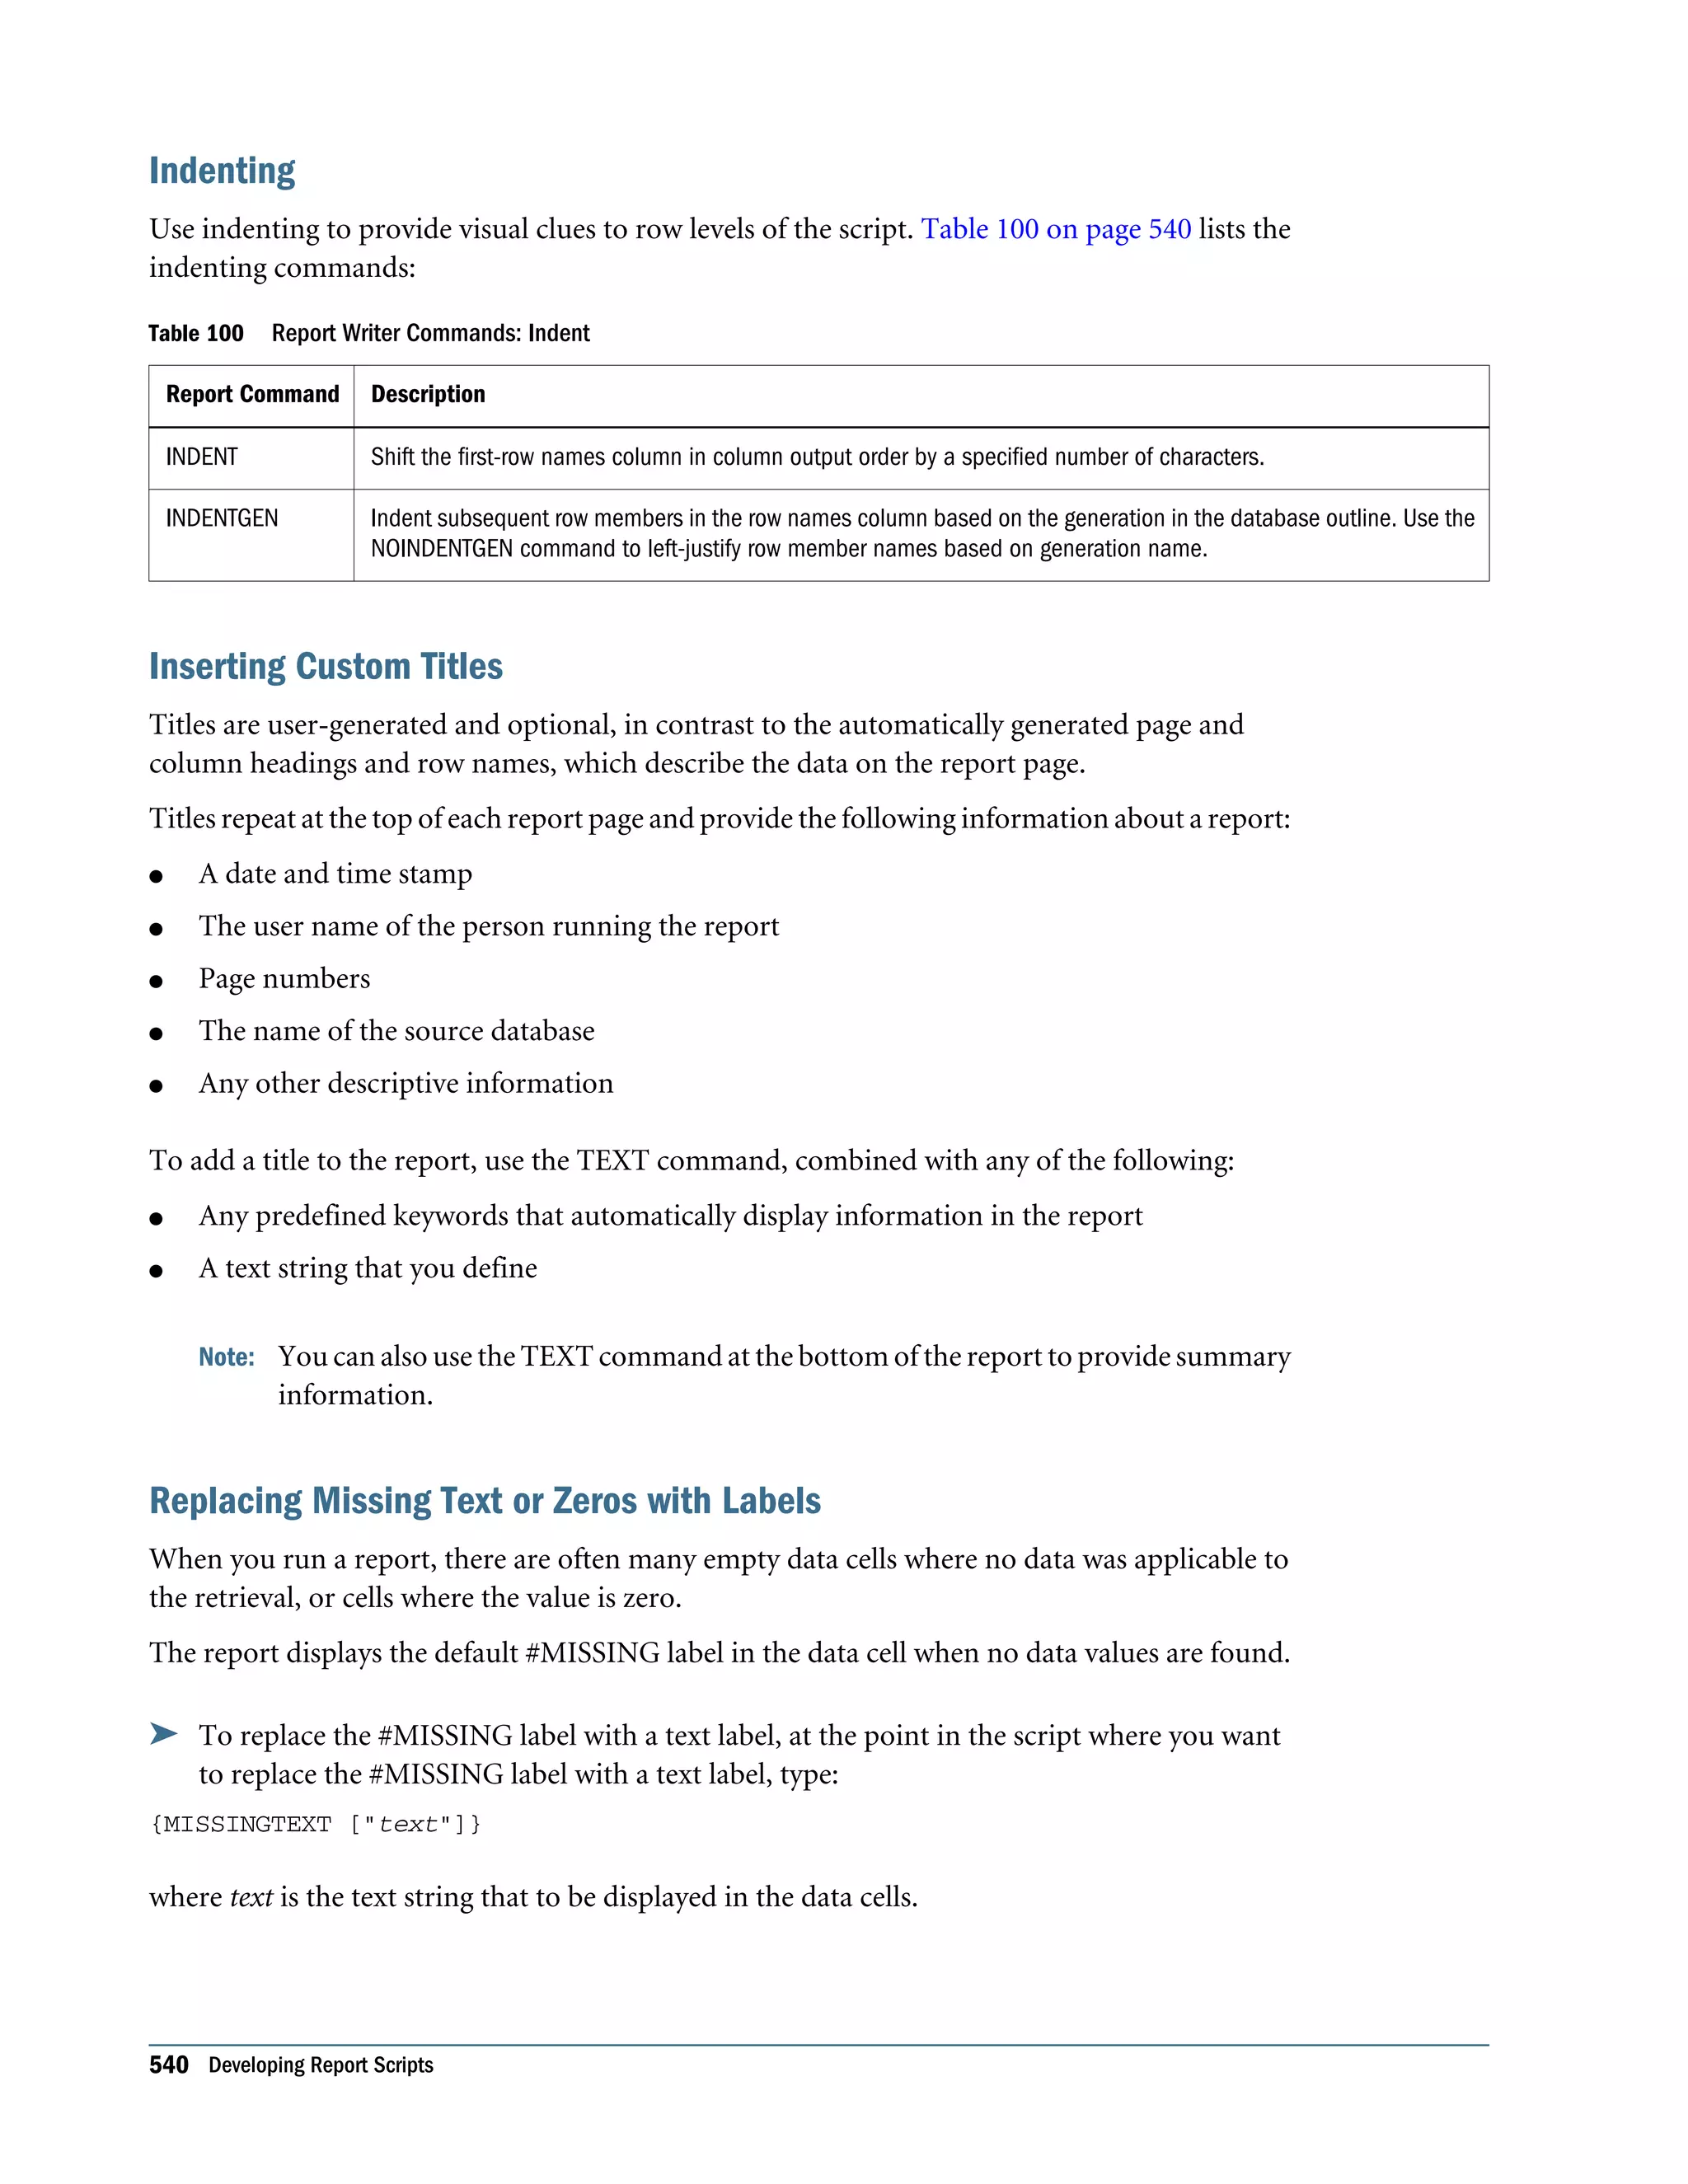
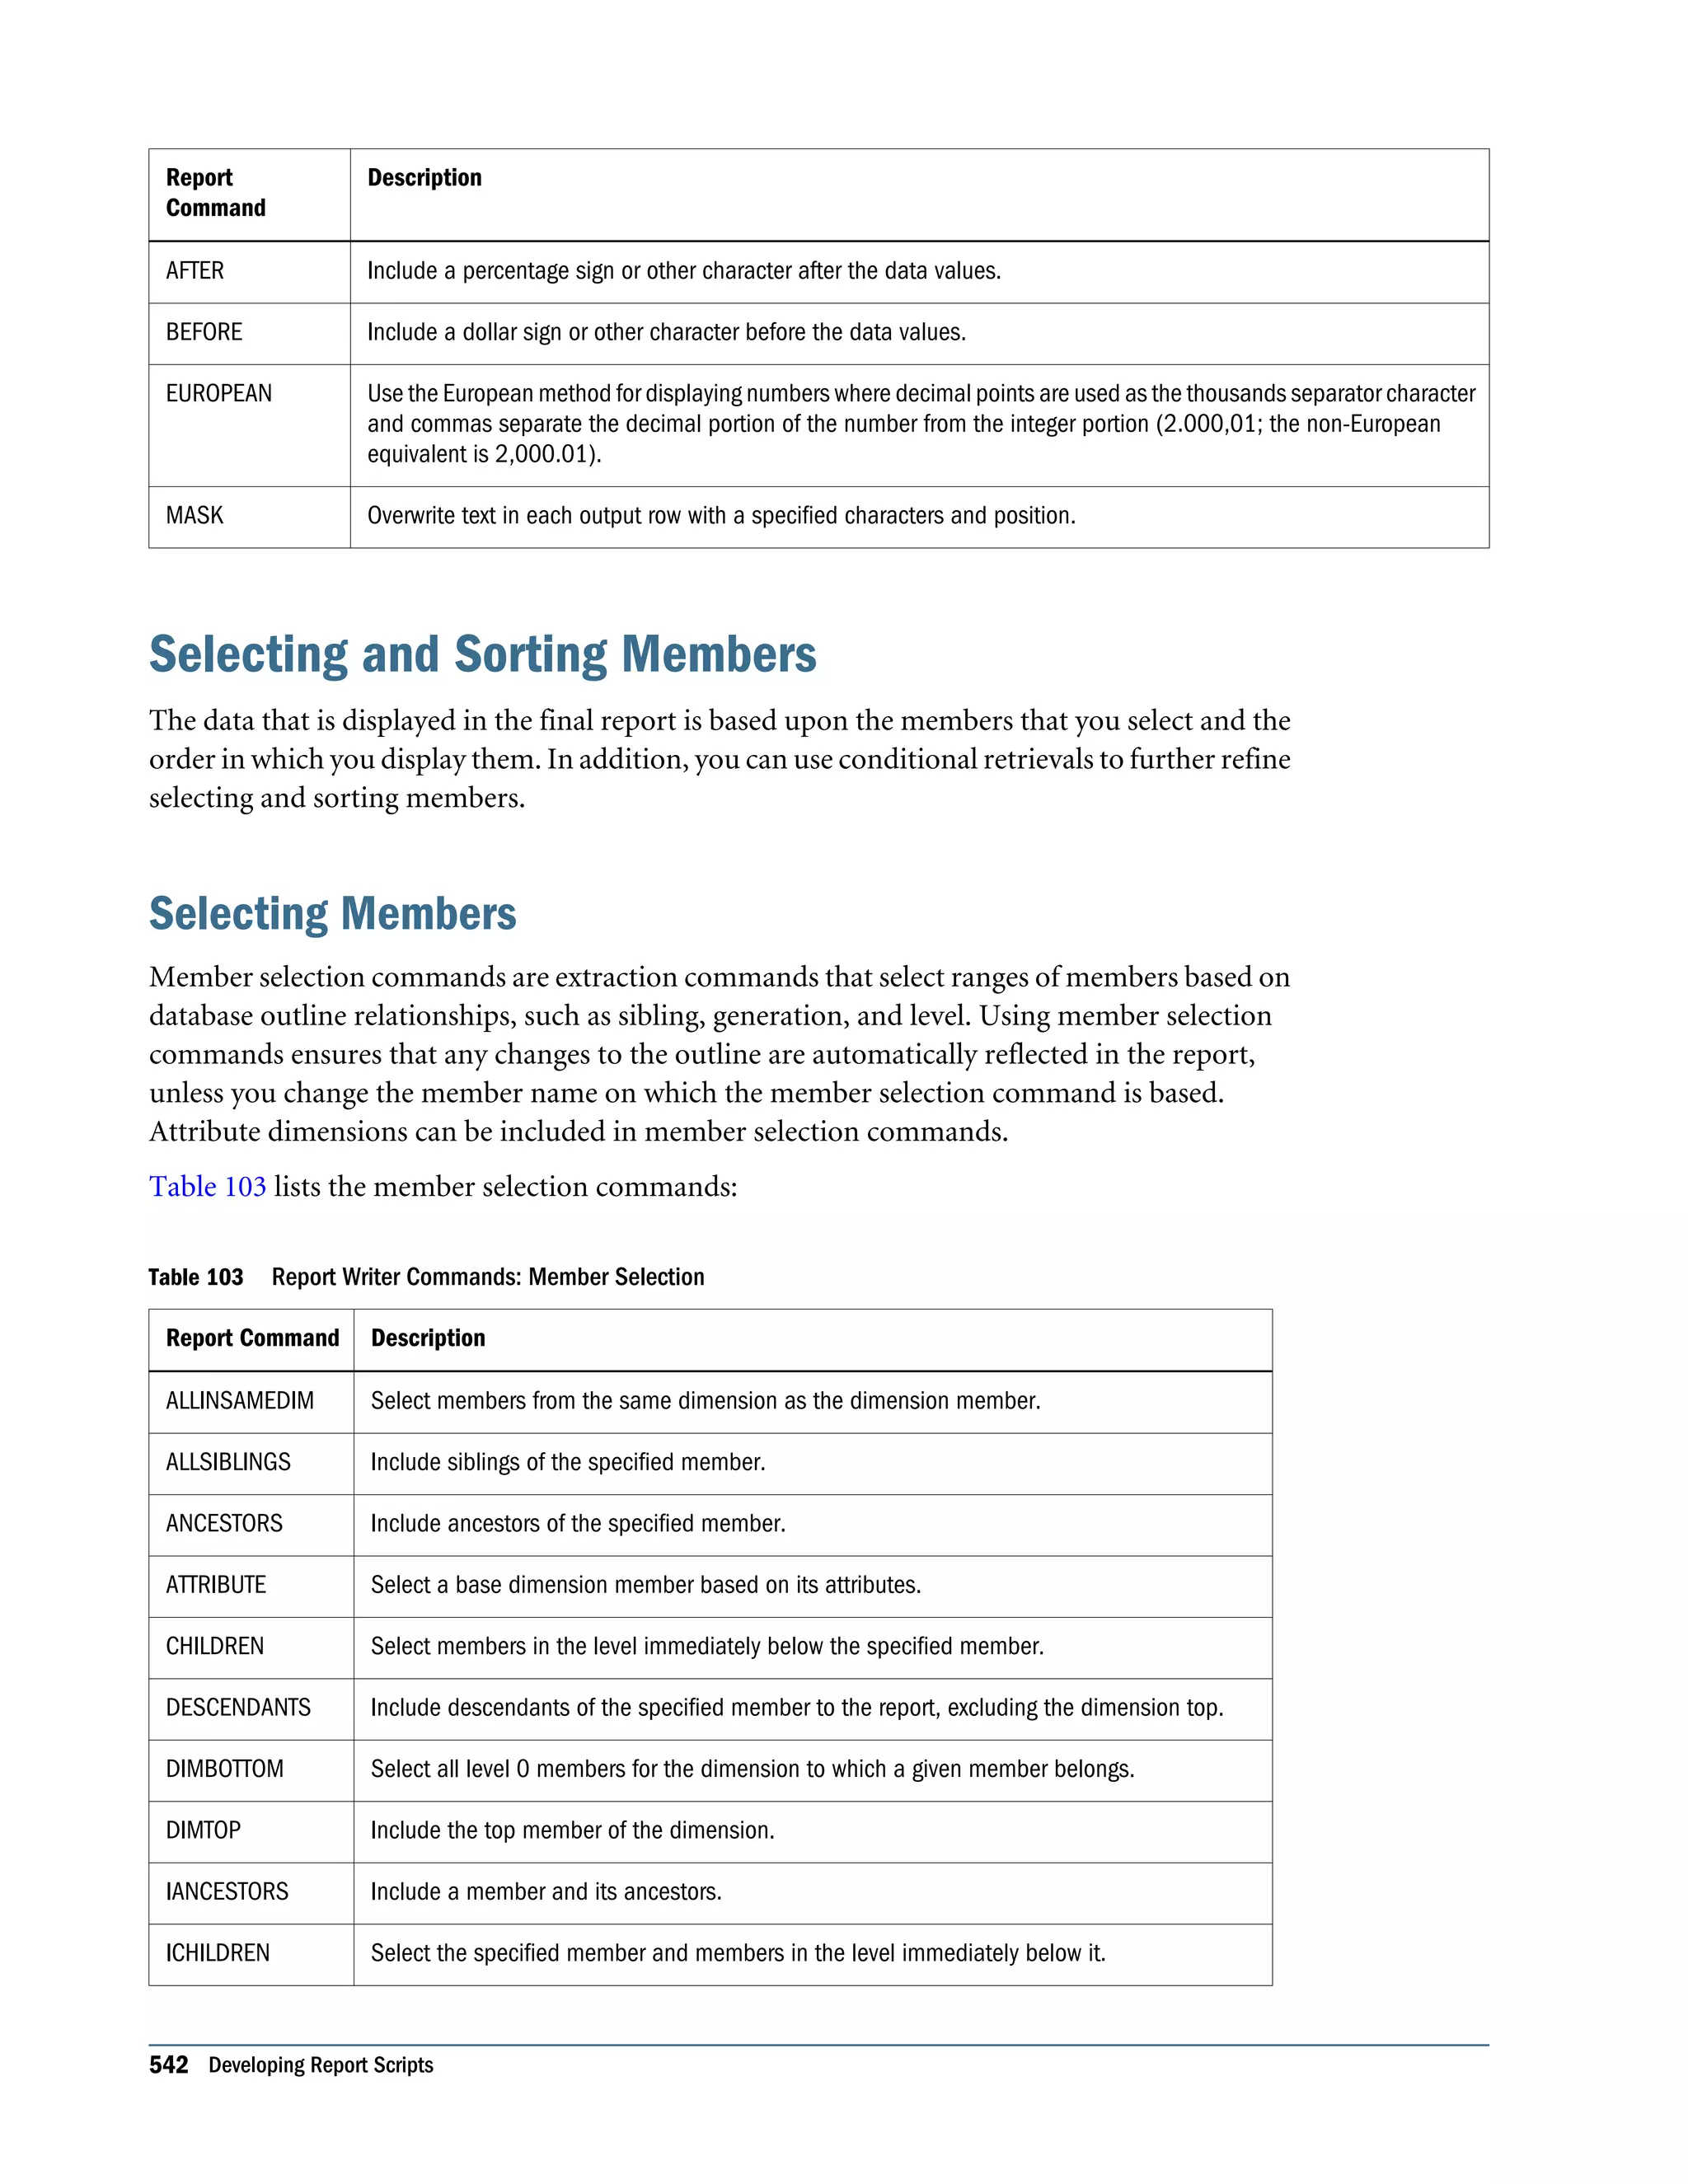
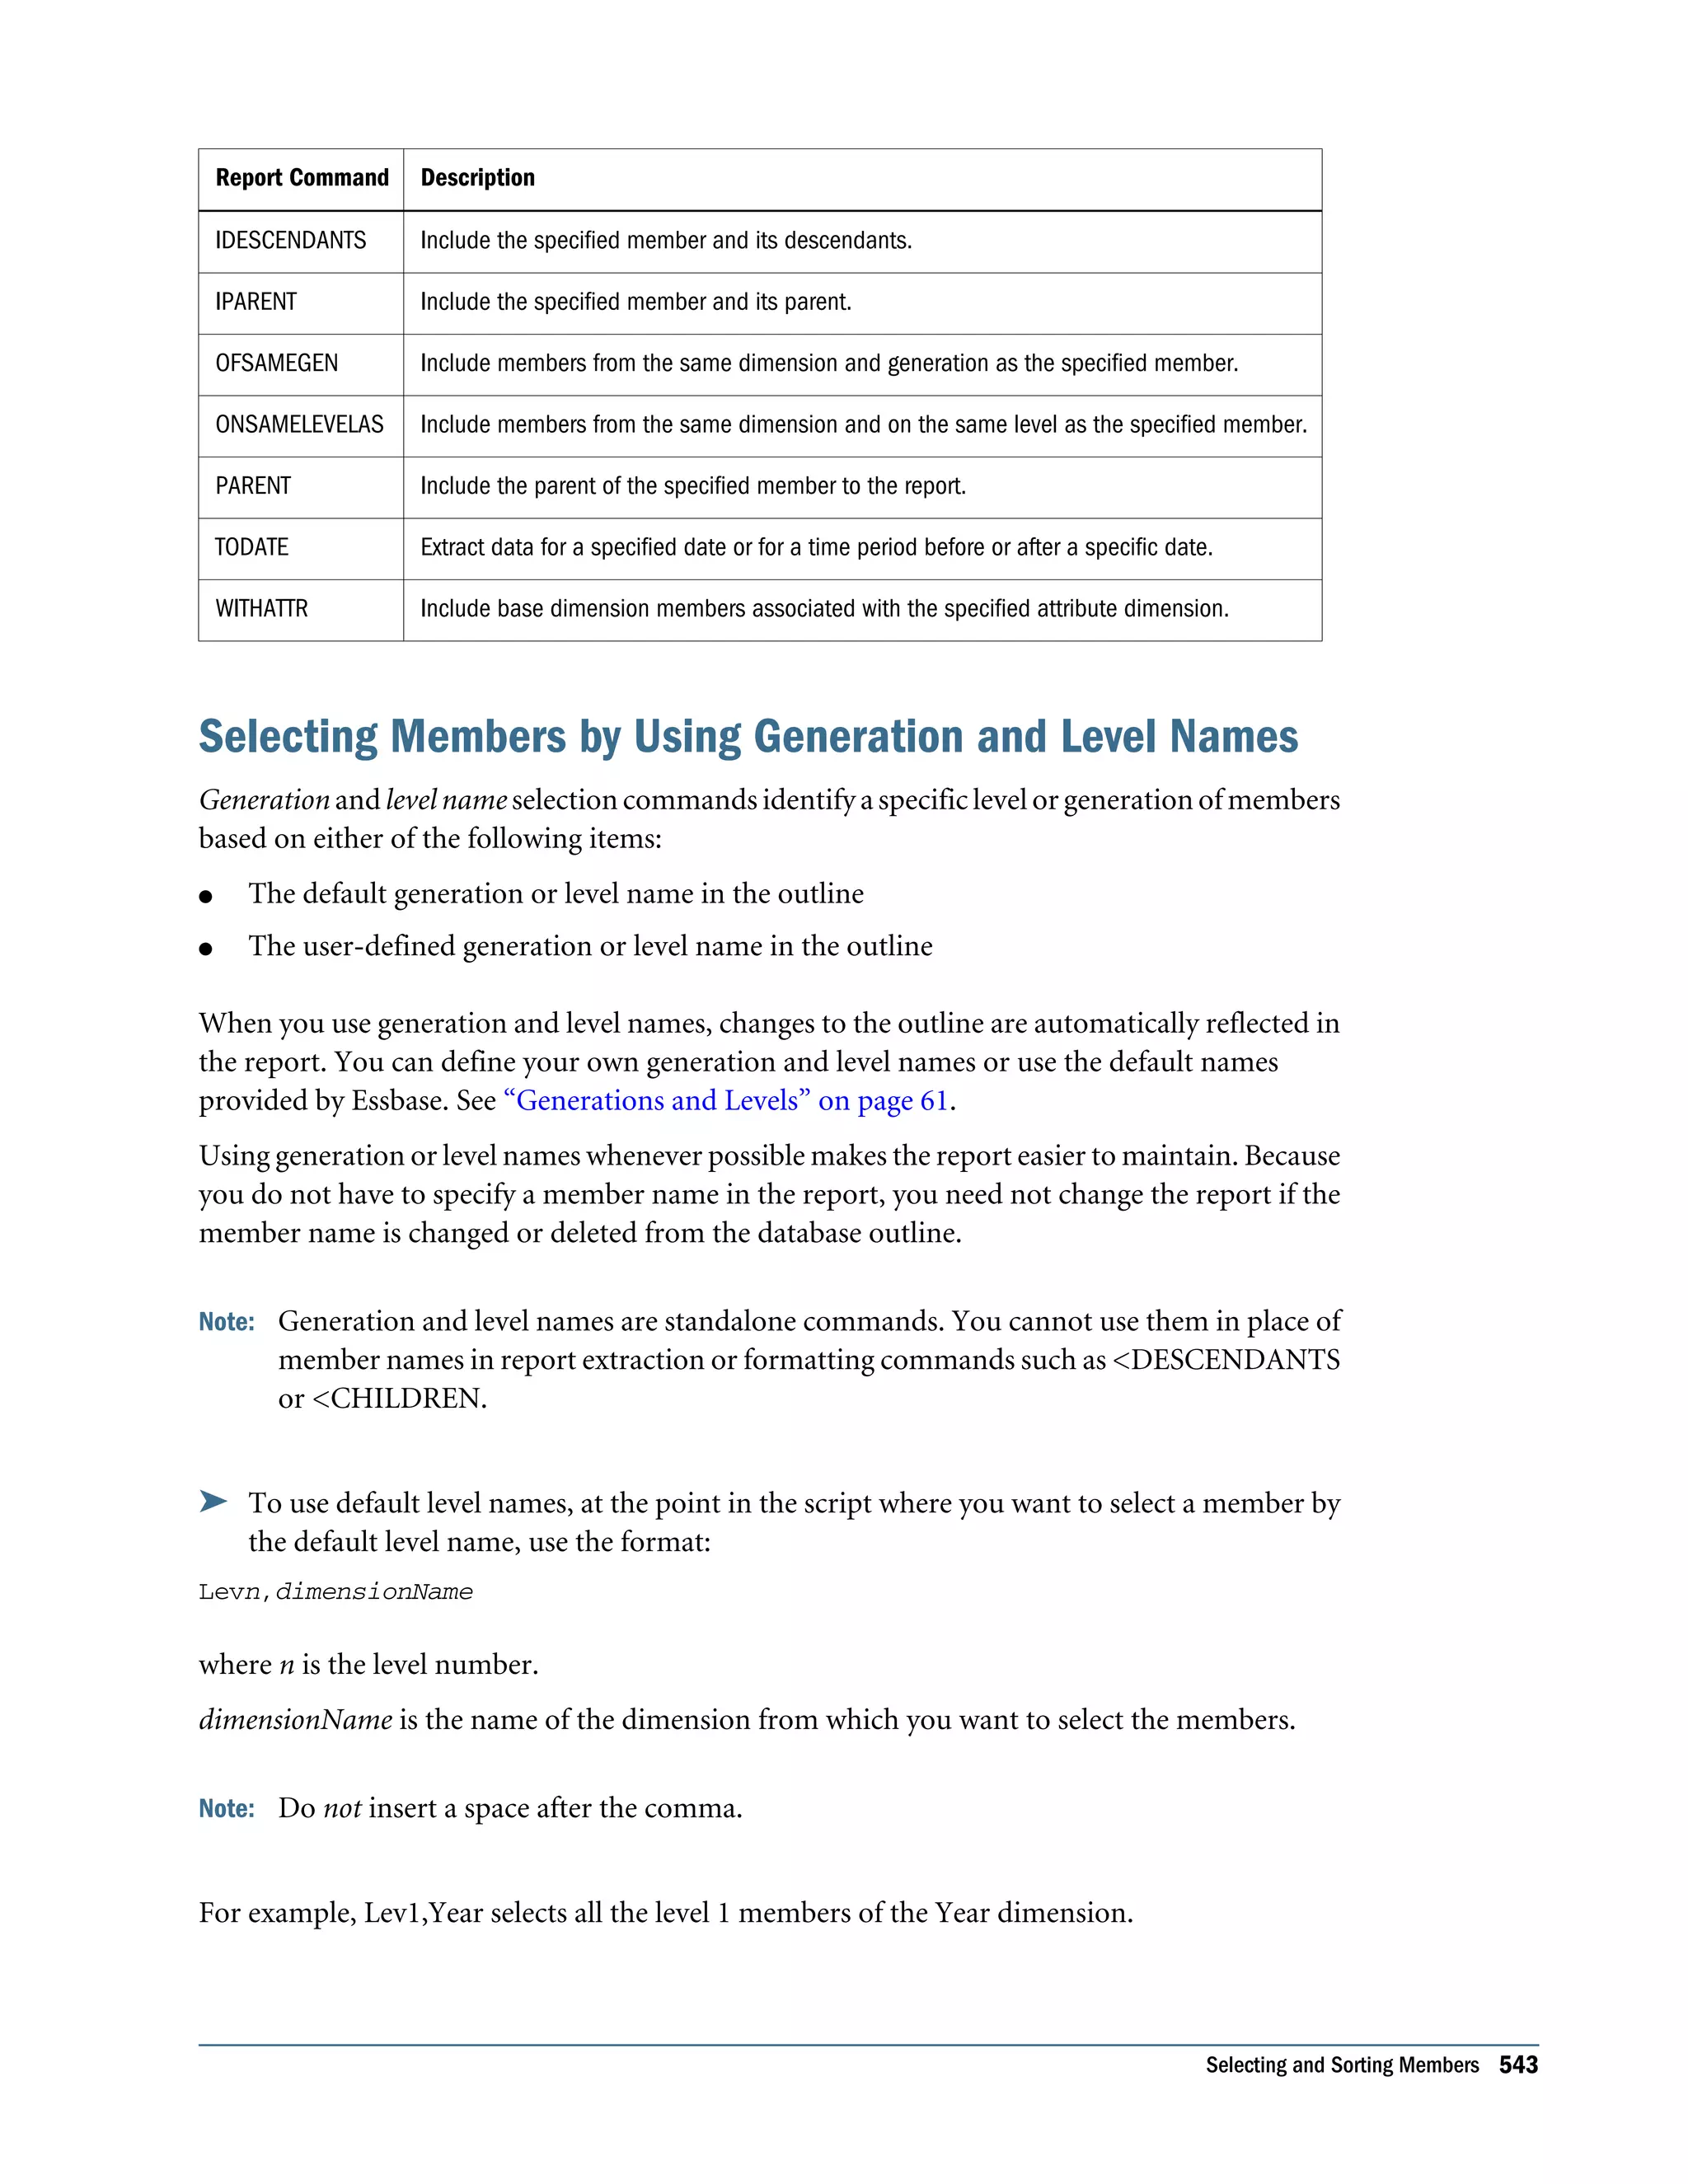
![Understanding Formatting Commands You use formatting commands to determine the visual design of the report and to control the display of the data values. Formatted data values are displayed in the report when you run the script, based on the combined extraction and report commands. Formattingcommandsenableyoutocustomizetheformatandappearanceofareportandcreate report-time calculations. Formatting commands are generally enclosed in braces ({ }), although several formatting commands begin with the less-than (<) character. Formatting commands are either applied globally within the report script or are specific to a member. Understanding Report Script Syntax To build a report, you enter commands that define the layout, member selection, and format you want in Report Script Editor. The different elements of a script are color-coded to aid readability. You can enable autocompletion to help build scripts interactively as you type. See “About Report Script Editor” in the Oracle Essbase Administration Services Online Help. When you write a report script, follow these guidelines: l Separate commands with at least one space, tab, or new line for readability. Report processing is unaffected by extra blank lines, spaces, or tabs. l Enter commands in uppercase or lowercase. Commands are not case-sensitive. If the database outline is case-sensitive, the members in the report script must match the outline. l To start report processing, enter the bang (!) report output command or one or more consecutive numeric values. You can place one or more report scripts, each terminated by its own ! command, in the same report file. l You can group multiple format commands within one set of braces. For example, these formats are synonymous: {UDATA SKIP} {UDATA} {SKIP} l Enclose member names in quotation marks in the following cases: m Names beginning with an ampersand (for example, “&Product”). m Names containing spaces (for example, “Cost of Goods Sold”). m Names containing the word Default (for example, “Default Value”). m Duplicate member names, which must be entered as qualified member names (for example, “[2006].[Qtr1]”) m Names containing one or more numerals at the beginning of the name (for example, “100-Blue”) m Names containing any of the characters listed in Table 90: 526 Developing Report Scripts](https://image.slidesharecdn.com/essbasedatabaseadministratorsguide-160425204626/75/Essbase-database-administrator-s-guide-526-2048.jpg)
![Table 90 Characters that Require Member Name Enclosures Character Description * asterisks @ at signs {} braces [ ] brackets , commas :](https://image.slidesharecdn.com/essbasedatabaseadministratorsguide-160425204626/75/Essbase-database-administrator-s-guide-527-2048.jpg)