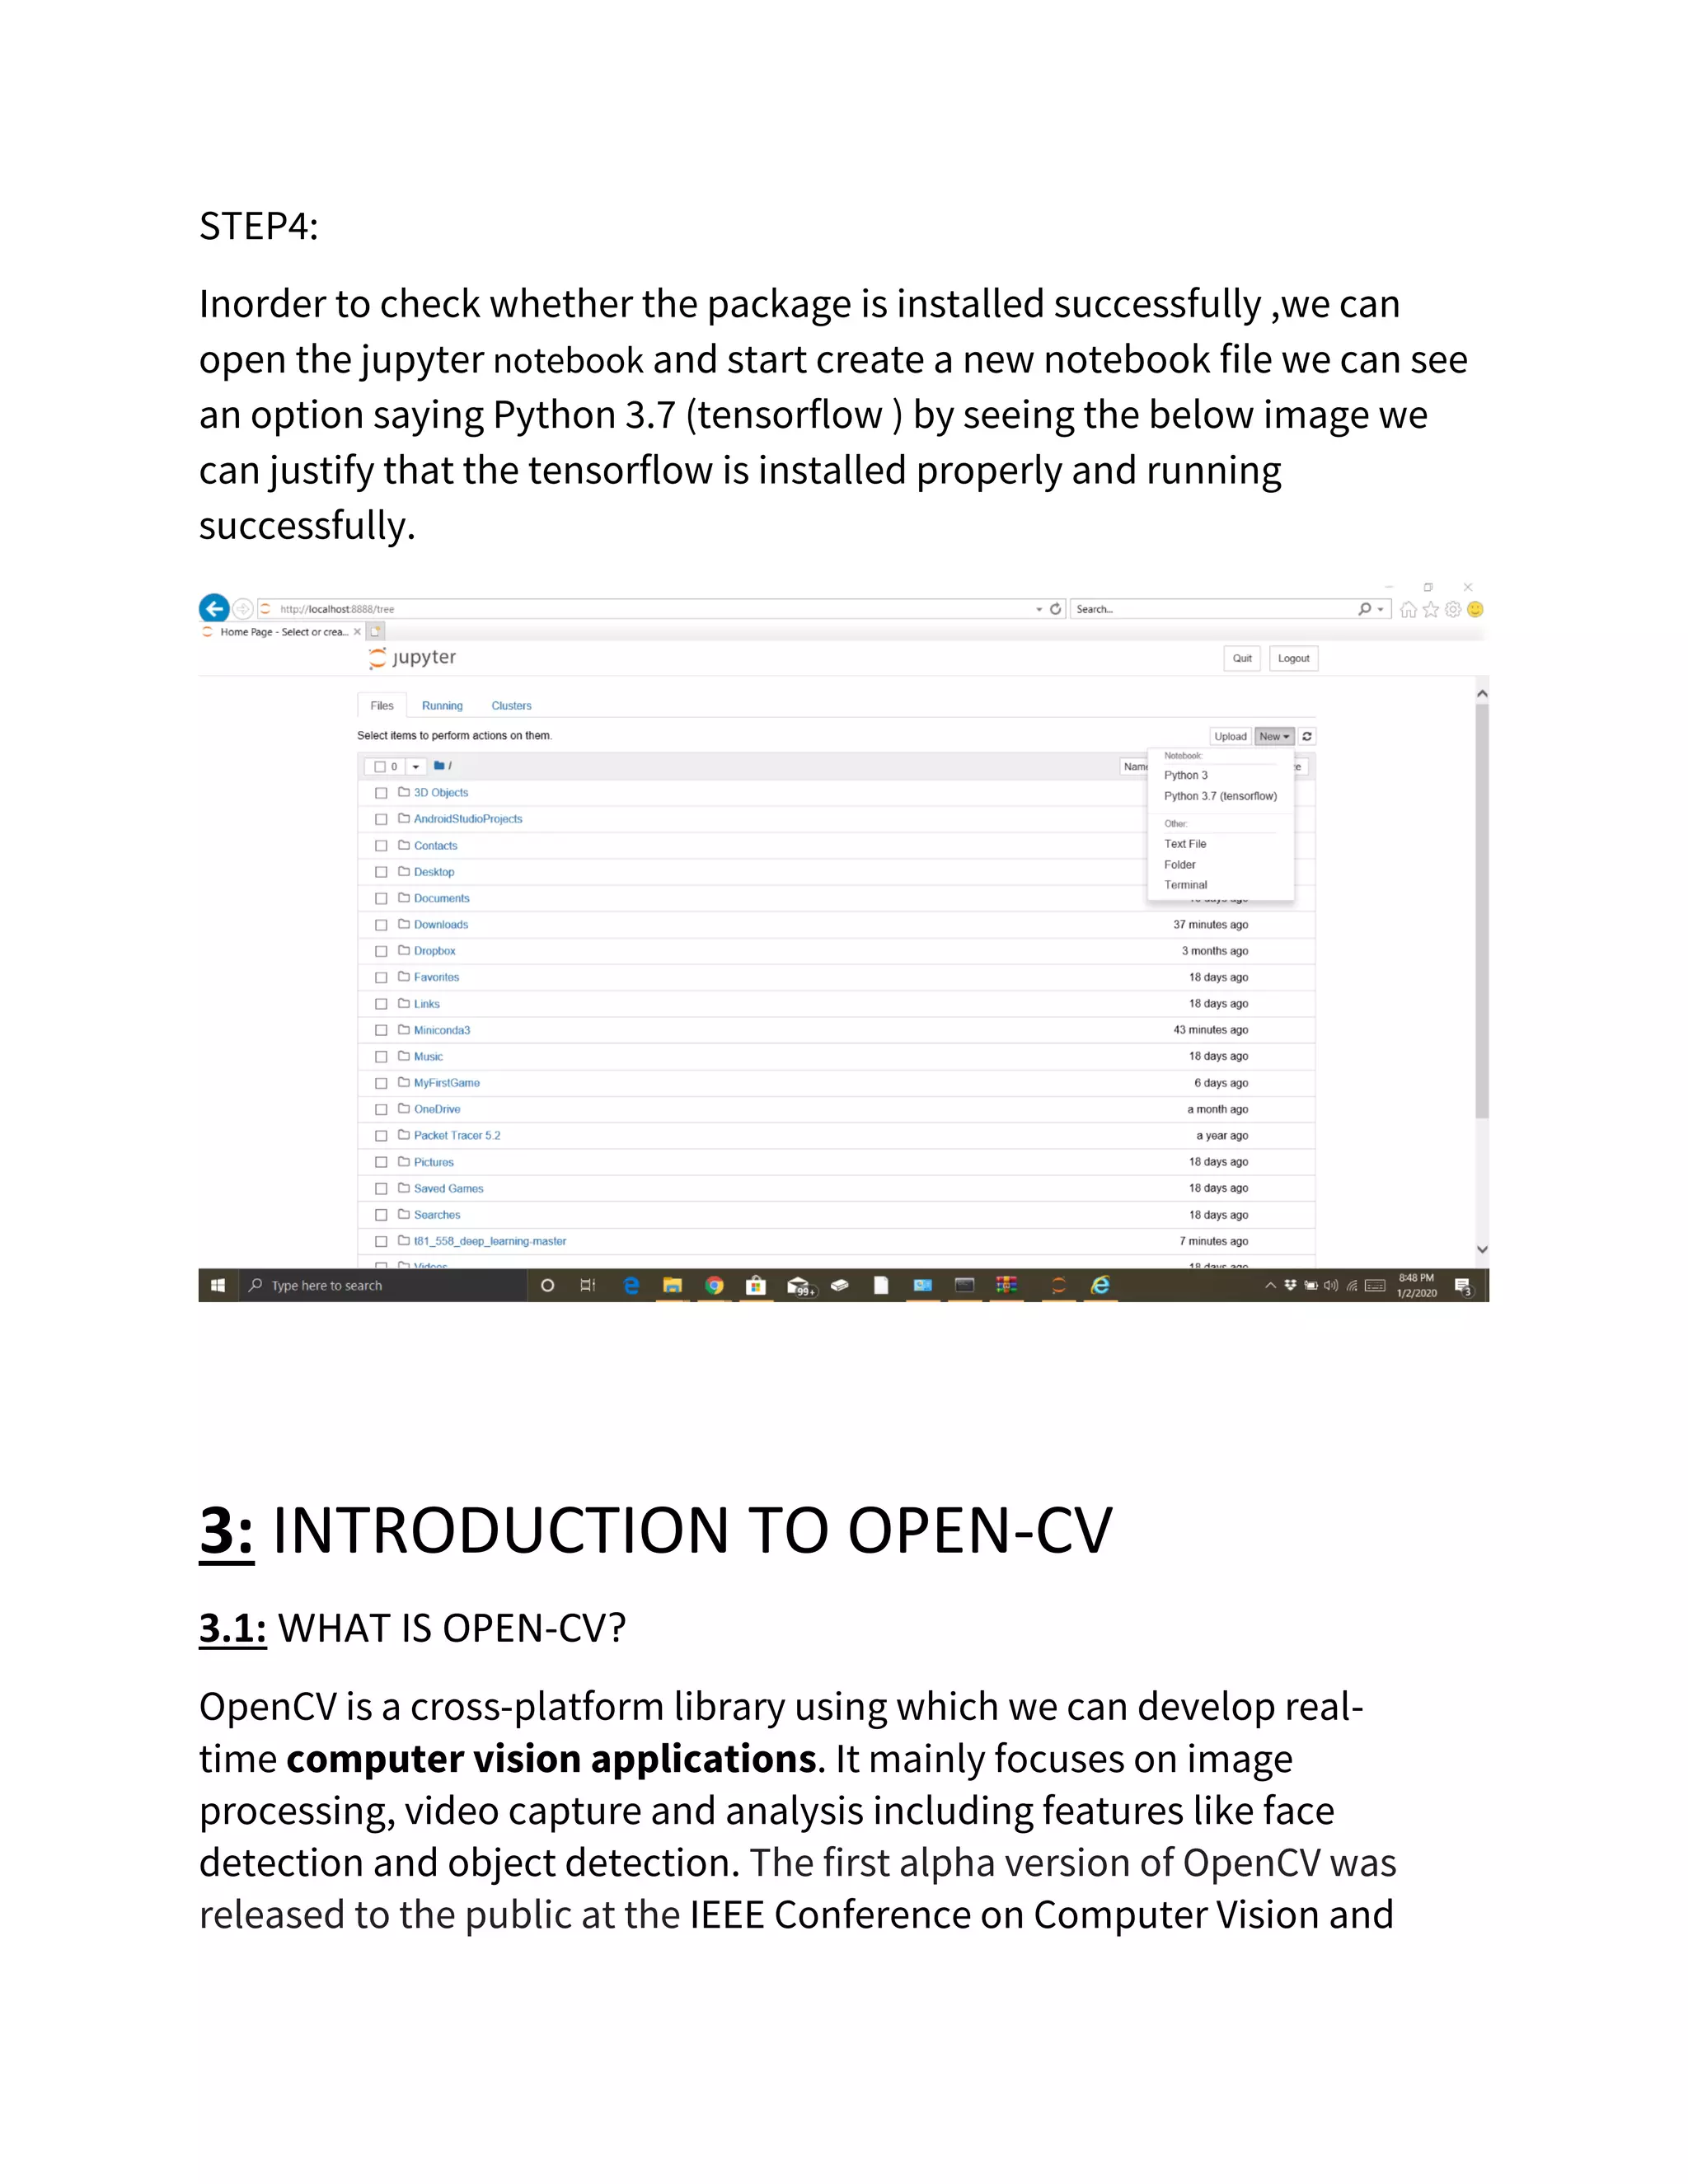
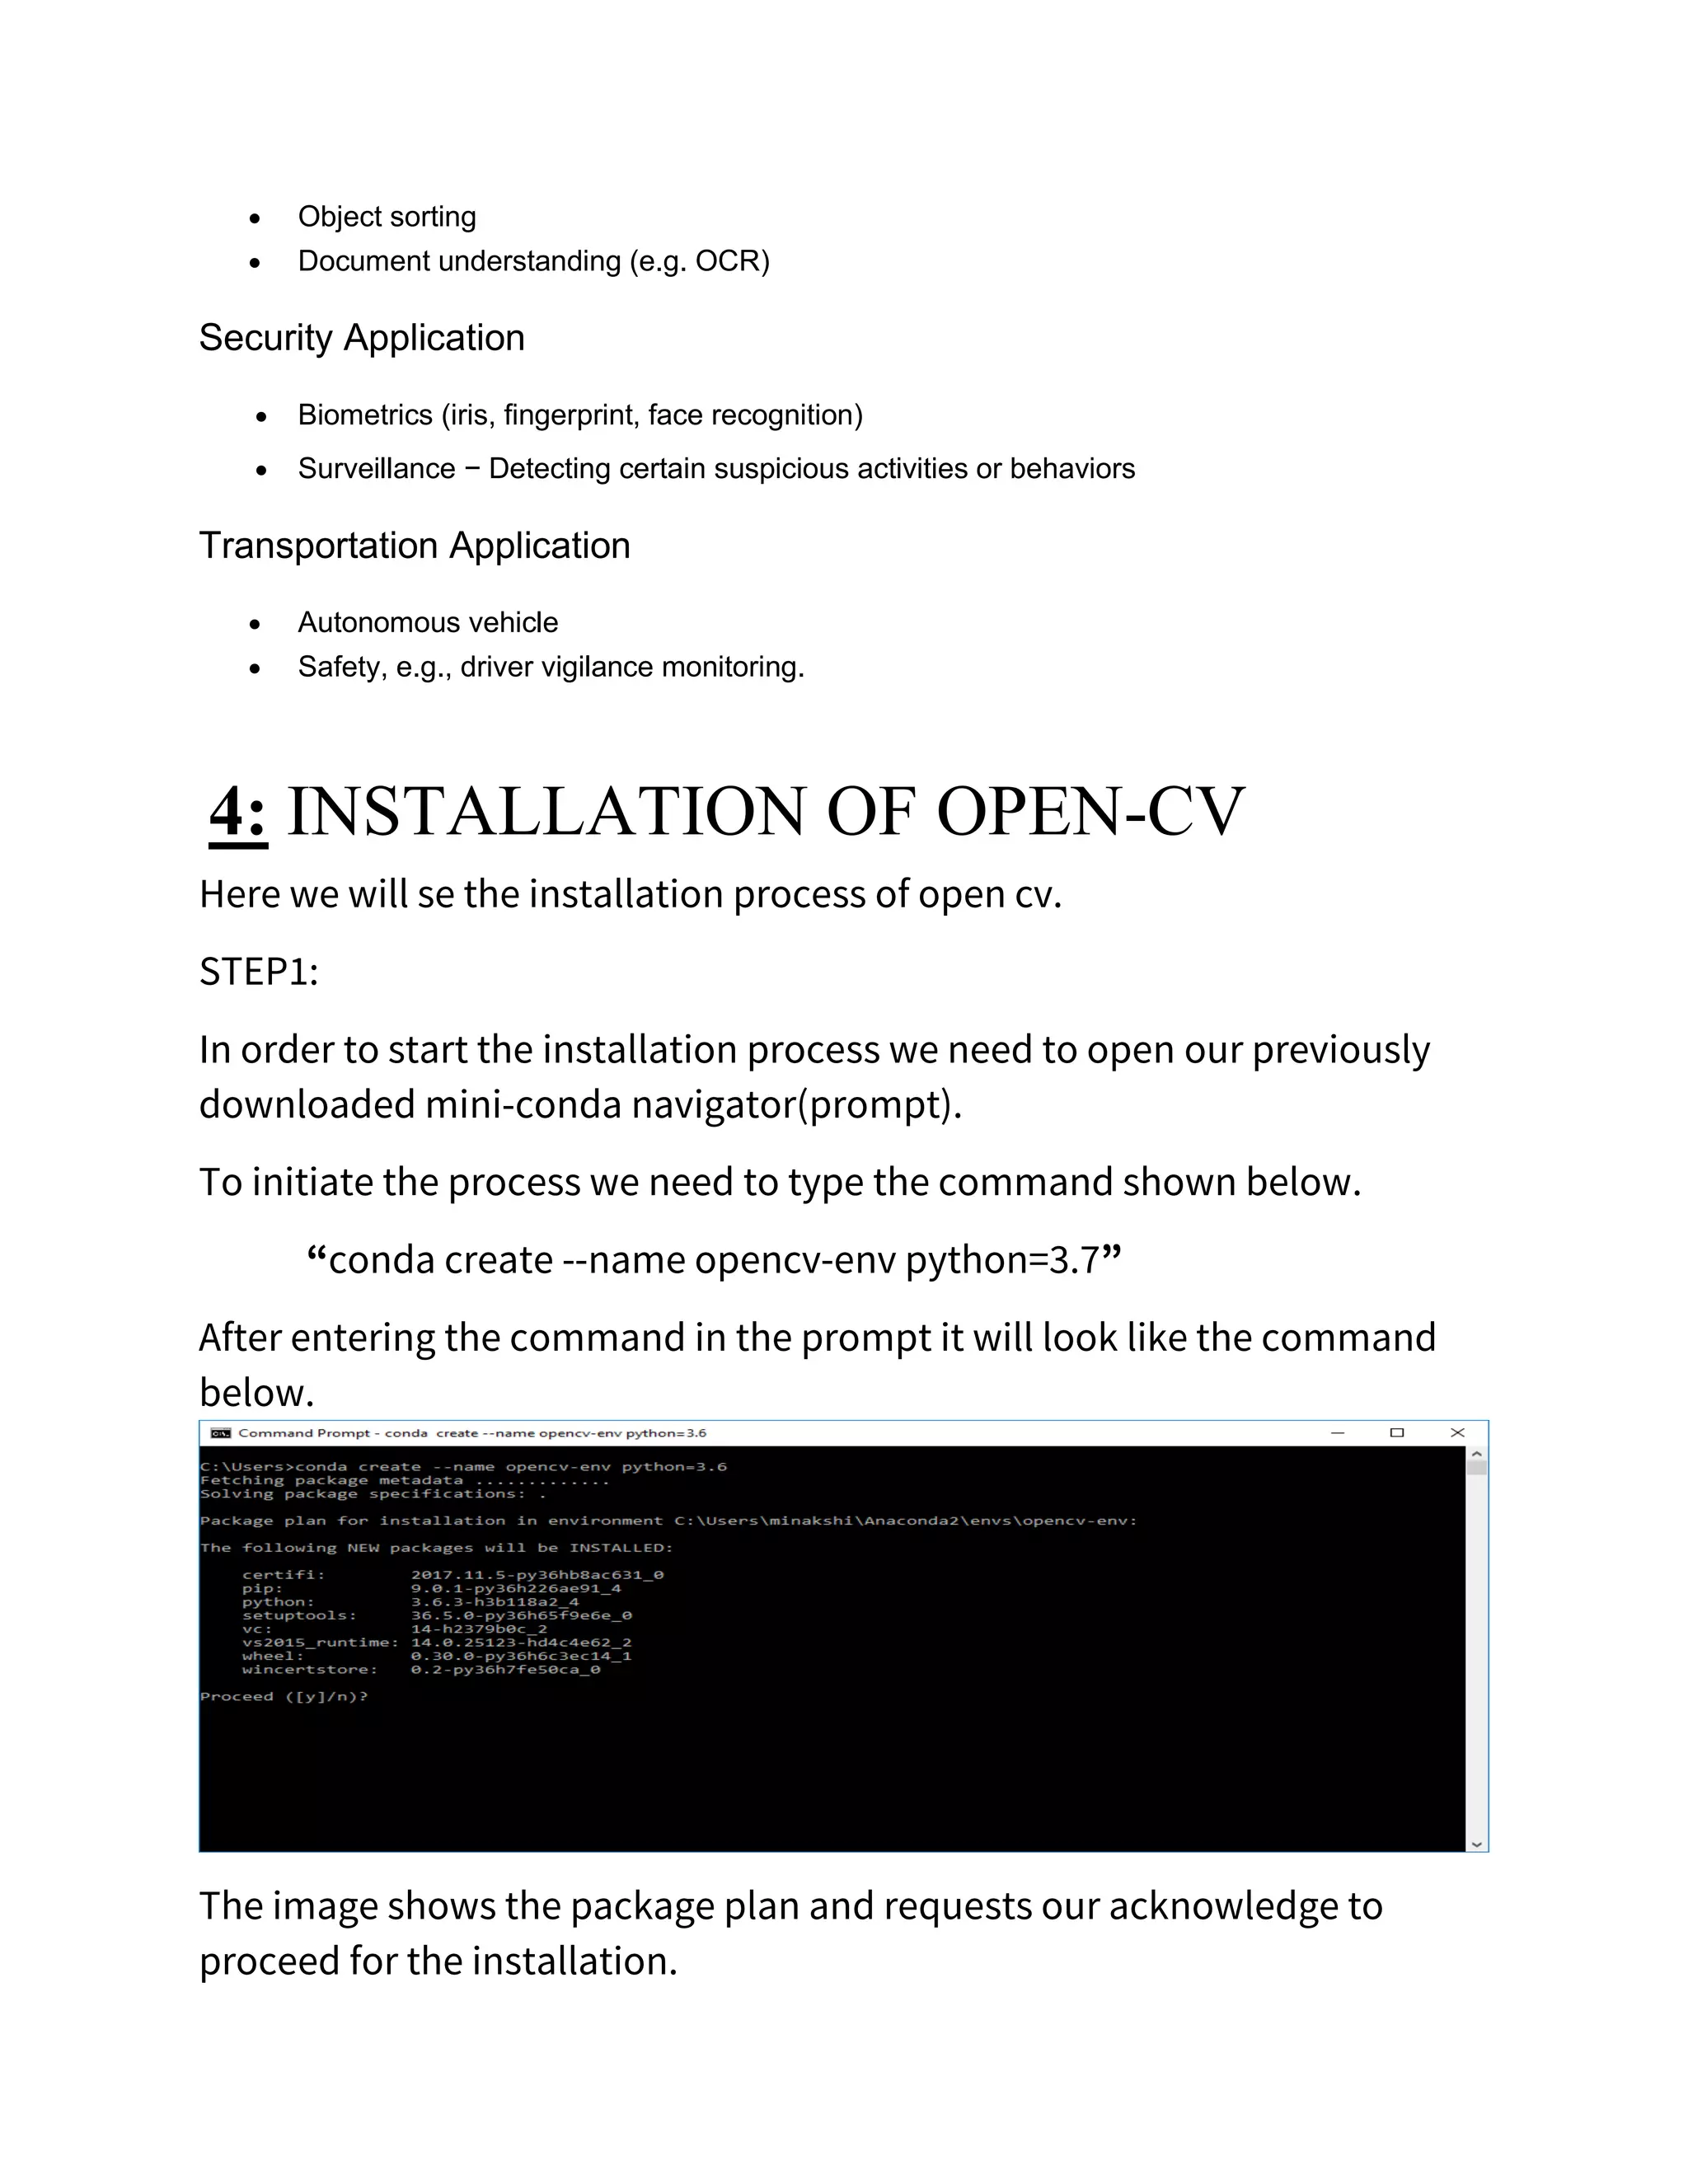
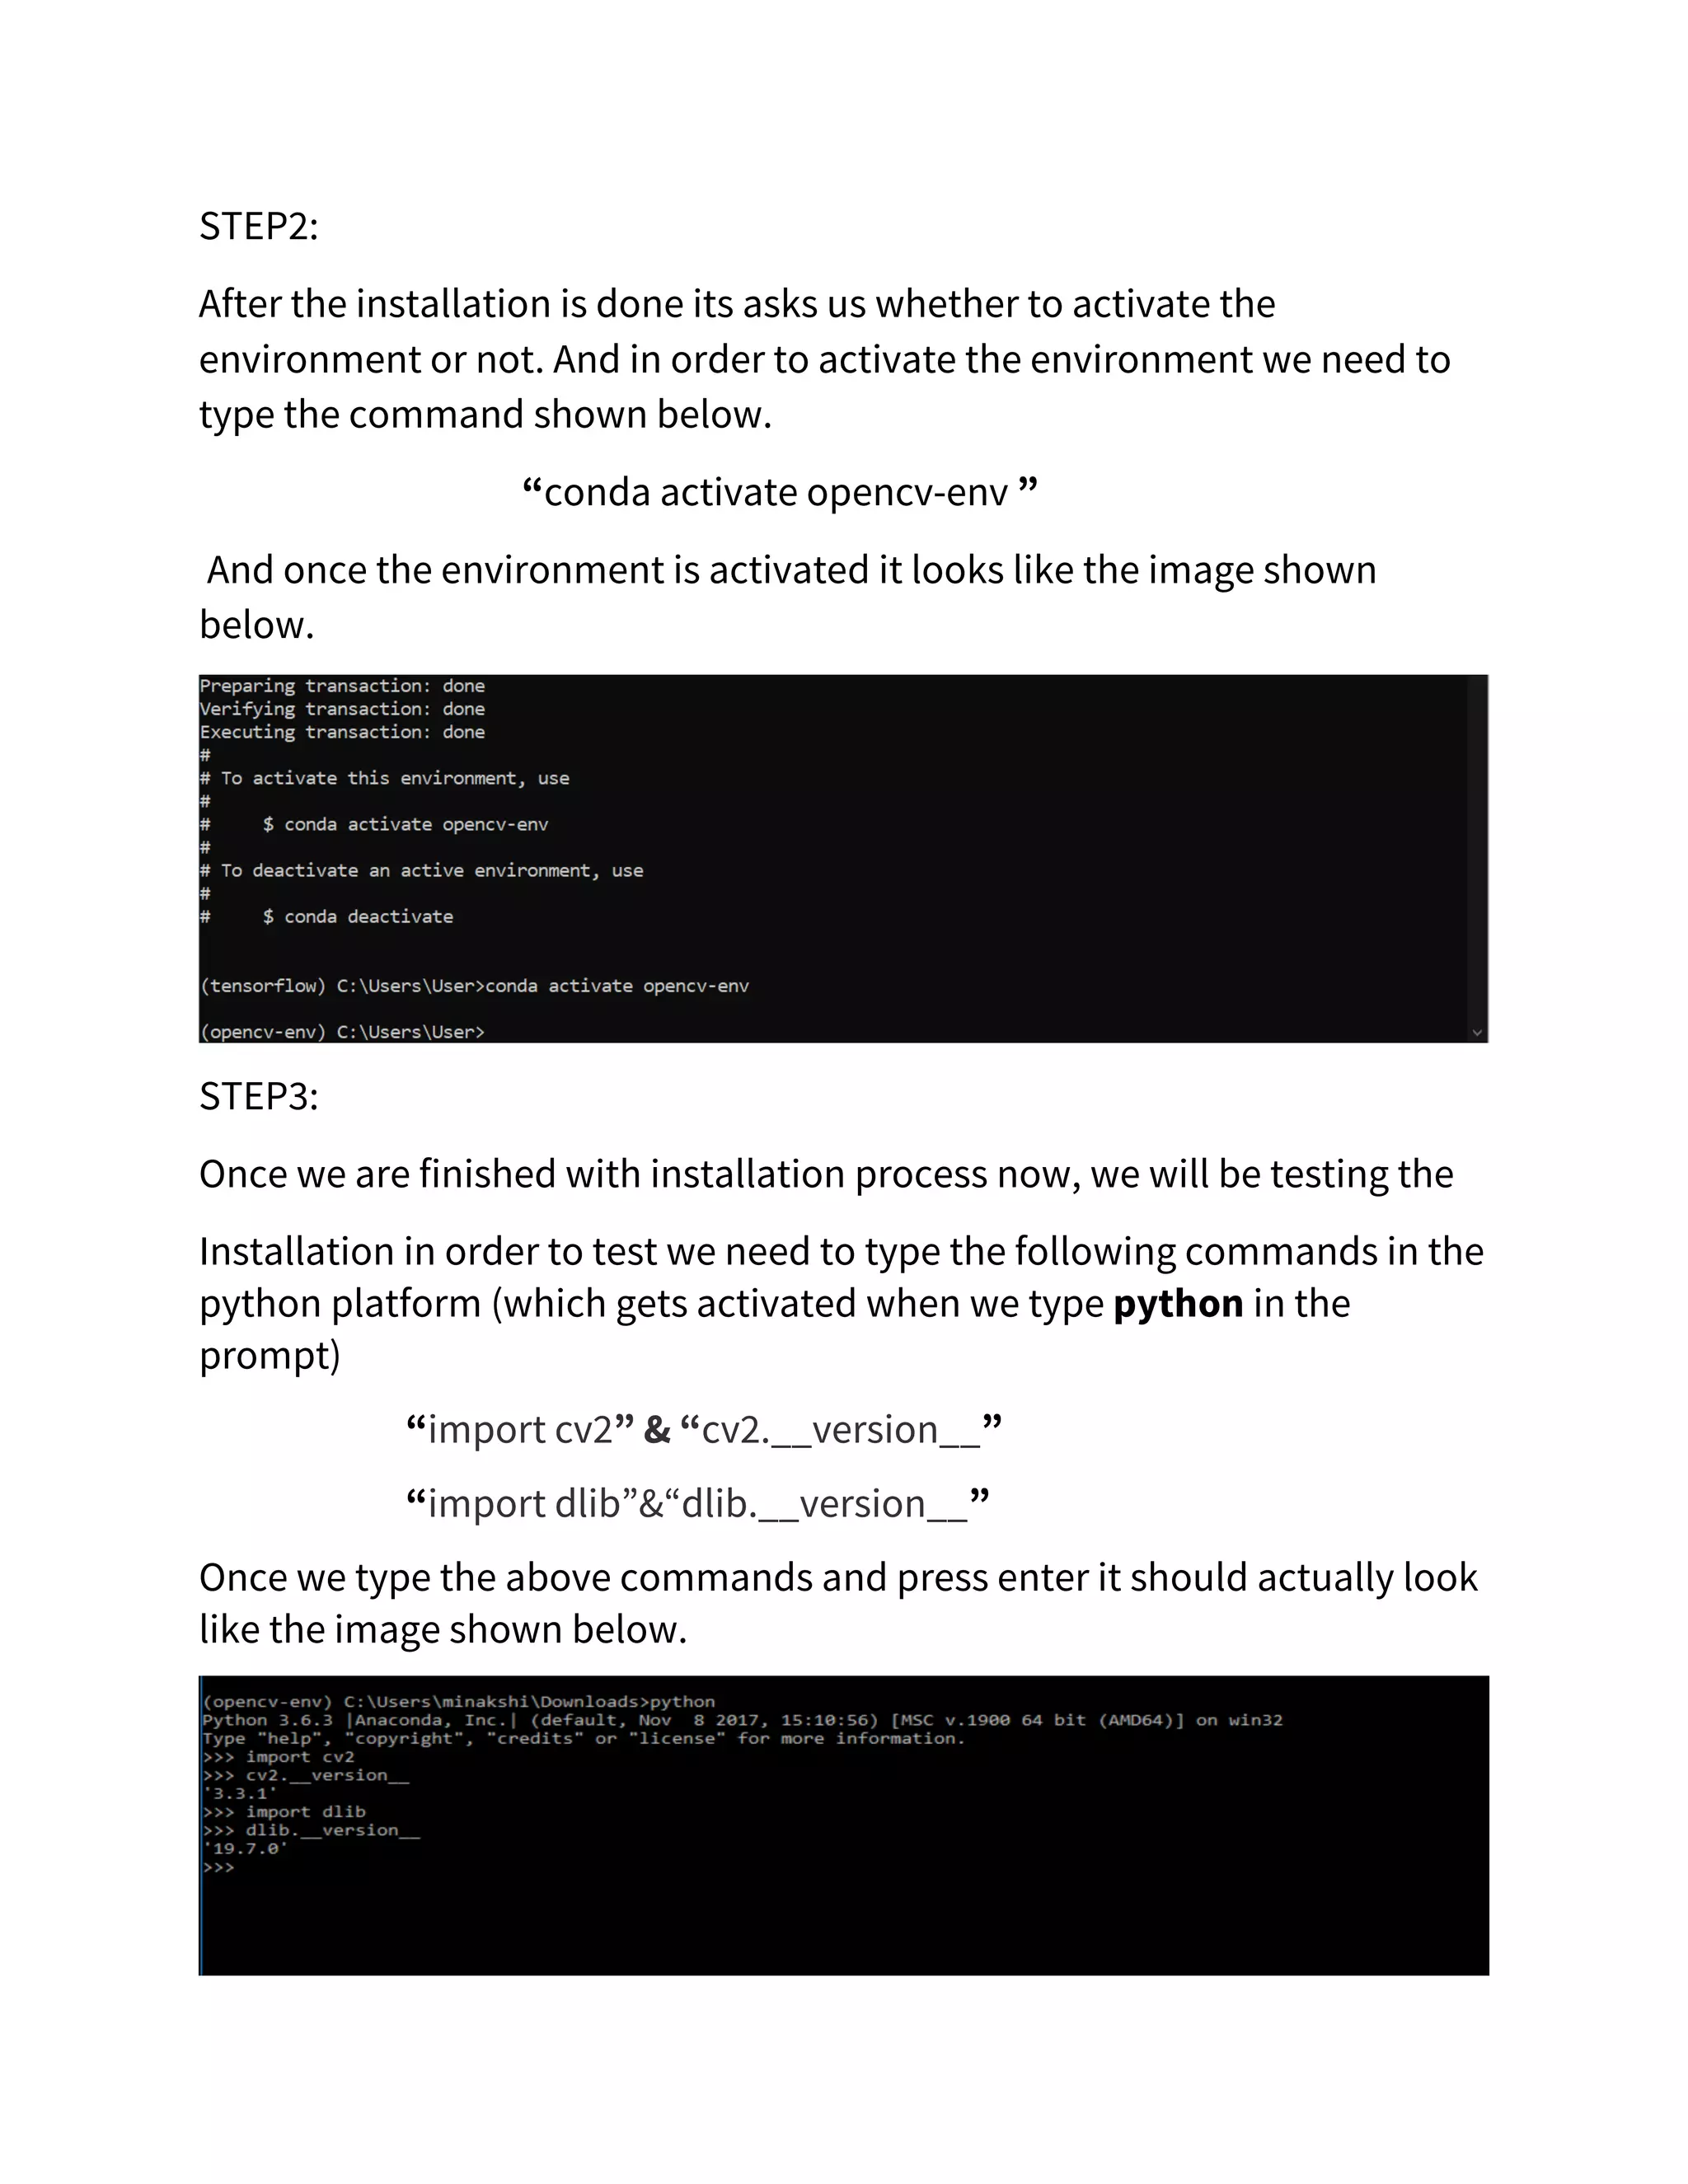
ARTIFICIAL INTELLIGENCE ASSIGNMENT-1 TENSORFLOW & OPEN CV DONE BY Name: T. Sai Abhijyan Branch & Section: CSE-B9
1: INTRODUCTION TO TENSORFLOW 1.1: WHAT IS TENSORFLOW? TensorFlow is an open source software library for numerical computation using data-flow graphs. It was originally developed by the Google Brain Team within Google's Machine Intelligence research organization for machine learning and deep neural networks research, but the system is general enough to be applicable in a wide variety of other domains as well. It reached version 1.0 in February 2017, and has continued rapid development, with 21,000+ commits thus far, many from outside contributors. This article introduces TensorFlow, its open source community and ecosystem, and highlights some interesting TensorFlow open sourced models. 1.2: WHAT MADE TENSORFLOW POPULAR? TensorFlow is the best library of all because it is built to be accessible for everyone. TensorFlow library incorporates different API to build at scale deep learning architecture like CNN or RNN. TensorFlow is based on graph computation; it allows the developer to visualize the construction of the neural network. This tool is helpful to debug the program. Finally, TensorFlow is built to be deployed at scale. It runs on CPU and GPU. TensorFlow attracts the largest popularity on GitHub compare to the other deep learning framework.
2: Downloading & Installing of TensorFlow 2.1: Installation of the suitable navigator. Firstly, we need an environment (Navigator) which supports python and its libraries. So, I have chosen mini-conda as my environment to install tensor flow and run programs which consists of tensor flow components. In-order, to download mini-conda navigator go to https://docs.conda.io/en/latest/miniconda.html and download the mini-conda navigator according to your system configurations. Make sure you download the navigator having python 3.7 version. Now download the application. And run the application downloaded. STEP1: Open the application downloaded. When you run the application it actually looks like the below displayed image.
Proceed by clicking on next. STEP2: As you click on the next button. It actually open the license agreement section. Which looks like the below image.
Read the License agreements T&C. After, you go through the license agreement, now click on I Agree button. STEP3: After clicking on Agree button you will moving on towards the select installation type section. Which looks like this.
For the time being continue with the Just Me option and click on next. STEP4: By clicking on next you will proceed to advanced options section which looks likes the below image.
Here rather than going with the default option , we need to select the first option (i.e Add anaconda to my path environment variable) after selecting the first option click on install . STEP5: By clicking on install the installation of the mini-conda navigator starts which looks like the below image. Once you are finished with the installation of the mini-conda navigator you will be enabled with the next button. Now click on the next button. STEP6: Once you click on the next button it will show the final installation section which looks like the below image.
This actually shows that the installation of the mini-conda navigator is finished. As the installation is finished to exit the setup click on finish button. 2.2: Installation of TensorFlow. STEP1: As previously we have finished your installation of mini-conda navigator. Now we need to open the mini-conda prompt to continue with the TensorFlow installion. To open the mini-conda prompt search for anaconda Prompt (Miniconda3) in the windows search. The below image shows the mini-conda prompt.
Now click on open to open the mini-conda prompt. STEP2: As we will be using the Jupiter notebook we will be installing Jupiter notebook through the mini-conda prompt by typing “conda install -y jupyter” And once you type the above code and press enter the installation of the jupyter notebook takes place which looks like the below image.
Once the installation is started it shows the list of packages wich will be downloaded. And once the download is finished it will followed by installation the packages and the installed packages are. once all the packages are installed and updated. It looks like the below image .
STEP3: So now we will create a –yml file Which is tensorflow.yml And the data present in it is Just make sure that this file is present in the same directory the anaconda prompt is present. If it’s not present change the directory by using the cd command and enter “conda env create -v -f tensorflow.yml”.
Once the packages are installed it actually asks to activate or deactivate tensorflow package if we activate the package the prompt will now be working with tensorflow as its base which looks like the below images.
Once we activate tensorflow we need to open the python console and type import tensorflow as tf followed by print(tf.__version__). As we can see in the image when we type print(tf.__version__) it prints the version of the tensorflow package and as we exit from the python the console the base of the prompt changes to tensorflow .
STEP4: Inorder to check whether the package is installed successfully ,we can open the jupyter notebook and start create a new notebook file we can see an option saying Python 3.7 (tensorflow ) by seeing the below image we can justify that the tensorflow is installed properly and running successfully. 3: INTRODUCTION TO OPEN-CV 3.1: WHAT IS OPEN-CV? OpenCV is a cross-platform library using which we can develop real- time computer vision applications. It mainly focuses on image processing, video capture and analysis including features like face detection and object detection. The first alpha version of OpenCV was released to the public at the IEEE Conference on Computer Vision and
Pattern Recognition in 2000, and five betas were released between 2001 and 2005. The first 1.0 version was released in 2006. A version 1.1 "pre- release" was released in October 2008.The second major release of the OpenCV was in October 2009. OpenCV 2 includes major changes to the C++ interface, aiming at easier, more type-safe patterns, new functions, and better implementations for existing ones in terms of performance (especially on multi-core systems). Official releases now occur every six months and development is now done by an independent Russian team supported by commercial corporations.In August 2012, support for OpenCV was taken over by a non-profit foundation OpenCV.org, which maintains a developerand user site. 3.2: WHAT MADE OPENCV POPULAR? Opencv is actually popular for its for applications in facial recognition and for many real world problems. The application of opencv in different streams are listed down: Robotics Application • Localization − Determine robot location automatically • Navigation • Obstacles avoidance • Assembly (peg-in-hole, welding, painting) • Manipulation (e.g. PUMA robot manipulator) • Human Robot Interaction (HRI) − Intelligent robotics to interact with and serve people Medicine Application • Classification and detection (e.g. lesion or cells classification and tumor detection) • 2D/3D segmentation • 3D human organ reconstruction (MRI or ultrasound) • Vision-guided robotics surgery Industrial Automation Application • Industrial inspection (defect detection) • Assembly • Barcode and package label reading
• Object sorting • Document understanding (e.g. OCR) Security Application • Biometrics (iris, fingerprint, face recognition) • Surveillance − Detecting certain suspicious activities or behaviors Transportation Application • Autonomous vehicle • Safety, e.g., driver vigilance monitoring. 4: INSTALLATION OF OPEN-CV Here we will se the installation process of open cv. STEP1: In order to start the installation process we need to open our previously downloaded mini-conda navigator(prompt). To initiate the process we need to type the command shown below. “conda create --name opencv-env python=3.7” After entering the command in the prompt it will look like the command below. The image shows the package plan and requests our acknowledge to proceed for the installation.
STEP2: After the installation is done its asks us whether to activate the environment or not. And in order to activate the environment we need to type the command shown below. “conda activate opencv-env ” And once the environment is activated it looks like the image shown below. STEP3: Once we are finished with installation process now, we will be testing the Installation in order to test we need to type the following commands in the python platform (which gets activated when we type python in the prompt) “import cv2” & “cv2.__version__” “import dlib”&“dlib.__version__” Once we type the above commands and press enter it should actually look like the image shown below.
It prints the versions of the open cv & dlib. And in coming to the mention of the library dlib (this is a library which is used is a general, purpose cross- platform software library written in the programming language C++. Its design is heavily influenced by ideas from design by contract and component-based software engineering). In this document I didn’t actually show the installation process of the dlib package because I have the package actually installed in beforehand. Actually the installation of dlib looks similar to the images shown below. Command to install dlib is “pip install dlib”.
THANK YOU

Introduction to TensorFlow and OpenCV libraries

  • 1.
    ARTIFICIAL INTELLIGENCE ASSIGNMENT-1 TENSORFLOW &OPEN CV DONE BY Name: T. Sai Abhijyan Branch & Section: CSE-B9
  • 2.
    1: INTRODUCTION TOTENSORFLOW 1.1: WHAT IS TENSORFLOW? TensorFlow is an open source software library for numerical computation using data-flow graphs. It was originally developed by the Google Brain Team within Google's Machine Intelligence research organization for machine learning and deep neural networks research, but the system is general enough to be applicable in a wide variety of other domains as well. It reached version 1.0 in February 2017, and has continued rapid development, with 21,000+ commits thus far, many from outside contributors. This article introduces TensorFlow, its open source community and ecosystem, and highlights some interesting TensorFlow open sourced models. 1.2: WHAT MADE TENSORFLOW POPULAR? TensorFlow is the best library of all because it is built to be accessible for everyone. TensorFlow library incorporates different API to build at scale deep learning architecture like CNN or RNN. TensorFlow is based on graph computation; it allows the developer to visualize the construction of the neural network. This tool is helpful to debug the program. Finally, TensorFlow is built to be deployed at scale. It runs on CPU and GPU. TensorFlow attracts the largest popularity on GitHub compare to the other deep learning framework.
  • 3.
    2: Downloading &Installing of TensorFlow 2.1: Installation of the suitable navigator. Firstly, we need an environment (Navigator) which supports python and its libraries. So, I have chosen mini-conda as my environment to install tensor flow and run programs which consists of tensor flow components. In-order, to download mini-conda navigator go to https://docs.conda.io/en/latest/miniconda.html and download the mini-conda navigator according to your system configurations. Make sure you download the navigator having python 3.7 version. Now download the application. And run the application downloaded. STEP1: Open the application downloaded. When you run the application it actually looks like the below displayed image.
  • 4.
    Proceed by clickingon next. STEP2: As you click on the next button. It actually open the license agreement section. Which looks like the below image.
  • 5.
    Read the Licenseagreements T&C. After, you go through the license agreement, now click on I Agree button. STEP3: After clicking on Agree button you will moving on towards the select installation type section. Which looks like this.
  • 6.
    For the timebeing continue with the Just Me option and click on next. STEP4: By clicking on next you will proceed to advanced options section which looks likes the below image.
  • 7.
    Here rather thangoing with the default option , we need to select the first option (i.e Add anaconda to my path environment variable) after selecting the first option click on install . STEP5: By clicking on install the installation of the mini-conda navigator starts which looks like the below image. Once you are finished with the installation of the mini-conda navigator you will be enabled with the next button. Now click on the next button. STEP6: Once you click on the next button it will show the final installation section which looks like the below image.
  • 8.
    This actually showsthat the installation of the mini-conda navigator is finished. As the installation is finished to exit the setup click on finish button. 2.2: Installation of TensorFlow. STEP1: As previously we have finished your installation of mini-conda navigator. Now we need to open the mini-conda prompt to continue with the TensorFlow installion. To open the mini-conda prompt search for anaconda Prompt (Miniconda3) in the windows search. The below image shows the mini-conda prompt.
  • 9.
    Now click onopen to open the mini-conda prompt. STEP2: As we will be using the Jupiter notebook we will be installing Jupiter notebook through the mini-conda prompt by typing “conda install -y jupyter” And once you type the above code and press enter the installation of the jupyter notebook takes place which looks like the below image.
  • 10.
    Once the installationis started it shows the list of packages wich will be downloaded. And once the download is finished it will followed by installation the packages and the installed packages are. once all the packages are installed and updated. It looks like the below image .
  • 11.
    STEP3: So now wewill create a –yml file Which is tensorflow.yml And the data present in it is Just make sure that this file is present in the same directory the anaconda prompt is present. If it’s not present change the directory by using the cd command and enter “conda env create -v -f tensorflow.yml”.
  • 12.
    Once the packagesare installed it actually asks to activate or deactivate tensorflow package if we activate the package the prompt will now be working with tensorflow as its base which looks like the below images.
  • 13.
    Once we activatetensorflow we need to open the python console and type import tensorflow as tf followed by print(tf.__version__). As we can see in the image when we type print(tf.__version__) it prints the version of the tensorflow package and as we exit from the python the console the base of the prompt changes to tensorflow .
  • 14.
    STEP4: Inorder to checkwhether the package is installed successfully ,we can open the jupyter notebook and start create a new notebook file we can see an option saying Python 3.7 (tensorflow ) by seeing the below image we can justify that the tensorflow is installed properly and running successfully. 3: INTRODUCTION TO OPEN-CV 3.1: WHAT IS OPEN-CV? OpenCV is a cross-platform library using which we can develop real- time computer vision applications. It mainly focuses on image processing, video capture and analysis including features like face detection and object detection. The first alpha version of OpenCV was released to the public at the IEEE Conference on Computer Vision and
  • 15.
    Pattern Recognition in2000, and five betas were released between 2001 and 2005. The first 1.0 version was released in 2006. A version 1.1 "pre- release" was released in October 2008.The second major release of the OpenCV was in October 2009. OpenCV 2 includes major changes to the C++ interface, aiming at easier, more type-safe patterns, new functions, and better implementations for existing ones in terms of performance (especially on multi-core systems). Official releases now occur every six months and development is now done by an independent Russian team supported by commercial corporations.In August 2012, support for OpenCV was taken over by a non-profit foundation OpenCV.org, which maintains a developerand user site. 3.2: WHAT MADE OPENCV POPULAR? Opencv is actually popular for its for applications in facial recognition and for many real world problems. The application of opencv in different streams are listed down: Robotics Application • Localization − Determine robot location automatically • Navigation • Obstacles avoidance • Assembly (peg-in-hole, welding, painting) • Manipulation (e.g. PUMA robot manipulator) • Human Robot Interaction (HRI) − Intelligent robotics to interact with and serve people Medicine Application • Classification and detection (e.g. lesion or cells classification and tumor detection) • 2D/3D segmentation • 3D human organ reconstruction (MRI or ultrasound) • Vision-guided robotics surgery Industrial Automation Application • Industrial inspection (defect detection) • Assembly • Barcode and package label reading
  • 16.
    • Object sorting •Document understanding (e.g. OCR) Security Application • Biometrics (iris, fingerprint, face recognition) • Surveillance − Detecting certain suspicious activities or behaviors Transportation Application • Autonomous vehicle • Safety, e.g., driver vigilance monitoring. 4: INSTALLATION OF OPEN-CV Here we will se the installation process of open cv. STEP1: In order to start the installation process we need to open our previously downloaded mini-conda navigator(prompt). To initiate the process we need to type the command shown below. “conda create --name opencv-env python=3.7” After entering the command in the prompt it will look like the command below. The image shows the package plan and requests our acknowledge to proceed for the installation.
  • 17.
    STEP2: After the installationis done its asks us whether to activate the environment or not. And in order to activate the environment we need to type the command shown below. “conda activate opencv-env ” And once the environment is activated it looks like the image shown below. STEP3: Once we are finished with installation process now, we will be testing the Installation in order to test we need to type the following commands in the python platform (which gets activated when we type python in the prompt) “import cv2” & “cv2.__version__” “import dlib”&“dlib.__version__” Once we type the above commands and press enter it should actually look like the image shown below.
  • 18.
    It prints theversions of the open cv & dlib. And in coming to the mention of the library dlib (this is a library which is used is a general, purpose cross- platform software library written in the programming language C++. Its design is heavily influenced by ideas from design by contract and component-based software engineering). In this document I didn’t actually show the installation process of the dlib package because I have the package actually installed in beforehand. Actually the installation of dlib looks similar to the images shown below. Command to install dlib is “pip install dlib”.
  • 19.