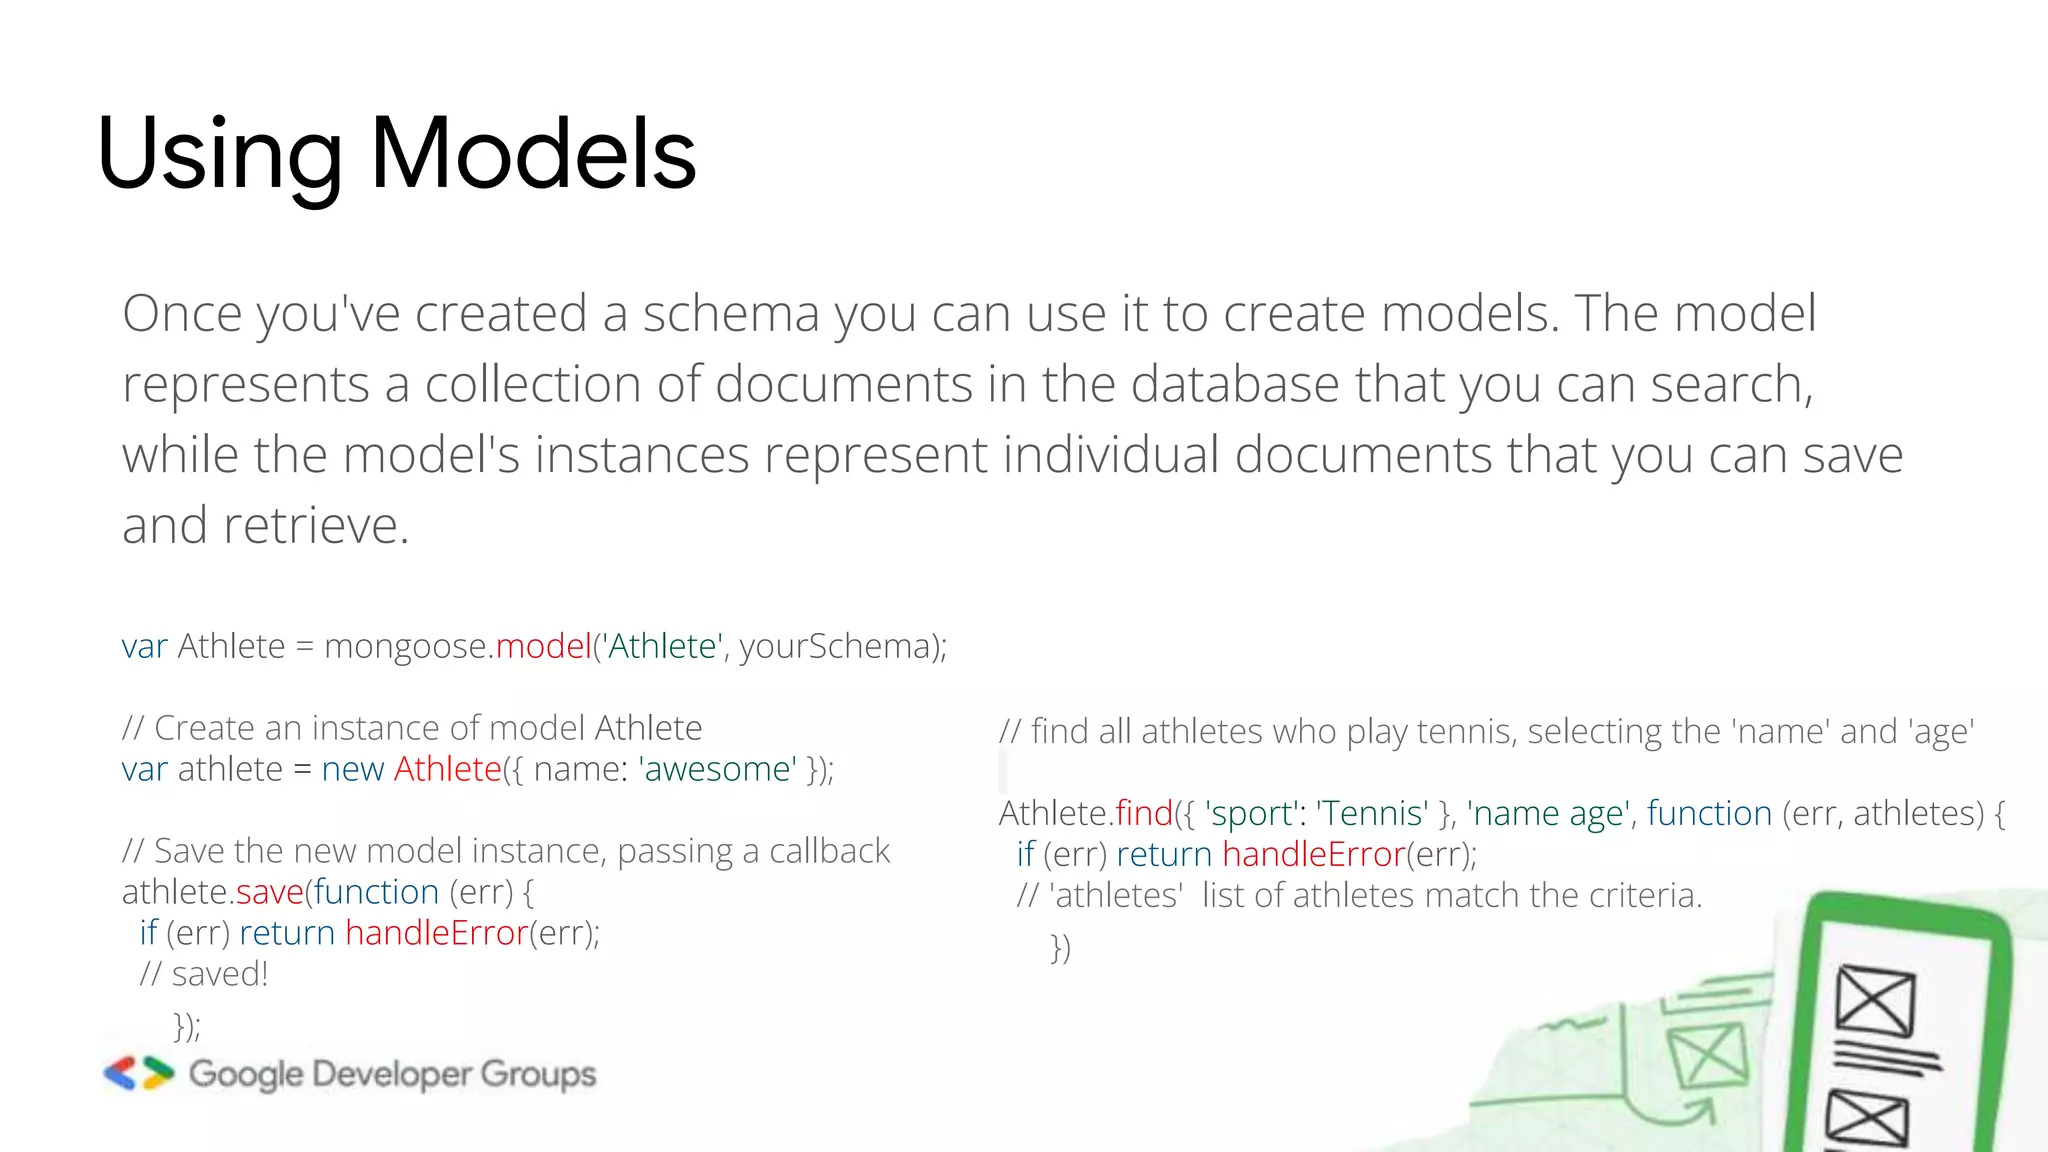
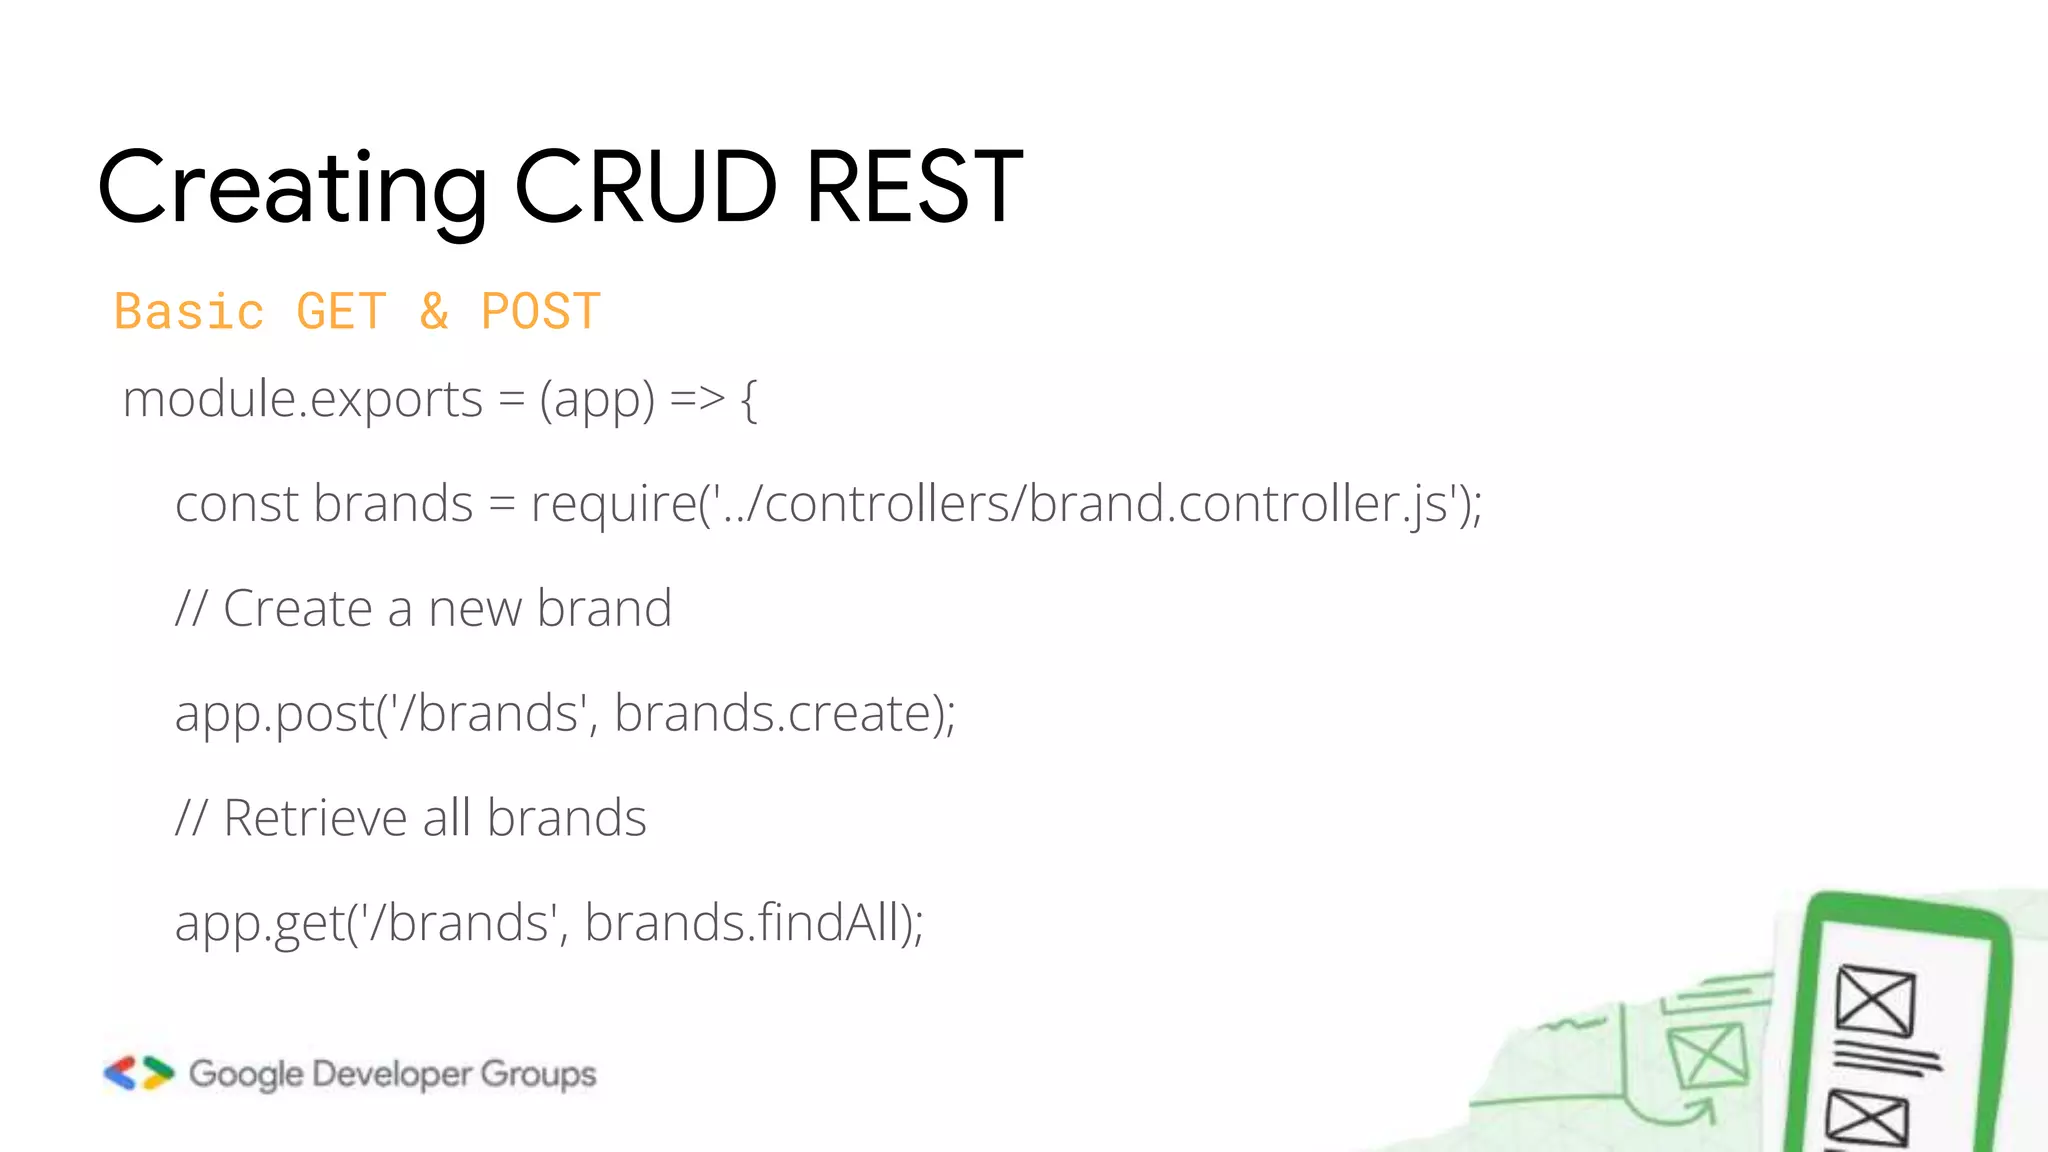
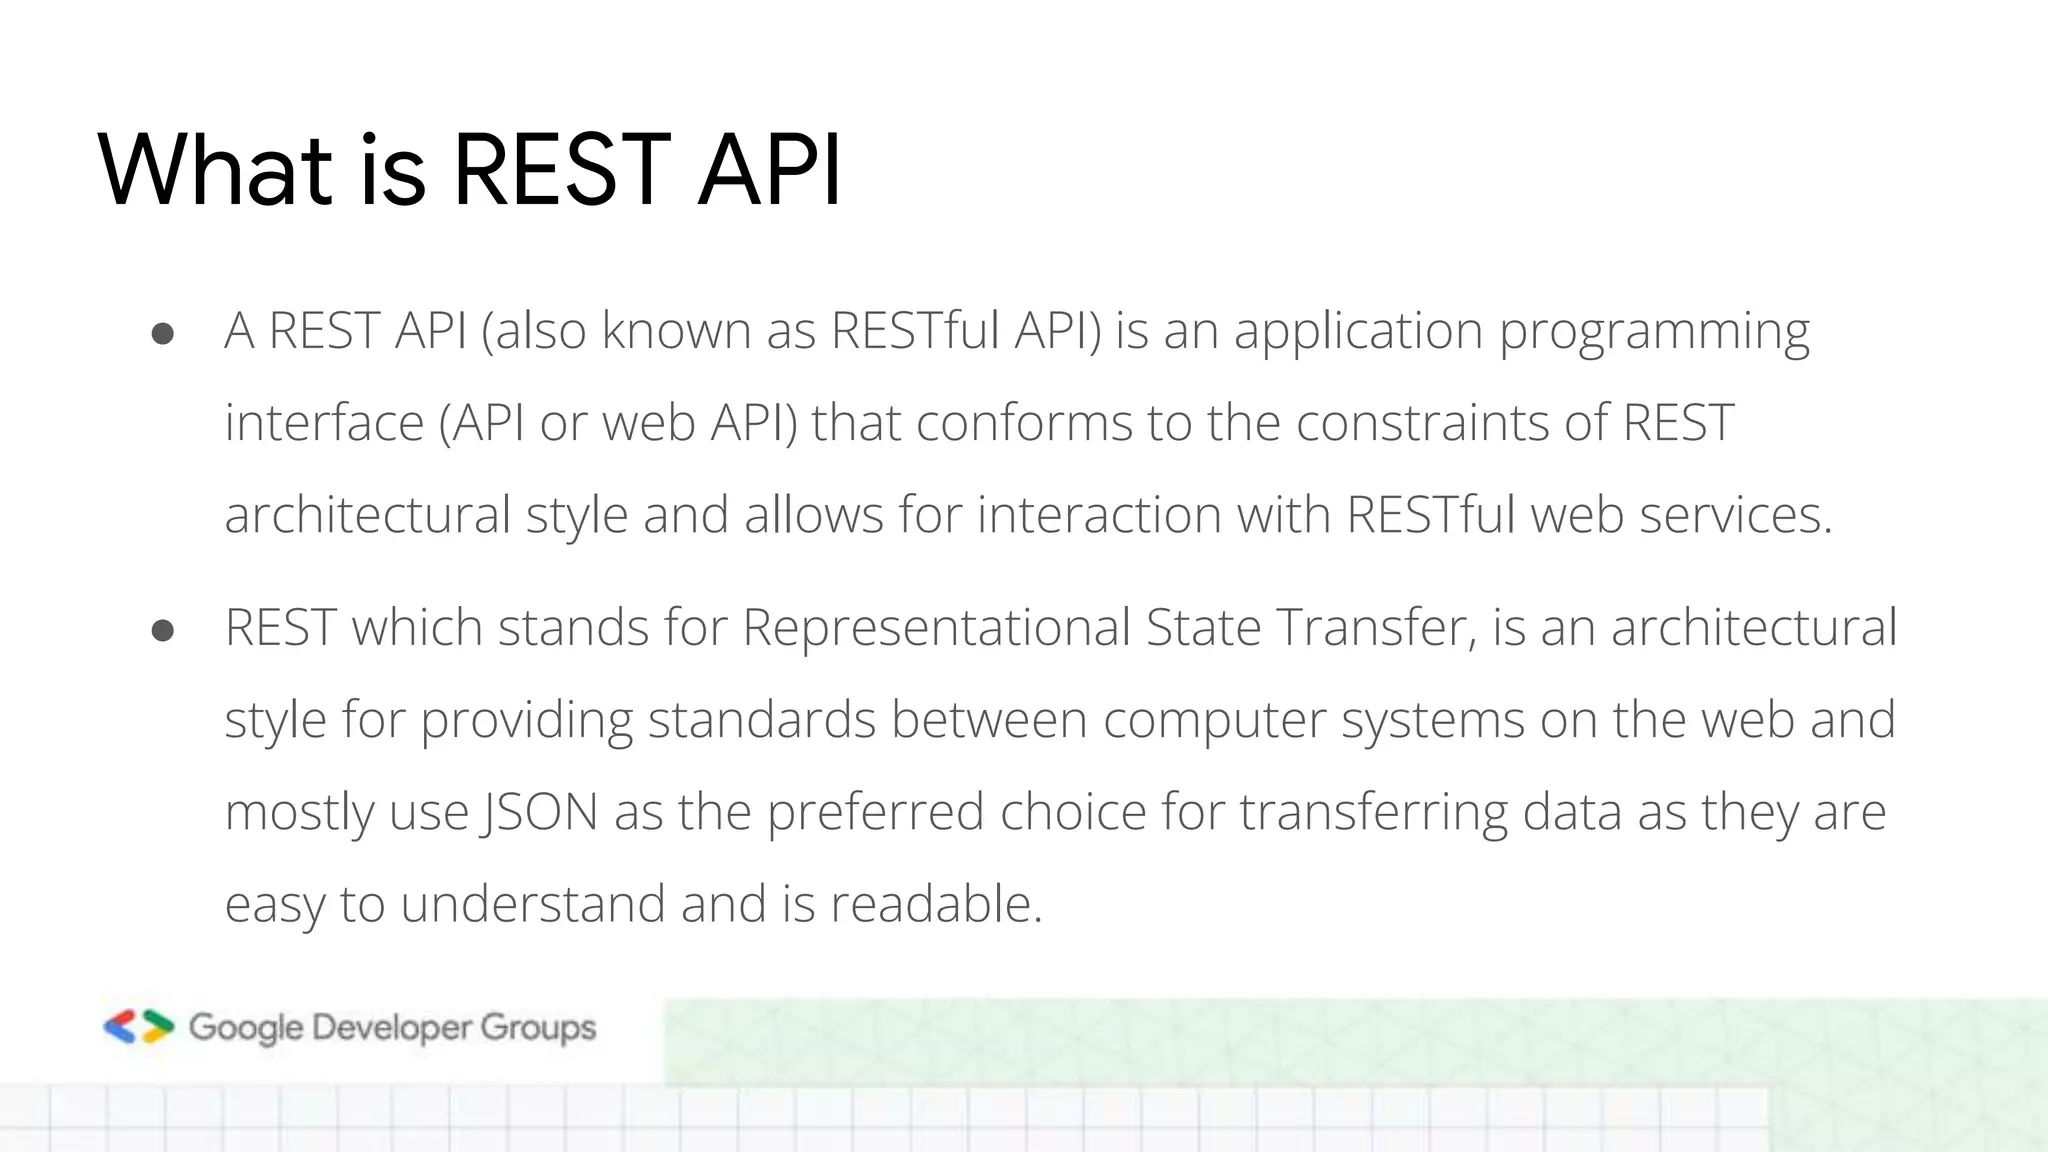
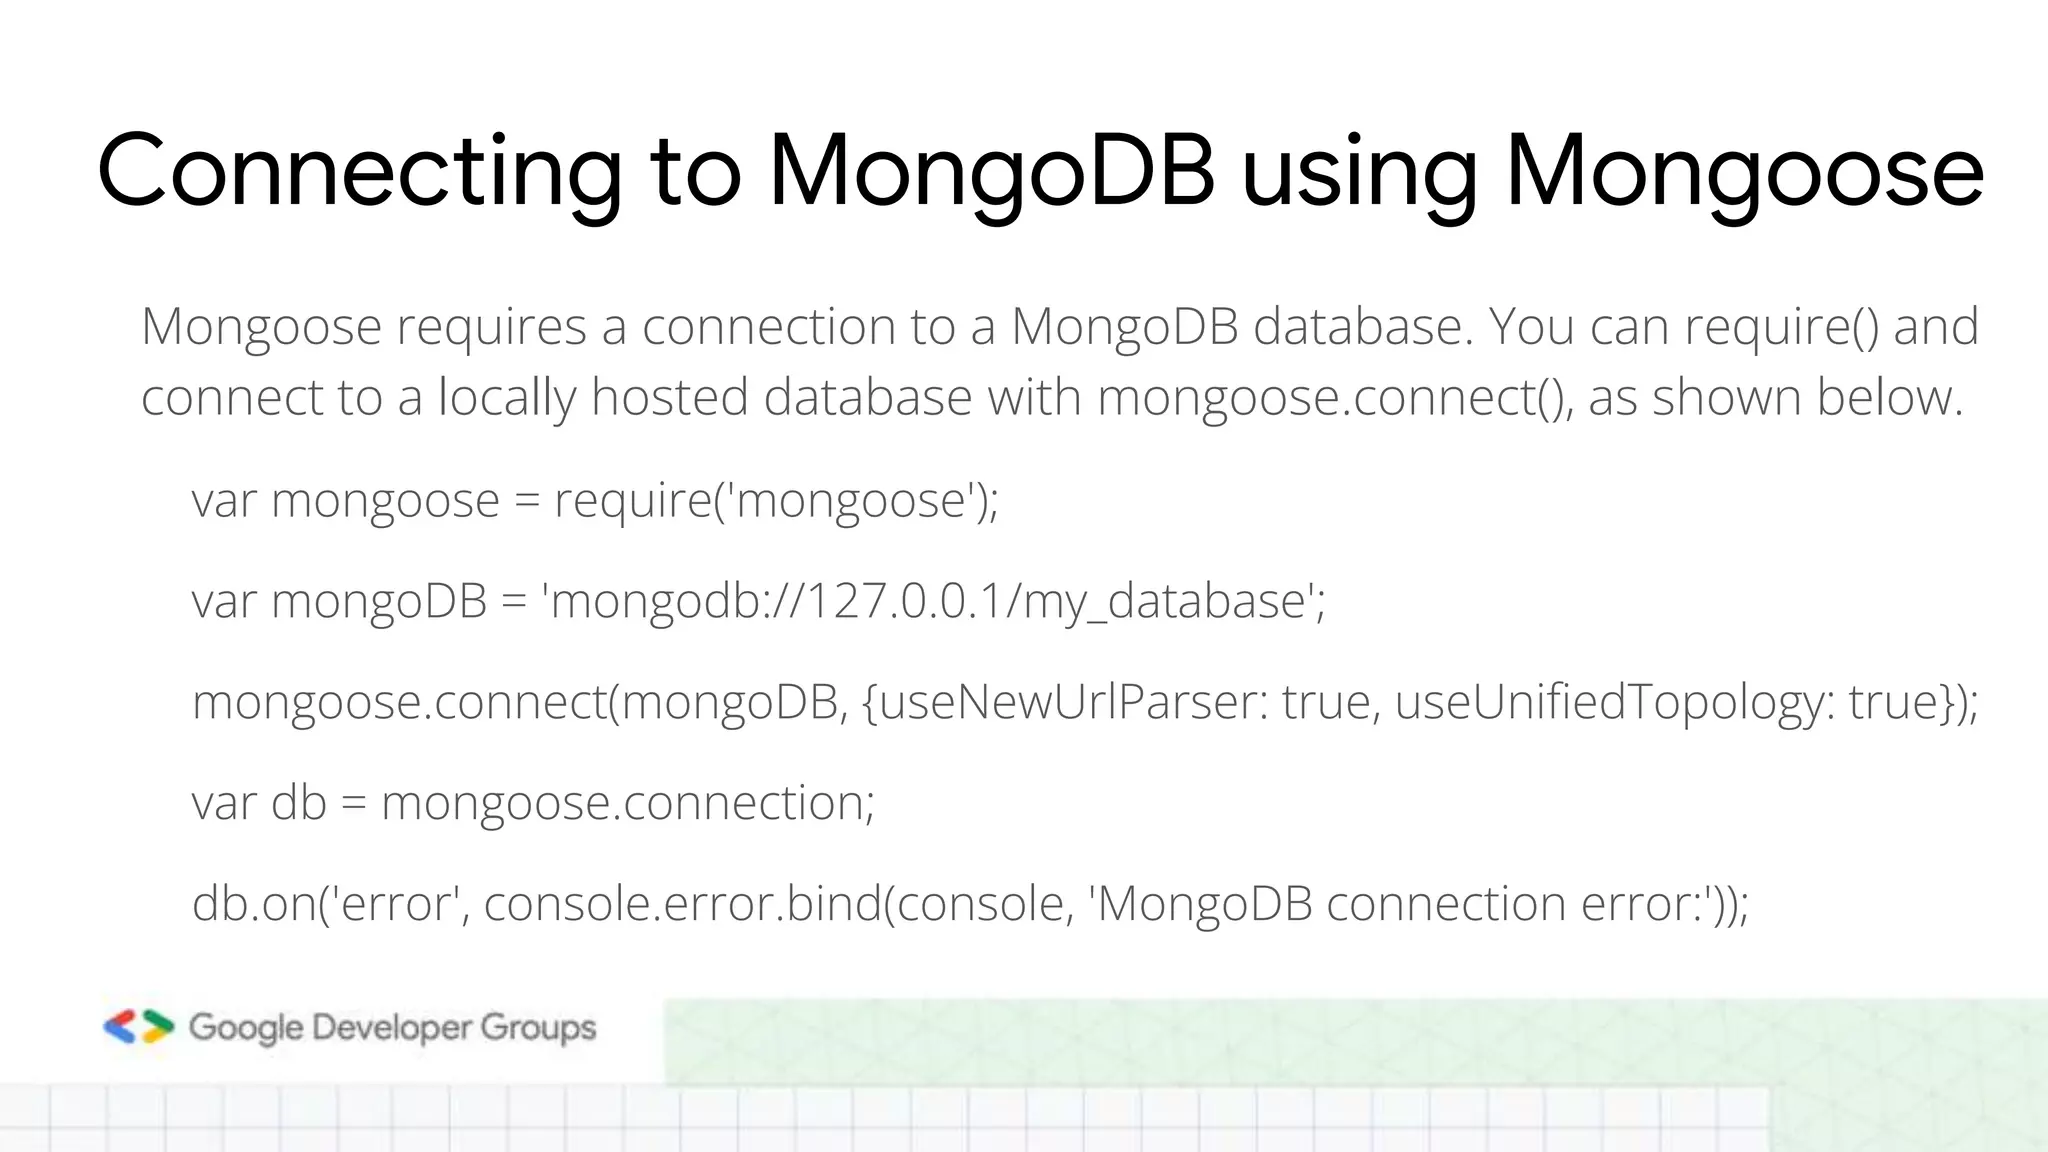
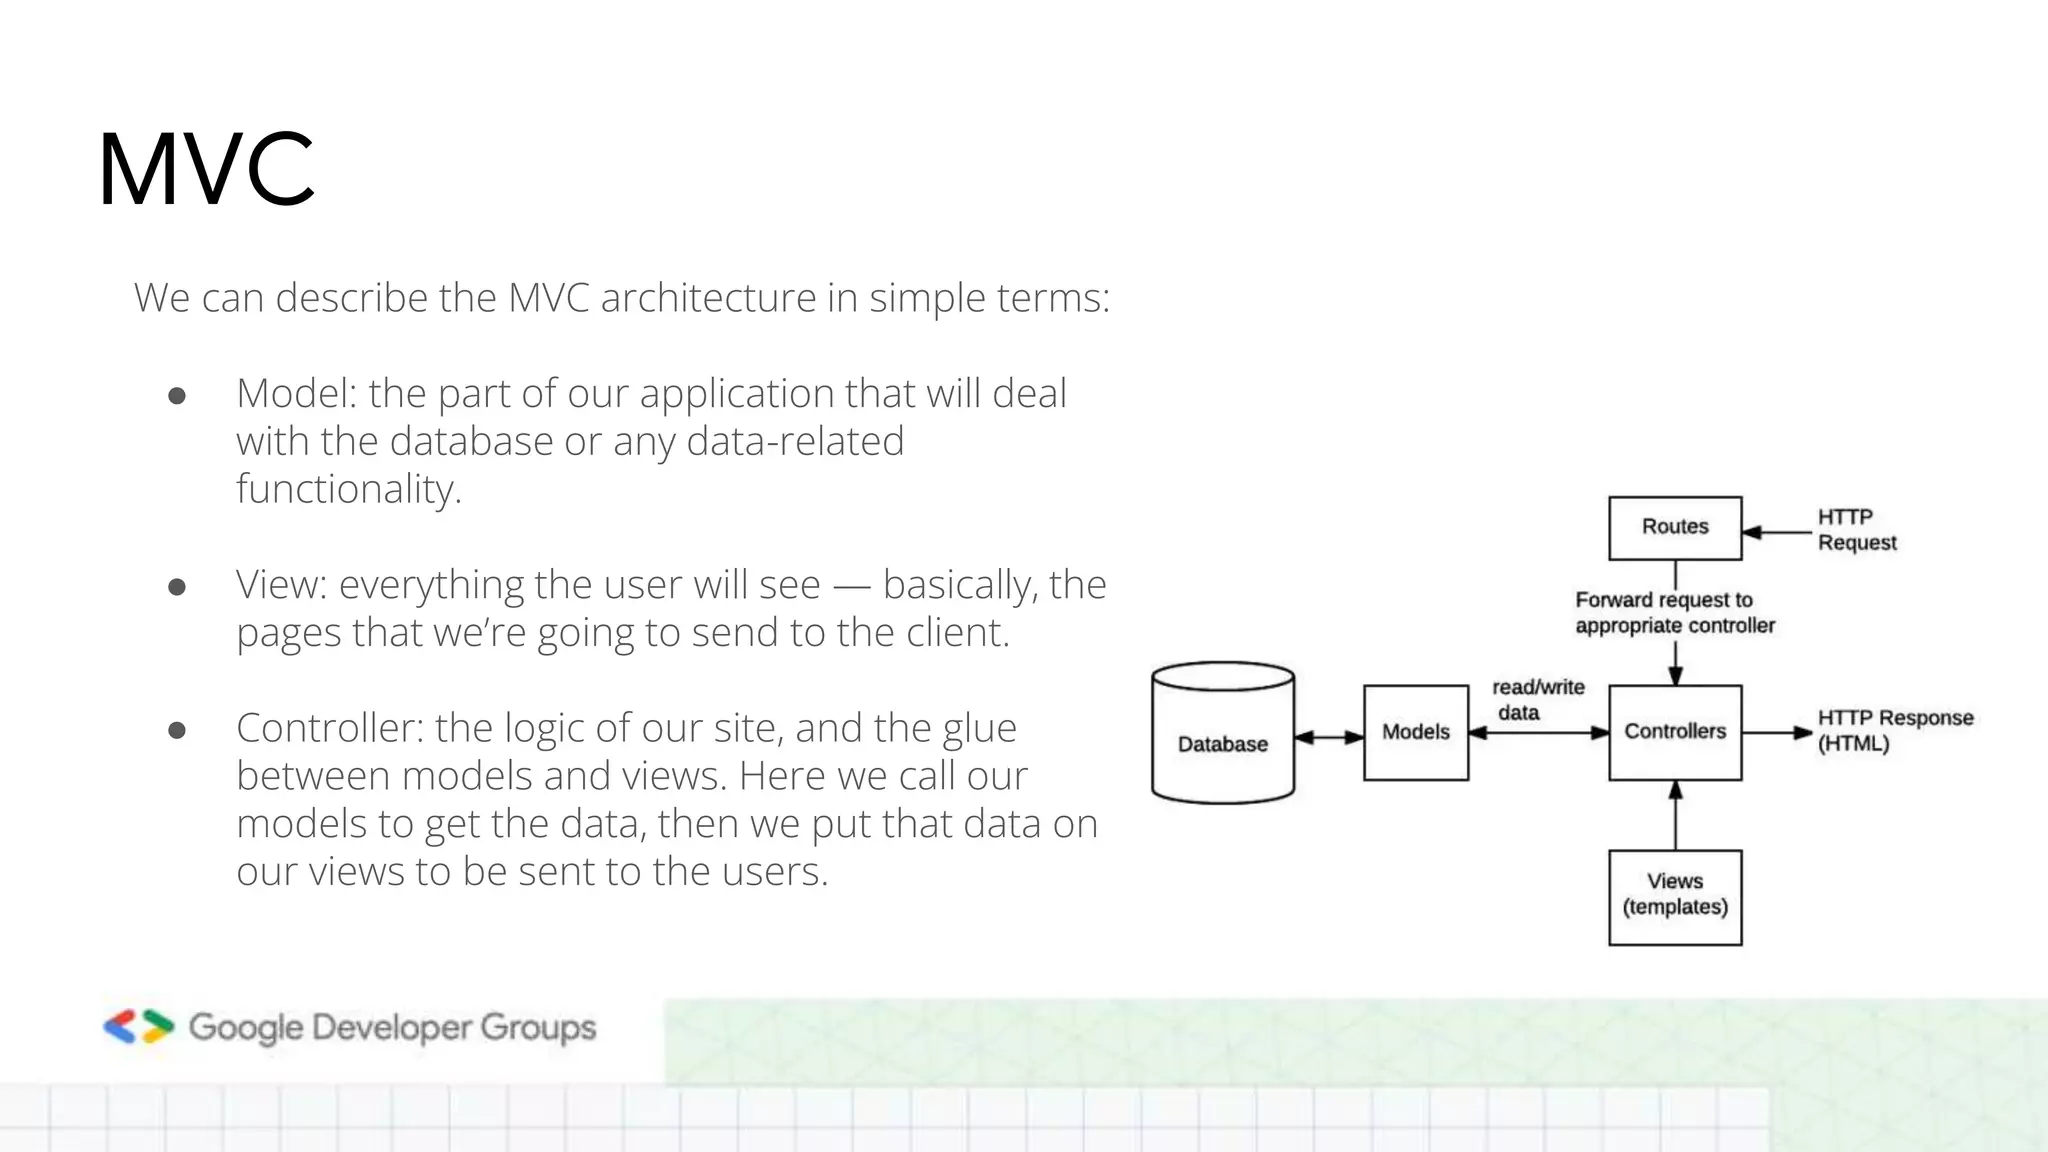
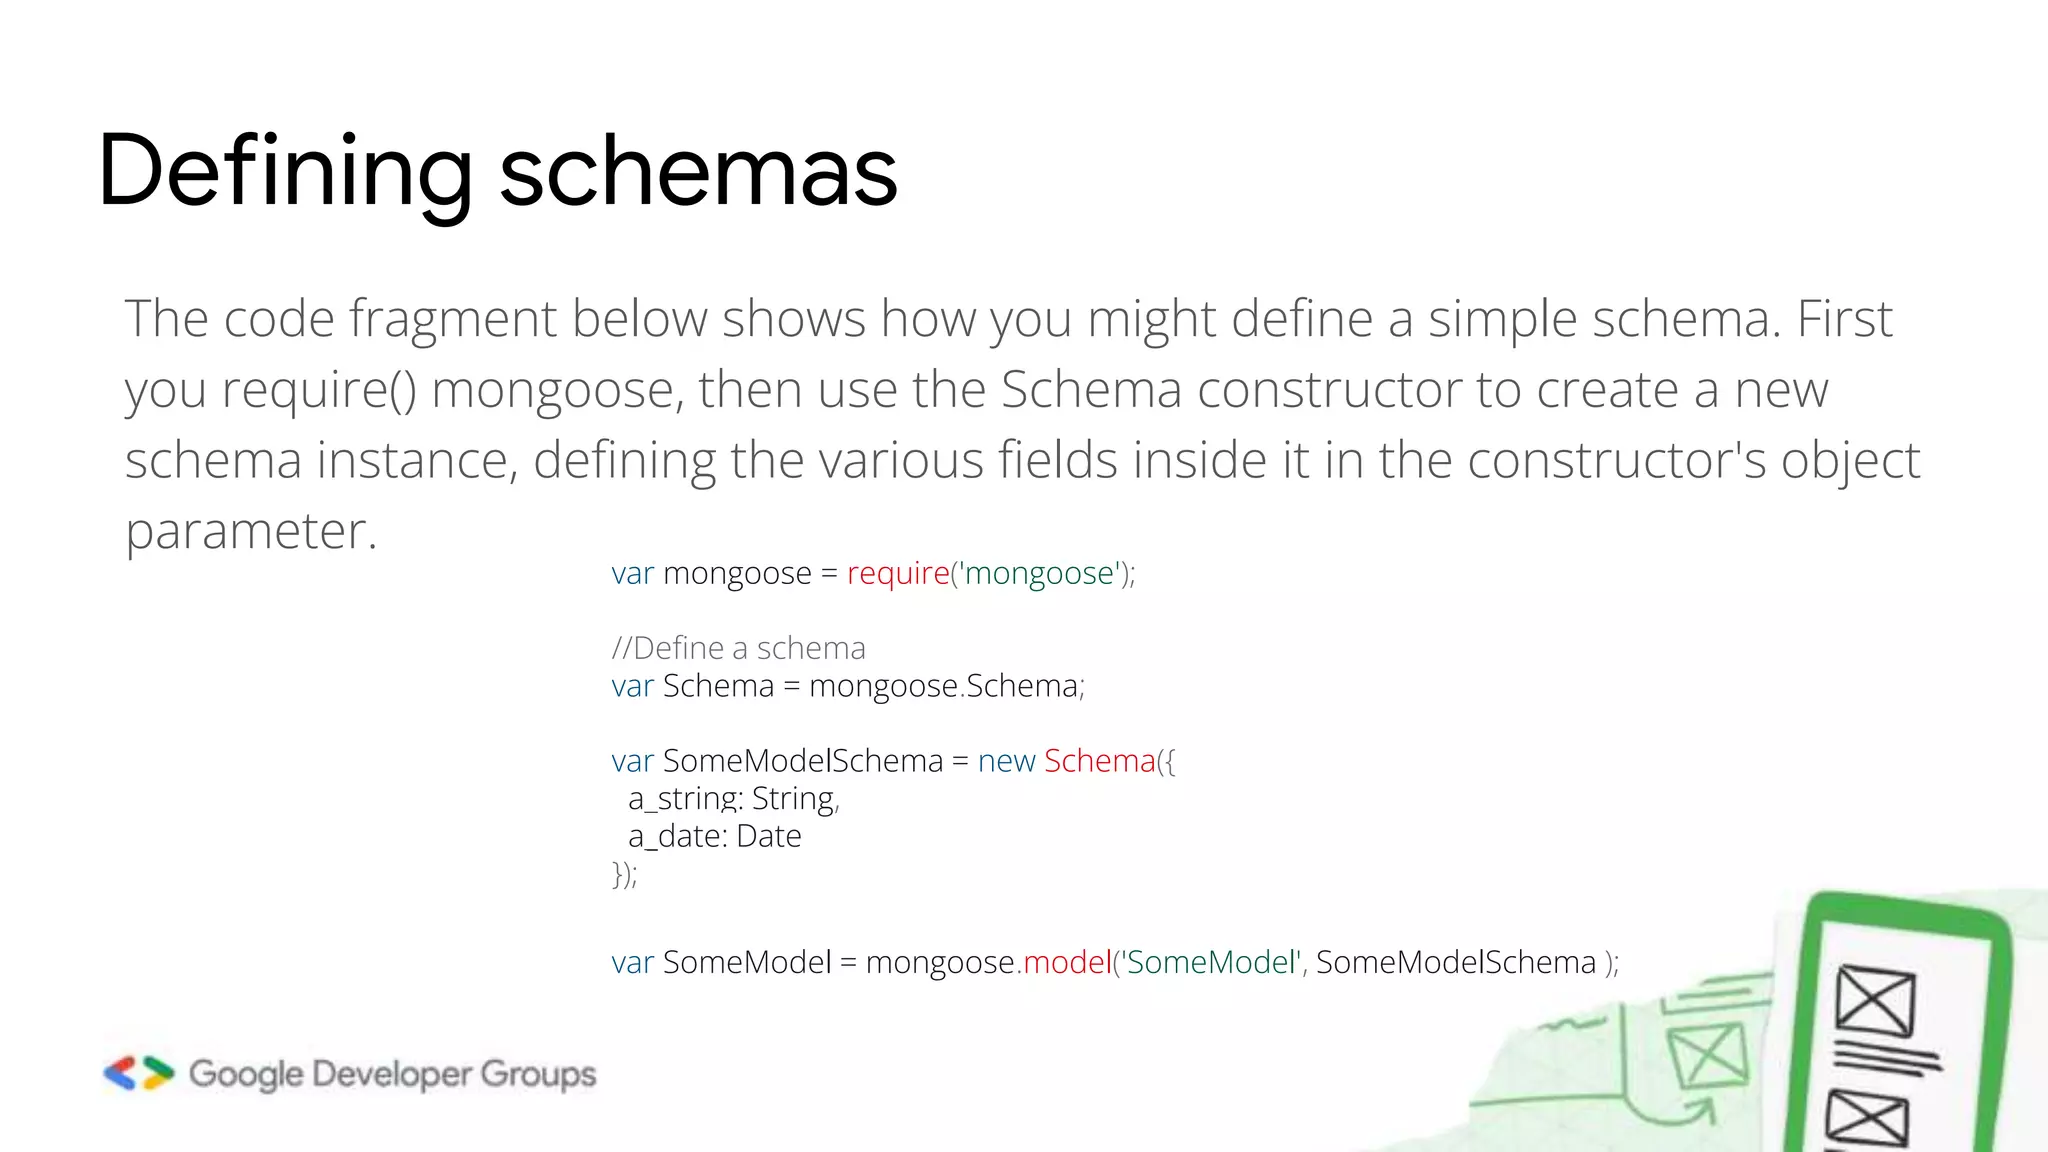
Node JS crash course Build REST API | 8:15 pm Abdul Rahman Masri Attal @abed_attal Elie Hannouch @eliehannouch
● A REST API (also known as RESTful API) is an application programming interface (API or web API) that conforms to the constraints of REST architectural style and allows for interaction with RESTful web services. What is REST API ● REST which stands for Representational State Transfer, is an architectural style for providing standards between computer systems on the web and mostly use JSON as the preferred choice for transferring data as they are easy to understand and is readable.
● What is server ● Express ● Routing ● Body params Recap of last week var express = require(“express”) var app = express(); app.get(‘/’, function(req,res){ res.send(‘First node app’); } app.get('/search/:id', function(req, res){ res.send(‘This is id’+req.param.id); }); var port = Number(process.env.port || 3000); app.listen(3000,function(){ console.log(“Listening on “ + port + “...”); }
app.get('/search?id=1', function(req, res){ res.send('id: ' + req.query.id); //req.query.id => give value: 1 }); app.post('/register', (req, res) => { // logic to save to database res.status(201).send({message : Saved!}) }); Req query & Error status code // 401 Unauthorized app.get('/user', (req, res) => { res.status(401).send({message : "You need to login to view this"}) }); // 500 Internal Server Error app.post('/500', (req, res) => { res.status(500).send({message : "I failed. I'm sorry"}) });
Express and MongoDB In this tutorial, we will be using Node, Express and MongoDB to create a REST API that would support the four operations — GET, POST, PUT and DELETE. So, our REST API will perform all these four operations. We will use MongoDB as the NoSQL database to store all our data. MongoDB stores data in JSON format.
Rest API and Front End Finally, our front-end application (for example React) use the REST API endpoints hosted on the Express.js server. The application is a Tinder-like application for the sample_airbnb database, containing information on various listings, available as part of the sample datasets you can load into the Atlas cluster.
Connecting to MongoDB Atlas ● Create a config file in the server directory with your connection string. ● There, assign a new ATLAS_URI variable the value of the connection string. ● Replace the <username> and the <password> with your database username and password. Once done, your file should look similar to the one below. ● ATLAS_URI=mongodb+srv://<username>:<password>@sandbox.jadwj.mongodb. net/myFirstDatabase?retryWrites=true&w=majority
Connecting to MongoDB Atlas
What is the best way to interact with a database? There are two common approaches for interacting with a database: ● Using the databases' native query language (e.g. MongoDB) ● Using an Object Data Model ("ODM") or an Object Relational Model ("ORM"). An ODM/ORM represents the website's data as JavaScript objects, which are then mapped to the underlying database. Some ORMs are tied to a specific database, while others provide a database-agnostic backend.
const { MongoClient } = require("mongodb"); const connectionString = process.env.ATLAS_URI; const client = new MongoClient(connectionString, { useNewUrlParser: true, useUnifiedTopology:true, } ); Connect MongoDB Natively let dbConnection; module.exports = { connectToServer: function (callback) { client.connect(function (err, db) { if (err || !db) return callback(err); dbConnection = db.db("sample_airbnb"); console.log("Successfully connected to MongoDB."); return callback(); }); }, getDb: function () { return dbConnection; }, };
app.get("/listings",function (req, res)=> { const dbConnect = dbo.getDb(); dbConnect .collection("listingsAndReviews") .find({}) .toArray(function (err, result) { if (err) { res.status(400).send("Error fetching listings!"); } else { res.json(result); } }); }); Execute Native MongoDB Queries - find
app.post("/listings/recordSwipe",function (req, res) => { const dbConnect = dbo.getDb(); const matchDocument = { “title”:”hello” }; dbConnect .collection("matches") .insertOne(matchDocument, function (err, result) { if (err) { res.status(400).send("Error inserting matches!");} else { console.log(`Added a new match with id ${result.insertedId}`); res.status(204).send(); } }); }); Execute MongoDB Queries - insertOne
We're going to use the Mongoose ODM to access our database. Mongoose acts as a front end to MongoDB, an open source NoSQL database that uses a document-oriented data model. A “collection” of “documents” in a MongoDB database is analogous to a “table” of “rows” in a relational database. This ODM and database combination is extremely popular in the Node community, partially because the document storage and query system looks very much like JSON, and is hence familiar to JavaScript developers. Using Mongoose and MongoDb
Mongoose is installed in your project like any other dependency using NPM. To install it, use the following command inside your project folder: npm install mongoose Installing Mongoose adds all its dependencies, including the MongoDB database driver, but it does not install MongoDB itself. Installing Mongoose and MongoDB
Connecting to MongoDB using Mongoose Mongoose requires a connection to a MongoDB database. You can require() and connect to a locally hosted database with mongoose.connect(), as shown below. var mongoose = require('mongoose'); var mongoDB = 'mongodb://127.0.0.1/my_database'; mongoose.connect(mongoDB, {useNewUrlParser: true, useUnifiedTopology: true}); var db = mongoose.connection; db.on('error', console.error.bind(console, 'MongoDB connection error:'));
MVC We can describe the MVC architecture in simple terms: ● Model: the part of our application that will deal with the database or any data-related functionality. ● View: everything the user will see — basically, the pages that we’re going to send to the client. ● Controller: the logic of our site, and the glue between models and views. Here we call our models to get the data, then we put that data on our views to be sent to the users.
Defining and creating models ● Models are defined using the Schema interface which allows you to define the fields stored in each document along with their validation requirements and default values. ● In addition, you can define static and instance helper methods to make it easier to work with your data types, and also virtual properties that you can use like any other field, but which aren't actually stored in the database ● Schemas are then "compiled" into models using the mongoose.model() method. Once you have a model you can use it to find, create, update, and delete objects of the given type.
The code fragment below shows how you might define a simple schema. First you require() mongoose, then use the Schema constructor to create a new schema instance, defining the various fields inside it in the constructor's object parameter. Defining schemas var mongoose = require('mongoose'); //Define a schema var Schema = mongoose.Schema; var SomeModelSchema = new Schema({ a_string: String, a_date: Date }); var SomeModel = mongoose.model('SomeModel', SomeModelSchema );
Schema types (fields) A schema can have an arbitrary number of fields — each one represents a field in the documents stored in MongoDB. An example schema showing many of the common field types and how they are declared is shown below. ● Date ● Number ● Boolean ● etc..
Validation Mongoose provides built-in and custom validators, and synchronous and asynchronous validators. It allows you to specify both the acceptable range of values and the error message for validation failure in all cases. The built-in validators include: ● All SchemaTypes have the built-in required validator. This is used to specify whether the field must be supplied in order to save a document. ● Numbers have min and max validators. ● Strings have: ○ enum: specifies the set of allowed values for the field. ○ match: specifies a regular expression that the string must match. ○ maxLength and minLength for the string.
Schema example with validation var schema = new Schema( { name: String, binary: Buffer, living: Boolean, updated: { type: Date, default: Date.now() }, age: { type: Number, min: 18, max: 65, required: true }, array: [], ofString: [String], nested: { stuff: { type: String, lowercase: true, trim: true } } })
const express = require('express'); //import express const router = express.Router() const teaController = require('../controllers/tea'); router.post('/tea', teaController.newTea); module.exports = router Express and Routes // newTea function for post tea route const newTea = (req, res, next) => { res.json({message: "POST new tea"}); //dummyfuncti }; module.exports = {newTea}; route.js /controllers/tea.js const express = require ('express'); const routes = require('./routes/tea'); const app = express(); app.use(express.json()); app.use('/', routes); //to use the routes const listener = app.listen(process.env.PORT || 3000, () => { console.log('Your app is listening on port ' + listener.address().port) }) server.js
Once you've created a schema you can use it to create models. The model represents a collection of documents in the database that you can search, while the model's instances represent individual documents that you can save and retrieve. Using Models var Athlete = mongoose.model('Athlete', yourSchema); // Create an instance of model Athlete var athlete = new Athlete({ name: 'awesome' }); // Save the new model instance, passing a callback athlete.save(function (err) { if (err) return handleError(err); // saved! }); // find all athletes who play tennis, selecting the 'name' and 'age' Athlete.find({ 'sport': 'Tennis' }, 'name age', function (err, athletes) { if (err) return handleError(err); // 'athletes' list of athletes match the criteria. })
module.exports = (app) => { const brands = require('../controllers/brand.controller.js'); // Create a new brand app.post('/brands', brands.create); // Retrieve all brands app.get('/brands', brands.findAll); Creating CRUD REST Basic GET & POST
// Retrieve a single brand with brandId app.get('/brands/:brandId', brands.findOne); // Update a brand with brandId app.put('/brands/:brandId', brands.update); // Delete a brand with brandId app.delete('/brands/:brandId', brands.delete); } Creating CRUD REST API by ID : GET & UPDATE & DELETE

Node js crash course session 5

  • 1.
    Node JS crashcourse Build REST API | 8:15 pm Abdul Rahman Masri Attal @abed_attal Elie Hannouch @eliehannouch
  • 2.
    ● A RESTAPI (also known as RESTful API) is an application programming interface (API or web API) that conforms to the constraints of REST architectural style and allows for interaction with RESTful web services. What is REST API ● REST which stands for Representational State Transfer, is an architectural style for providing standards between computer systems on the web and mostly use JSON as the preferred choice for transferring data as they are easy to understand and is readable.
  • 3.
    ● What isserver ● Express ● Routing ● Body params Recap of last week var express = require(“express”) var app = express(); app.get(‘/’, function(req,res){ res.send(‘First node app’); } app.get('/search/:id', function(req, res){ res.send(‘This is id’+req.param.id); }); var port = Number(process.env.port || 3000); app.listen(3000,function(){ console.log(“Listening on “ + port + “...”); }
  • 4.
    app.get('/search?id=1', function(req, res){ res.send('id:' + req.query.id); //req.query.id => give value: 1 }); app.post('/register', (req, res) => { // logic to save to database res.status(201).send({message : Saved!}) }); Req query & Error status code // 401 Unauthorized app.get('/user', (req, res) => { res.status(401).send({message : "You need to login to view this"}) }); // 500 Internal Server Error app.post('/500', (req, res) => { res.status(500).send({message : "I failed. I'm sorry"}) });
  • 5.
    Express and MongoDB Inthis tutorial, we will be using Node, Express and MongoDB to create a REST API that would support the four operations — GET, POST, PUT and DELETE. So, our REST API will perform all these four operations. We will use MongoDB as the NoSQL database to store all our data. MongoDB stores data in JSON format.
  • 6.
    Rest API andFront End Finally, our front-end application (for example React) use the REST API endpoints hosted on the Express.js server. The application is a Tinder-like application for the sample_airbnb database, containing information on various listings, available as part of the sample datasets you can load into the Atlas cluster.
  • 7.
    Connecting to MongoDBAtlas ● Create a config file in the server directory with your connection string. ● There, assign a new ATLAS_URI variable the value of the connection string. ● Replace the <username> and the <password> with your database username and password. Once done, your file should look similar to the one below. ● ATLAS_URI=mongodb+srv://<username>:<password>@sandbox.jadwj.mongodb. net/myFirstDatabase?retryWrites=true&w=majority
  • 8.
  • 9.
    What is thebest way to interact with a database? There are two common approaches for interacting with a database: ● Using the databases' native query language (e.g. MongoDB) ● Using an Object Data Model ("ODM") or an Object Relational Model ("ORM"). An ODM/ORM represents the website's data as JavaScript objects, which are then mapped to the underlying database. Some ORMs are tied to a specific database, while others provide a database-agnostic backend.
  • 10.
    const { MongoClient} = require("mongodb"); const connectionString = process.env.ATLAS_URI; const client = new MongoClient(connectionString, { useNewUrlParser: true, useUnifiedTopology:true, } ); Connect MongoDB Natively let dbConnection; module.exports = { connectToServer: function (callback) { client.connect(function (err, db) { if (err || !db) return callback(err); dbConnection = db.db("sample_airbnb"); console.log("Successfully connected to MongoDB."); return callback(); }); }, getDb: function () { return dbConnection; }, };
  • 11.
    app.get("/listings",function (req, res)=>{ const dbConnect = dbo.getDb(); dbConnect .collection("listingsAndReviews") .find({}) .toArray(function (err, result) { if (err) { res.status(400).send("Error fetching listings!"); } else { res.json(result); } }); }); Execute Native MongoDB Queries - find
  • 12.
    app.post("/listings/recordSwipe",function (req, res)=> { const dbConnect = dbo.getDb(); const matchDocument = { “title”:”hello” }; dbConnect .collection("matches") .insertOne(matchDocument, function (err, result) { if (err) { res.status(400).send("Error inserting matches!");} else { console.log(`Added a new match with id ${result.insertedId}`); res.status(204).send(); } }); }); Execute MongoDB Queries - insertOne
  • 13.
    We're going touse the Mongoose ODM to access our database. Mongoose acts as a front end to MongoDB, an open source NoSQL database that uses a document-oriented data model. A “collection” of “documents” in a MongoDB database is analogous to a “table” of “rows” in a relational database. This ODM and database combination is extremely popular in the Node community, partially because the document storage and query system looks very much like JSON, and is hence familiar to JavaScript developers. Using Mongoose and MongoDb
  • 14.
    Mongoose is installedin your project like any other dependency using NPM. To install it, use the following command inside your project folder: npm install mongoose Installing Mongoose adds all its dependencies, including the MongoDB database driver, but it does not install MongoDB itself. Installing Mongoose and MongoDB
  • 15.
    Connecting to MongoDBusing Mongoose Mongoose requires a connection to a MongoDB database. You can require() and connect to a locally hosted database with mongoose.connect(), as shown below. var mongoose = require('mongoose'); var mongoDB = 'mongodb://127.0.0.1/my_database'; mongoose.connect(mongoDB, {useNewUrlParser: true, useUnifiedTopology: true}); var db = mongoose.connection; db.on('error', console.error.bind(console, 'MongoDB connection error:'));
  • 16.
    MVC We can describethe MVC architecture in simple terms: ● Model: the part of our application that will deal with the database or any data-related functionality. ● View: everything the user will see — basically, the pages that we’re going to send to the client. ● Controller: the logic of our site, and the glue between models and views. Here we call our models to get the data, then we put that data on our views to be sent to the users.
  • 17.
    Defining and creatingmodels ● Models are defined using the Schema interface which allows you to define the fields stored in each document along with their validation requirements and default values. ● In addition, you can define static and instance helper methods to make it easier to work with your data types, and also virtual properties that you can use like any other field, but which aren't actually stored in the database ● Schemas are then "compiled" into models using the mongoose.model() method. Once you have a model you can use it to find, create, update, and delete objects of the given type.
  • 18.
    The code fragmentbelow shows how you might define a simple schema. First you require() mongoose, then use the Schema constructor to create a new schema instance, defining the various fields inside it in the constructor's object parameter. Defining schemas var mongoose = require('mongoose'); //Define a schema var Schema = mongoose.Schema; var SomeModelSchema = new Schema({ a_string: String, a_date: Date }); var SomeModel = mongoose.model('SomeModel', SomeModelSchema );
  • 19.
    Schema types (fields) Aschema can have an arbitrary number of fields — each one represents a field in the documents stored in MongoDB. An example schema showing many of the common field types and how they are declared is shown below. ● Date ● Number ● Boolean ● etc..
  • 20.
    Validation Mongoose provides built-inand custom validators, and synchronous and asynchronous validators. It allows you to specify both the acceptable range of values and the error message for validation failure in all cases. The built-in validators include: ● All SchemaTypes have the built-in required validator. This is used to specify whether the field must be supplied in order to save a document. ● Numbers have min and max validators. ● Strings have: ○ enum: specifies the set of allowed values for the field. ○ match: specifies a regular expression that the string must match. ○ maxLength and minLength for the string.
  • 21.
    Schema example withvalidation var schema = new Schema( { name: String, binary: Buffer, living: Boolean, updated: { type: Date, default: Date.now() }, age: { type: Number, min: 18, max: 65, required: true }, array: [], ofString: [String], nested: { stuff: { type: String, lowercase: true, trim: true } } })
  • 22.
    const express =require('express'); //import express const router = express.Router() const teaController = require('../controllers/tea'); router.post('/tea', teaController.newTea); module.exports = router Express and Routes // newTea function for post tea route const newTea = (req, res, next) => { res.json({message: "POST new tea"}); //dummyfuncti }; module.exports = {newTea}; route.js /controllers/tea.js const express = require ('express'); const routes = require('./routes/tea'); const app = express(); app.use(express.json()); app.use('/', routes); //to use the routes const listener = app.listen(process.env.PORT || 3000, () => { console.log('Your app is listening on port ' + listener.address().port) }) server.js
  • 23.
    Once you've createda schema you can use it to create models. The model represents a collection of documents in the database that you can search, while the model's instances represent individual documents that you can save and retrieve. Using Models var Athlete = mongoose.model('Athlete', yourSchema); // Create an instance of model Athlete var athlete = new Athlete({ name: 'awesome' }); // Save the new model instance, passing a callback athlete.save(function (err) { if (err) return handleError(err); // saved! }); // find all athletes who play tennis, selecting the 'name' and 'age' Athlete.find({ 'sport': 'Tennis' }, 'name age', function (err, athletes) { if (err) return handleError(err); // 'athletes' list of athletes match the criteria. })
  • 24.
    module.exports = (app)=> { const brands = require('../controllers/brand.controller.js'); // Create a new brand app.post('/brands', brands.create); // Retrieve all brands app.get('/brands', brands.findAll); Creating CRUD REST Basic GET & POST
  • 25.
    // Retrieve asingle brand with brandId app.get('/brands/:brandId', brands.findOne); // Update a brand with brandId app.put('/brands/:brandId', brands.update); // Delete a brand with brandId app.delete('/brands/:brandId', brands.delete); } Creating CRUD REST API by ID : GET & UPDATE & DELETE