Sometimes, you need to share a WordPress page without making it public. Maybe you’re working on a draft that isn’t ready yet, or you want to give a client or subscriber exclusive access.
The challenge is finding a way to keep that content private while still making it easy for the right people to view it.
That’s where WordPress password protection comes in.
It’s a built-in feature that restricts access to your content without requiring a full membership site or complicated setup.
In this tutorial, I’ll show you two easy ways to password-protect your content in WordPress. By the end, you’ll know how to keep your pages private while staying in control of who can see them.
Expert Tip: If you’re looking for ways to protect a lot of posts and pages on your website, then please see our guide on how to create a membership site in WordPress.
Why Do You Need Password Protection for WordPress Content?
Password protection in WordPress lets you keep certain content private while still sharing it with specific people. It’s useful when you want control over who can view a page or post without setting up a full membership website.
There are many situations where this comes in handy. Maybe you’re waiting on final approval, collecting feedback, or just not ready to publish. Instead of leaving the content in draft mode or sending email attachments back and forth, you can share a live link that’s protected with a password.
Here are some common use cases for password protection in WordPress:
- Exclusive content: Bloggers and creators use password protection to share early access, bonus tutorials, or subscriber-only posts without setting up a full membership system.
- Client previews: Designers, developers, and content writers often create password-protected pages so that clients can review content.
- Internal communication: Business owners can protect sensitive content like financial reports or strategic plans, keeping it private while still accessible to the right people.
- Testing and feedback: Before launching a new service page or product, password protection makes it easy to gather feedback from a select group of beta users, without exposing it to your entire audience.
- Personal content: Family bloggers love this feature for sharing photos and stories with relatives while keeping strangers out.
In short, password protection gives you flexibility, privacy, and control.
In this article, I’ll show you how to protect your page or post with a password.
And here’s everything I’ll cover in this guide:
- Method 1: Password-Protect a WordPress Page or Post (No Plugin)
- Method 2: Create a Custom Password-Protected WordPress Page (More Flexibility)
- Bonus: Hide Password-Protected Posts From WordPress Loop
- FAQs: Password-Protect Pages and Posts in WordPress
- Additional Resources: WordPress Page and Post Management
Method 1: Password-Protect a WordPress Page or Post
If you only need to protect a single page or post, then WordPress has a simple built-in feature that can help. The whole process takes less than two minutes, and you don’t have to worry about installing or configuring additional software.
Step 1: Open the Page or Post Editor
From your WordPress admin area, you can head over to Pages or Posts, and click ‘Edit’ under the one you want to lock down.
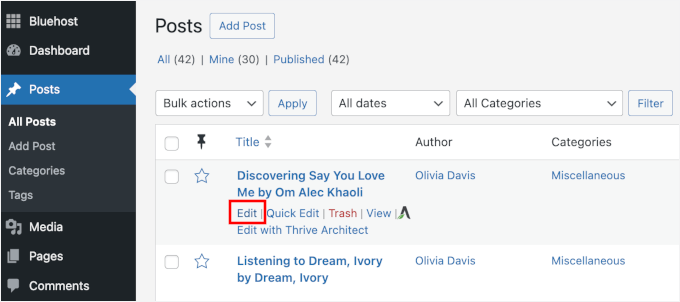
This will open the content editor where you normally write and format your content.
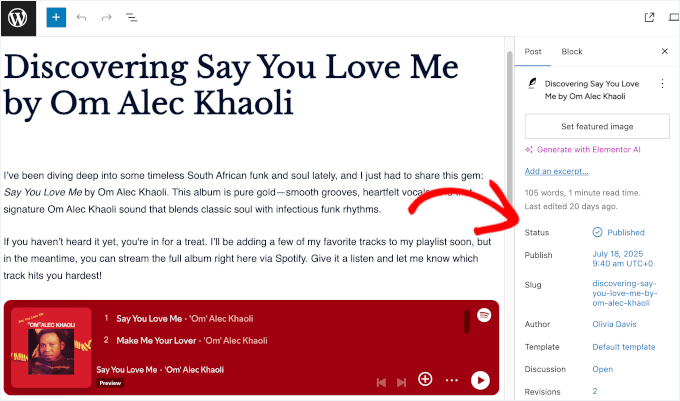
You’ll see all your familiar editing tools, but we’re going to focus on the publishing options in the sidebar.
Step 2: Enable Password Protection
In the sidebar on the right, you’ll want to look for the ‘Status’ setting.
By default, WordPress sets all your posts or pages to public, which means anyone can find and read your content.
From here, let’s click on the ‘Published’ link, then in the dropdown menu, select ‘Password protected’.
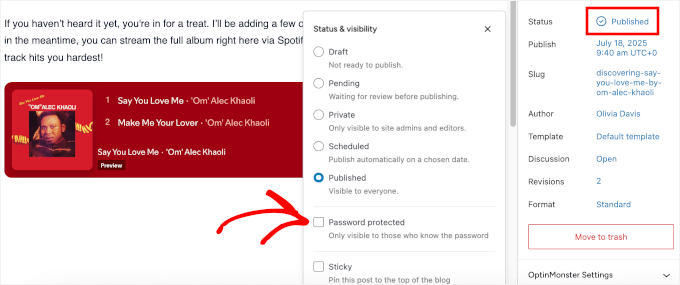
This will open a new field where you can enter your password.
Here’s a simple trick: Use a password that’s easy for your intended visitors to remember, but hard for others to guess. You don’t need anything fancy, just skip obvious choices like “1234” or “password.”
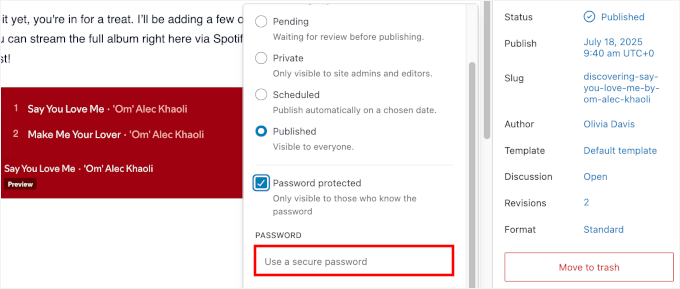
Personally, I like to create passwords that are meaningful to the people I’m sharing them with but meaningless to everyone else.
For client projects, something like “ClientName2025” or a mix of their business name and the current month works well.
Step 4: Save or Update Your Page
When everything looks good, click ‘Publish’ (or ‘Update’, if it’s already live). WordPress will automatically save your password settings and apply the content protection immediately.
You can then open the page in a private or incognito window to make sure the password prompt shows up as expected. You should see a simple form asking for the password before revealing your content:

And that’s it! This method works just as well for protecting a WordPress post or page, making it perfect for drafts, client work, or content you’re not quite ready to make public.
Method 2: Create a Custom Password-Protected WordPress Page
The default WordPress password prompt gets the job done, but it’s pretty basic. If you want full design control to create a branded experience for your visitors, then you’ll need a more powerful tool.
This is the perfect job for SeedProd, the best drag-and-drop WordPress page builder. It lets you build beautiful, custom pages without needing to touch any code.
💡 Important: Before I start, let’s talk about how SeedProd’s content protection works. Instead of adding a password field to your content, this method “gates” it behind a custom landing page.
You can then grant access to specific users, letting them bypass the gate and see the private content.
Some of our partner brands even use SeedProd to custom-build entire sections of their websites. For more insights into the plugin’s features, check out our full SeedProd review.
Step 1: Install and Activate SeedProd
To get started, let’s create a SeedProd account. You can go to the SeedProd website and click on the ‘Get SeedProd Now’ button.
You’ll then be prompted to choose a plan and complete the checkout process.

Upon signup, log in to your SeedProd account and download the plugin .zip file from their website. Once you have the file saved to your computer, you can head back to your WordPress dashboard.
From here, you can navigate to Plugins » Add New and click ‘Upload Plugin.’
Then, go ahead and click ‘Choose File’ to upload your SeedProd zip file.
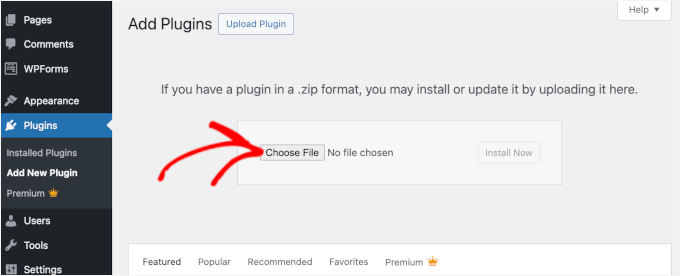
Next, simply click ‘Install Now’, then ‘Activate’ to make the plugin live on your site. If you need help, please see our guide on how to install a WordPress plugin.
📝 Note: There’s also a free version of SeedProd available from the WordPress plugin directory if you want to test it out first.
Upon activation, you’ll see the SeedProd menu item in your WordPress sidebar.
Go ahead and click on it, and you’ll be prompted to activate your license key.
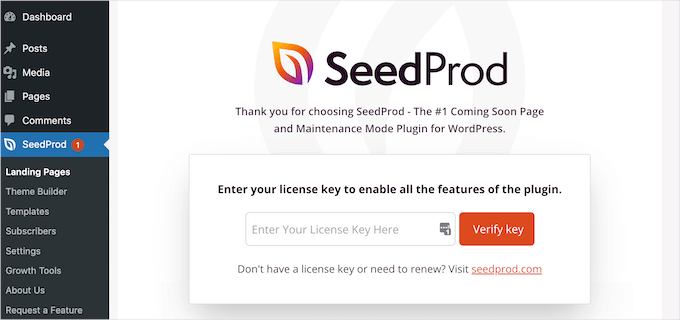
You can get your license key in your SeedProd account dashboard. Simply copy, paste, and click the ‘Verify key’ button to finish setup.
Step 2: Create a Coming Soon or Maintenance Mode Page
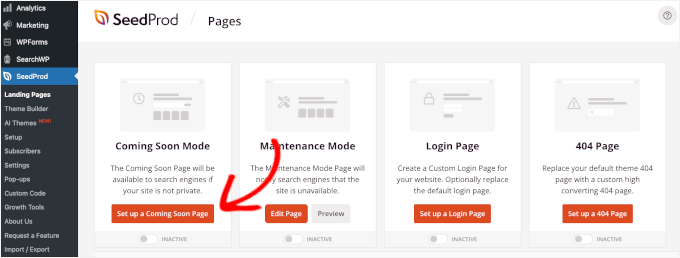
From your dashboard, go to SeedProd » Landing Pages and you’ll see templates for Coming Soon Mode and Maintenance Mode. Both work well for password protection.
From here, let’s click ‘Set Up a Coming Soon Page.’
On the next screen, you’ll see a library of professionally designed templates.
You can pick one that matches your brand or the feeling you want to create for your protected content.
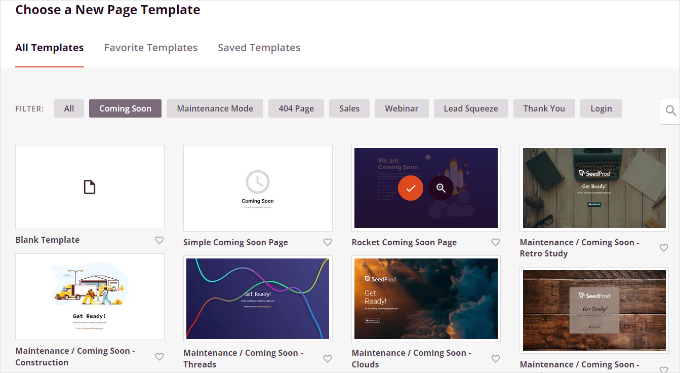
To select a template, you can hover over the box and click on the checkmark button.
If you want to preview it first, then just click on the magnifying glass button instead.

Once you’ve chosen a template, you’ll be taken to SeedProd’s drag-and-drop builder where you can customize everything.
From here, you can just click on any element to edit it, or drag new blocks from the left panel onto your page. You can also remove the pre-made content and replace that with your own.
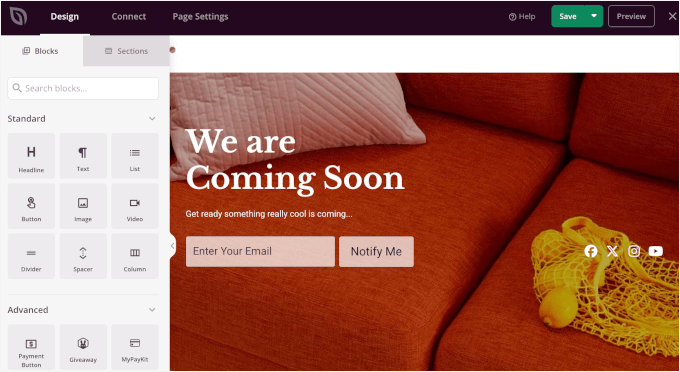
Since we’re creating a password-protected page, let’s adjust the content to guide visitors and explain what they need to access the content.
Go ahead and click a text block(s) on your page to edit the content. This will open the block’s settings on the left-hand panel.
I usually add a brief explanation and contact information so people know how to get the password if they need it.
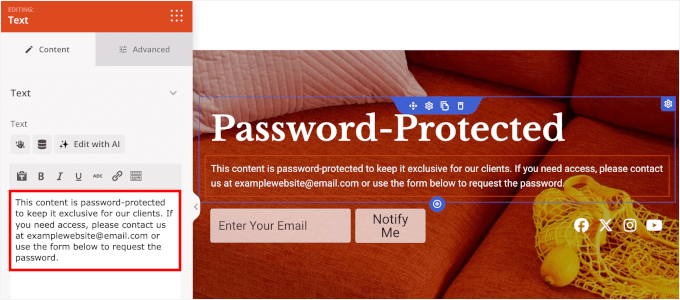
You can continue customizing to get the look you want. For example, you can add a timer to count down to your launch date, highlight special promotions, or create urgency for upcoming events.
See our guide on how to create a Coming Soon page in WordPress for step-by-step instructions.
Step 3: Enable SeedProd Protection Features
SeedProd’s protection works by gating your content behind a custom landing page rather than adding a password field. You can then allow specific users to bypass the gate and view the private content.
Now that your design is ready, click the ‘Page Settings’ tab at the top of the builder. From there, you can set up your access controls.
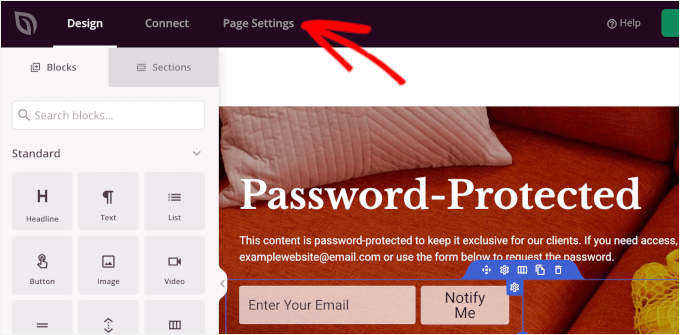
On the next screen, you’ll want to switch to the ‘Access Control’ section, and you’ll see several options for controlling who can see your content.
First, we’re going to allow intended visitors to access your protected page while the coming soon page is active.
Here are a few ways you can do that:
- Bypass Link – Generate a unique link that lets people skip the coming soon page and view your protected content directly.
- Access by IP – Add specific IP addresses so anyone visiting from that address can view the page without a password or link.
- Access by Role – Set a specific WordPress role, whether it’s an Editor or a Collaborator, so anyone with the user role can access the page.
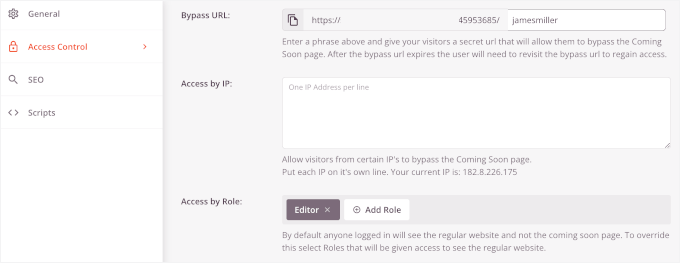
These settings are perfect for giving clients, staff members, or testers access without making the page public.
After that, let’s click on the ‘Include URLs’ radio button to specify exactly which posts or pages you want to protect using this Coming Soon page.
Then, you can enter the URLs of the specific pages, posts, or categories you want to protect, with one URL per line.
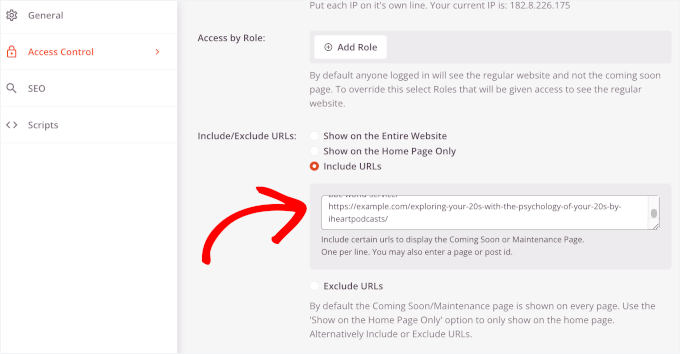
This gives you much more flexibility than WordPress’s built-in method, which only works on individual pieces of content.
Step 4: Test and Publish Your Protected Page
Before launching the page, you might want to double-check your settings to make sure you’ve included all the URLs you want to protect.
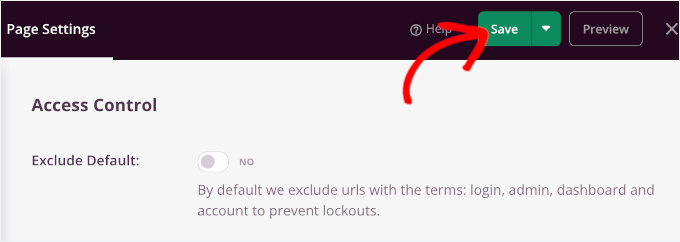
Once everything’s configured the way you want it, go ahead and click ‘Save’ to store your changes.
After that, you can head over to SeedProd » Landing Pages from your WordPress admin area.
Under Coming Soon Mode, you’ll see a toggle switch. Click it to change from ‘Inactive’ to ‘Active,’ and your custom password-protected page will go live immediately.
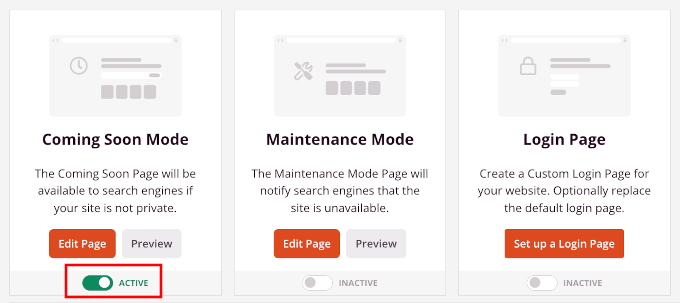
That’s it! Your password-protected page is now active and working.
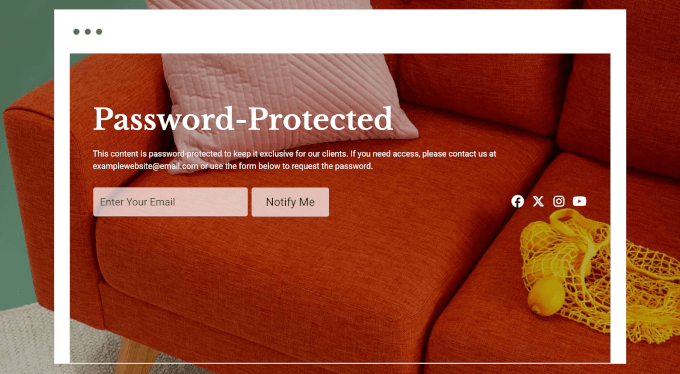
Anyone who tries to visit the URLs you specified will see your custom page instead of the actual content.
Here’s what it looks like on my demo site:
Bonus: Hide Password-Protected Posts From WordPress Loop
By default, password-protecting a post only secures the content itself. The post’s title may still appear on your homepage or in archive listings, which isn’t ideal if you want the post to be completely private.
Thankfully, you can hide these posts from view entirely. Typically, lots of people will say you’ll need to modify your theme’s functions.php or use a site-specific plugin.
That said, this method isn’t very beginner-friendly because one tiny typo can lock you out of your WordPress site. That’s why I always recommend using WPCode, the best code snippet plugin for WordPress.
WPCode makes it easy to add custom code snippets without editing your theme files directly. This is much safer, and your code won’t disappear when you update or switch themes.
A lot of our partner brands use WPCode to easily manage custom code snippets across their WordPress sites. For details about the plugin, check out our complete WPCode review.

First, you need to install and activate the WPCode plugin. For step-by-step instructions, follow our guide on how to install a WordPress plugin.
📝 Note: You can use the free WPCode plugin for this tutorial. But if you need more features like code scheduling and access to full revision history, then you’ll want to upgrade to WPCode Pro.
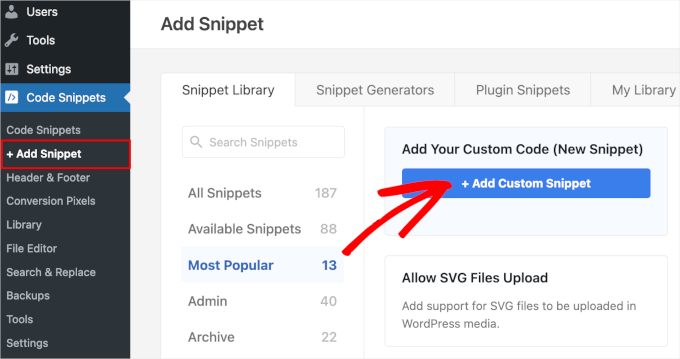
Once WPCode is active, go to Code Snippets » Add Snippet from your WordPress dashboard.
After that, you can hover over the ‘Add Your Custom Code (New Snippet)’ box and click ‘+ Add Custom Snippet’ when it appears.
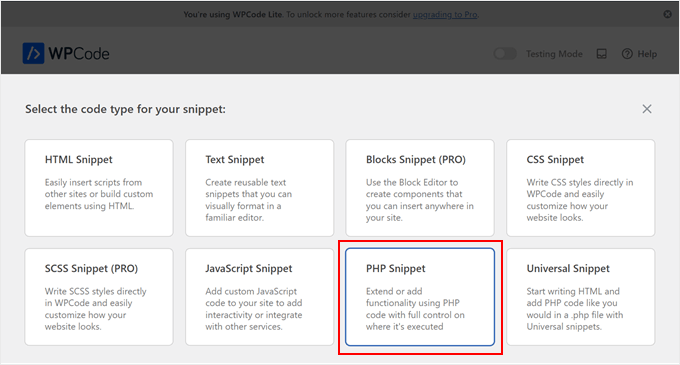
On the next screen, you’ll be prompted to choose the code type for your custom snippet.
For this tutorial, you’ll select the ‘PHP Snippet’ option.
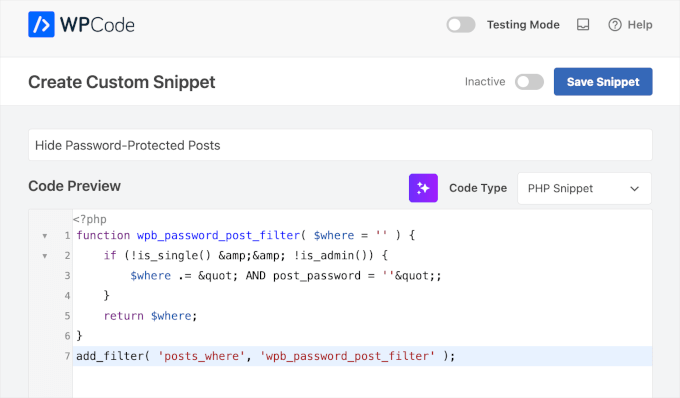
This will take you to the WPCode editor.
From here, you can give your snippet a descriptive title like “Hide Password-Protected Posts” so you can easily find it later.
Then, paste this code into the Code Preview box:
function wpb_password_post_filter( $where = '' ) { if (!is_single() && !is_admin()) { $where .= " AND post_password = ''"; } return $where; } add_filter( 'posts_where', 'wpb_password_post_filter' ); Here’s what it looks like in the editor:
Finally, you can toggle the switch from Inactive to Active, and click ‘Save’.
That’s all. Your protected posts will not appear on the site’s homepage or archives. You can send the post’s URL to users with the password.
For details, you can refer to our guide on how to hide password-protected posts from the WordPress loop.
FAQs: Password-Protect Pages and Posts in WordPress
Still have questions about how WordPress password protection works? Here are some common ones we get.
Can visitors see password-protected content in search results?
WordPress handles this well by default. While search engines like Google may index the title and URL of a password-protected page, they won’t index or show the actual content behind the password.
If you want to hide these pages completely, you can use the Include/Exclude URLs method in SeedProd. Another option is to set the page to ‘noindex’ using an SEO plugin.
We use All in One SEO (AIOSEO) on the WPBeginner site because it offers simple, powerful controls for tasks like this. You can easily noindex a specific page right from the editor, ensuring it stays hidden from search engines. See our detailed AIOSEO review for information.
What happens when someone enters the wrong password?
If a visitor types in the wrong password, WordPress refreshes the page and shows a small error message. There’s no limit to how many times someone can try, and no lockout feature with the built-in tool.
This makes it convenient for low-risk content. But for sensitive data, you might want more advanced protection (like user-based access or login requirements).
How long do passwords stay active?
When a visitor enters the correct password, WordPress uses a browser cookie to remember their access for 10 days. This is like a temporary key that saves them from retyping the password on every visit.
Can I use the same password for multiple pages?
Yes! You can absolutely reuse the same password on several pages or posts. This is helpful when you’re sharing a collection of draft or client-only pages under one access code.
Just keep in mind that anyone with the password will be able to view all pages using that password, so it’s best used for low-security use cases.
Will password protection work with my theme?
In most cases, yes. WordPress’s default password protection will work with any well-coded theme and inherit its styling. That said, the default form is pretty basic.
If you want full control over the look and feel, like adding branding, images, or styled forms, a plugin like SeedProd is a much better option.
Additional Resources: WordPress Page and Post Management
We hope this article helped you password-protect pages or posts in WordPress. Next up, you might want to check out our helpful guides on:
- How to Show Excerpt of a Password-Protected Post in WordPress
- How to Write a Great Blog Post (Structure + Examples)
- Ways to Protect Content in WordPress
- How to Create a Paywall in WordPress (with Preview Option)
- Advanced Landing Page Tips to Skyrocket WordPress Conversions
- Beginner’s Guide to WordPress User Roles and Permissions
If you liked this article, then please subscribe to our YouTube Channel for WordPress video tutorials. You can also find us on Twitter and Facebook.


MJ
Once enter the password in on the password-protected page and it displays the protected information, how can I log out again to see what the page looks like to non-logged-in visitors?
Thank you
WPBeginner Support
The simplest method would be to use an incognito/private browser window
Admin
Noreen
I have set the Blog page to password protected. The site is juliananoreen.com.
Saved.
It still is visible! Had a friend test from a cell phone. Visible there too.
Is there an additional setting that I am overlooking?
I am expecting to see a message and password section but the test posts are completely visible.
Thanks for your insights!
N
WPBeginner Support
Hi Noreen,
The blog page is a place holder to display your WordPress blog posts. Unlike regular WordPress pages which show page content, this page shows your blog posts list. Normally, the WordPress password protect feature works on the content of a post or page. However, a blog page has no content of its own. This is why before the password protection can kick in, the blog posts get displayed.
Admin
Noreen
Oh, darn!
Have any ideas how to fully lock it down so I can add content and all elements are hidden? I did initially try password protecting the posts – not an option b/c the title and feature images are still visible. Hmmmmm….?
TY!
WPBeginner Support
For what it sounds like you’re wanting, you would want to set up a membership plugin to password your content: https://www.wpbeginner.com/plugins/5-best-wordpress-membership-plugins-compared/
Mary Ann
I have password protected a pages (and children pages…not posts). I want it to prompt the user to reinsert the password when they leave the page…
I saw that you can set the post_password_expires to 0 but where would I do it for a page?
Ben
My password protection is not working. It keeps referring back to the password prompt. Yes i have the correct password. Any ideas?
ellen
I made sometime ago a Password protected post, but I can’t remember the password.
Can you help me with this ?
thanks in advance
ellen
I just found it…!!!
Diao
If I dont know the password, how to read a protected post?
Justin
Is there a way to change the default text to these password protected pages? I would like to leave a link in this text if it’s possible?
Thanks,
J
Stephanie
Hi, I use password protection for a specific page. However, whenever I use the password to access the page, a pop-up window appears and wants my admin credentials. How can I make this issue disappear. That shouldn’t happen. I used passwort protection before and it worked fine, but now it doesn’t anymore.
Mark
I have pages not posts that are password protected. Being pages i have no issue with them showing up in archives etc. I have them on my menu. I want only the main page not any of its children to show up in my custom menu until the user logs in. Is that possible?
WPBeginner Support
See our guide on how to show different menus to logged in users in WordPress
Admin
Mark
Does that code work where it is not technically a “user” it is entering the password for a protected page? Anyone can do that, they do not need to be registered as a user.
Mark Gason
the default WP expiry of the login is 10 days!! That is not much use on a private computer. I found if I used this plugin ‘Protected Posts Logout Button’ and added the logout button to every page with the password it logged out of all of them when I clicked one. It also allows setting auto logout time/cookie expiry. So I set 30 minutes in case a user does not logout.
Ian
Static page – I set visibility to “password” and set a password. Worked a treat for a few weeks. In the last couple of days when entering password page results to “Forbidden”. Password is correct. have disabled Plugins, activated default themes and still same result – cannot access password protected content.
Any thoughts…
Is this a server host issue or WP issue?
Amanda
I’m having the same issue.
Naomi
I tried this and find the following error: when someone wants to use it, they fill in the password (on a page) and they are redirected to the captcha and directed to my wordpress login in. That should not be the case? I do not understand this.
tom
this was working great until a recent update now I just get a 404 page..
WPBeginner Support
Try updating your permalinks. Simply go to Settings > Permalinks and click on the save changes button.
Admin
Tom
Yes, first thing I did, was surprised when that didn’t fix it.
WPBeginner Support
We tested the code again with the latest version. It worked fine on our end. Have you tried troubleshooting steps like deactivating all plugins, switching to default theme, deleting and regenerating .htaccess file?
Sean Vandenberg
Hi, interesting – I’ve never seen this before (I don’t think!). …Will this be bad for SEO purposes? Can search engines still crunch the content?
Maryam
So this was pretty cool – it protects the page. I enter the correct password, and the page shows up fine. Now, when I Refresh the page, it still shows up. When does the password prompt come up again?
Justin
I am unable to access the private blog from my iphone as it only allows me to type the password in capital letters, yet my password is all lowercase.
Also any text entry like subscribe box is all in caps too.
how can I resolve this apart from changing the password to all caps.
thanks
Justin
Thomas Stahl
I think it’s a great feature. How can I open the password protected Page with a Query String? So I can send a Link to my friends. Thanks for any ideas.
Thomas
Zeeshan
Hello sir,
i added a link in my site and i want that whenever anybody click on in there then by Clicking this link will bring up a password prompt, if user successfully enters password they are allowed to access a password-protected page.
Thanks in advance
Ryan
This works great EXCEPT the post is still showing up in the “Latest Posts” widget. Any code change to fix that?
mdfaizan
is there any way to make it available to logged in users. By default even a logged in admin cannot see this password protected post.
Is there any way we can make it available to all logged in users?