File upload in WordPress was frustrating.
When I used to provide tech supports, my clients would describe their issues over email, but without seeing error logs or screenshots, I was often shooting in the dark.
That’s when I discovered the power of Dropbox upload forms in WordPress. Unlike the default WordPress media uploader, which had file size limits, file sizes weren’t an issue with Dropbox upload forms. It helped my hosting stay clean and I could access uploads from anywhere.
In this article, I’ll show you exactly how to create a Dropbox upload form that streamlines everything.

Why Use Dropbox to Upload Form Attachments
By default, WordPress saves all uploaded files directly to your Media Library. While this works for basic use, it often creates problems when running advanced WordPress websites, such as a job board or a site with multiple submission forms.
The main issue is that WordPress doesn’t automatically organize uploads by the form they came from. This leads to two big challenges:
- All file types are stored together in one place, making it hard to manage.
- There’s no way to categorize files by the specific form entry they belong to.
That way, finding the right user-submitted file can be frustrating and time-consuming.
Another drawback is server storage usage, as every uploaded file takes up space on your hosting plan. Large files, like dozens of PDF documents adding up to hundreds of megabytes, can quickly eat up storage and even force you to upgrade your hosting.
Plus, the WordPress Media Library lacks advanced file management features, like permission control. That means there’s always a risk of accidental deletion with no easy recovery option.
By connecting your WordPress forms to Dropbox, you solve all these issues. Uploaded files are stored securely in the cloud, neatly organized, and won’t slow down your website or take up hosting storage.
This setup works especially well for forms that collect large, important files, such as:
- Job boards to manage resumes, cover letters, and portfolios
- Project proposal forms to handle pitches, budgets, and supporting documents
- Event registration forms for ID scans, waivers, and consent forms
- School or course enrollment forms to submit assignments, transcripts, and projects
- And many more…
In this article, I’ll show you the exact method we use to connect our WordPress forms to Dropbox. Here’s a quick overview of all the steps we’ll cover in this guide:
- Install and Activate WPForms
- Connect WPForms to Your Dropbox Account
- Create Your Dropbox File Upload Form
- Set Up Form Notifications and Confirmation
- Configure Dropbox Storage Settings
- Test and Publish Your Form
- Bonus Tip: Track Your WordPress Form Submissions
- FAQs: Dropbox Upload Form in WordPress
- Other Helpful Guides to Using Forms in WordPress
Ready? Let’s get started.
Step 1: Install and Activate WPForms
The easiest way to make a Dropbox form in WordPress is by using WPForms. It’s the best contact form plugin for WordPress and offers pre-built templates, a drag-and-drop form builder, and premium integrations.
We use WPForms to create forms to accept job applications and offer tech support that handles large media files. Be it a contact form or our annual user surveys, WPForms makes the process simple. See our full WPForms review to see what it can do.

First, let’s install and activate the WPForms plugin. For more details, you can check out our article on how to install a WordPress plugin.
📝 Note: You’ll need at least their ‘Pro’ plan to access the Dropbox add-on, which we will be using in this tutorial. If you want to test it out first, there’s also a WPForms Lite version you can use for free.
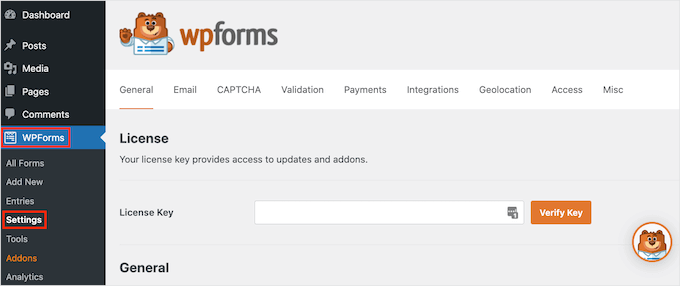
Upon activation, you’ll need to go to WPForms » Settings from your WordPress dashboard and enter your license key. You can easily find the license key in your WPForms account area.
Step 2: Connect WPForms to Your Dropbox Account
Before you can start sending files to Dropbox, you need to install the Dropbox addon and connect your accounts.
To start, you can go to WPForms » Addons from your WordPress dashboard. On the next screen, scroll down until you find the ‘Dropbox’ addon in the list and click the ‘Install Addon’ button.
The addon will download, install, and activate automatically.

Upon activation, you can connect your Dropbox account.
To do this, navigate to WPForms » Settings from your WordPress dashboard. Then, click on the ‘Integrations’ tab at the top of the settings page.
Go ahead and click the Dropbox section to expand it.
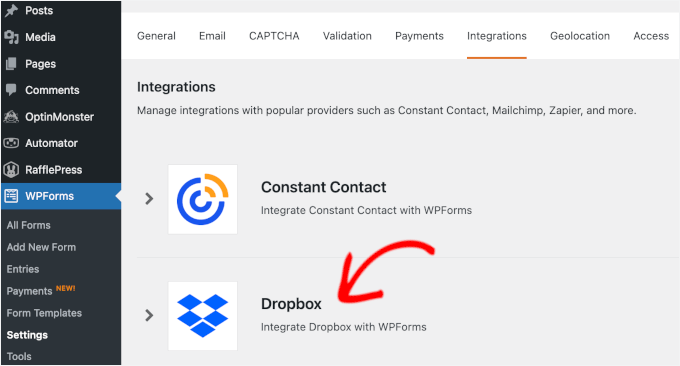
📝 Note: The Integrations page lists all available services, including Constant Contact and Brevo. If you plan to use multiple tools alongside Dropbox, you can manage them all here without leaving WPForms.
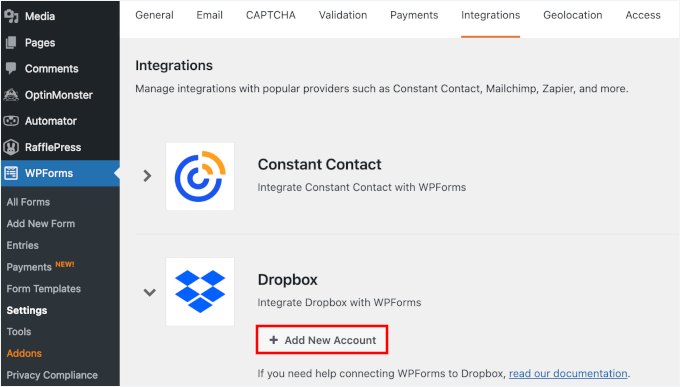
Next, you can click the ‘Add New Account’ button to start the integration.
This will open a new window or tab that takes you to Dropbox’s authorization page. If you’re not already logged into Dropbox, you’ll need to enter your Dropbox credentials.
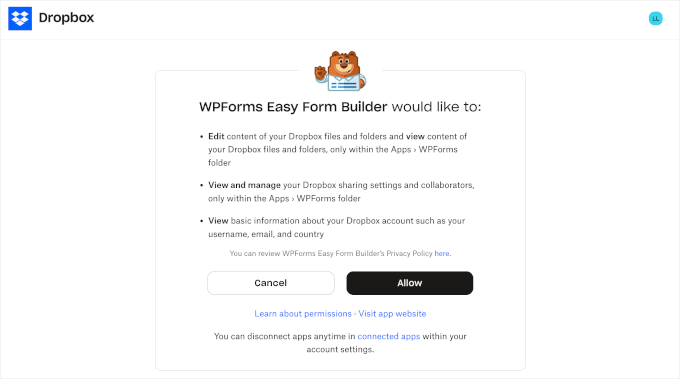
Then, Dropbox will ask for permission to allow WPForms to access your account. You can review the permissions carefully. But, in general, WPForms will need access to create folders and upload files to your Dropbox account.
After that, you can click ‘Allow’ to grant these permissions.
After authorization, you’ll be redirected back to your WordPress website.
You should see a confirmation note that your Dropbox account has been successfully connected to WPForms.

Step 3: Create Your Dropbox File Upload Form
Now, you can start building your Dropbox upload form.
Simply navigate to WPForms » Add New from your WordPress admin area.
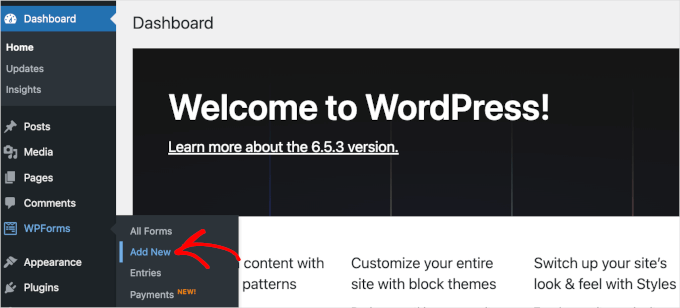
This will take you to the Setup page.
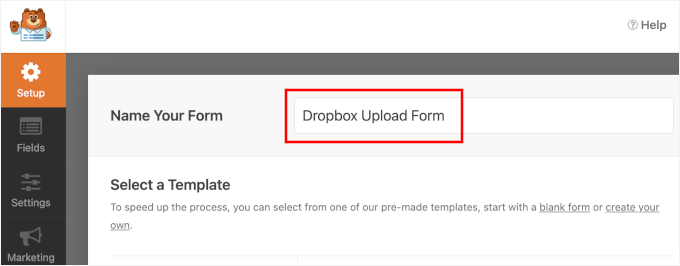
Here, the first thing you’ll want to do is name your form. I recommend using a clear, descriptive name, so it’s easy to recognize later, especially if you create multiple forms.
For example, I named our form “Dropbox Upload Form.”
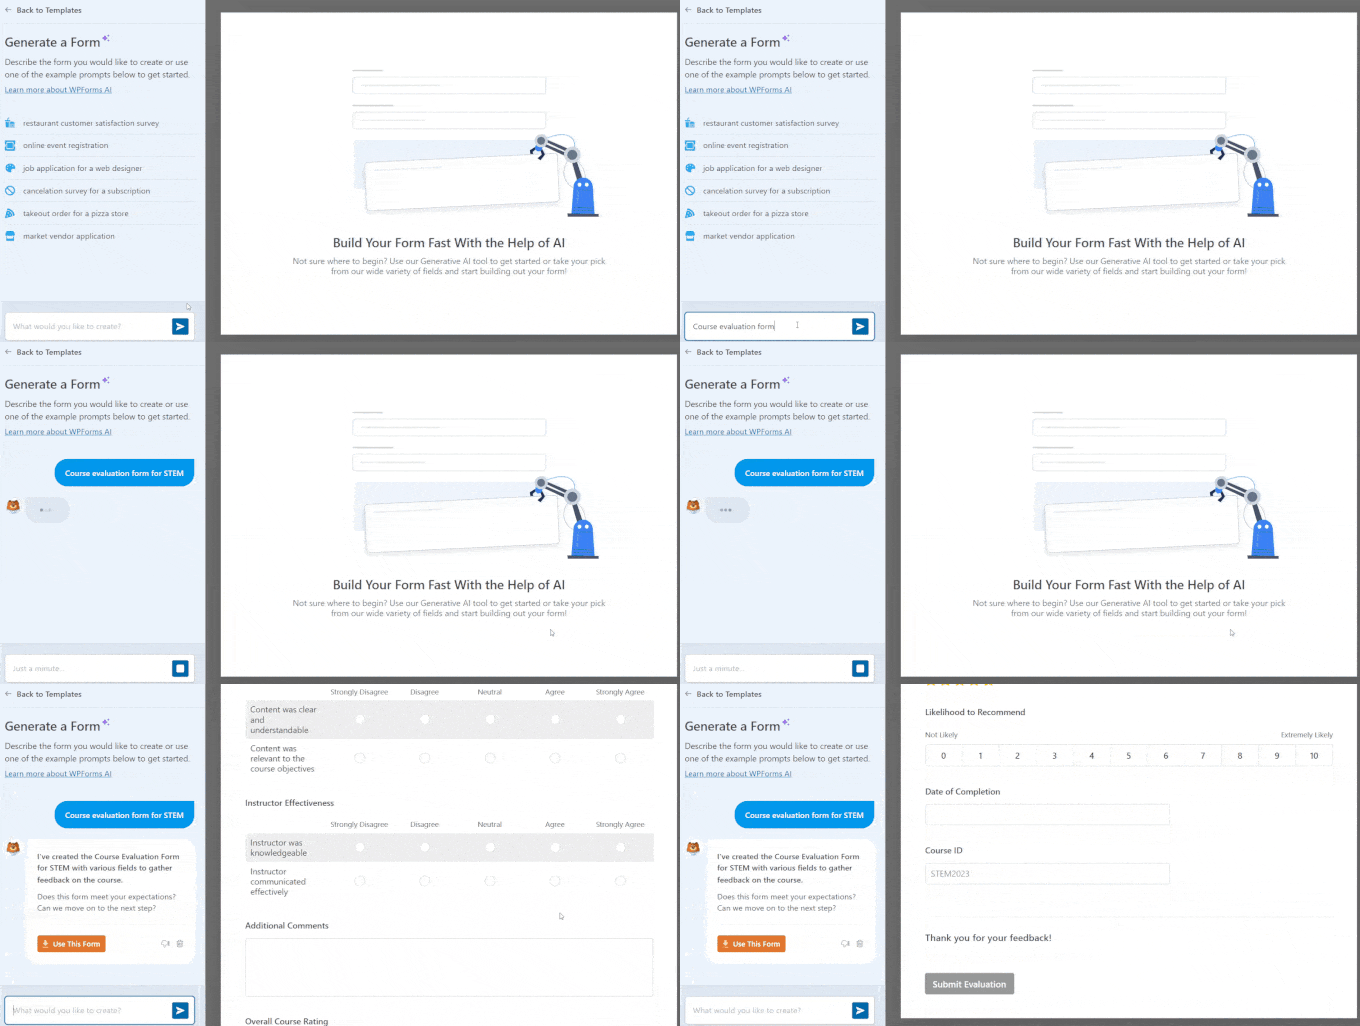
After that, you’ll choose how you’ll build your form: starting with a blank form, using the AI Form Builder, or choosing from pre-made templates.
If you want to use the AI-powered form builder, you can just write a simple prompt describing your form and wait for the tool to generate it for you. It takes just a few seconds.
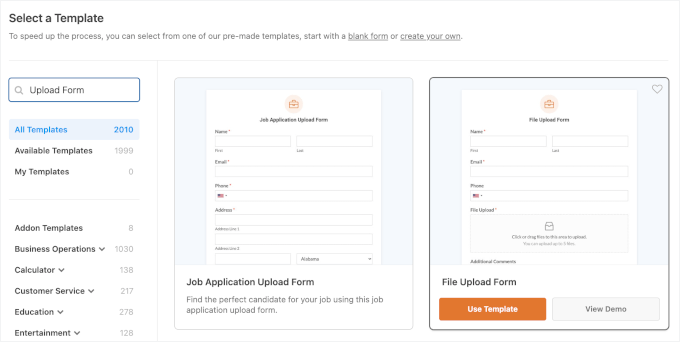
For this tutorial, though, I’ll show you the steps using the File Upload Form pre-made template.
Since WPForms has 2,000+ templates to choose from, it’s easy to pick one that matches your needs and then tweak it to fit your project perfectly.
You can type in ‘Upload Form’ in the search bar to narrow down your options. These templates already include the basic structure for collecting files along with user information.
Once you’ve found the best one for your form, just hover over it and click ‘Use Template.’
This will open the drag-and-drop form builder.
Here, you can see that the template includes standard fields like Name, Email, a File Upload field, and more.
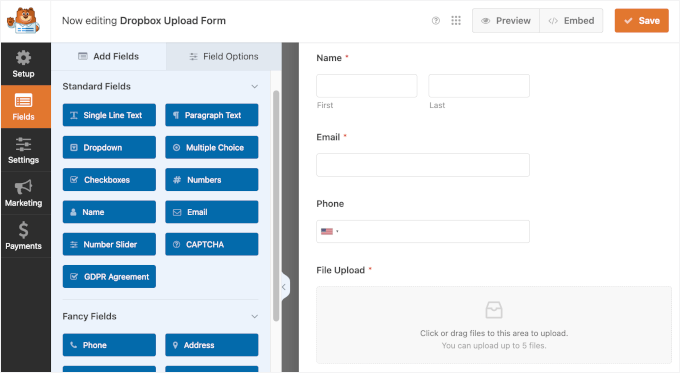
Next, let’s click on the ‘File Upload’ field to customize it.
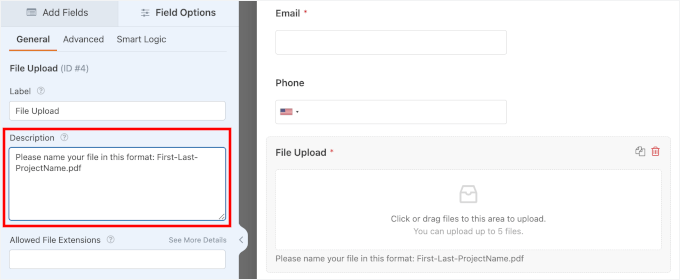
To avoid digging through a mess of “document(1).pdf” or “image.jpeg” files, I recommend adding a short note near the file upload field with naming guidelines.
Here are some examples for different use cases:
- ✅ “John-Doe-Resume.pdf” for job application forms
- ✅ “Project-XYZ-Proposal.pdf” for submission forms
- ✅ “Event-Photos-July2024.zip” for media uploads
Go ahead and add a note, like “Please name your file in this format: First-Last-ProjectName.pdf,” in the ‘Description’ field.
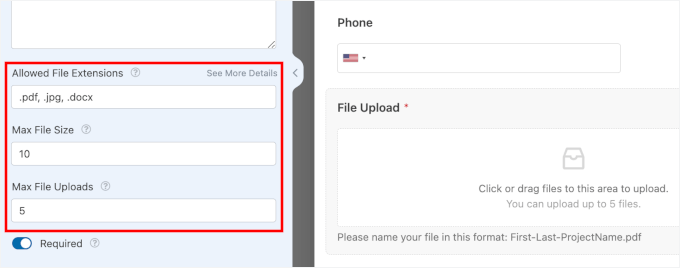
Under ‘Description,’ you’ll find more customization options for the file upload field. Here you can:
- Restrict file types, like .pdf, .jpg, .svg, or .docx. Simply enter the formats you want, separated by commas
- Set the maximum file size in megabytes to prevent oversized uploads
- Limit the number of files a user can upload
For example, I allowed .pdf, .jpg, and .docx files up to 10 MB each, with a maximum of 5 uploads.
If your website serves users in the EU (or other regions with privacy laws like CCPA), you’re required to get explicit consent before collecting personal data or files — especially if those files are stored in third-party services like Dropbox.
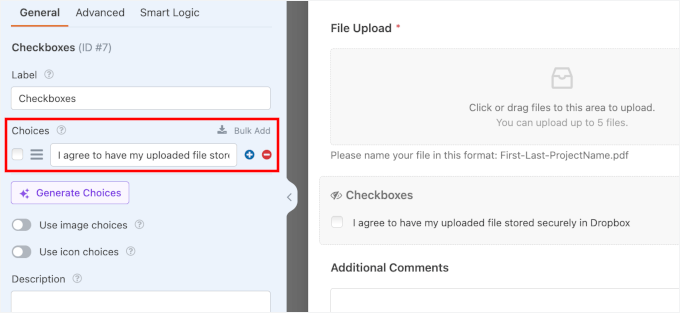
To accept user consent, you can drag the ‘Checkboxes’ field from the left panel and drop it in the form preview area.
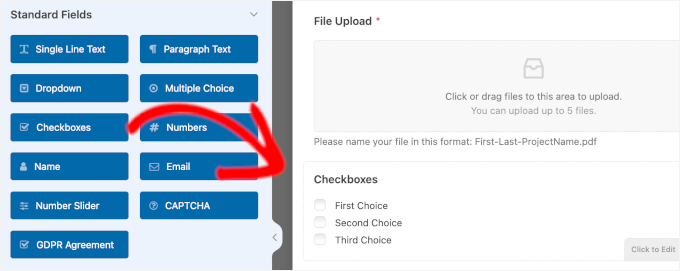
Then, you can customize its description by clicking on the field.
You can write something like “I agree to have my uploaded file stored securely in Dropbox” and make it required. This makes sure users understand where their files are going and gives you proper permission to store them.
Don’t forget to delete the remaining choices using the ‘-‘ icon, as you won’t need them.
Next, you may want to hide the field label to keep your Dropbox upload form clean and minimal.
Just switch to the ‘Advanced’ tab and turn on the ‘Hide Label’ option.
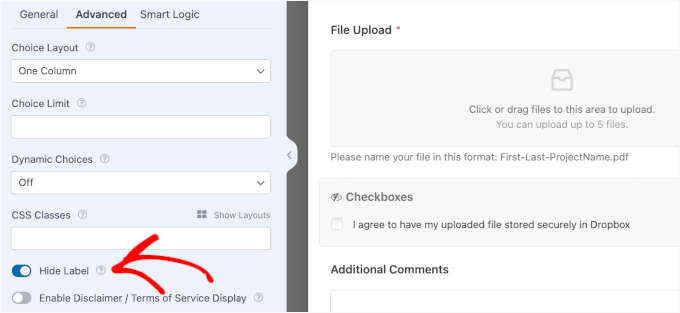
This is what all you need to create a Dropbox upload form. If you want to go further, simply drag and drop new fields into the form and edit their details.
Step 4: Set Up Form Notifications and Confirmation
Once you’re happy with how your form looks, go to the ‘Settings’ tab to set up notifications and confirmations.
Under the ‘Notifications’ section, you’ll notice that WPForms is set to automatically send an email notification to the site administrator whenever someone submits the form.
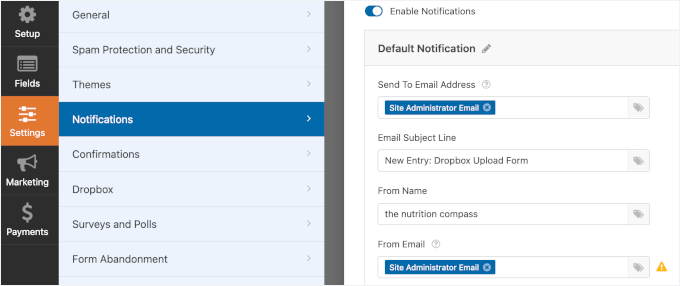
If you’d like to send notifications to multiple recipients, you can do that too. Just add their emails in the ‘Send To’ field, separated by commas.
In the ‘Confirmation’ section, you can choose what users see after submitting the form. The best part is that you can customize them as well:
- Message – Shows a simple confirmation message. Each template comes with a default message, but you can easily edit it to match your brand’s tone.
- Show Page – Decide where you want to send users within your site, like a thank-you page, after they’ve submitted the form.
- Go to URL (Redirect) – Redirect users to any link you choose, including an external site, custom landing page, or special offer.

Step 5: Configure Dropbox Storage Settings
In this step, you’ll choose exactly which Dropbox folder the uploaded files should be saved to.
The best part? WPForms makes it easy — you can set the Dropbox destination directly inside the form builder, without needing to leave your WordPress dashboard.
Assign a Dropbox Folder in WPForms
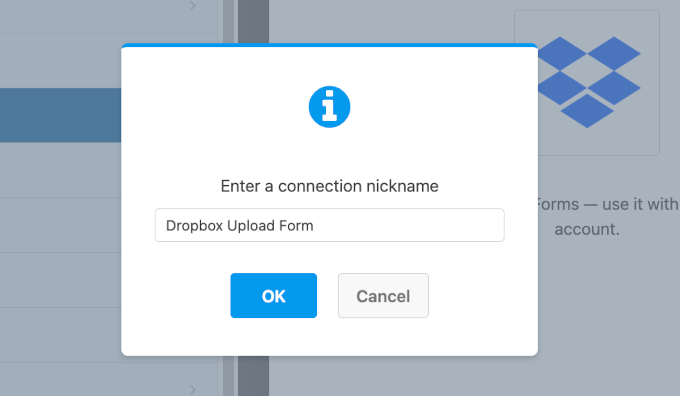
From the WPForms builder, let’s go to the Settings » Dropbox panel. Then, go ahead and click ‘Add New Connection.’

In the popup that appears, you can give your connection a descriptive name like “Client File Uploads” or “Resume Submissions.”
You can also just use the same name as your file upload form.
Now, for the Dropbox account, WPForms will automatically detect the available integration.
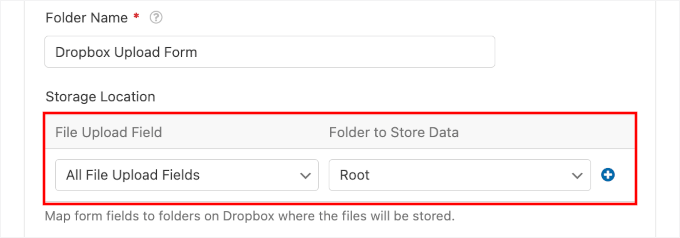
In the ‘Folder Name’ field, you can simply enter any name you like. WPForms will then create a new Dropbox folder inside Apps/WPForms/[Folder Name].

Next, under ‘Storage Location,’ you can choose where the uploaded files should be stored.
The default setting is: “All File Upload Fields” will go to the “Root” folder. This means all file upload fields will be saved in the folder you just created.
Map File Upload Fields to Different Subfolders (Optional)
Want to keep things more organized? This optional step lets you automatically sort files from different upload fields into separate subfolders in Dropbox.
For example, you can have résumés saved in one folder and cover letters in another, making it much easier to manage submissions.
If you’re okay with all files going into one folder, feel free to skip ahead to the ‘Set Up Conditional Logic’ section below.
To set up file upload mapping, you’ll first need to manually create subfolders in your Dropbox account.
Let’s open a new tab, go to the Dropbox website, and log in to your account. In your Dropbox dashboard, you can navigate to All Files » Apps and click the ‘WPForms’ folder.
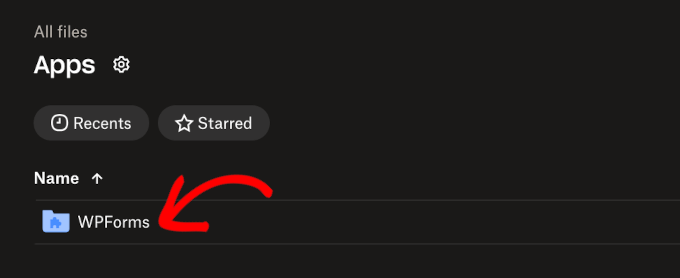
On the next screen, you’ll see the Dropdown File Upload folder you just created.
Let’s click on it to create subfolders.

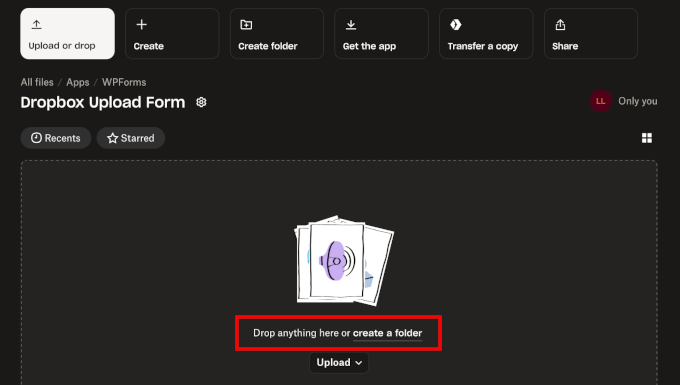
This will open the Dropbox Upload Form, where all your files will be stored.
Just click ‘Create a folder’ to set up your first subfolder.
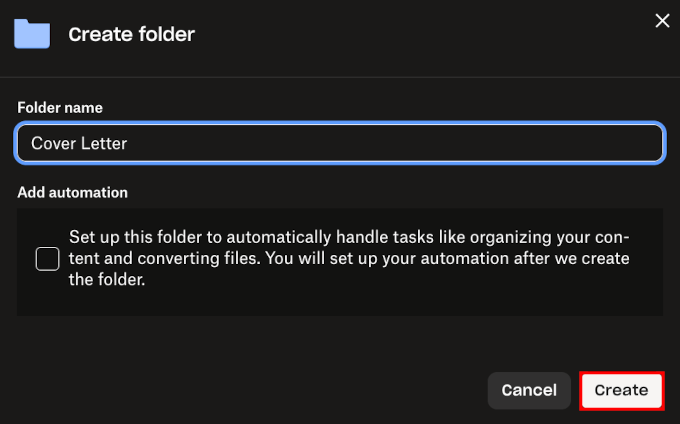
On the popup that appears, you can type in your subfolder a name.
After that, click the ‘Create’ button.
From here, you can add as many subfolders as you need.
And you’ll see all of your subfolders listed in the Dropbox Upload Form folder like this:
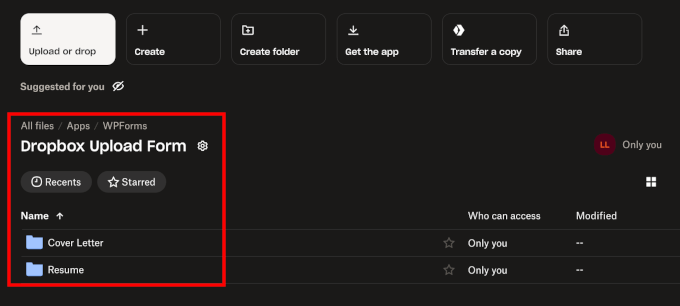
Once done, you can return to the WPForms form builder tab to create your file upload mapping.
Just use the ‘+’ and ‘-‘ buttons to add or remove settings.
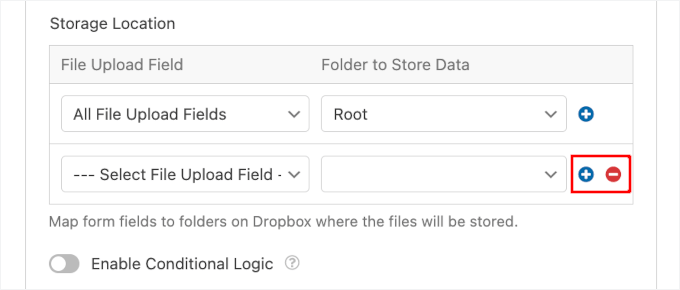
In the ‘File Upload Field’ dropdown, you’ll see all the file upload fields on your form.
Go ahead and select a file upload field to add.

Then, you can choose which subfolder to store them in the ‘Folder to Store Data.’
Just click on the dropdown to expand and select the subfolder.

🧑💻 Pro Tip: If you don’t see your new subfolders right away, make sure to save your current form settings. This will refresh the folder structure in the ‘Folder to Store Data’ dropdown.
You can repeat the process for all the file upload fields you have.
Set Up Conditional Logic for File Uploads
Next, let’s make sure your files are only stored in Dropbox when users give explicit consent. WPForms makes this easy with its smart conditional logic feature.
You can click ‘Enable Conditional Logic’ to start.

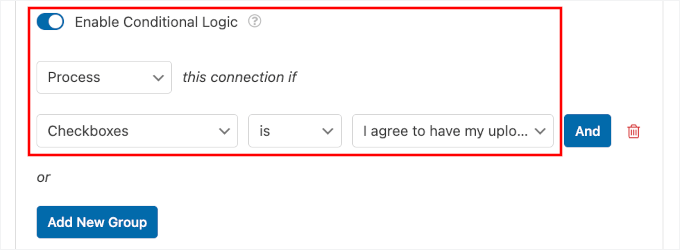
This will open the configuration section where you can set up the conditional logic to only process uploads when the consent checkbox is selected.
Then, you can configure it like this:
- In the first dropdown, choose the ‘Process’ option. This sets a rule that tells WPForms: ‘Only send the file to Dropbox’ if the following condition is met.
- In the next field, choose your Checkboxes field. This should be the one where users give permission for cloud storage.
- Set the condition to ‘is.’
- From the last dropdown, pick the option ‘I agree to have my uploads stored in Dropbox’ (or whatever wording you used).
With this setup, WPForms will only send files to Dropbox when users actively check the permission box.
Enabling the Cleanup Option (Optional)
Finally, there’s a cleanup option to automatically remove files from your WordPress site after they’re safely stored in Dropbox.
By turning this on, WordPress media library doesn’t get cluttered with uploads you’ve already stored in Dropbox.
To enable this, you’ll first need to expand the ‘Advanced Options’ section. After that, you can switch the ‘Delete Local Files After Upload’ option.

From here, you can click ‘Save’ to store your Dropbox configuration settings.
Step 6: Test and Publish Your Form
Before making your form live, you absolutely need to test everything.
Start by previewing your form within the WPForms builder. Then, just click the ‘Preview’ button at the top of the form editor to see exactly how your form will look to visitors.
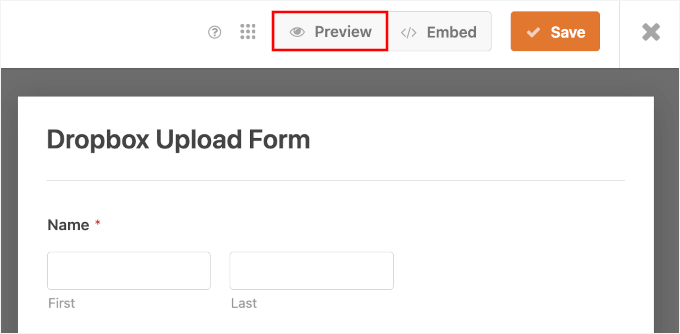
On the preview tab, you’ll want to check that all your fields display correctly and that additional notes are easy to understand.
For the real test, you can fill out the form completely using test information.
This will let you check if the form validation is working. For example, whether a required field was skipped or a value was entered in the wrong format.
You can also upload a sample file from your computer.
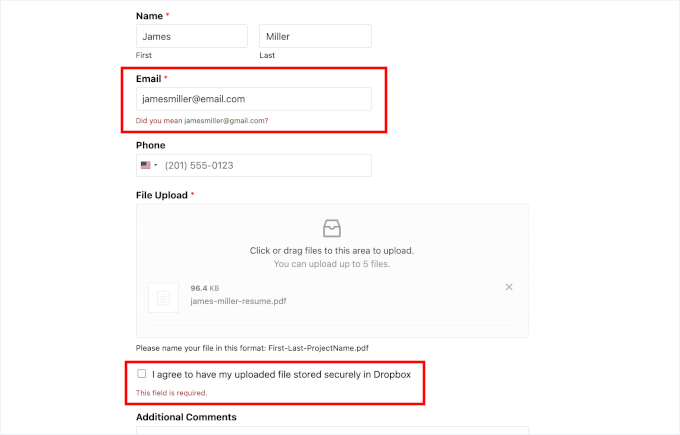
You can then hit the ‘Submit’ button and see if your custom confirmation message shows up.
Here’s mine, for example:
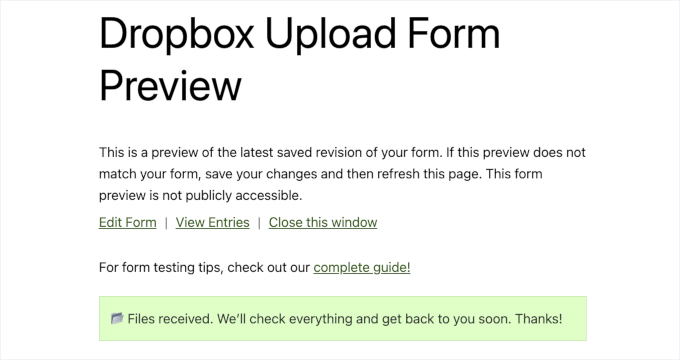
Now, you can check if you received your test submission.
On this tab, you can open your WordPress admin area, navigate to WPForms » Entries, and click on the Dropdown Upload Form from the list.
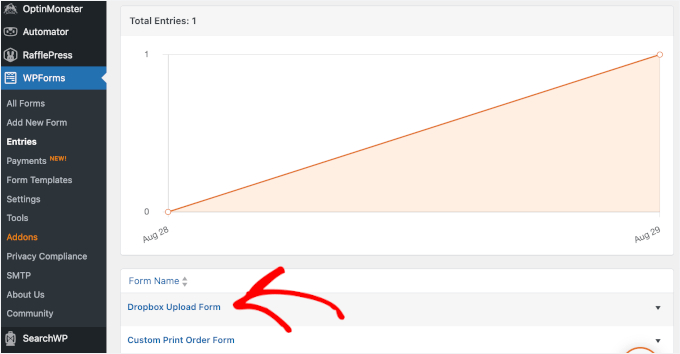
In the form entry list, you can see links on the right.
Click ‘View’ to open the entry details.
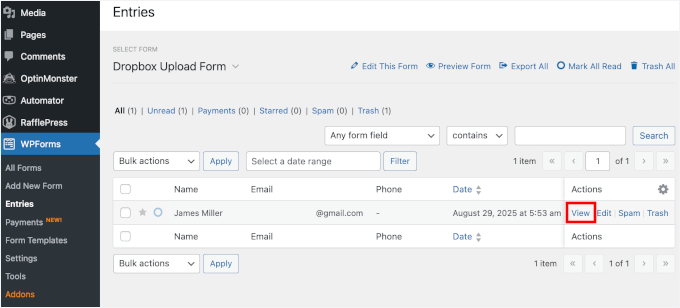
On the next screen, you should be able to see all the information you submitted in the form.
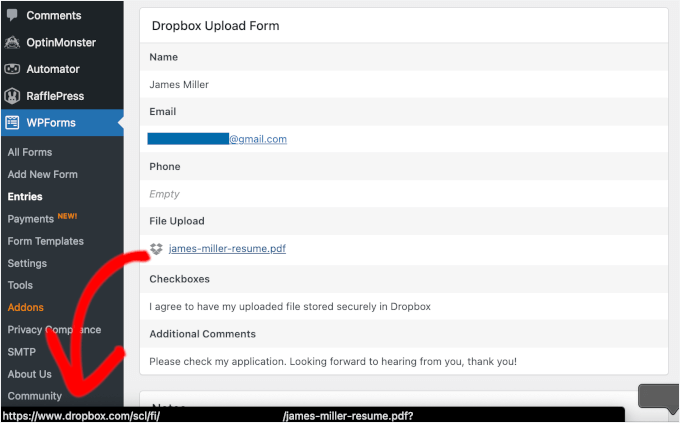
To check if your uploaded file is sent to Dropbox, hover over the link and see if it shows a Dropbox URL in the bottom left corner.
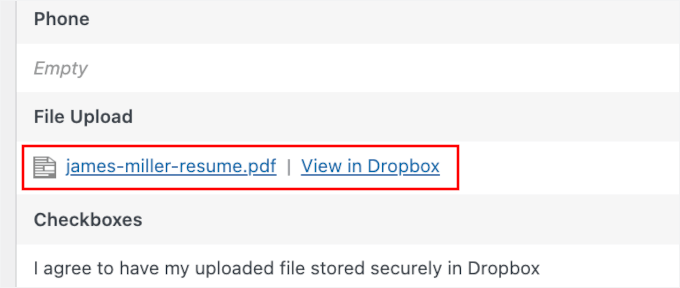
If you didn’t enable the cleanup option in Step 5, then you will see the View in Dropbox link along with the uploaded files instead.
This is because the files are stored on both WordPress and Dropbox.
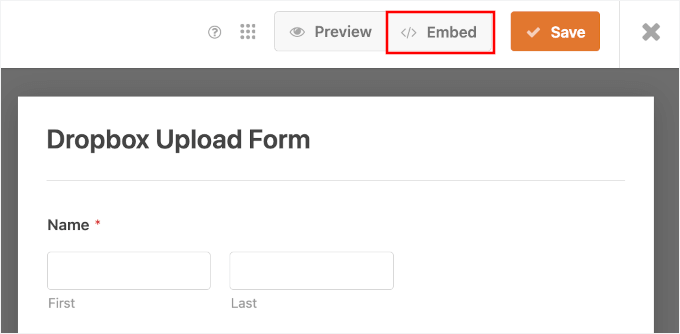
Once you’ve verified that everything works properly, you can return to your form builder and embed your form into your WordPress site.
From here, let’s click on the ‘Embed’ button.
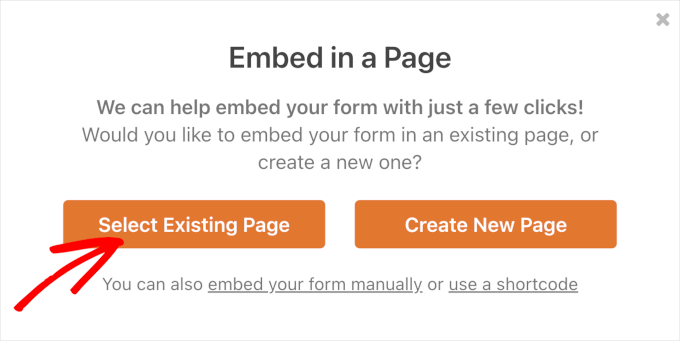
On the popup that appears, WPForms will ask where you will add your form: an existing page or a new page.
For this tutorial, I’ll choose ‘Select Existing Page,’ but the process is pretty similar for both.
Next, you can select a page using the dropdown menu. You’ll see a prompt to name your new page instead if you go that road.
Go ahead and click ‘Let’s Go!’
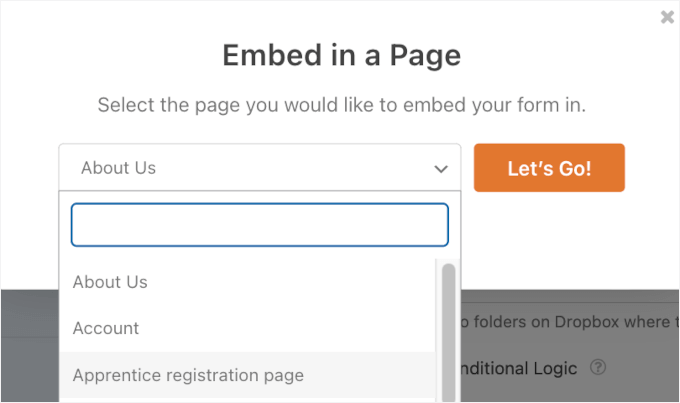
This will take you to the WordPress block editor.
From here, you can click the ‘+’ button and add the WPForms block.

Now, you should see the WPForms dropdown in your content editor.
Simply expand the dropdown menu and select the Dropbox upload form you just created.
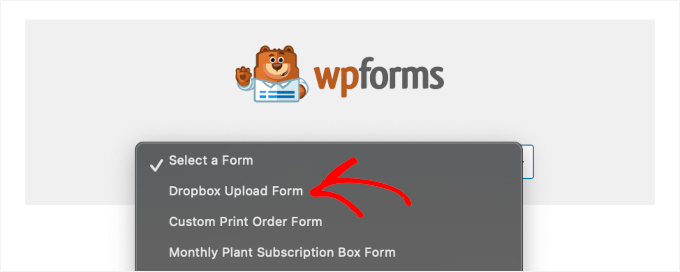
WordPress will then load the form in the content editor.
To make things clearer, you can enable the ‘Show Title’ option in the right-hand panel. This will display the form’s title to users.
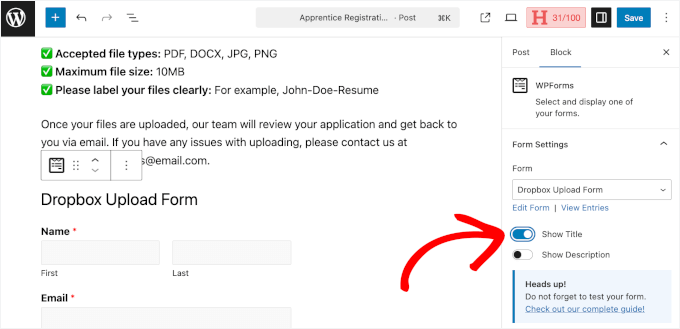
If everything looks good already, you can then go ahead and hit ‘Save’ or ‘Publish.
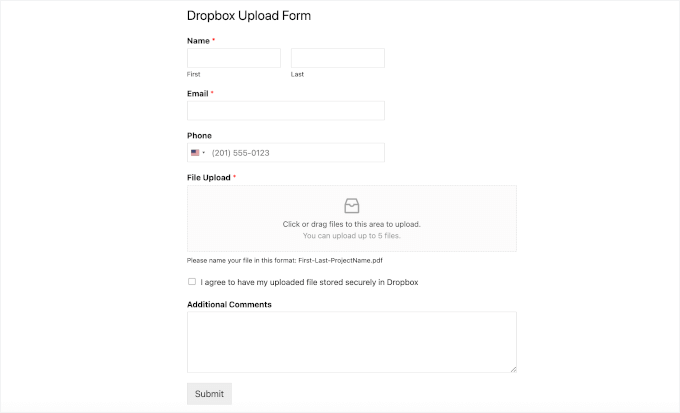
Now, if you visit your page, you’ll see your Dropbox upload form in action:
Bonus Tip: Track Your WordPress Form Submissions
Once your Dropbox upload form is live, it’s a good idea to track how users are interacting with it. This way, you can see how many people start filling it out, how many complete their uploads, and where you might be losing submissions.
To track your forms this way, you’ll first need a Google Analytics account.
The easiest way to connect your site to Google Analytics is by using MonsterInsights, the #1 Google Analytics plugin. It can help you automatically track form submissions, including file upload forms, thanks to its Forms addon.
At WPBeginner, we actually use MonsterInsights ourselves for a lot of tracking tasks. For more insights into the plugin, see our complete MonsterInsights review.
Once you install the addon and data starts coming in, you can view impressions, conversions, and conversion rates for all of your WordPress forms.
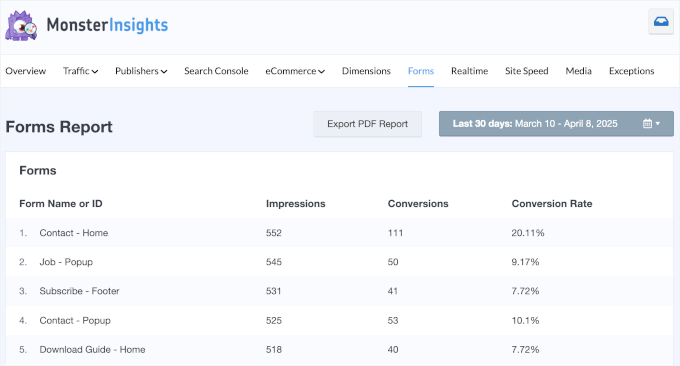
This helps you identify whether users are completing uploads or abandoning the form halfway, so you can optimize for better results.
For details, you can see our guide on how to track and reduce form abandonment in WordPress.
FAQs: Dropbox Upload Form in WordPress
Here are answers to some of the most common questions about setting up file uploads
Can I limit the file types and size for uploads?
Yes, absolutely. WPForms gives you full control over the file upload field, which is something I find incredibly useful for managing submissions on my own site.
When you click on the ‘File Upload’ field in the form builder, you can specify allowed file extensions (like .pdf, .jpg, .docx) and set a maximum file size in megabytes. This prevents users from uploading unsupported or overly large files.

Is this process secure?
Yes, the entire process is secure. WPForms securely handles the form submission on your WordPress site, and the transfer to Dropbox is also encrypted.
What happens if my Dropbox account is full?
If your Dropbox account runs out of storage space, the file upload from your form will fail. WPForms will still save the user’s submitted information in your WordPress dashboard, but the file itself won’t be sent to Dropbox.
Other Helpful Guides to Using Forms in WordPress
I hope this article helped you learn how to create a Dropbox upload form in WordPress. Next, you may also want to see our guides on:
- How to Customize and Style Your WordPress Forms
- How to Show a Floating Contact Form in WordPress
- How to Create Multilingual Forms in WordPress
- How I Blocked 18,000 Spam Lead Attacks in My WordPress Form
- How to Auto-Export WordPress Form Entries
- How to Create a Custom Airtable Form in WordPress
- How to Connect Salesforce to Your WordPress Forms
- WordPress Form Does Not Work: Troubleshooting Tips
If you liked this article, then please subscribe to our YouTube Channel for WordPress video tutorials. You can also find us on Twitter and Facebook.


Jiří Vaněk
WPForms is a great plugin and the more I see what it can do, the more I’m glad I have the full version. I see a great advantage in storing data on DropBox in that I can also protect my website space from malicious files. I will definitely use this guide, as I don’t want to let website users upload data directly to wp-content. It seems dangerous to me.
Dennis Muthomi
Yep…you make an excellent point about the security benefits of using Dropbox for file uploads instead of storing them directly on your WordPress site.
the best part is that storing uploads in Dropbox can also help reduce disk space usage on your hosting account. Especially if you expect to receive many file uploads, having them go directly to Dropbox prevents those files from eating up your limited server space over time.
Jiří Vaněk
Yes, that’s the second benefit. I have a community website, and users often submit various data related to the articles on the blog. Over time, this can really strain the hosting plan, especially since many of them have quite limited FTP space. This article, therefore, perfectly addresses two issues at once: security and FTP space. I applied the forms to my website using this guide, and I must admit that since then, I have peace of mind. I don’t have to worry about the data on the website since it’s being uploaded elsewhere, and I’ve also noticeably freed up space on my FTP. Additionally, since I now have a lot of free space on Dropbox, I don’t need to periodically save data to my own disk; I can keep it in the cloud and accessible to users. For me, this is truly a brilliant solution for data uploads via forms.