
To use Jetpack WebGPU, your project must meet the following minimum requirements:
- Minimum API Level: Android API 24 (Nougat) or higher is required.
- Hardware: Devices supporting Vulkan 1.1+ are preferred for the backend.
- Compatibility Mode and OpenGL ES Support: Using WebGPU with compatibility mode is possible by setting the standardized
featureLeveloption tocompatibilitywhile requesting theGPUAdapter.
// Example of requesting an adapter with "compatibility" mode enabled: val adapter = instance.requestAdapter( GPURequestAdapterOptions(featureLevel = FeatureLevel.Compatibility)) Installation & setup
Prerequisites:
Android Studio: Download the latest version of Android Studio from the official website and follow the instructions given in the Android Studio Installation Guide.
Create a new project
Once Android Studio is installed, follow these steps to set up your WebGPU project:
- Start a New Project: Open Android Studio and click on New Project.
Select a template: Choose the Empty Activity template in Android Studio and click Next.
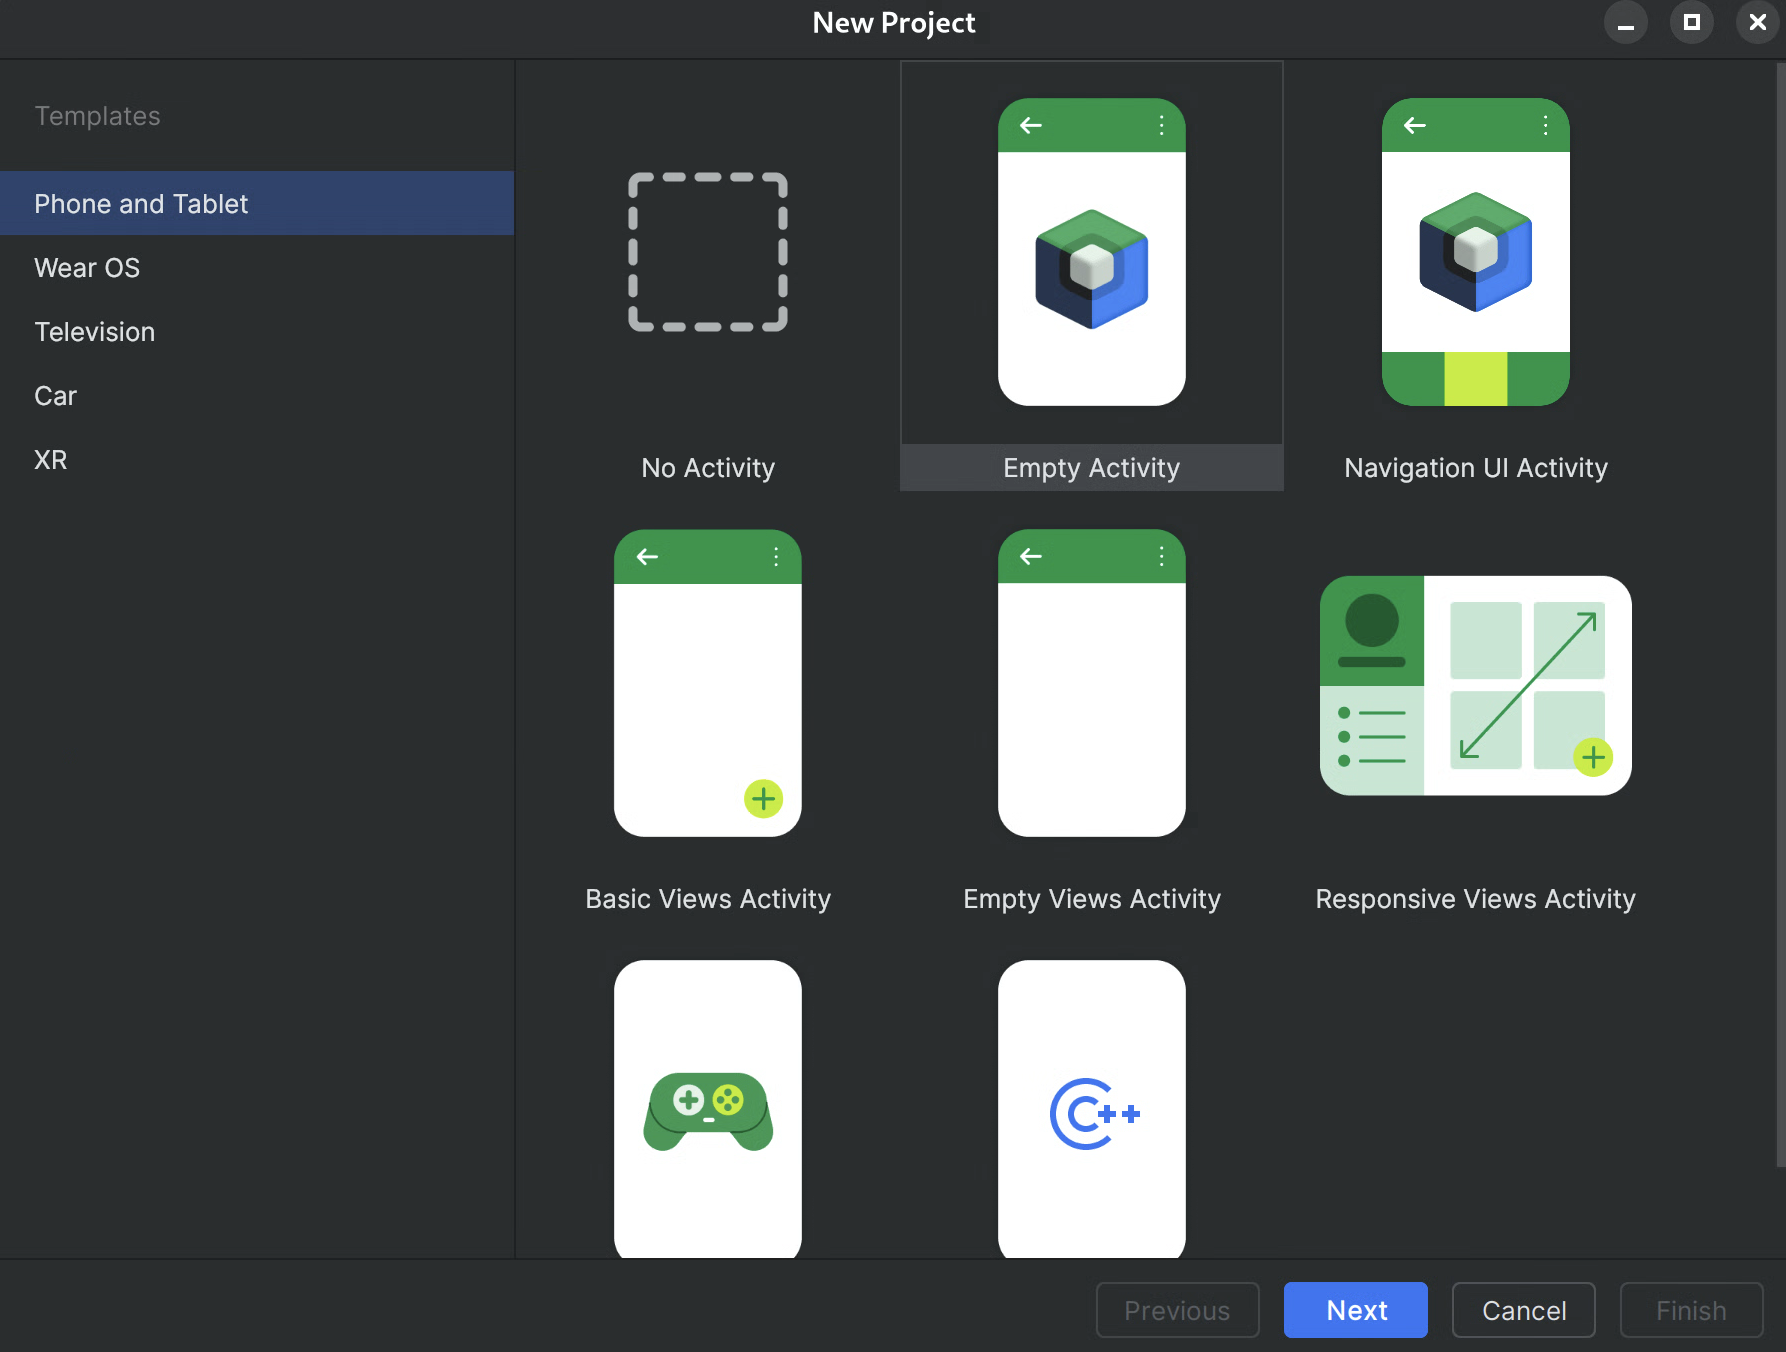
Figure 1.Creating a new project in Android Studio Configure your project:
- Name: Give your project a name (e.g., "JetpackWebGPUSample").
- Package Name: Verify that the package name matches your chosen namespace (e.g., com.example.webgpuapp).
- Language: Select Kotlin.
- Minimum SDK: Select API 24: Android 7.0 (Nougat) or higher, as recommended for this library.
- Build Configuration Language: It is recommended to use Kotlin DSL (build.gradle.kts) for modern dependency management.
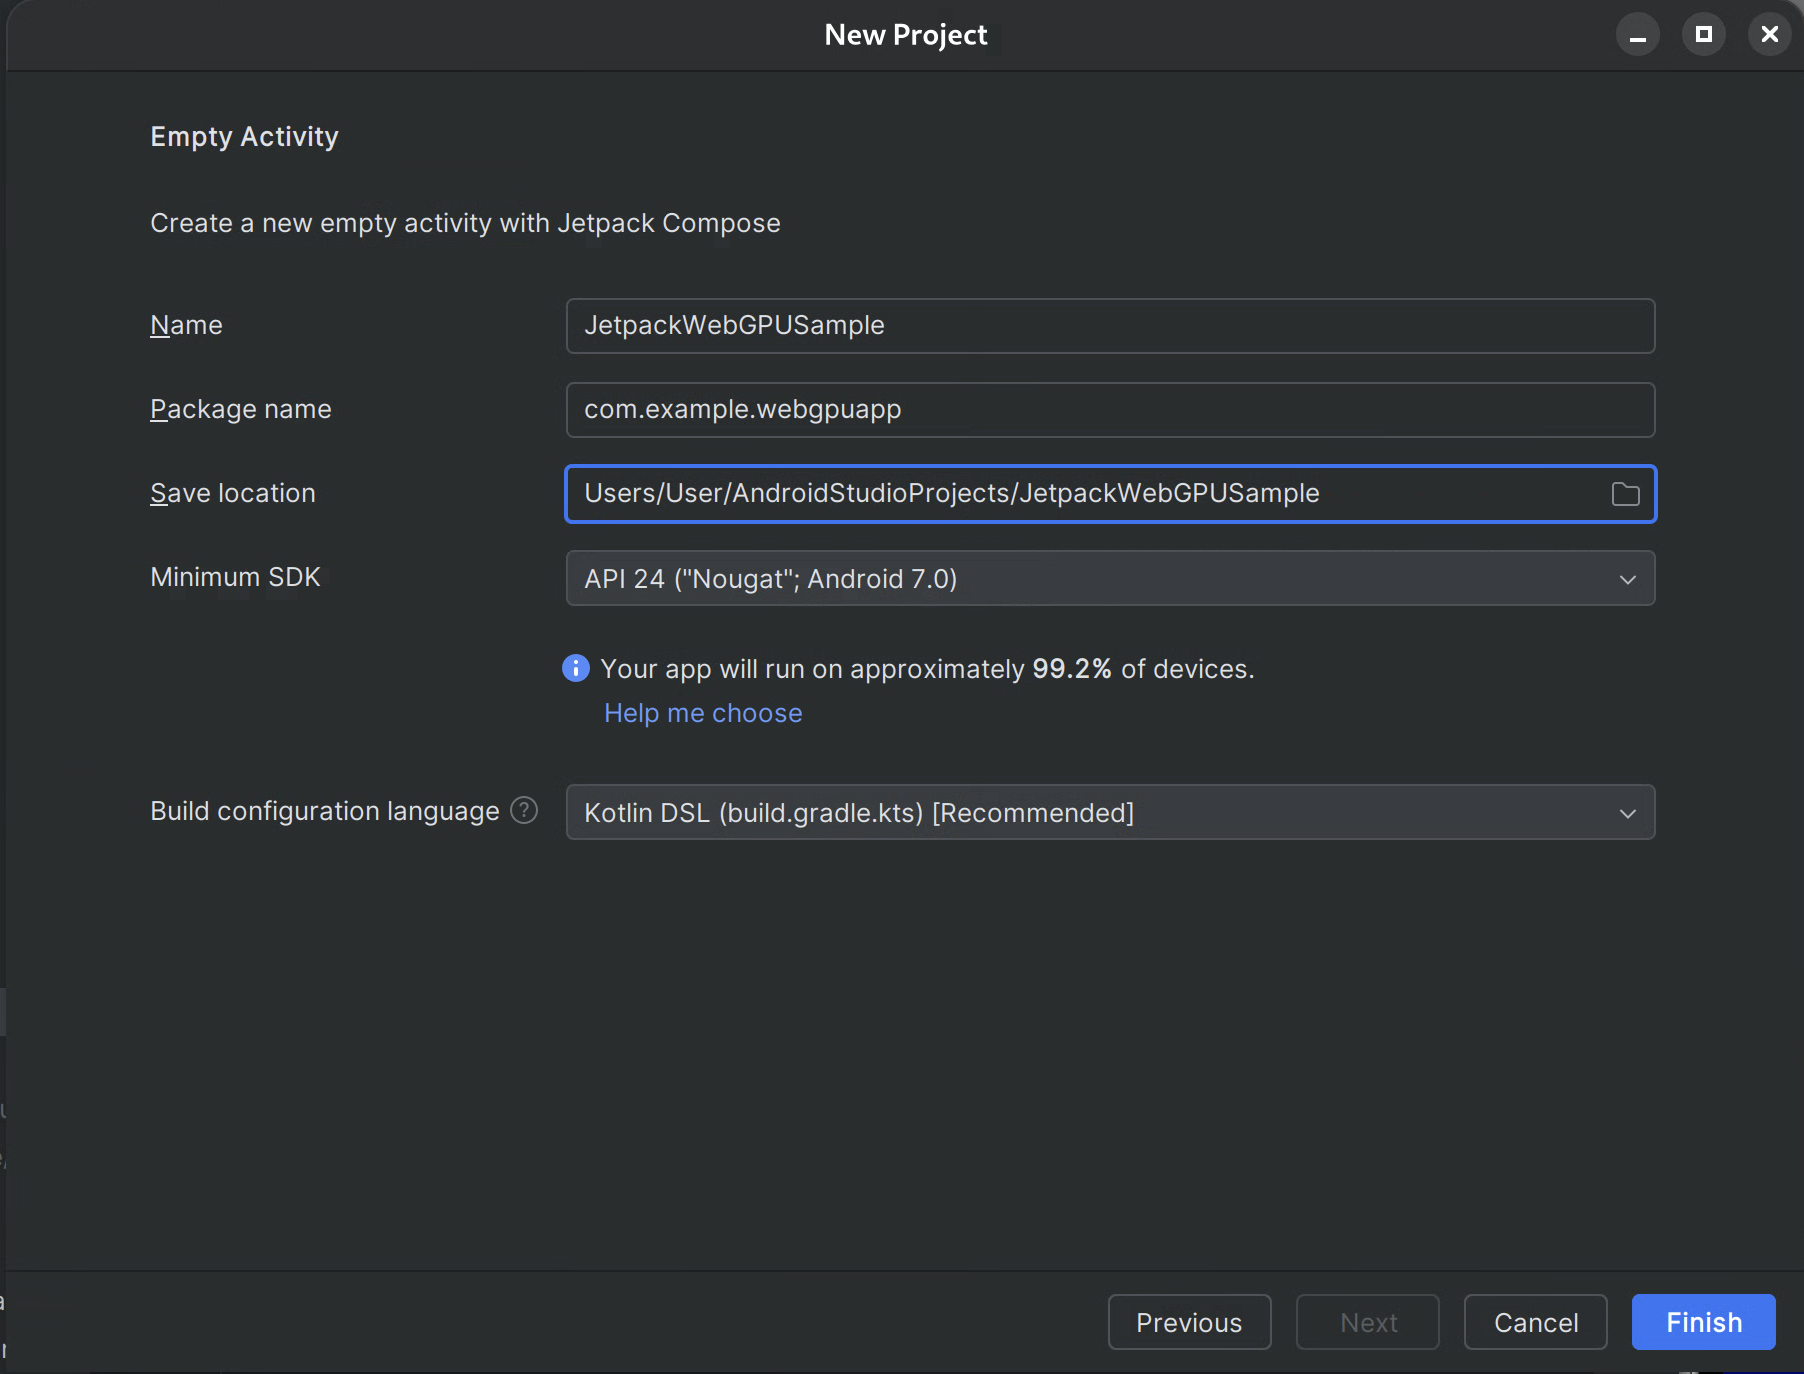
Figure 2.Starting with an empty activity Finish: Click Finish and wait for Android Studio to sync your project files.
Add WebGPU Jetpack library
- Add the
googlerepository tosettings.gradleas described in Use a Jetpack library in your app - Add the dependencies for the artifacts you need in the build.gradle file for your app or module:
- Note: Check webgpu | Jetpack | Android Developers for the latest library version
The androidx.webgpu library contains the WebGPU NDK .so library files as well as the managed code interfaces.
You can update the library version by updating your build.gradle and synchronizing your project with gradle files using the "Sync Project" button in Android Studio.
High-level architecture
WebGPU rendering within an Android application is run on a dedicated rendering thread to maintain the responsiveness of the UI.
- UI Layer: The UI is built with Jetpack Compose. A WebGPU drawing surface is integrated into the Compose hierarchy using
AndroidExternalSurface. - Rendering Logic: A specialized class (e.g., WebGpuRenderer) is responsible for managing all WebGPU objects and coordinating the rendering loop.
- The Shader Layer: WGSL shader code stored in res or string constants.

Step-by-step: sample app
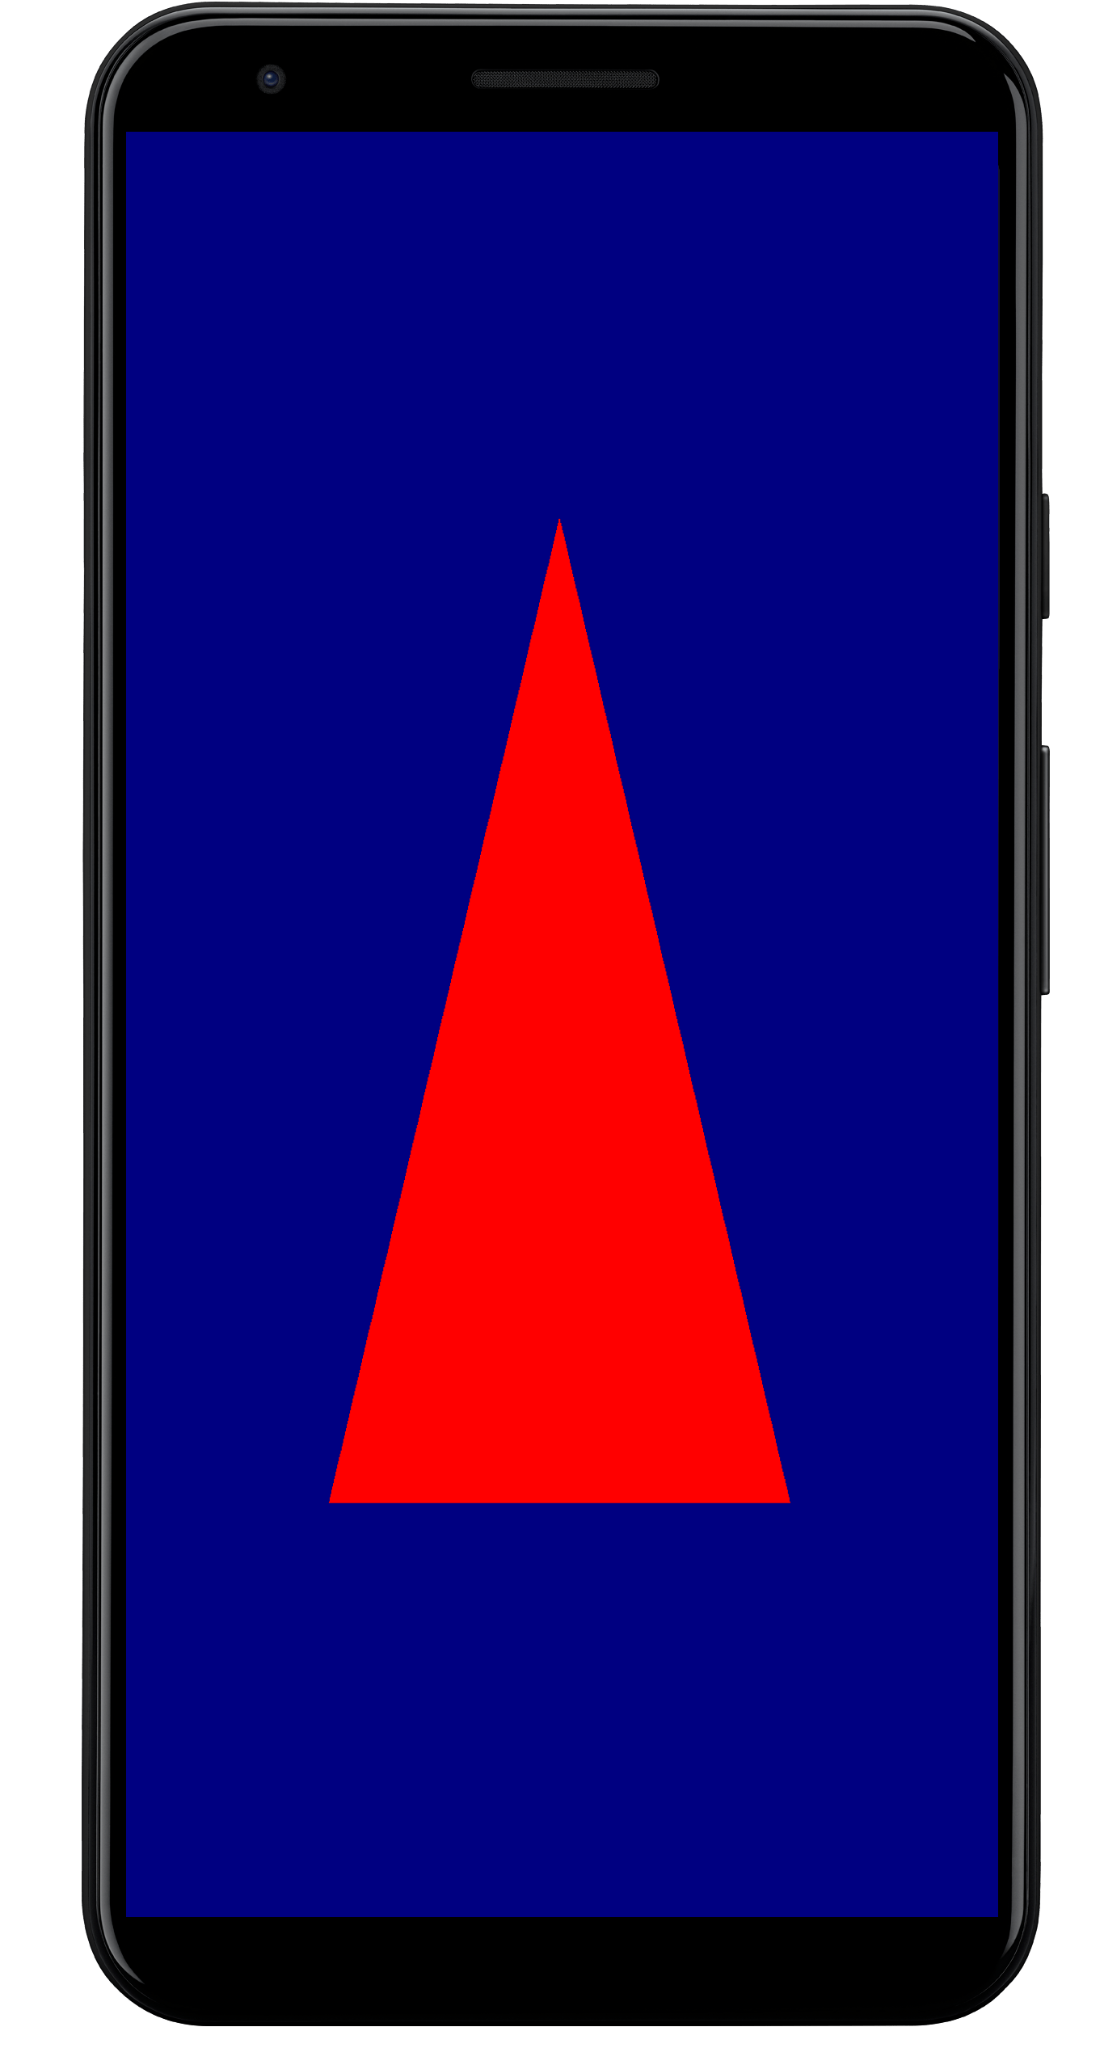
This section walks through the essential steps required to render a colored triangle on the screen, demonstrating the core WebGPU workflow.
The main Activity
class MainActivity : ComponentActivity() { override fun onCreate(savedInstanceState: Bundle?) { super.onCreate(savedInstanceState) setContent { WebGpuSurface() } } } The external surface Composable
Create a new file named WebgpuSurface.kt. This Composable wraps the AndroidExternalSurface to provide a bridge between Compose and your renderer.
@Composable fun WebGpuSurface(modifier: Modifier = Modifier) { // Create and remember a WebGpuRenderer instance. val renderer = remember { WebGpuRenderer() } AndroidExternalSurface( modifier = modifier.fillMaxSize(), ) { // This block is called when the surface is created or resized. onSurface { surface, width, height -> // Run the rendering logic on a background thread. withContext(Dispatchers.Default) { try { // Initialize the renderer with the surface renderer.init(surface, width, height) // Render a frame. renderer.render() } finally { // Clean up resources when the surface is destroyed. renderer.cleanup() } } } } } Set up the renderer
Create a WebGpuRenderer class in WebGpuRenderer.kt. This class will handle the heavy lifting of communicating with the GPU.
First, define the class structure and the variables:
class WebGpuRenderer() { private lateinit var webGpu: WebGpu private lateinit var renderPipeline: GPURenderPipeline } Initialization: Next, implement the init function to create the WebGPU instance and configure the surface. This function is called by the AndroidExternalSurface scope inside the external surface composable we created earlier.
Note: The init function uses createWebGpu, a helper method (part of androidx.webgpu.helper) to streamline setup. This utility creates the WebGPU instance, selects an adapter, and requests a device.
// Inside WebGpuRenderer class suspend fun init(surface: Surface, width: Int, height: Int) { // 1. Create Instance & Device webGpu = createWebGpu(surface) val device = webGpu.device // 2. Setup Pipeline (compile shaders) initPipeline(device) // 3. Configure the Surface webGpu.webgpuSurface.configure( GPUSurfaceConfiguration( device, width, height, TextureFormat.RGBA8Unorm, ) ) } The androidx.webgpu library includes JNI and .so files, that are automatically linked and managed by the build system. The helper method createWebGpu takes care of loading the bundled libwebgpu_c_bundled.so.
Pipeline setup
Now that we have a device, we need to tell the GPU how to draw our triangle. We do this by creating a "pipeline" that contains our shader code (written in WGSL).
Add this private helper function to your WebGpuRenderer class to compile the shaders and create the render pipeline.
// Inside WebGpuRenderer class private fun initPipeline(device: GPUDevice) { val shaderCode = """ @vertex fn vs_main(@builtin(vertex_index) vertexIndex : u32) -> @builtin(position) vec4f { const pos = array(vec2f(0.0, 0.5), vec2f(-0.5, -0.5), vec2f(0.5, -0.5)); return vec4f(pos[vertexIndex], 0, 1); } @fragment fn fs_main() -> @location(0) vec4f { return vec4f(1, 0, 0, 1); } """ // Create Shader Module val shaderModule = device.createShaderModule( GPUShaderModuleDescriptor(shaderSourceWGSL = GPUShaderSourceWGSL(shaderCode)) ) // Create Render Pipeline renderPipeline = device.createRenderPipeline( GPURenderPipelineDescriptor( vertex = GPUVertexState( shaderModule, ), fragment = GPUFragmentState( shaderModule, targets = arrayOf(GPUColorTargetState(TextureFormat.RGBA8Unorm)) ), primitive = GPUPrimitiveState(PrimitiveTopology.TriangleList) ) ) } Draw a frame
With the pipeline ready, we can now implement the render function. This function acquires the next available texture from the screen, records drawing commands, and submits them to the GPU.
Add this method to your WebGpuRenderer class:
// Inside WebGpuRenderer class fun render() { if (!::webGpu.isInitialized) { return } val gpu = webGpu // 1. Get the next available texture from the screen val surfaceTexture = gpu.webgpuSurface.getCurrentTexture() // 2. Create a command encoder val commandEncoder = gpu.device.createCommandEncoder() // 3. Begin a render pass (clearing the screen to blue) val renderPass = commandEncoder.beginRenderPass( GPURenderPassDescriptor( colorAttachments = arrayOf( GPURenderPassColorAttachment( GPUColor(0.0, 0.0, 0.5, 1.0), surfaceTexture.texture.createView(), loadOp = LoadOp.Clear, storeOp = StoreOp.Store, ) ) ) ) // 4. Draw renderPass.setPipeline(renderPipeline) renderPass.draw(3) // Draw 3 vertices renderPass.end() // 5. Submit and Present gpu.device.queue.submit(arrayOf(commandEncoder.finish())) gpu.webgpuSurface.present() } Resource cleanup
Implement the cleanup function, which is called by the WebGpuSurface when the surface is destroyed.
// Inside WebGpuRenderer class fun cleanup() { if (::webGpu.isInitialized) { webGpu.close() } } Rendered output
Sample app structure
It is a good practice to decouple your rendering implementation from your UI logic, as in the structure used by the sample app:
app/src/main/ ├── java/com/example/app/ │ ├── MainActivity.kt // Entry point │ ├── WebGpuSurface.kt // Composable Surface │ └── WebGpuRenderer.kt // Pure WebGPU logic - MainActivity.kt: The application entry point. It sets the content to the
WebGpuSurfaceComposable. - WebGpuSurface.kt: Defines the UI component using
[AndroidExternalSurface](/reference/kotlin/androidx/compose/foundation/package-summary#AndroidExternalSurface(androidx.compose.ui.Modifier,kotlin.Boolean,androidx.compose.ui.unit.IntSize,androidx.compose.foundation.AndroidExternalSurfaceZOrder,kotlin.Boolean,kotlin.Function1)). It manages theSurfacelifecycle scope, initializing the renderer when the surface is ready and cleaning up when it is destroyed. - WebGpuRenderer.kt: Encapsulates all WebGPU-specific logic (Device creation, Pipeline setup). It is decoupled from the UI, receiving only the
[Surface](/reference/android/view/Surface.html)and dimensions it needs to draw.
Lifecycle & resource management
Lifecycle management is handled by the Kotlin Coroutine scope provided by [AndroidExternalSurface](/reference/kotlin/androidx/compose/foundation/package-summary#AndroidExternalSurface(androidx.compose.ui.Modifier,kotlin.Boolean,androidx.compose.ui.unit.IntSize,androidx.compose.foundation.AndroidExternalSurfaceZOrder,kotlin.Boolean,kotlin.Function1)) within Jetpack Compose.
- Surface Creation: Initialize the
DeviceandSurfaceconfiguration at the start of theonSurfacelambda block. This code runs immediately when theSurfacebecomes available. - Surface Destruction: When the user navigates away or the
Surfaceis destroyed by the system, the lambda block is cancelled. Afinallyblock is executed, callingrenderer.cleanup()to prevent memory leaks. - Resizing: If the surface dimensions change,
AndroidExternalSurfacemay restart the block or directly handle updates depending on configuration, so the renderer always writes to a valid buffer.
Debugging & validation
WebGPU has mechanisms designed to validate input structures and capture runtime errors.
- Logcat: Validation errors are printed to the Android Logcat.
- Error Scopes: You can capture specific errors by encapsulating GPU commands within
[device.pushErrorScope()](/reference/kotlin/androidx/webgpu/GPUDevice#pushErrorScope(kotlin.Int))and `device.popErrorScope() blocks.
device.pushErrorScope(ErrorFilter.Validation) // ... potentially incorrect code ... device.popErrorScope { status, type, message -> if (status == PopErrorScopeStatus.Success && type != ErrorType.NoError) { Log.e("WebGPU", "Validation Error: $message") } } Performance tips
When programming in WebGPU, consider the following to avoid performance bottlenecks:
- Avoid Per-Frame Object Creation: Instantiate pipelines (
GPURenderPipeline), bind group layouts, and shader modules once during application setup to maximize reuse. - Optimize Buffer Usage: Update the contents of existing
GPUBuffersviaGPUQueue.writeBufferinstead of creating new buffers each frame. - Minimize State Changes: Group draw calls that share the same pipeline and bind groups to minimize driver overhead and improve rendering efficiency.