-
application.properties 配置 在application.properties 做相关配置。 在默认设置下,该服务注册中心也会将自己作为客户端来尝试注册它自己,所以我们需要禁用它的客户端注册行为
server.port=1111 #端口 eureka.client.register-with-eureka=false eureka.client.fetch-registry=false eureka.client.serviceUrl.defaultZone=http://localhost:${server.port}/eureka/ -
applicaiton 入口
@EnableEurekaServer //启动服务注册中心 @SpringBootApplication public class RegisterApplication { public static void main(String[] args) { SpringApplication.run(RegisterApplication.class, args); } } - POM 文件
<dependency> <groupId>org.springframework.cloud</groupId> <artifactId>spring-cloud-starter-eureka-server</artifactId> </dependency> - 配置
#配置服务实例的名字,在后续的调用中,可以直接通过该名字对此服务进行访问 spring.application.name=compute-service #指定服务实例的访问端口 server.port=2222 #指定要注册到上面的服务注册中心的位置 eureka.client.serviceUrl.defaultZone = http://localhost:1111/eureka/ - application.properties 配置文件
#配置服务实例的名字,在后续的调用中,可以直接通过该名字对此服务进行访问 spring.application.name=compute-service #指定服务实例的访问端口 server.port=2222 #指定要注册到上面的服务注册中心的位置 eureka.client.serviceUrl.defaultZone=http://127.0.0.1:1111/eureka/ - Application 入口
@EnableDiscoveryClient //该注释能激活DiscoveryClient的实现,实现controller中的信息输出 @SpringBootApplication public class ServiceApplication { public static void main(String[] args) { SpringApplication.run(ServiceApplication.class, args); } } - POM 文件
<dependency> <groupId>org.springframework.cloud</groupId> <artifactId>spring-cloud-starter-eureka-server</artifactId> </dependency> -
简介
- Ribbon是一个基于HTTP和TCP客户端的负载均衡器。
- Ribbon可以在通过客户端中配置的ribbonServerList服务端列表去轮询访问以达到均衡负载的作用。
- 当Ribbon与Eureka联合使用时,ribbonServerList会被DiscoveryEnabledNIWSServerList重写, 扩展成从Eureka注册中心中获取服务端列表。同时它也会用NIWSDiscoveryPing来取代IPing,它将职责委托给Eureka来确定服务端是否已经启动。
-
POM jar包
<dependency> <groupId>org.springframework.cloud</groupId> <artifactId>spring-cloud-starter-ribbon</artifactId> </dependency> - service代码
@Service public class ComputeService { @Autowired RestTemplate template; @HystrixCommand(fallbackMethod = "addServiceFallback") //开启熔断 public String addService() { return template.getForEntity("http://COMPUTE-SERVICE/add?a=10&b=20", String.class).getBody(); } public String addServiceFallback() { return "error"; } } - Application 程序入口
@EnableDiscoveryClient //该注释能激活DiscoveryClient的实现,实现controller中的信息输出 @SpringBootApplication @EnableCircuitBreaker //注解开启断路器功能: public class ClientApplication { @Bean @LoadBalanced //负载均衡 RestTemplate restTemplate() { return new RestTemplate(); } public static void main(String[] args) { SpringApplication.run(ClientApplication.class, args); } } - appliaction.properties 配置文件
spring.application.name=ribbon-consumer server.port=3333 eureka.client.serviceUrl.defaultZone=http://127.0.0.1:1111/eureka/ -
简介
- Feign是一个声明式的Web Service客户端,它使得编写Web Serivce客户端变得更加简单。
- 我们只需要使用Feign来创建一个接口并用注解来配置它既可完成。它具备可插拔的注解支持,包括Feign注解和JAX-RS注解
- Spring Cloud为Feign增加了对Spring MVC注解的支持,还整合了Ribbon和Eureka来提供均衡负载的HTTP客户端实现。
-
POM jar包
<dependency> <groupId>org.springframework.cloud</groupId> <artifactId>spring-cloud-starter-feign</artifactId> </dependency> - 服务代码
@FeignClient(value="compute-service",fallback=ComputeClientHystrix.class) //fallback 熔断支持 public interface ComputeService { @RequestMapping(method = RequestMethod.GET, value = "/add") Integer add(@RequestParam(value = "a") Integer a, @RequestParam(value = "b") Integer b); } - Application 入口
@EnableDiscoveryClient //该注释能激活DiscoveryClient的实现,实现controller中的信息输出 @SpringBootApplication @EnableFeignClients //@EnableFeignClients注解开启Feign功能, public class FeignClientApplication { public static void main(String[] args) { SpringApplication.run(FeignClientApplication.class, args); } } - application.properties 配置
pring.application.name=feign-consumer server.port=3334 eureka.client.serviceUrl.defaultZone=http://127.0.0.1:1111/eureka/ -
简介
- Spring Cloud中使用了Hystrix 来实现断路器的功能。
- Hystrix是Netflix开源的微服务框架套件之一,该框架目标在于通过控制那些访问远程系统、服务和第三方库的节点,从而对延迟和故障提供更强大的容错能力。
- Hystrix具备拥有回退机制和断路器功能的线程和信号隔离,请求缓存和请求打包,以及监控和配置等功能。
-
在eureka-ribbon的主类RibbonApplication中使用@EnableCircuitBreaker注解开启断路器功能:
@SpringBootApplication @EnableDiscoveryClient @EnableCircuitBreaker public class RibbonApplication { @Bean @LoadBalanced RestTemplate restTemplate() { return new RestTemplate(); } public static void main(String[] args) { SpringApplication.run(RibbonApplication.class, args); } } - 在使用ribbon消费服务的函数上增加@HystrixCommand注解来指定回调方法。
@Service public class ComputeService { @Autowired RestTemplate restTemplate; @HystrixCommand(fallbackMethod = "addServiceFallback") public String addService() { return restTemplate.getForEntity("http://COMPUTE-SERVICE/add?a=10&b=20", String.class).getBody(); } public String addServiceFallback() { return "error"; } } -
说明
- Spring Cloud Config为服务端和客户端提供了分布式系统的外部化配置支持
- 配置服务器为各应用的所有环境提供了一个中心化的外部配置。
- Spring Cloud Config也提供本地存储配置的方式。
我们只需要设置属性spring.profiles.active=native,Config Server会默认从应用的src/main/resource目录下检索配置文件。
也可以通过spring.cloud.config.server.native.searchLocations=file:F:/properties/属性来指定配置文件的位置。
虽然Spring Cloud Config提供了这样的功能,但是为了支持更好的管理内容和版本控制的功能,还是推荐使用git的方式。
-
pom.xml中引入spring-cloud-config-server
<dependency> <groupId>org.springframework.cloud</groupId> <artifactId>spring-cloud-config-server</artifactId> </dependency> - applicaiton 入口 @EnableConfigServer注解,开启Config Server
@EnableConfigServer @SpringBootApplication public class Application { public static void main(String[] args) { new SpringApplicationBuilder(Application.class).web(true).run(args); } } - application.properties 中配置服务信息以及git信息
spring.application.name=config-server server.port=7001 # git管理配置 spring.cloud.config.server.git.uri=http://git.oschina.net/didispace/SpringBoot-Learning/ #配置git仓库位置 spring.cloud.config.server.git.searchPaths=Chapter9-1-4/config-repo #配置仓库路径下的相对搜索位置,可以配置多个 spring.cloud.config.server.git.username=username spring.cloud.config.server.git.password=password -
验证
- URL与配置文件的映射关系如下:
- /{application}/{profile}[/{label}]
- /{application}-{profile}.yml
- /{label}/{application}-{profile}.yml
- /{application}-{profile}.properties
- /{label}/{application}-{profile}.properties
上面的url会映射{application}-{profile}.properties对应的配置文件,{label}对应git上不同的分支,默认为master
- pom 文件
<dependency> <groupId>org.springframework.boot</groupId> <artifactId>spring-boot-starter-web</artifactId> </dependency> - bootstrap.properties
#对应前配置文件中的{application}部分 spring.application.name=didispace #对应前配置文件中的{profile}部分 spring.cloud.config.profile=prod #对应前配置文件的git分支 spring.cloud.config.label=master #配置中心的地址 spring.cloud.config.uri=http://localhost:7001/ 注意:属性必须配置在bootstrap.properties中,因为config配置会先于application.properties。bootstrap 先于 application
- Controller 使用
后在需要自动更新配置变量的Java类上,使用注解 @RefreshScope 修饰。@Value 来获取值
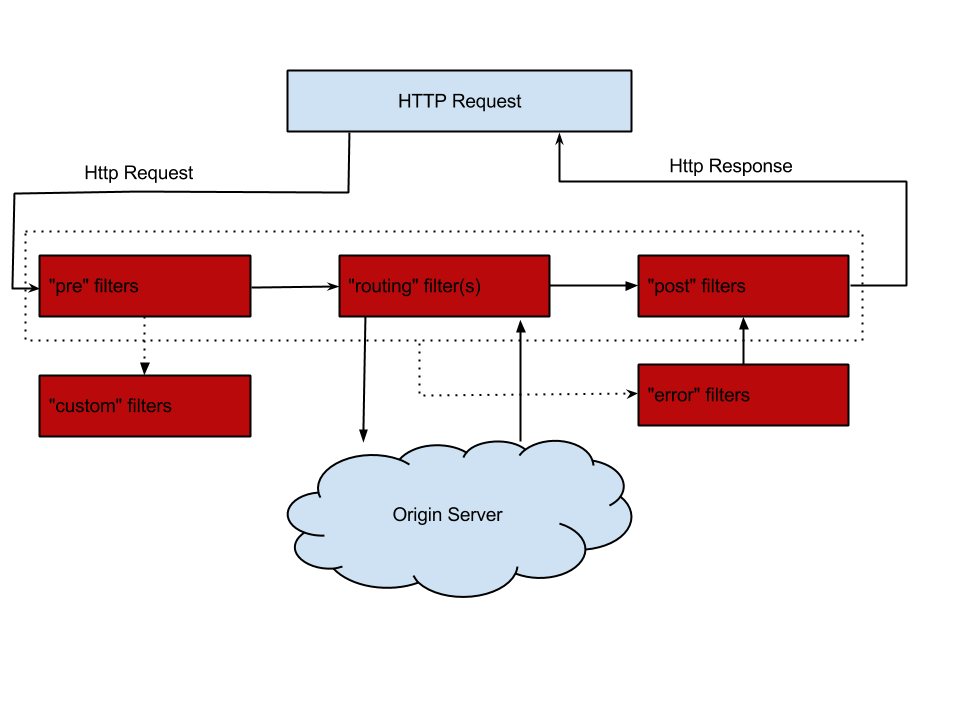
@RefreshScope @RestController class TestController { @Value("${from}") private String from; @RequestMapping("/from") public String from() { return this.from; } } - Zuul的主要功能是路由和过滤器。路由功能是微服务的一部分。包括一下功能
- Authentication
- Insights
- Stress Testing
- Canary Testing
- Dynamic Routing
- Service Migration
- Load Shedding
- Security
- Static Response handling
- Active/Active traffic management
- pom 文件
<dependency> <groupId>org.springframework.cloud</groupId> <artifactId>spring-cloud-starter-zuul</artifactId> </dependency> <dependency> <groupId>org.springframework.cloud</groupId> <artifactId>spring-cloud-starter-eureka</artifactId> </dependency> - application 入口
@EnableZuulProxy //注解开启Zuul @SpringCloudApplication //整合了@SpringBootApplication、@EnableDiscoveryClient、@EnableCircuitBreaker public class Application { public static void main(String[] args) { new SpringApplicationBuilder(Application.class).web(true).run(args); } @Bean public AccessFilter accessFilter() { return new AccessFilter(); } } - applicaiton.properties 配置文件
spring.application.name=api-gateway server.port=5555 # routes to url zuul.routes.api-a-url.path=/api-a-url/** zuul.routes.api-a-url.url=http://localhost:2222/ zuul.routes.api-a.path=/api-a/** zuul.routes.api-a.serviceId=service-A zuul.routes.api-b.path=/api-b/** zuul.routes.api-b.serviceId=service-B eureka.client.serviceUrl.defaultZone=http://localhost:1111/eureka/ 其中api-a-url 是自己定义的,可以随意。请求的话,是path -> url的映射。
- 服务过滤
- 在服务网关中定义过滤器只需要继承ZuulFilter抽象类实现其定义的四个抽象函数就可对请求进行拦截与过滤。
public class AccessFilter extends ZuulFilter{ private static Logger log = LoggerFactory.getLogger(AccessFilter.class); @Override public Object run() { RequestContext ctx = RequestContext.getCurrentContext(); HttpServletRequest request = ctx.getRequest(); log.info(String.format("%s request to %s", request.getMethod(), request.getRequestURL().toString())); Object accessToken = request.getParameter("accessToken"); if(accessToken == null) { log.warn("access token is empty"); ctx.setSendZuulResponse(false); ctx.setResponseStatusCode(401); return null; } log.info("access token ok"); return null; } /** * 返回一个boolean类型来判断该过滤器是否要执行,所以通过此函数可实现过滤器的开关。在上例中,我们直接返回true,所以该过滤器总是生效。 */ @Override public boolean shouldFilter() { // TODO Auto-generated method stub return true; } /** * 通过int值来定义过滤器的执行顺序 */ @Override public int filterOrder() { // TODO Auto-generated method stub return 0; } /** * pre:可以在请求被路由之前调用 routing:在路由请求时候被调用 post:在routing和error过滤器之后被调用 error:处理请求时发生错误时被调用 */ @Override public String filterType() { return "pre"; } } - filterType生命周期