# 一、 内容目录如下: 1. java环境搭建(初识java), 2. springboot2.x快速入门(搭建、开发、部署,从0-1), 3. springboot2.x整合常用业务场景(API开发、数据持久化、nosql、日志、异常、多环境配置等场景) # 二、 程序目录(常用业务场景) 1. HelloController: API编写 及 常用注解 2. ConfigXXXController: 多环境配置 及 读取配置 3. ExceptionController: 异常处理(自定义异常及异常捕获) 4. LogController: SpringBoot2.x 整合Logback框架(日志处理) 5. MybatisController: SpringBoot2.x 整合Mybatis 3.X(数据持久化) 5.1 MybatisController: SpringBoot2.x 整合Mybatis 事务处理 5.2 MybatisController: Mybatis PageHelper 分页查询(PageHelper 原理也是过滤器) 5.3 UpdateLogInterceptor: 基于 Mybatis Interceptor(过滤器) 实现操作日志的记录 6. ThyemeleafControoler: SpringBoot2.x 整合 Thymeleaf3.0(模板引擎) 7. RedisController: SpringBoot2.x 整合 Redis4.X (分布式缓存) 7.1 RedisClient: (Redis工具类) RedisAspect(Spring AOP 增加项目前缀) 7.2 JsonUtils: Json字符串序列化与反序列化工具类 8. TimeTakesAspect: 利用AOP 在controller api中添加程序运行耗时 9. SpringBoot2.x 整合 Actuator监控 10. SpringBoot2.x 整合 SpringBoot-Admin 2.1 11. SpringBoot2.x 整合单元测试 ``` # 三、 其他Java 基础学习文档 博客地址: https://blog.csdn.net/shuai_wy/article/category/7388774 todo: 接口路由未以 Restful格式标准命名,请留意,有时间会更新一下。
2019/2/19: 更新Mybatis PageHelper 分页, 更新Mybatis interceptor 过滤器记录用户更新日志
old record: 新增节点: 新增AOP记录controller api 耗时
- 执行DOC中的sql文件,mybatis 相关的DEMO 便可正常运行
- 打开porm.xml 文件中 注释掉的监控依赖,监控DEMO 便可正常运行
官方文档(十五分钟快速入门SpringBoot):https://spring.io/guides/gs/spring-boot/
(JDK + IDEA + maven + tomcat)
与C#环境对比如下:
- JDK:jre( ≈ .net CLR,java运行环境,包含了常用的基本的类库(net,util,sql,io,javax.servlet)+ jvm) + java工具(javac编译,jar打包,javadoc文档,java运行编译后的代码)
- IDEA: ≈ Visual studio
- maven : ≈ nuget
- tomcat or resin or Jetty: IIS
补充:java语法与C#非常相近,转换成本较低,C#语法基本上就是在java语法的基础上包了一层层语法糖
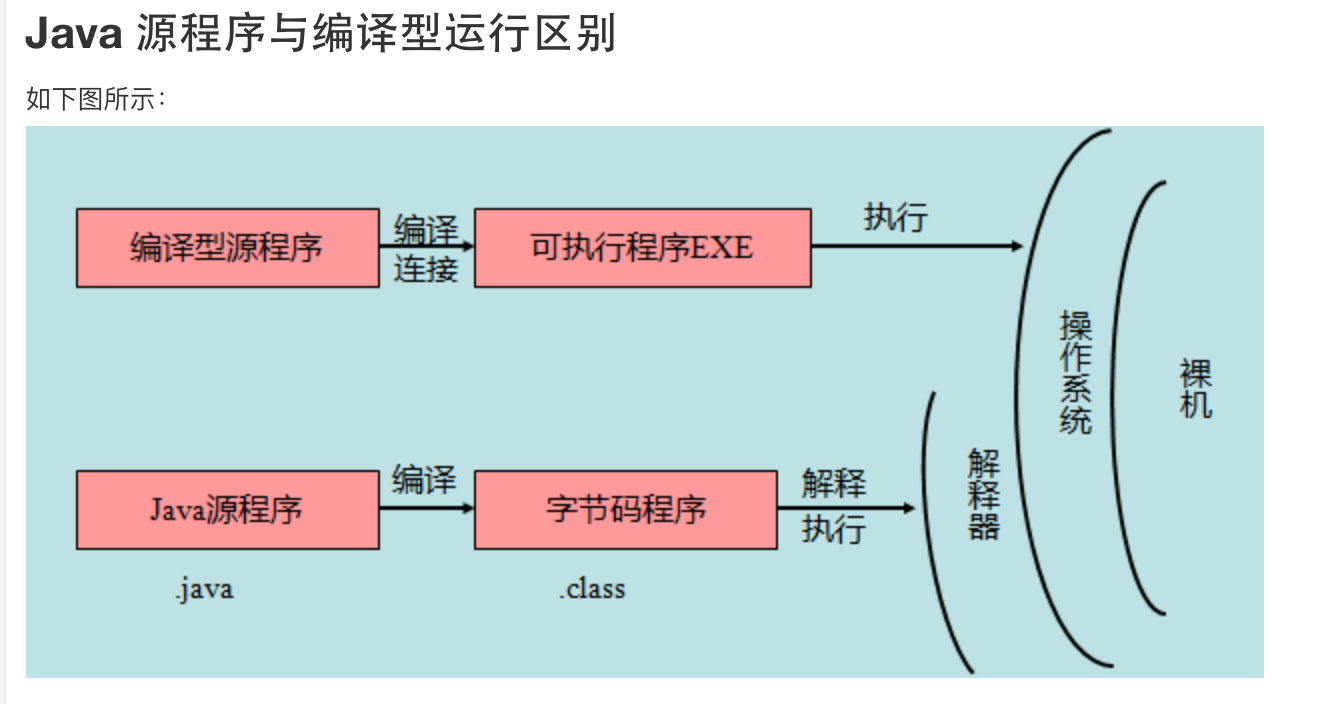
补充(java编译器和java解释器、JVM):
参考博客: https://www.cnblogs.com/chengdabelief/p/6576320.html
JVM:JVM有自己完善的硬件架构,如处理器、堆栈(Stack)、寄存器等,还具有相应的指令系统(字节码就是一种指令格式)。JVM屏蔽了与具体操作系统平台相关的信息,使得Java程序只需要生成在Java虚拟机上运行的目标代码(字节码),就可以在多种平台上不加修改地运行。JVM是Java平台无关的基础。JVM负责运行字节码:JVM把每一条要执行的字节码交给解释器,翻译成对应的机器码,然后由解释器执行。JVM解释执行字节码文件就是JVM操作Java解释器进行解释执行字节码文件的过程。
SpringBoot 轻量级框架,相对于SpringMVC,仅需要较少的配置,并升级了常用的注解(更加轻便),通过SpringBoot 我们可以更加专注于业务,而不是架构。
-
使用官网构建工具自动创建web应用(快速创建)
-
使用 IDEA 创建(手动创建)
-
目录文件结构讲解
src/main/java:存放代码 src/main/resources static: 存放静态文件,比如 css、js、image, (访问方式 http://localhost:8080/js/main.js) templates:存放静态页面jsp,html,tpl config:存放配置文件,application.properties resources: - 开发 "SpringBoot HelloWorld" (编写API常用注解介绍)
- IDEA RUN (F5, IDEA 可以直接将使用Vs快捷键)
- jar启动方式(用的较少,一般spirng boot是使用war进行部署的)
- mvn install 生成jar包
- java -jar xxx.jar (jar包方式)
- war包方式启动
- 修改porm.xml,改成war方式
- 修改启动类,extends SpringBootServletInitializer,并override方法
- mvn clean && mvn install 打包
- 将war包放至 tomcat webapps下
- tomcat/bin startup.bat,
- 访问localhost:8080/**项目名/**路径 (注意项目名,tomcat下可以部署多个项目的)
引入jar包后,不用重新启动,IDEA环境下rebuild则可以启动生效
- Controller上面配置
@PropertySource({"classpath":resource.property}) - 增加属性
@Value("{xxxx}") private String xx; - 配置实体集ServerSettings 需添加注解
@Component @PropertySource({"classpath:/config/config.properties","classpath:/config/server.properties"}) @ConfigurationProperties(prefix = "ask") - @Component:会扫描到它
- @PropertySource:注入来源,之所以用大括号,是因为数组形式,可以注入多个文件
- @ConfigurationProperties: 添加前缀,注意添加前缀之后,注入bean的方式,属性名称和配置文件里面的key一一对应,就不用加@Value 这个注解; 如果不一样,就要加 @value("${XXX}",xxx表示全名比如: ask.search)
- resource
- applicaition.properties
- applicaiton-dev.properties
- applicaiton-pro.properties
在 applicaiton.properties 选择要激活的文件,如:使用测试配置文件
// 激活测试配置 spring.profiles.active=dev 所以, 需要区分环境的配置,可以放置 application-{profile}.properties中,通用配置可以放到 applicaition.properties中。
也可以在运行的时候,执行如下命令: java -jar xxx.jar --spring.profile.active=dev java -jar xxx.jar --spring.profile.active=prod
实现目标: 我们在程序中,ConfigMavenProfile Demo中使用了 @PropertySource({"classpath:/config/api.properties"})了, Resource/config 目录下,有两个环境 dev/prod, 我们需要将激活的环境配置文件copy 到 config目录下, 我们将使用以下步骤实现。
- porm.xml 文件中配置多个profile
<!--Maven Profiles 多环境配置 start--> <profiles> <!--开发环境--> <profile> <id>dev</id> <!--定义配置打包目录属性--> <properties> <profiles.active>dev</profiles.active> </properties> <activation> <activeByDefault>true</activeByDefault> </activation> </profile> <!--生产环境--> <profile> <id>prod</id> <properties> <profiles.active>prod</profiles.active> </properties> </profile> </profiles> - 使用文件copy插件
- 配置 maven copy 插件,使用我们选择激活的路径—— src/main/resources/config/${profiles.active}, copy 至 ${project.build.outputDirectory}/config/ 路径下。
补充: 可能有同学对 ${profiles.active} 不知道是什么意思,${profiles.active} 是我们在 标签下定义的常量
<build> <plugins> <plugin> <groupId>org.springframework.boot</groupId> <artifactId>spring-boot-maven-plugin</artifactId> </plugin> <!-- 文件拷贝 --> <plugin> <artifactId>maven-resources-plugin</artifactId> <executions> <execution> <id>copy-resources</id> <phase>validate</phase> <goals> <goal>copy-resources</goal> </goals> <configuration> <outputDirectory>${project.build.outputDirectory}/config/</outputDirectory> <resources> <resource> <directory>src/main/resources/config/${profiles.active}</directory> <filtering>false</filtering> </resource> </resources> </configuration> </execution> </executions> </plugin> </plugins> <!--<filters>--> <!--<filter>src/main/resources/config/${profiles.active}/config.properties</filter>--> <!--<filter>src/main/resources/config/${profiles.active}/server.properties</filter>--> <!--</filters>--> <!--Maven Profiles 多环境配置 start--> <resources> <resource> <directory>src/main/resources</directory> <!-- 资源根目录排除各环境的配置,使用单独的资源目录来指定 --> <excludes> <exclude>config/**</exclude> </excludes> </resource> </resources> </build> <!--Maven Profiles 多环境配置 end--> - package 打包指定 profile mvn package –P prod
- 增加异常处理类 ExceptionHandler
添加 @RestControllerAdvice 注解 或 ControllerAdvice注解
- 在异常处理类中,增加异常处理方法
在方法上添加 @ExceptionHandler(value=CustomerException.class)注解 详见 CustomerExceptionHandler类及自定义CustomerException类(继承Excption,扔出异常时使用)
-
常用处理java的日志组件 slf4j,log4j,logback,common-logging 等
-
logback介绍:基于Log4j基础上大量改良,不能单独使用,推荐配合日志框架SLF4J来使用 logback当前分成三个模块:logback-core,logback-classic和logback-access; logback-core是其它两个模块的基础模块
-
配置文件:classpath:logback-spring.xml
-
调用语法
private Logger logger = LoggerFactory.getLogger(this.getClass()); logger.error("this is a error"); - logback-spring.xml 支持多环境配置 参考博文: https://blog.csdn.net/qianyiyiding/article/details/76565810
<springProfile name="production"> <root level="DEBUG"> <!--<appender-ref ref="FILEERROR"/>--> <!--<appender-ref ref="FILEWARN"/>--> <!--<appender-ref ref="FILEINFO"/>--> <!--<appender-ref ref="DBAPPENDER"/>--> <appender-ref ref="STDOUT"/> </root> </springProfile> <springProfile name="dev"> <root level="DEBUG"> <!--<appender-ref ref="FILEERROR"/>--> <!--<appender-ref ref="FILEWARN"/>--> <!--<appender-ref ref="FILEINFO"/>--> <!--<appender-ref ref="DBAPPENDER"/>--> <appender-ref ref="CONSOLE"/> </root> </springProfile> TODO:
<dependency> <groupId>org.springframework.boot</groupId> <artifactId>spring-boot-starter-thymeleaf</artifactId> </dependency> # SpringBoot2.x 整合thymeleaf #开发时关闭缓存,不然没法看到实时页面 spring.thymeleaf.cache=false spring.thymeleaf.mode=HTML5 #前缀 spring.thymeleaf.prefix=classpath:/templates/ #编码 spring.thymeleaf.encoding=UTF-8 #类型 #spring.thymeleaf.content-type=text/html #名称的后缀 spring.thymeleaf.suffix=.html @GetMapping("/hello_page") public Object helloPage() { return "/templates/customerError"; } - 页面
<h3 th:text="${hello}">hello</h3> - 控制器
@GetMapping("/hello_data_page") public Object helloPage(ModelMap modelMap) { modelMap.addAttribute("hello","hello SpringBoot2.x !"); return "tl/hello_data_page"; } -
介绍什么是actuator 官方介绍: Spring Boot包含许多附加功能,可帮助您在将应用程序投入生产时监视和管理应用程序。 可以选择使用HTTP端点或JMX来管理和监控您的应用程序,自动应用于审计,健康和指标收集;
一句话:springboot提供用于监控和管理生产环境的模块 官方文档:https://docs.spring.io/spring-boot/docs/2.1.0.BUILD-SNAPSHOT/reference/htmlsingle/#production-ready
-
加入依赖
<dependency> <groupId>org.springframework.boot</groupId> <artifactId>spring-boot-starter-actuator</artifactId> </dependency> - 加入上述依赖后,访问几个url 同时可以在配置中,添加配置,限定可访问内容
/actuator/health /actuator/info /actuator