Posts

Showing posts with the label tutorial

Colors Galore Crazy Quilting Tutorial "Updated"

Image
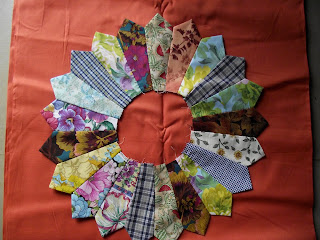
I really love autumn colors, but when its summer, I love summer colors and about the only time I give in to the seasonal colors is winter and Christmas. Do you have favorite colors? These Dresden Plates are coming along and you can read this post if you like by clicking on this link.  I love to make a quilt 'pop', you know?  I lean toward the color most bright against the project I'm working on. I don't care a hoot for matchy matchy! In the quilt "Oranga Finished Yet?" I leave the rush of orange to take it to more calmer colors so the orange stands out and makes a statement of some sort. For example, this "Oranga Finished Yet?" is a freeform improvisational style of quilt. In my mind, improvisational work is just that, without a plan. I use all colors in my work, this is part of what makes my upcoming book so different from other Crazy Quilting artists in the world. I don't live my life by the book or craft my art ...

Crazy Quilting Tute #1

Image
I invite you to think back to any time you've seen a crazy quilt? Most people are drawn to the 'crazy' way these special quilts look or maybe the hand stitched embroidery or the other multitudes of embellishments you can buy these days were the creativity that drew you in! Personally, I love the look of the old time crazy quilts with lots of bold colors, endless amounts of hand stitching that really spells out "hand made" and you won't need a rotary cutter etc! For those of  you who have already made one or more crazy quilts, this little tutorial can be a gift to a special friend.  Carli's Special Effects Supplies:  Used top quality evening wear clothing, even flimsy stuff upholstery fabrics of a light texture labels from clothing ribbons, lace, buttons Welcome to this first tutorial of four on how you can achieve a fabulous one of a kind crazy quilt! Starting point! Foundation muslin cut into 12.5 in.squares (Be...

Carli's Freestyle Dresden Plate Template & Tutorial

Image
I make my own templates. Its quite simple, trust is involved and careful storage of similar sized templates are essential. As you know from reading my blog, I like to be frugal with supplies and tools. I used the cardboard above decades ago and I still have it. I didn't have a template in the beginning. So I made my own. You start with making a straight line on cereal board. Placing a quilting ruler with the 60 degree line on the drawn straight line. Then draw a line upwards away from the original line. Repeat on the other side. Its your decision to decide what size of fan template you want?  In this photo above, you can see that I used a fabric fan piece to assist you in your fan development.  Here I used a template from a magazine wedge that I modified to fit my size of fan. This is a simple way to use something already made. You can even take another dresdent fan apart to discover the size of a finished plate. Its up to you. This is my sto...

Three Hour Fast Block Magic! Tutorial

Image
1.    Start with 5 fat quarters, one the focus fabric, 2 light colors and 2 dark colors.(Two Hour Table Runner Part One) 2.    Layer the FQ’s face up, 1 st light fabric, 1 st dark fabric, focus fabric, 2 nd light fabric, 2 nd dark fabric.(Step two photo) 3.    Make only 4 vertical cuts with rotary cutter across and through all layers of the FQ’s. Make these cuts off on any any that is workable for sewing together fast, try to vary the width of each cut, this is where it gets very individual. (Step 3 photo) 4.    Start with the far left stack of slices: ·       Take 1 top slice and move it to the bottom of the 1 st stack. ·       Moving to the right always, take 2 top slices and move to the bottom of 2nd stack. ·       Take 3 top slices and move to the bottom of 3 rd stack. ·       Take 4 top slices and move to t...