Downloaded 10 times

!["src/styles.css", "node_modules/@fortawesome/fontawesome-free-webfonts/css/fontawesome. css", "node_modules/@fortawesome/fontawesome-free-webfonts/css/fa-regular.css", "node_modules/@fortawesome/fontawesome-free-webfonts/css/fa-brands.css", "node_modules/@fortawesome/fontawesome-free-webfonts/css/fa-solid.css", "node_modules/ngx-toastr/toastr.css" ], Please don’t forget to restart the server. When you make any changes in the angular.json file. Otherwise, changes won’t reflect in your Angular project. First close the server then use the following command in Angular CLI. ng serve --open Go through this article to know more about a detailed explanation on setting up the Angular project using external dependencies from scratch. How to Setup Angular 7 Project using Bootstrap 4, SASS, Font Awesome, and Ng Bootstrap? 5. Firebase Account Set up + AngularFire2 Library Integration Go to Firebase website login using your email id. When you see given below screen click on Add Project section.](https://image.slidesharecdn.com/angular7firebase5crudoperationswithreactiveforms3-190109092736/75/Angular-7-Firebase5-CRUD-Operations-with-Reactive-Forms-4-2048.jpg)
![Go to src/environments/enviorment.ts and enviorment.prod.ts files in your project’s enviornments folder. Then add your firebase configuration details in both the environment files as given below. Open app.module.ts file and register the Firebase required services. // Firebase Modules import { AngularFireModule } from '@angular/fire'; import { AngularFireDatabaseModule } from '@angular/fire/database'; import { environment } from '../environments/environment'; @NgModule({ imports: [ AngularFireModule.initializeApp(environment.firebase), // Main Angular fire module AngularFireDatabaseModule // Firebase database module ] })](https://image.slidesharecdn.com/angular7firebase5crudoperationswithreactiveforms3-190109092736/75/Angular-7-Firebase5-CRUD-Operations-with-Reactive-Forms-8-2048.jpg)

![import { NgModule } from '@angular/core'; import { CommonModule } from '@angular/common'; // Use RouterModule, Routes for activating routing in angular import { RouterModule, Routes } from '@angular/router'; // Include components for in which router service to be used import { AddStudentComponent } from './add-student/add-student.component'; import { StudentsListComponent } from './students-list/students-list.component'; import { EditStudentComponent } from './edit-student/edit-student.component'; // Routes array define component along with the path name for url const routes: Routes = [ { path: '', redirectTo: '/register-student', pathMatch: 'full' }, { path: 'register-student', component: AddStudentComponent }, { path: 'view-students', component: StudentsListComponent }, { path: 'edit-student/:id', component: EditStudentComponent } ]; // Import RouterModule and inject routes array in it and dont forget to export the RouterModule @NgModule({ imports: [CommonModule,RouterModule.forRoot(routes)], exports: [RouterModule], declarations: [] })](https://image.slidesharecdn.com/angular7firebase5crudoperationswithreactiveforms3-190109092736/75/Angular-7-Firebase5-CRUD-Operations-with-Reactive-Forms-13-2048.jpg)
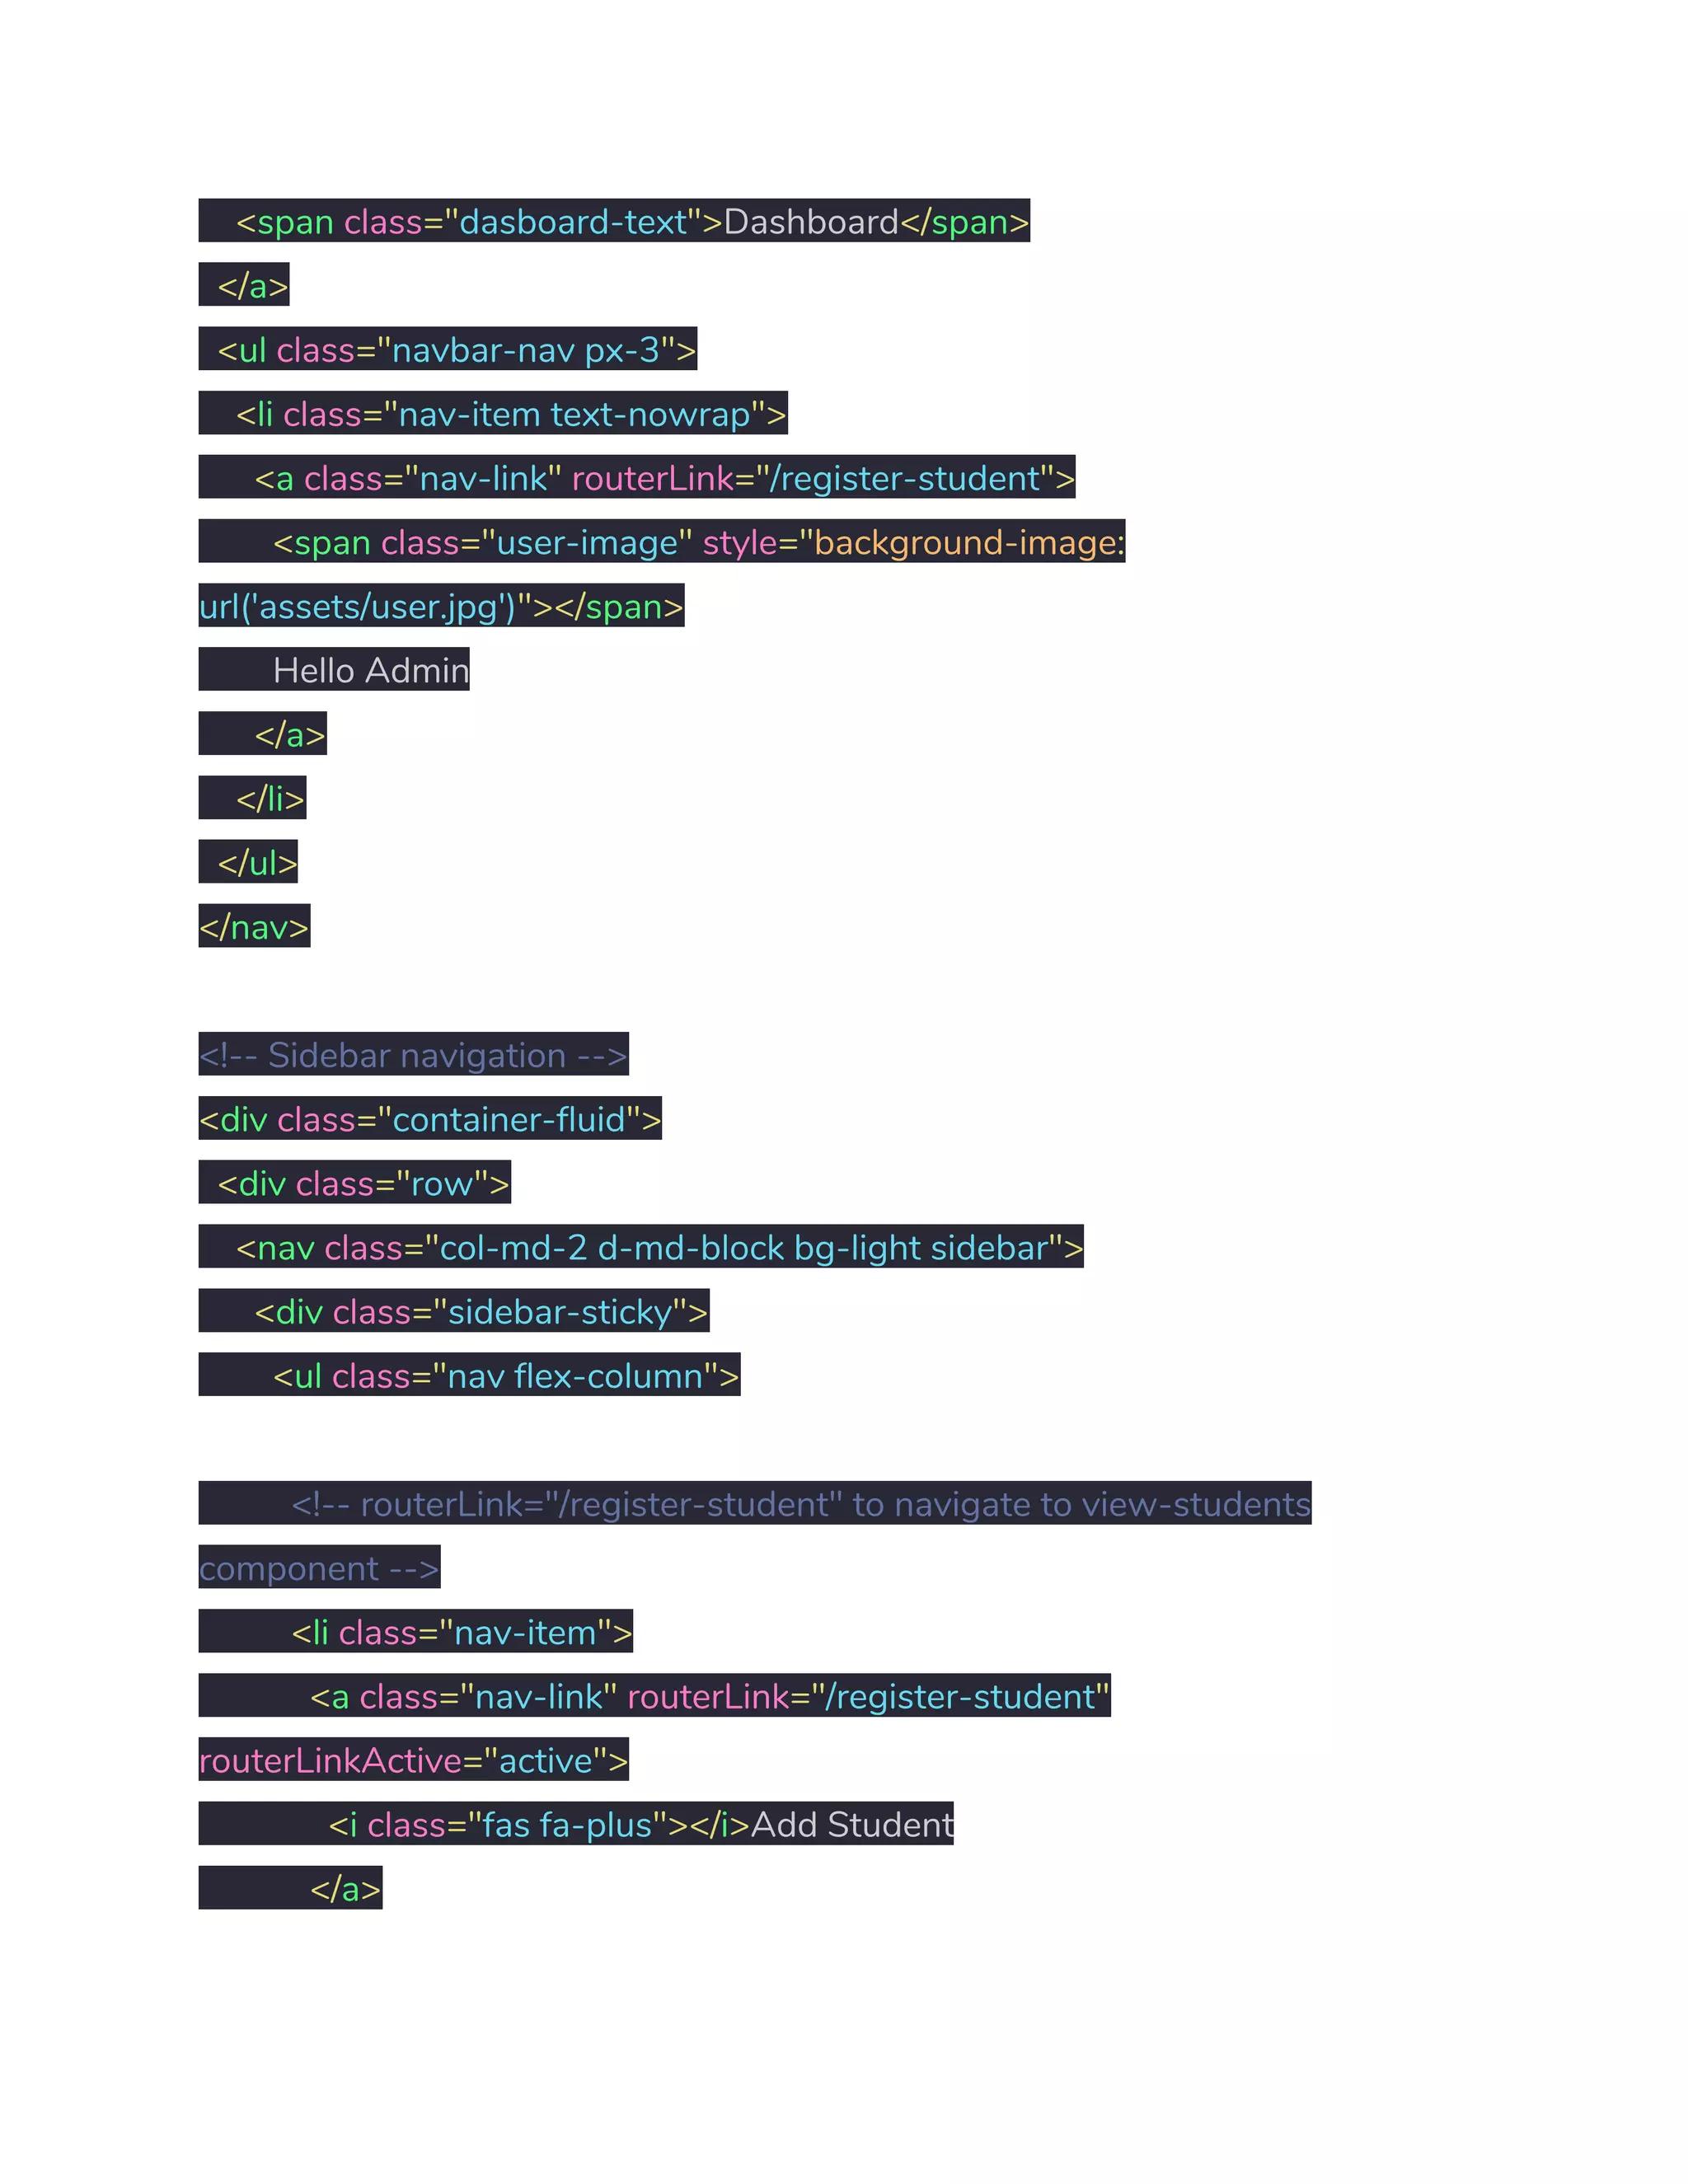
![export class AppRoutingModule { } Afterwards, Go to src > app > app.modules.ts and add the following code into app.module.ts. import { AppRoutingModule } from './/app-routing.module'; // AppRoutingModule Module @NgModule({ imports: [ AppRoutingModule // Declare AppRoutingModule into imports array ] }) Now go to src > app > app.component.html file to activate router service and layout for the student demo app. <!-- Top navigation --> <nav class="navbar navbar-dark fixed-top bg-dark flex-md-nowrap p-0 shadow"> <a class="navbar-brand col-sm-3 col-md-2 mr-0" routerLink="/register-student"> <img class="brand-logo" src="assets/logo-positronx-white.svg" alt="positronX.io Logo">](https://image.slidesharecdn.com/angular7firebase5crudoperationswithreactiveforms3-190109092736/75/Angular-7-Firebase5-CRUD-Operations-with-Reactive-Forms-14-2048.jpg)

![</div> 09. Integrate NGX-Toastr Module to Show Alert Messages We’ll be requiring NGX Toastr NPM module to show alert messages when an update occurs in student’s data. In order to install NGX Toastr, we’ll be using the following command. npm install ngx-toastr --save // @angular/animations package is a required dependency for the default toast npm install @angular/animations --save Then go to angular.json and add the following code in styles array. "styles": [ "node_modules/ngx-toastr/toastr.css" // Includes ngx-toastr's css ] Go to app.moudule.ts file and include this code for NGX Toastr // Import below modules for NGX Toastr import { BrowserAnimationsModule } from '@angular/platform-browser/animations'; import { ToastrModule } from 'ngx-toastr';](https://image.slidesharecdn.com/angular7firebase5crudoperationswithreactiveforms3-190109092736/75/Angular-7-Firebase5-CRUD-Operations-with-Reactive-Forms-17-2048.jpg)
![@NgModule({ imports: [ BrowserAnimationsModule, // required animations module ToastrModule.forRoot() // ToastrModule added ] }) class MainModule {} How to use NGX-Toastr in the ANgular Component? import { ToastrService } from 'ngx-toastr'; @Component({...}) export class YourComponent { constructor(private toastr: ToastrService) {} showSuccess() { this.toastr.success('You've Got It Successfully!'); } } To know more about ngx-toastr NPM module and its API please click on this link. 10. Use Reactive Form to Add Student in Firebase Database using CRUD Services Go to src > app > app.module.ts file and add the given below code within app.module.ts file to activate Reactive Forms service in your Angular project.](https://image.slidesharecdn.com/angular7firebase5crudoperationswithreactiveforms3-190109092736/75/Angular-7-Firebase5-CRUD-Operations-with-Reactive-Forms-18-2048.jpg)
![import { ReactiveFormsModule } from '@angular/forms'; // Reactive Form Module @NgModule({ imports: [ ReactiveFormsModule // Reactive forms module ] }) Afterwards, go to src > app > add-student.component.html file and add the following code. It contains Reactive Forms tags and form validation logic and HTML layout for add student component. <div class="pt-3 pb-2 mb-3 border-bottom"> <h1 class="h2">Add Student</h1> <p class="custom-text">A demo CRUD app for <strong>student record management system</strong> built with <strong>Angular6 and Firebase5</strong></p> </div> <!-- Student form --> <form [formGroup]="studentForm" (ngSubmit)="submitStudentData()" novalidate> // Declared formGroup="studentForm" to create Reactive form group, novalidate is used to disable HTML5 default validation <div class="row"> <div class="col-lg-5 col-md-12 col-sm-12"> <div class="row"> <div class="col-md-12 mb-3">](https://image.slidesharecdn.com/angular7firebase5crudoperationswithreactiveforms3-190109092736/75/Angular-7-Firebase5-CRUD-Operations-with-Reactive-Forms-19-2048.jpg)
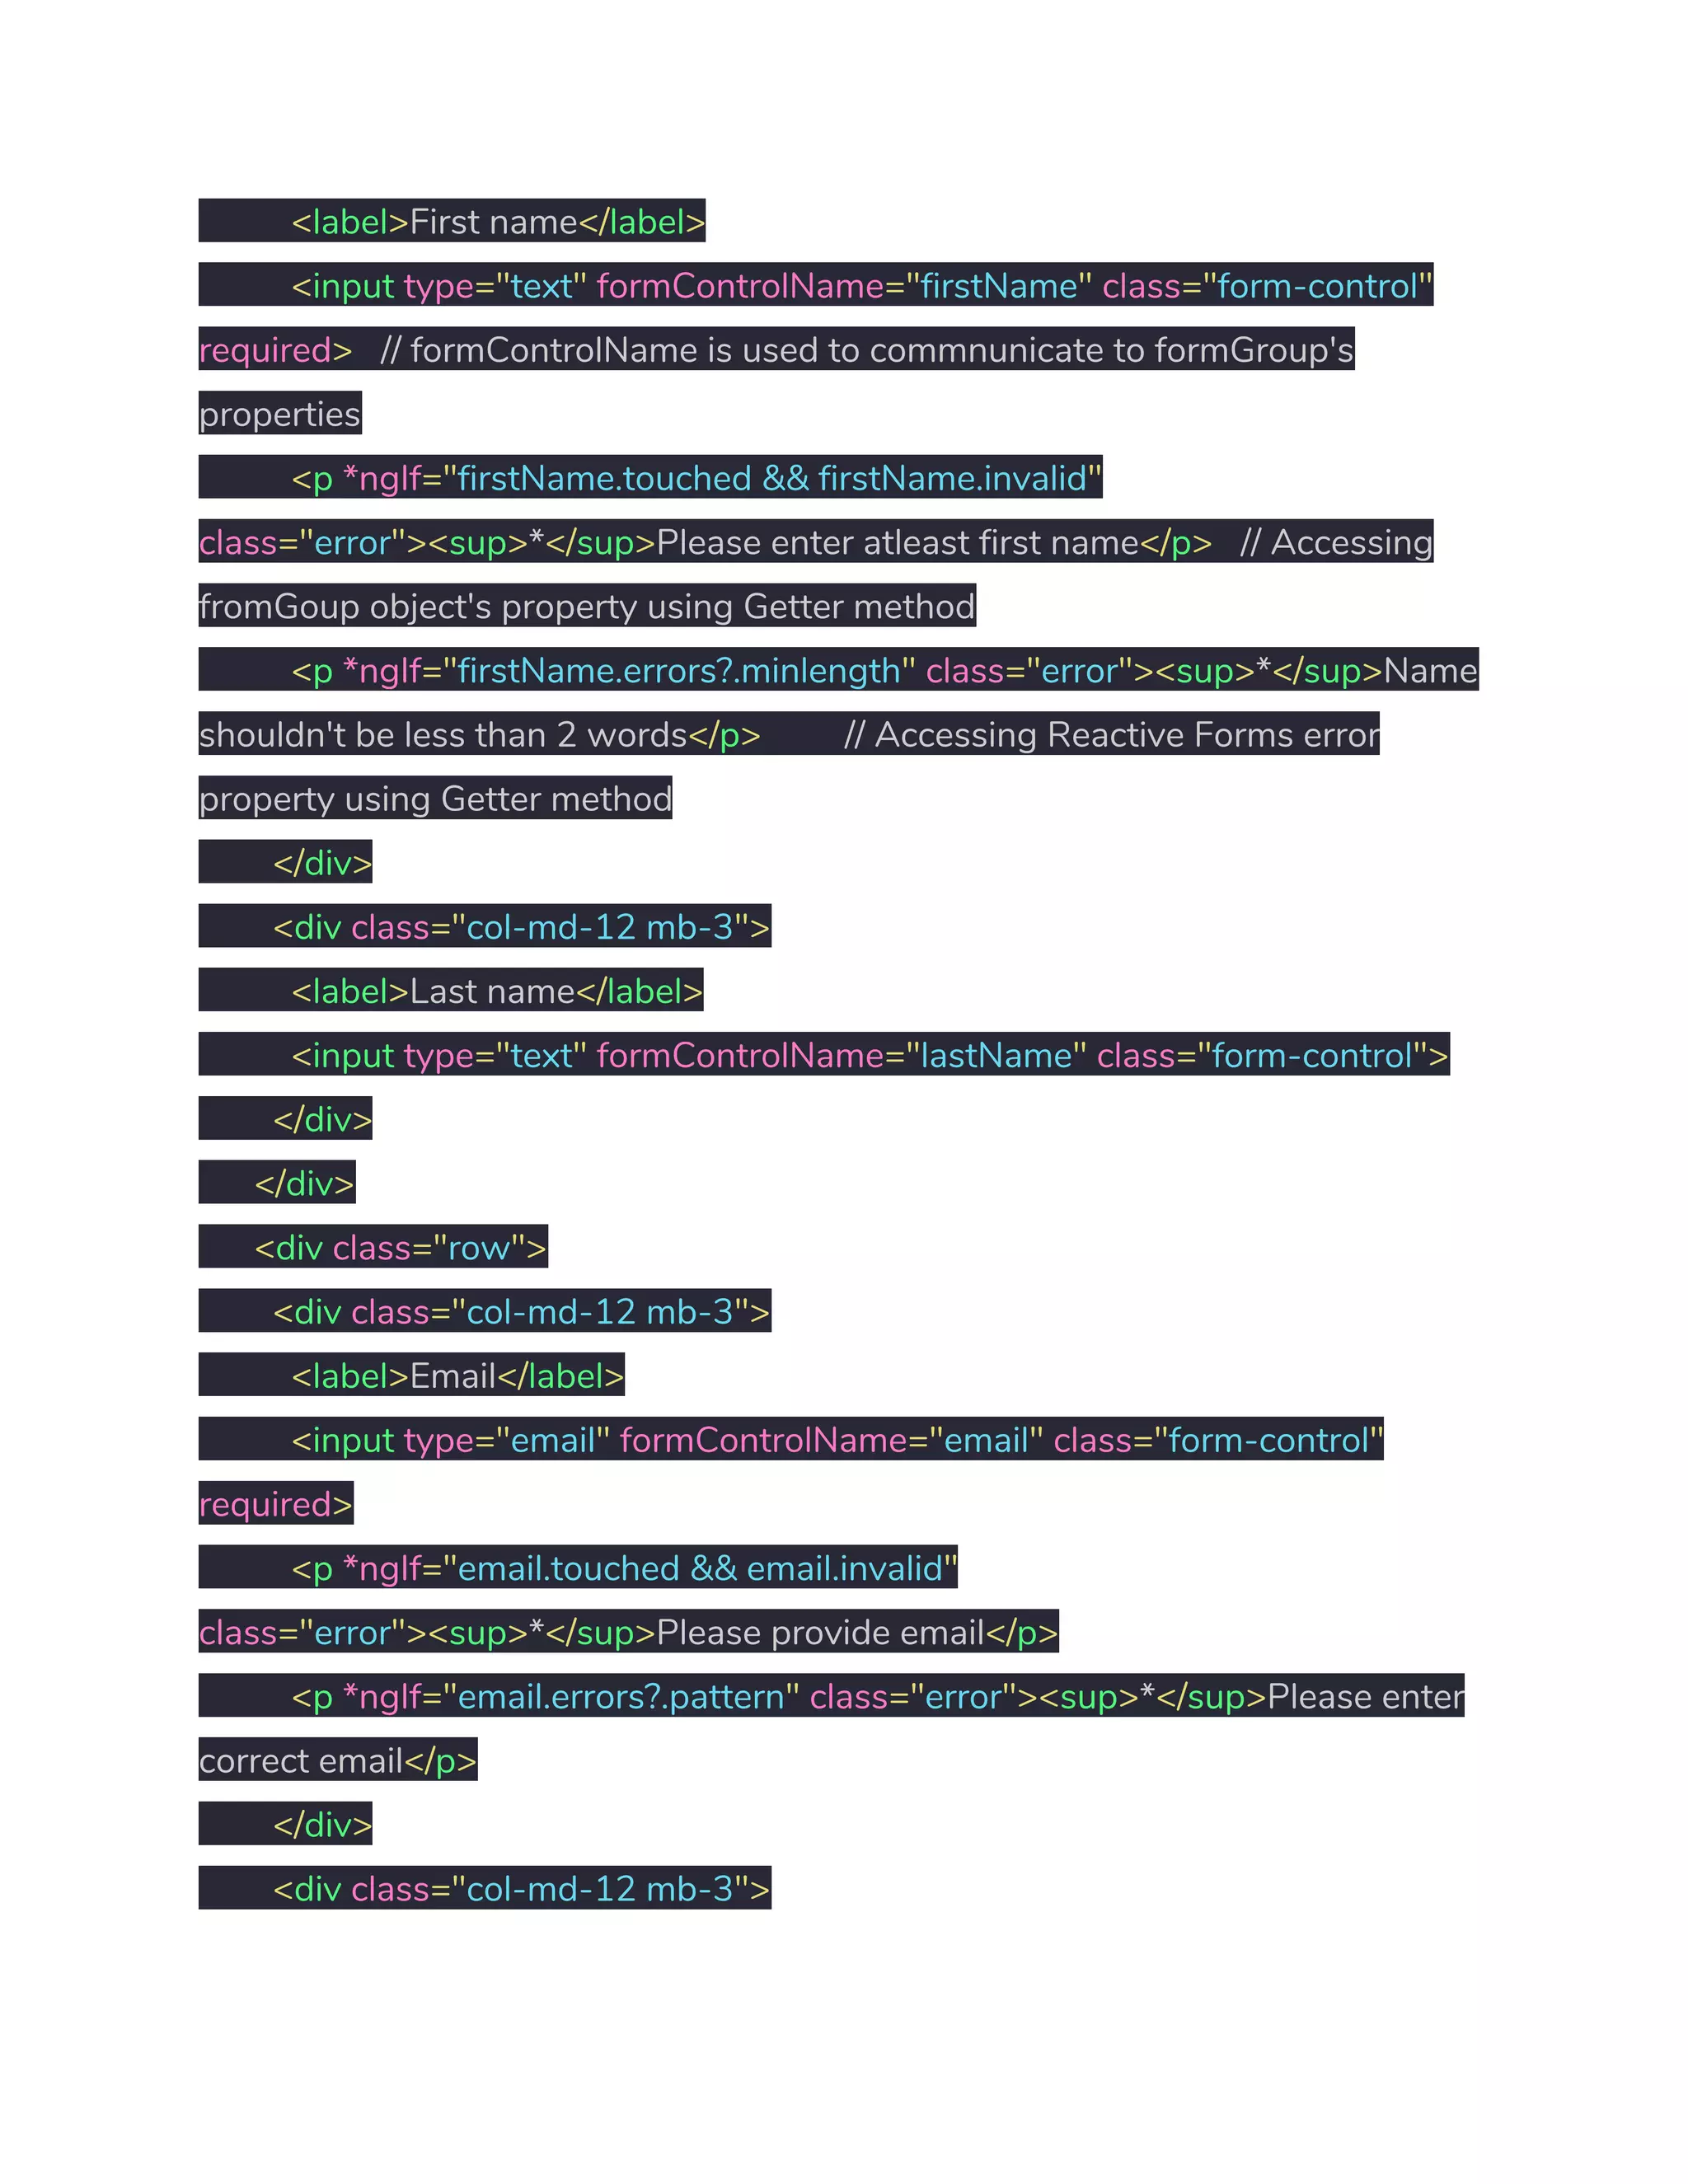
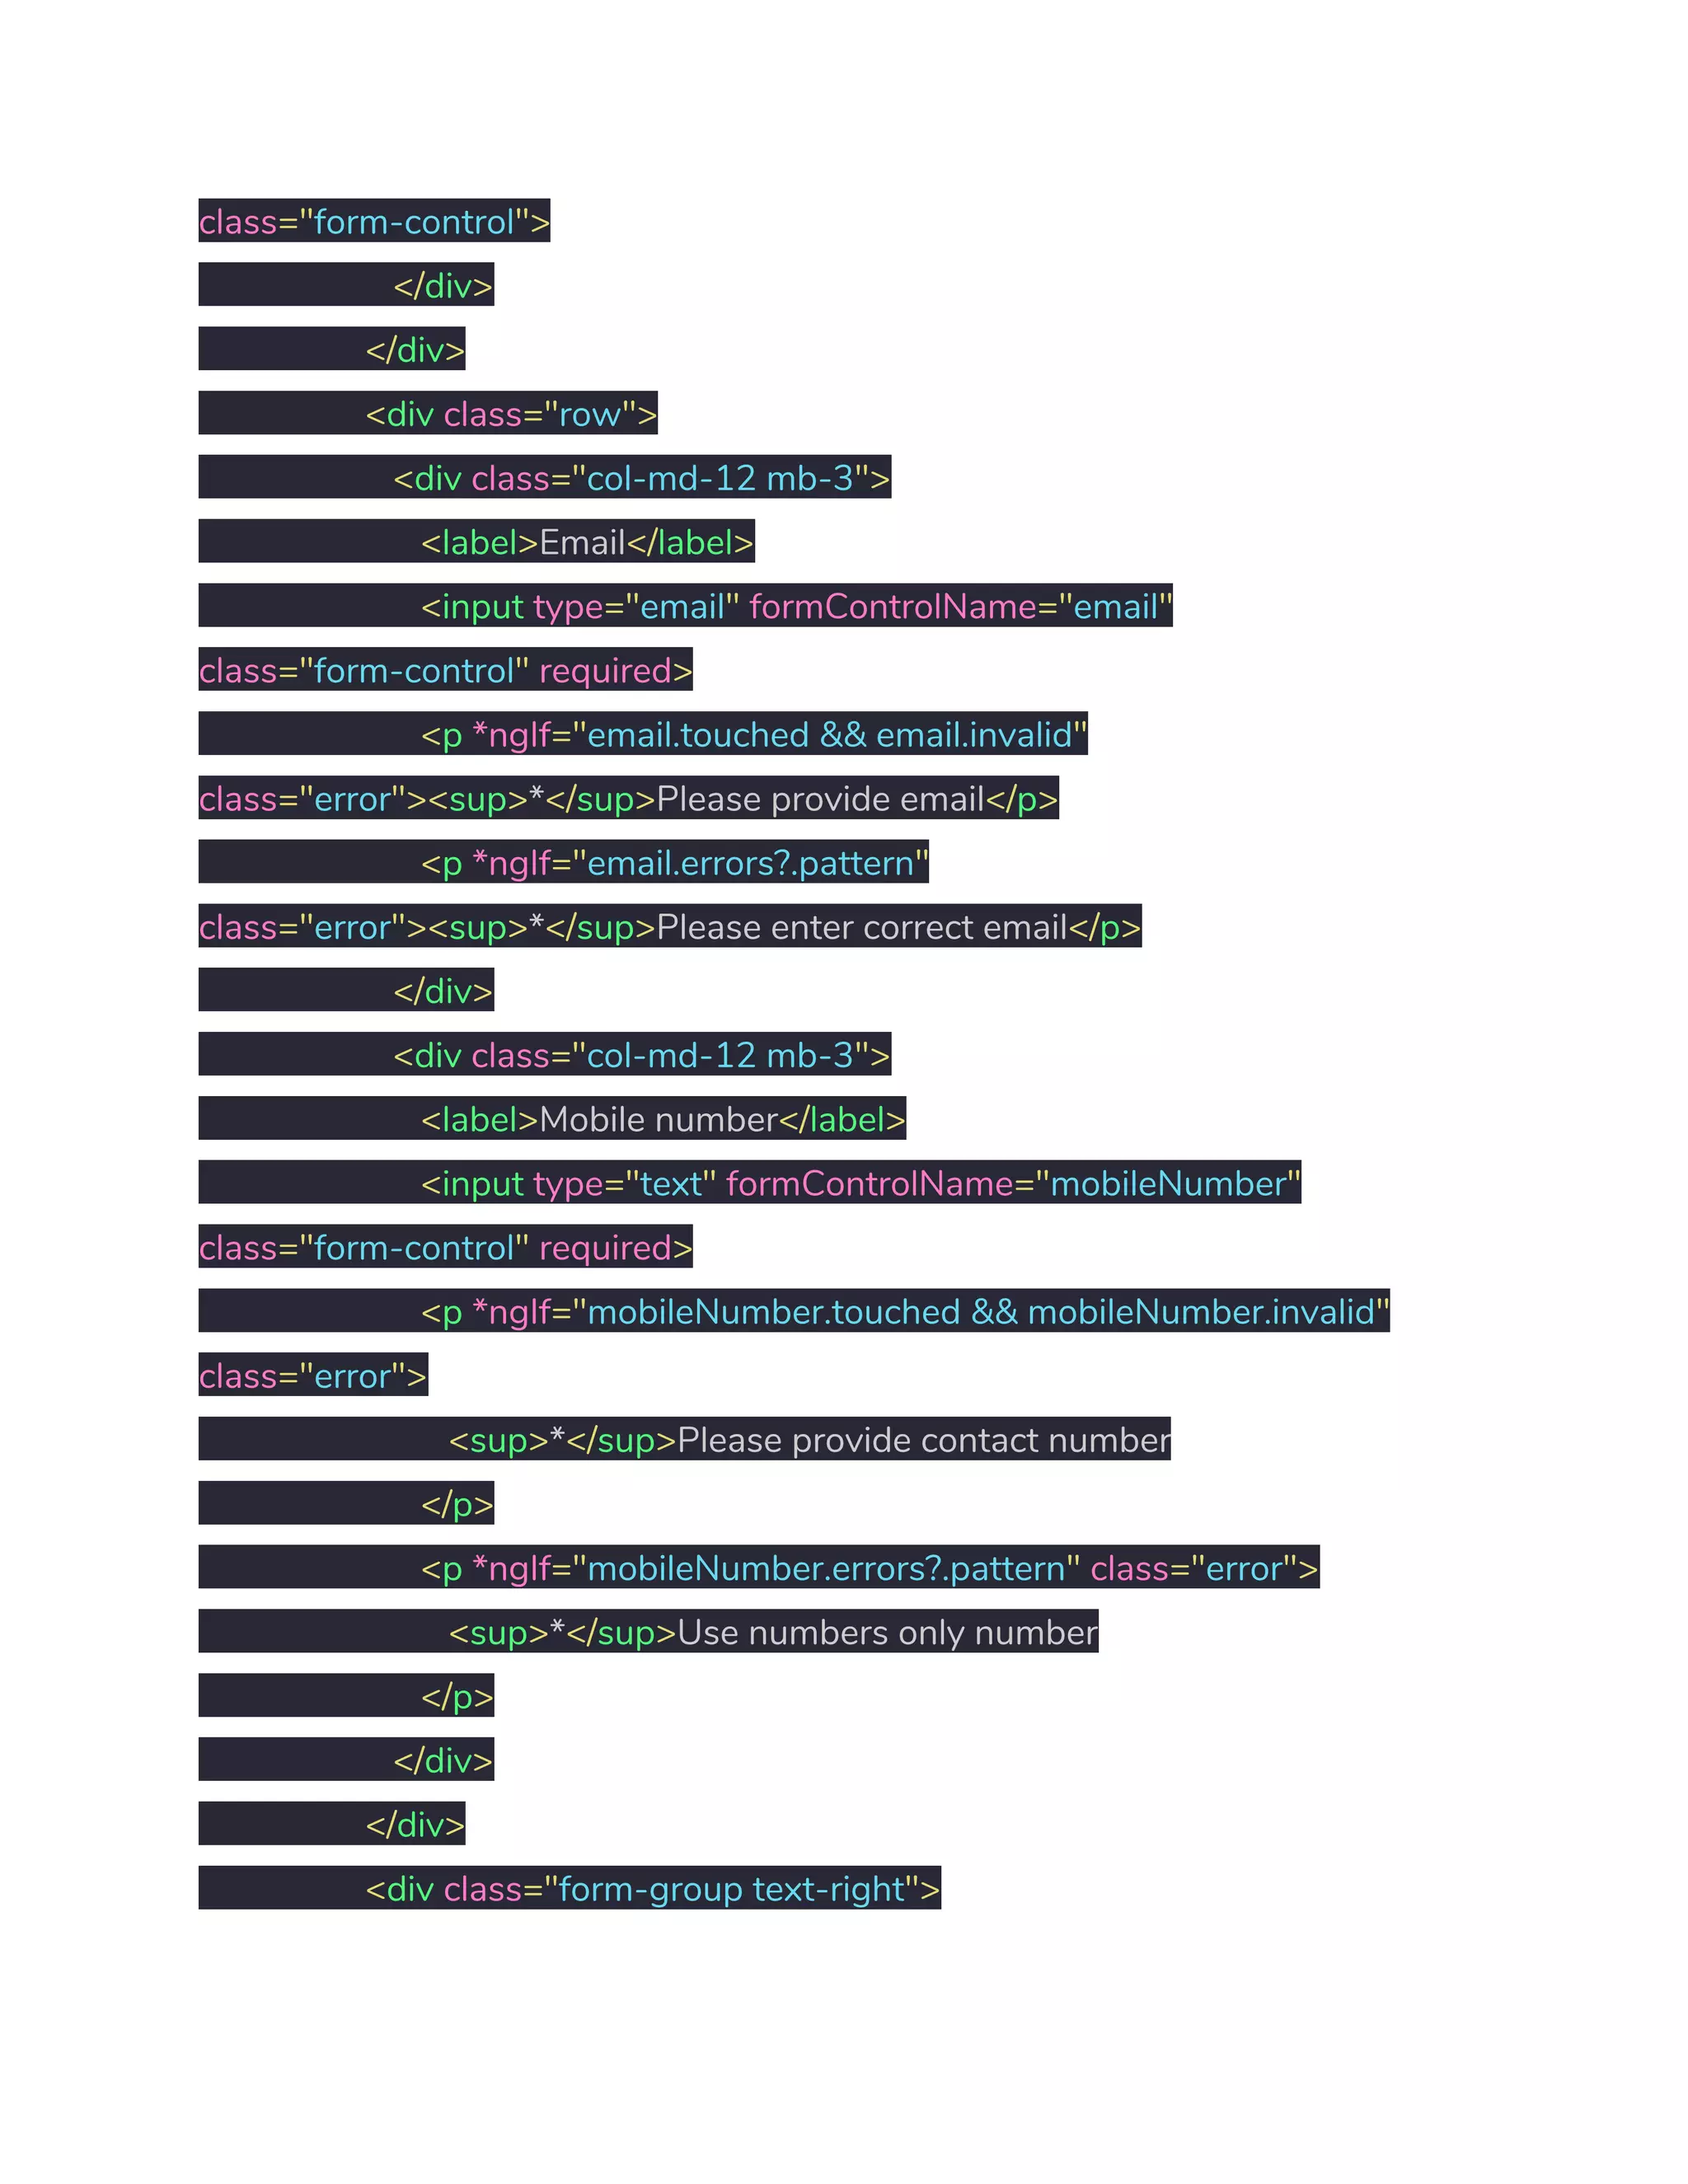
![<label>Mobile number</label> <input type="text" formControlName="mobileNumber" class="form-control" required> <p *ngIf="mobileNumber.touched && mobileNumber.invalid" class="error"><sup>*</sup>Please provide contact number</p> <p *ngIf="mobileNumber.errors?.pattern" class="error"><sup>*</sup>Use numbers only number</p> </div> </div> <div class="form-group text-right"> <button type="button" class="btn btn-secondary gap-right" (click)="ResetForm()">Reset</button> // (click) event to trigger ResetForm <button type="submit" class="btn btn-success" [disabled]="!studentForm.valid">Add Student</button> // Disable student form unless it is valid </div> </div> </div> </form><!-- Student form ends--> Afterwards, go to src > app > add-student.component.ts file and add the given below code. It contains Reactive Forms Logic, Getter method to access FormGroup’s properties, Reactive Form validation logic, Form Reset method and Toastr service for showing alert messages. import { Component, OnInit } from '@angular/core'; import { CrudService } from '../shared/crud.service'; // CRUD services API](https://image.slidesharecdn.com/angular7firebase5crudoperationswithreactiveforms3-190109092736/75/Angular-7-Firebase5-CRUD-Operations-with-Reactive-Forms-21-2048.jpg)
![import { FormBuilder, FormGroup, FormControl, Validators } from '@angular/forms'; // Reactive form services import { ToastrService } from 'ngx-toastr'; // Alert message using NGX toastr @Component({ selector: 'app-add-student', templateUrl: './add-student.component.html', styleUrls: ['./add-student.component.css'] }) export class AddStudentComponent implements OnInit { public studentForm: FormGroup; // Define FormGroup to student's form constructor( public crudApi: CrudService, // CRUD API services public fb: FormBuilder, // Form Builder service for Reactive forms public toastr: ToastrService // Toastr service for alert message ) { } ngOnInit() { this.crudApi.GetStudentsList(); // Call GetStudentsList() before main form is being called this.studenForm(); // Call student form when component is ready }](https://image.slidesharecdn.com/angular7firebase5crudoperationswithreactiveforms3-190109092736/75/Angular-7-Firebase5-CRUD-Operations-with-Reactive-Forms-22-2048.jpg)
![// Reactive student form studenForm() { this.studentForm = this.fb.group({ firstName: ['', [Validators.required, Validators.minLength(2)]], lastName: [''], email: ['', [Validators.required, Validators.pattern('^[a-zA-Z0-9_.+-]+@[a-zA-Z0-9-]+.[a-zA-Z0-9-.]+$')]], mobileNumber: ['', [Validators.required, Validators.pattern('^[0-9]+$')]] }) } // Accessing form control using getters get firstName() { return this.studentForm.get('firstName'); } get lastName() { return this.studentForm.get('lastName'); } get email() { return this.studentForm.get('email'); } get mobileNumber() { return this.studentForm.get('mobileNumber'); }](https://image.slidesharecdn.com/angular7firebase5crudoperationswithreactiveforms3-190109092736/75/Angular-7-Firebase5-CRUD-Operations-with-Reactive-Forms-23-2048.jpg)
![// Reset student form's values ResetForm() { this.studentForm.reset(); } submitStudentData() { this.crudApi.AddStudent(this.studentForm.value); // Submit student data using CRUD API this.toastr.success(this.studentForm.controls['firstName'].value + ' successfully added!'); // Show success message when data is successfully submited this.ResetForm(); // Reset form when clicked on reset button }; } 11. Set up and Usage of NGX Pagination Module Run below command in Angular CLI to install NGX Pagination NPM module. npm install ngx-pagination --save Open src > app > app.module.ts file and add the given below code. // NGX Pagination import { NgxPaginationModule } from 'ngx-pagination'; @NgModule({ imports: [](https://image.slidesharecdn.com/angular7firebase5crudoperationswithreactiveforms3-190109092736/75/Angular-7-Firebase5-CRUD-Operations-with-Reactive-Forms-24-2048.jpg)
![NgxPaginationModule // Include it in imports array ] }) How to use NGX Pagination? // your.component.ts example import {Component} from '@angular/core'; @Component({ selector: 'my-component', template: ` <ul> <li *ngFor="let item of collection | paginate: { itemsPerPage: 07, currentPage: p }"> ... </li> </ul> <pagination-controls (pageChange)="p = $event"></pagination-controls> ` }) export class MyComponent { p: number = 1; collection: any[] = someArrayOfThings; } To learn more about ngx-pagination and its API please visit Pagination for Angular (v2+)](https://image.slidesharecdn.com/angular7firebase5crudoperationswithreactiveforms3-190109092736/75/Angular-7-Firebase5-CRUD-Operations-with-Reactive-Forms-25-2048.jpg)


![@Component({ selector: 'app-students-list', templateUrl: './students-list.component.html', styleUrls: ['./students-list.component.css'] }) export class StudentsListComponent implements OnInit { p: number = 1; // Settup up pagination variable Student: Student[]; // Save students data in Student's array. hideWhenNoStudent: boolean = false; // Hide students data table when no student. noData: boolean = false; // Showing No Student Message, when no student in database. preLoader: boolean = true; // Showing Preloader to show user data is coming for you from thre server(A tiny UX Shit) constructor( public crudApi: CrudService, // Inject student CRUD services in constructor. public toastr: ToastrService // Toastr service for alert message ){ } ngOnInit() { this.dataState(); // Initialize student's list, when component is ready let s = this.crudApi.GetStudentsList();](https://image.slidesharecdn.com/angular7firebase5crudoperationswithreactiveforms3-190109092736/75/Angular-7-Firebase5-CRUD-Operations-with-Reactive-Forms-29-2048.jpg)
![s.snapshotChanges().subscribe(data => { // Using snapshotChanges() method to retrieve list of data along with metadata($key) this.Student = []; data.forEach(item => { let a = item.payload.toJSON(); a['$key'] = item.key; this.Student.push(a as Student); }) }) } // Using valueChanges() method to fetch simple list of students data. It updates the state of hideWhenNoStudent, noData & preLoader variables when any changes occurs in student data list in real-time. dataState() { this.crudApi.GetStudentsList().valueChanges().subscribe(data => { this.preLoader = false; if(data.length <= 0){ this.hideWhenNoStudent = false; this.noData = true; } else { this.hideWhenNoStudent = true; this.noData = false; } }) }](https://image.slidesharecdn.com/angular7firebase5crudoperationswithreactiveforms3-190109092736/75/Angular-7-Firebase5-CRUD-Operations-with-Reactive-Forms-30-2048.jpg)
![</div> </div> <div class="row"> <div class="col-lg-12"> <div class="pricing-header form-block mx-auto"> <!-- Student's Edit Form --> <form [formGroup]="editForm" (ngSubmit)="updateForm()" novalidate> <div class="row"> <div class="col-lg-5 col-md-12 col-sm-12"> <div class="row"> <div class="col-md-12 mb-3"> <label>First name</label> <input type="text" formControlName="firstName" class="form-control" required> <p *ngIf="firstName.touched && firstName.invalid" class="error"> <sup>*</sup>Please enter firstname </p> <p *ngIf="firstName.errors?.minlength" class="error"> <sup>*</sup>Name shouldn't be less than 2 words </p> </div> <div class="col-md-12 mb-3"> <label>Last name</label> <input type="text" formControlName="lastName"](https://image.slidesharecdn.com/angular7firebase5crudoperationswithreactiveforms3-190109092736/75/Angular-7-Firebase5-CRUD-Operations-with-Reactive-Forms-32-2048.jpg)
![<button type="submit" class="btn btn-success btn-block" [disabled]="!editForm.valid"> Update Student </button> </div> </div> </div> </form> <!-- Student's Edit Form ends--> </div> </div> </div> Go to src > app > edit-student.component.ts file and write the edit form logic using Activated Route in the same order as mentioned below. import { Component, OnInit, AfterViewInit } from '@angular/core'; import { FormGroup, FormBuilder, Validators } from '@angular/forms'; import { CrudService } from '../shared/crud.service'; import { ActivatedRoute, Router } from "@angular/router"; // ActivatedRoue is used to get the current associated components information. import { Location } from '@angular/common'; // Location service is used to go back to previous component import { ToastrService } from 'ngx-toastr'; @Component({ selector: 'app-edit-student',](https://image.slidesharecdn.com/angular7firebase5crudoperationswithreactiveforms3-190109092736/75/Angular-7-Firebase5-CRUD-Operations-with-Reactive-Forms-34-2048.jpg)
![templateUrl: './edit-student.component.html', styleUrls: ['./edit-student.component.css'] }) export class EditStudentComponent implements OnInit { editForm: FormGroup; // Define FormGroup to student's edit form constructor( private crudApi: CrudService, // Inject CRUD API in constructor private fb: FormBuilder, // Inject Form Builder service for Reactive forms private location: Location, // Location service to go back to previous component private actRoute: ActivatedRoute, // Activated route to get the current component's inforamation private router: Router, // Router service to navigate to specific component private toastr: ToastrService // Toastr service for alert message ){ } ngOnInit() { this.updateStudentData(); // Call updateStudentData() as soon as the component is ready const id = this.actRoute.snapshot.paramMap.get('id'); // Getting current component's id or information using ActivatedRoute service this.crudApi.GetStudent(id).valueChanges().subscribe(data => { this.editForm.setValue(data) // Using SetValue() method, It's a ReactiveForm's API to store intial value of reactive form](https://image.slidesharecdn.com/angular7firebase5crudoperationswithreactiveforms3-190109092736/75/Angular-7-Firebase5-CRUD-Operations-with-Reactive-Forms-35-2048.jpg)
![}) } // Accessing form control using getters get firstName() { return this.editForm.get('firstName'); } get lastName() { return this.editForm.get('lastName'); } get email() { return this.editForm.get('email'); } get mobileNumber() { return this.editForm.get('mobileNumber'); } // Contains Reactive Form logic updateStudentData() { this.editForm = this.fb.group({ firstName: ['', [Validators.required, Validators.minLength(2)]], lastName: [''], email: ['', [Validators.required, Validators.pattern('^[a-zA-Z0-9_.+-]+@[a-zA-Z0-9-]+.[a-zA-Z0-9-.]+$')]],](https://image.slidesharecdn.com/angular7firebase5crudoperationswithreactiveforms3-190109092736/75/Angular-7-Firebase5-CRUD-Operations-with-Reactive-Forms-36-2048.jpg)
![mobileNumber: ['', [Validators.required, Validators.pattern('^[0-9]+$')]] }) } // Go back to previous component goBack() { this.location.back(); } // Below methods fire when somebody click on submit button updateForm(){ this.crudApi.UpdateStudent(this.editForm.value); // Update student data using CRUD API this.toastr.success(this.editForm.controls['firstName'].value + ' updated successfully'); // Show succes message when data is successfully submited this.router.navigate(['view-students']); // Navigate to student's list page when student data is updated } }](https://image.slidesharecdn.com/angular7firebase5crudoperationswithreactiveforms3-190109092736/75/Angular-7-Firebase5-CRUD-Operations-with-Reactive-Forms-37-2048.jpg)

This document discusses how to create Angular 7 Firebase5 CRUD operations using Reactive Forms. It involves setting up a student record management system where an admin can create, read, update and delete student records. The key steps include setting up an Angular project with Bootstrap and Firebase, creating CRUD services, generating components, setting up routing, and integrating modules like NGX Toastr for alerts.
Introduction to Angular 7 Firebase CRUD operations including create, read, update, and delete functionalities.
Details on technologies used like Angular, Firebase, AngularFire2, Bootstrap, and prerequisites for project setup.
Instructions for setting up an Angular project with Bootstrap, Font Awesome, and configuring styles in angular.json.
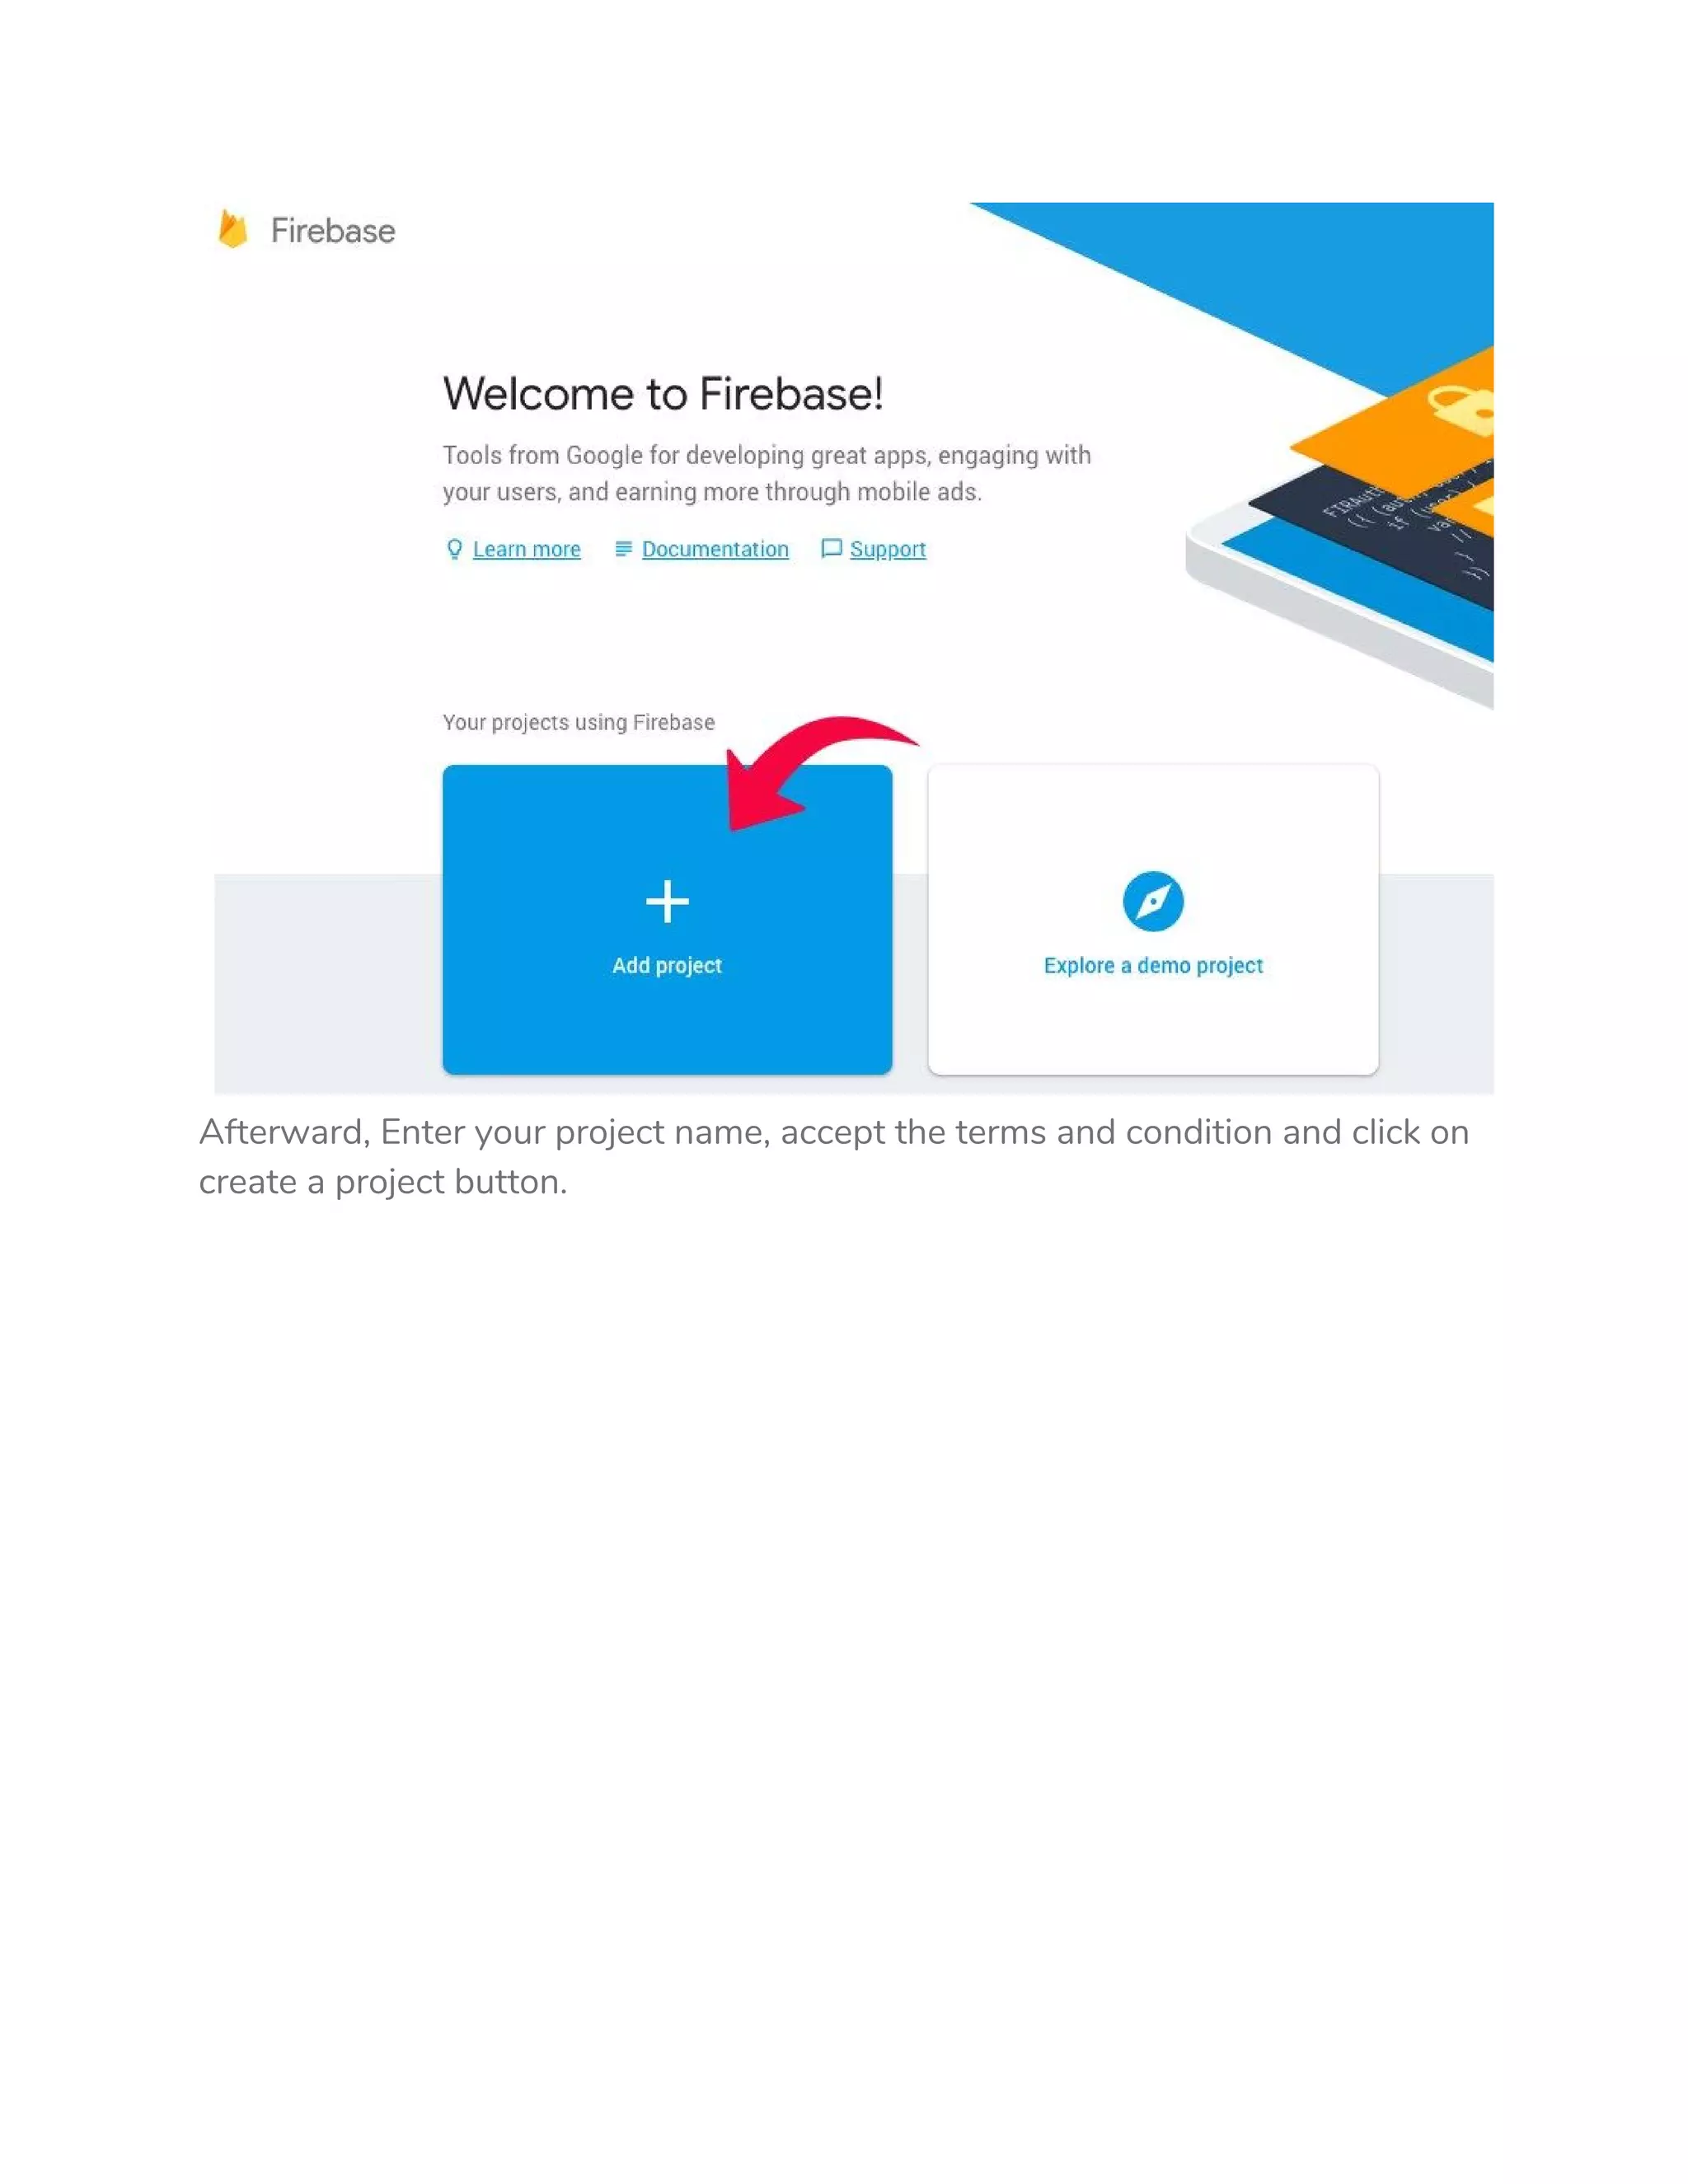
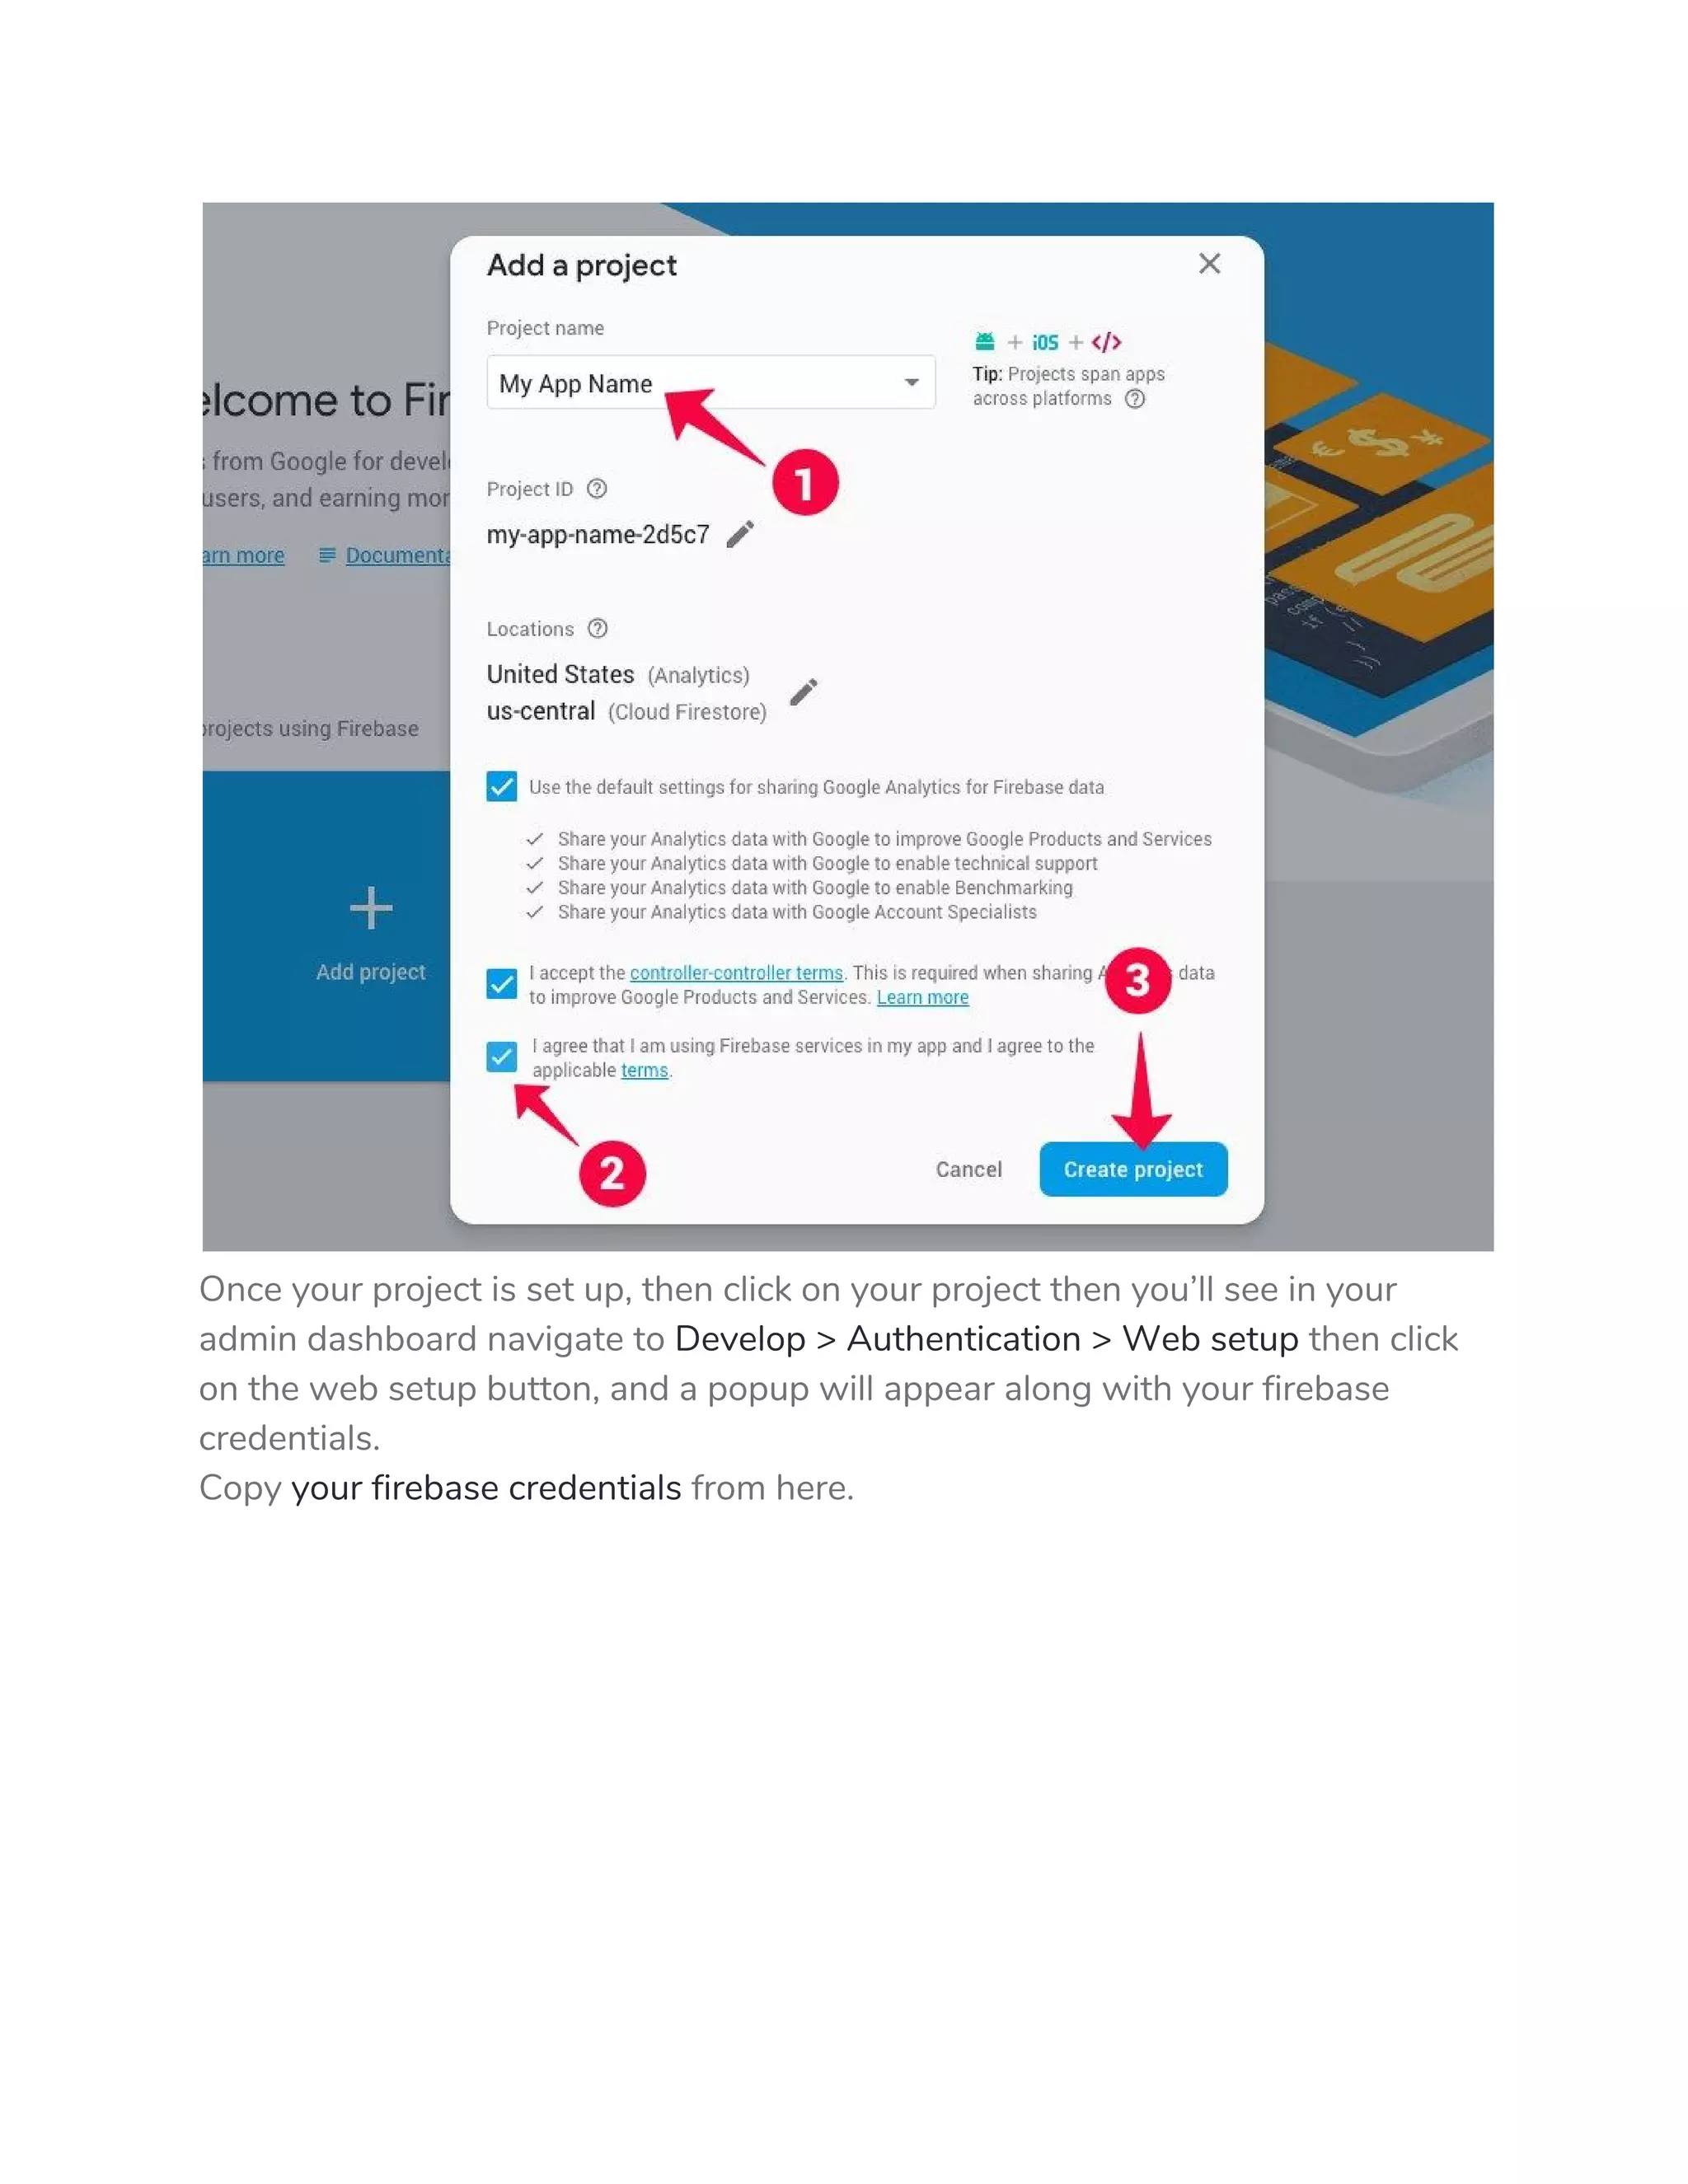
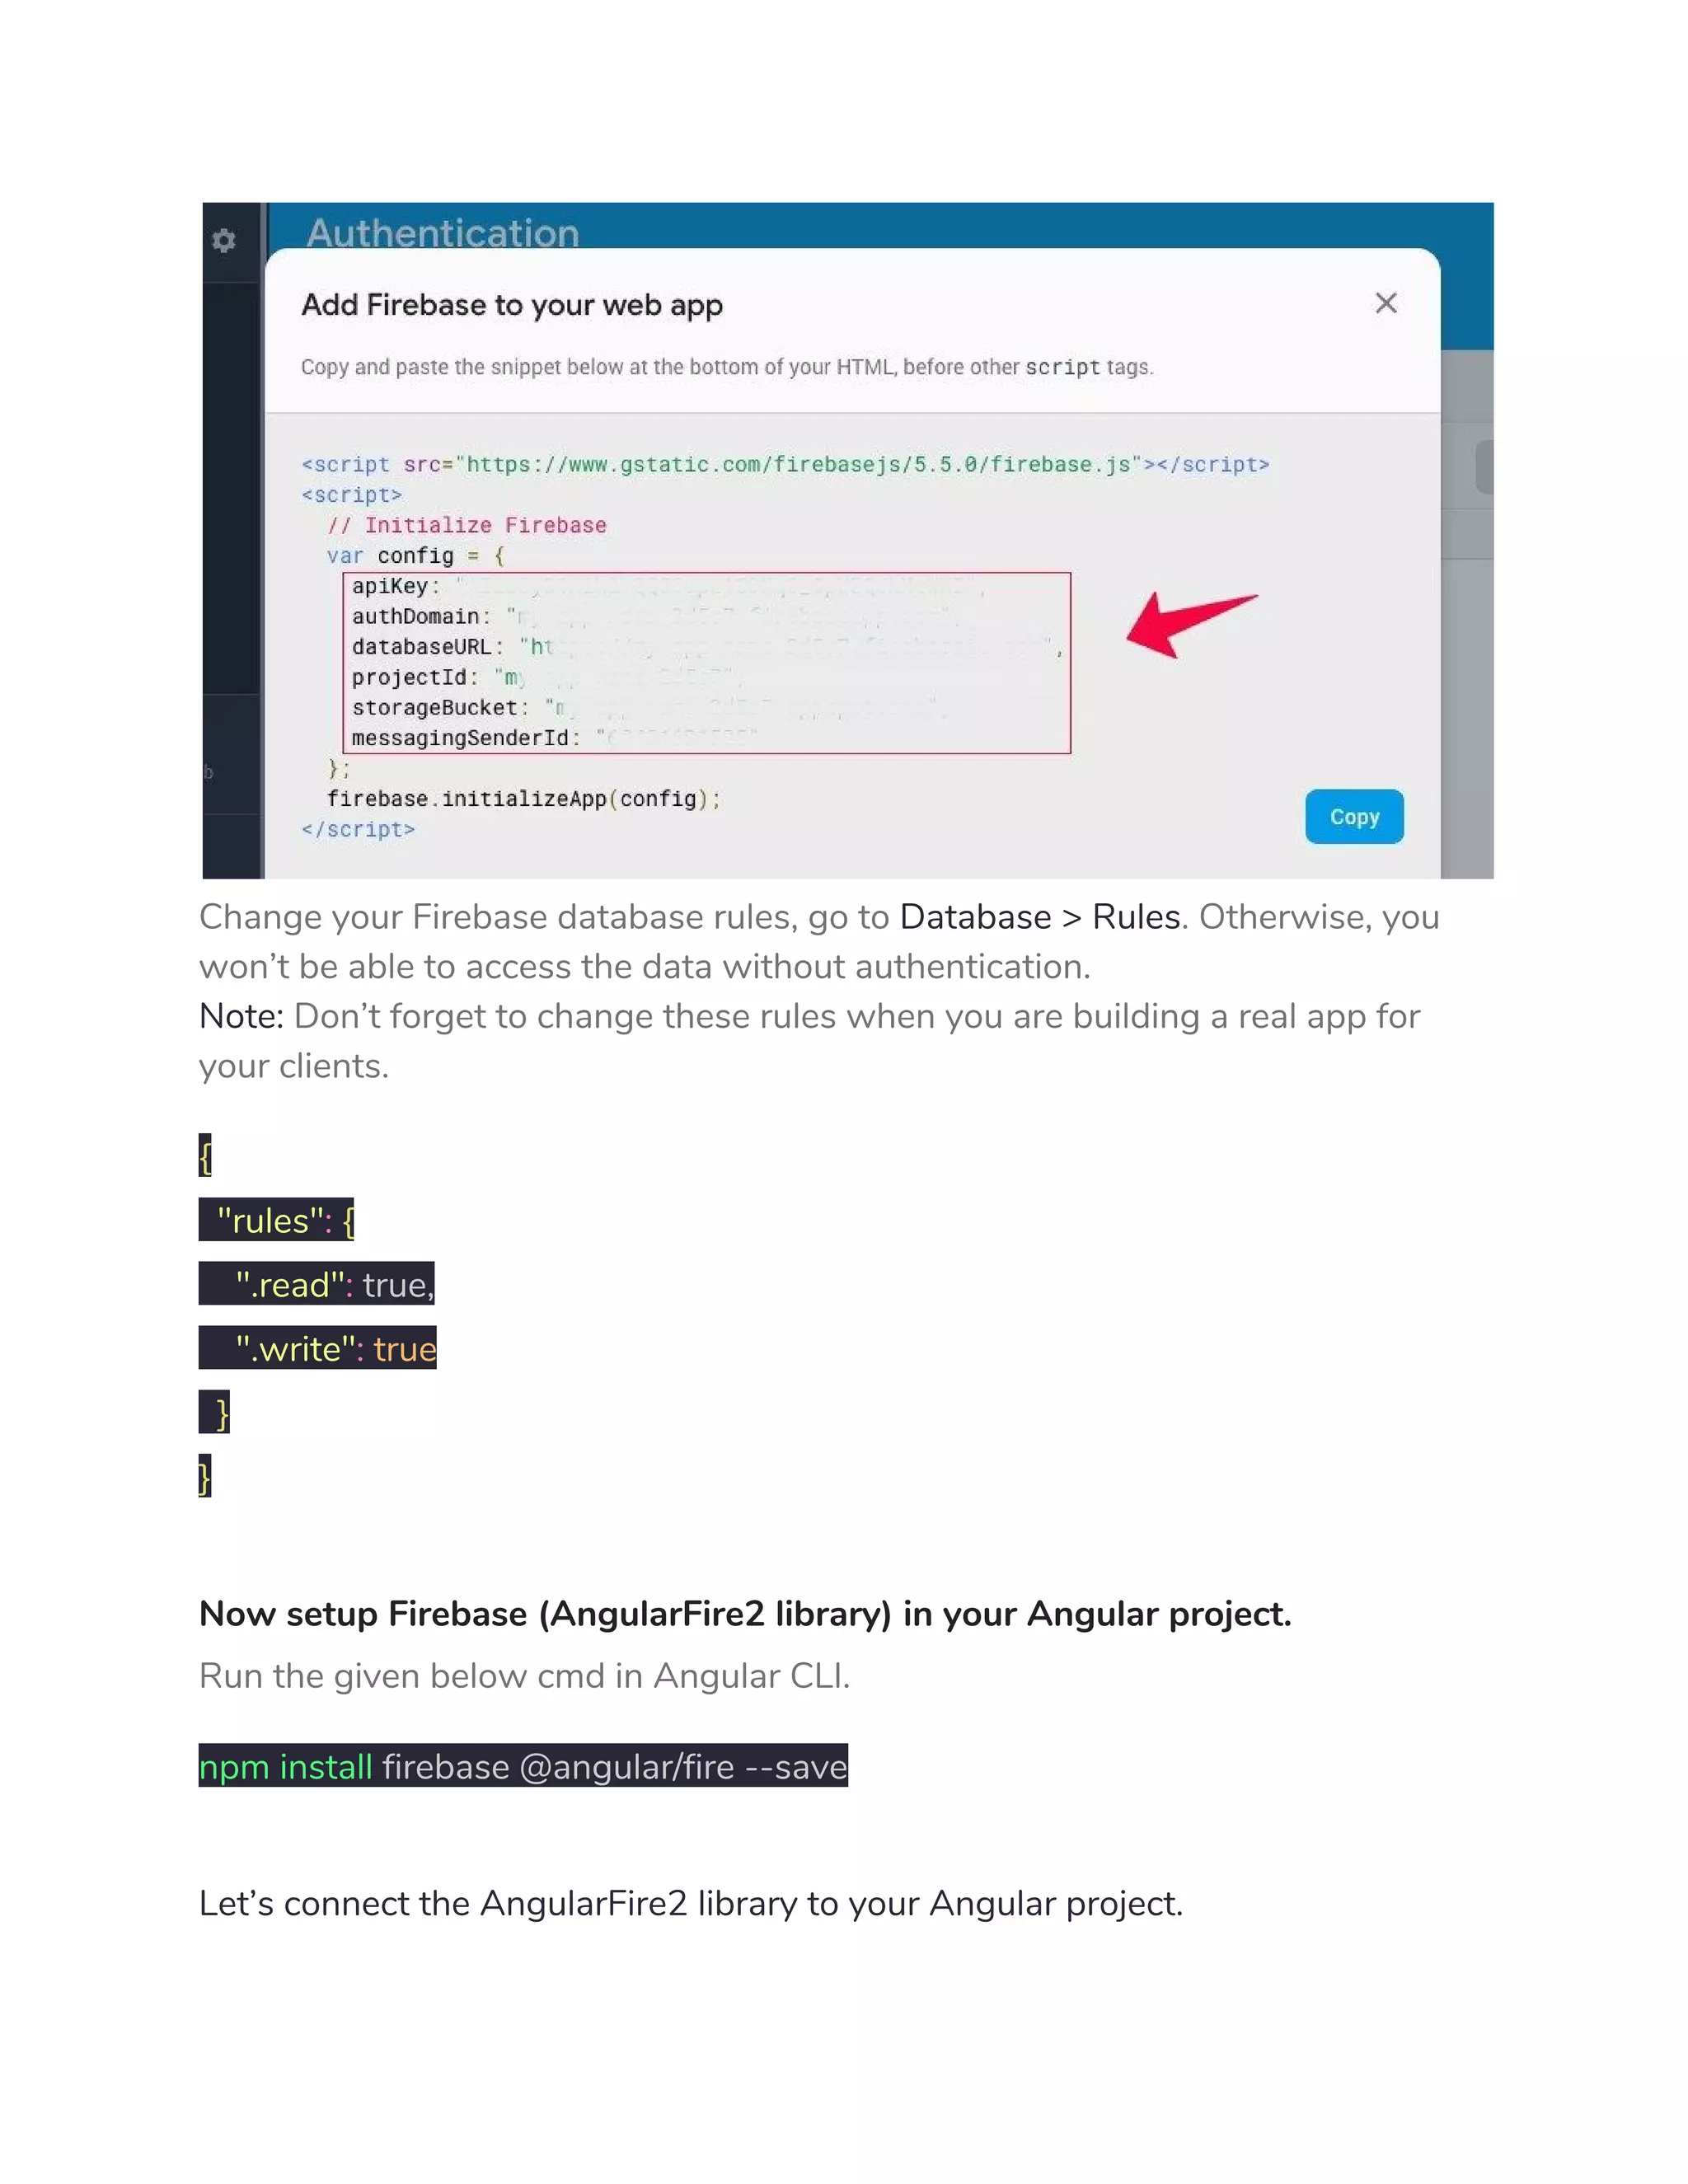
Guidelines for setting up a Firebase account, database rules, and integrating AngularFire2 with the Angular app.
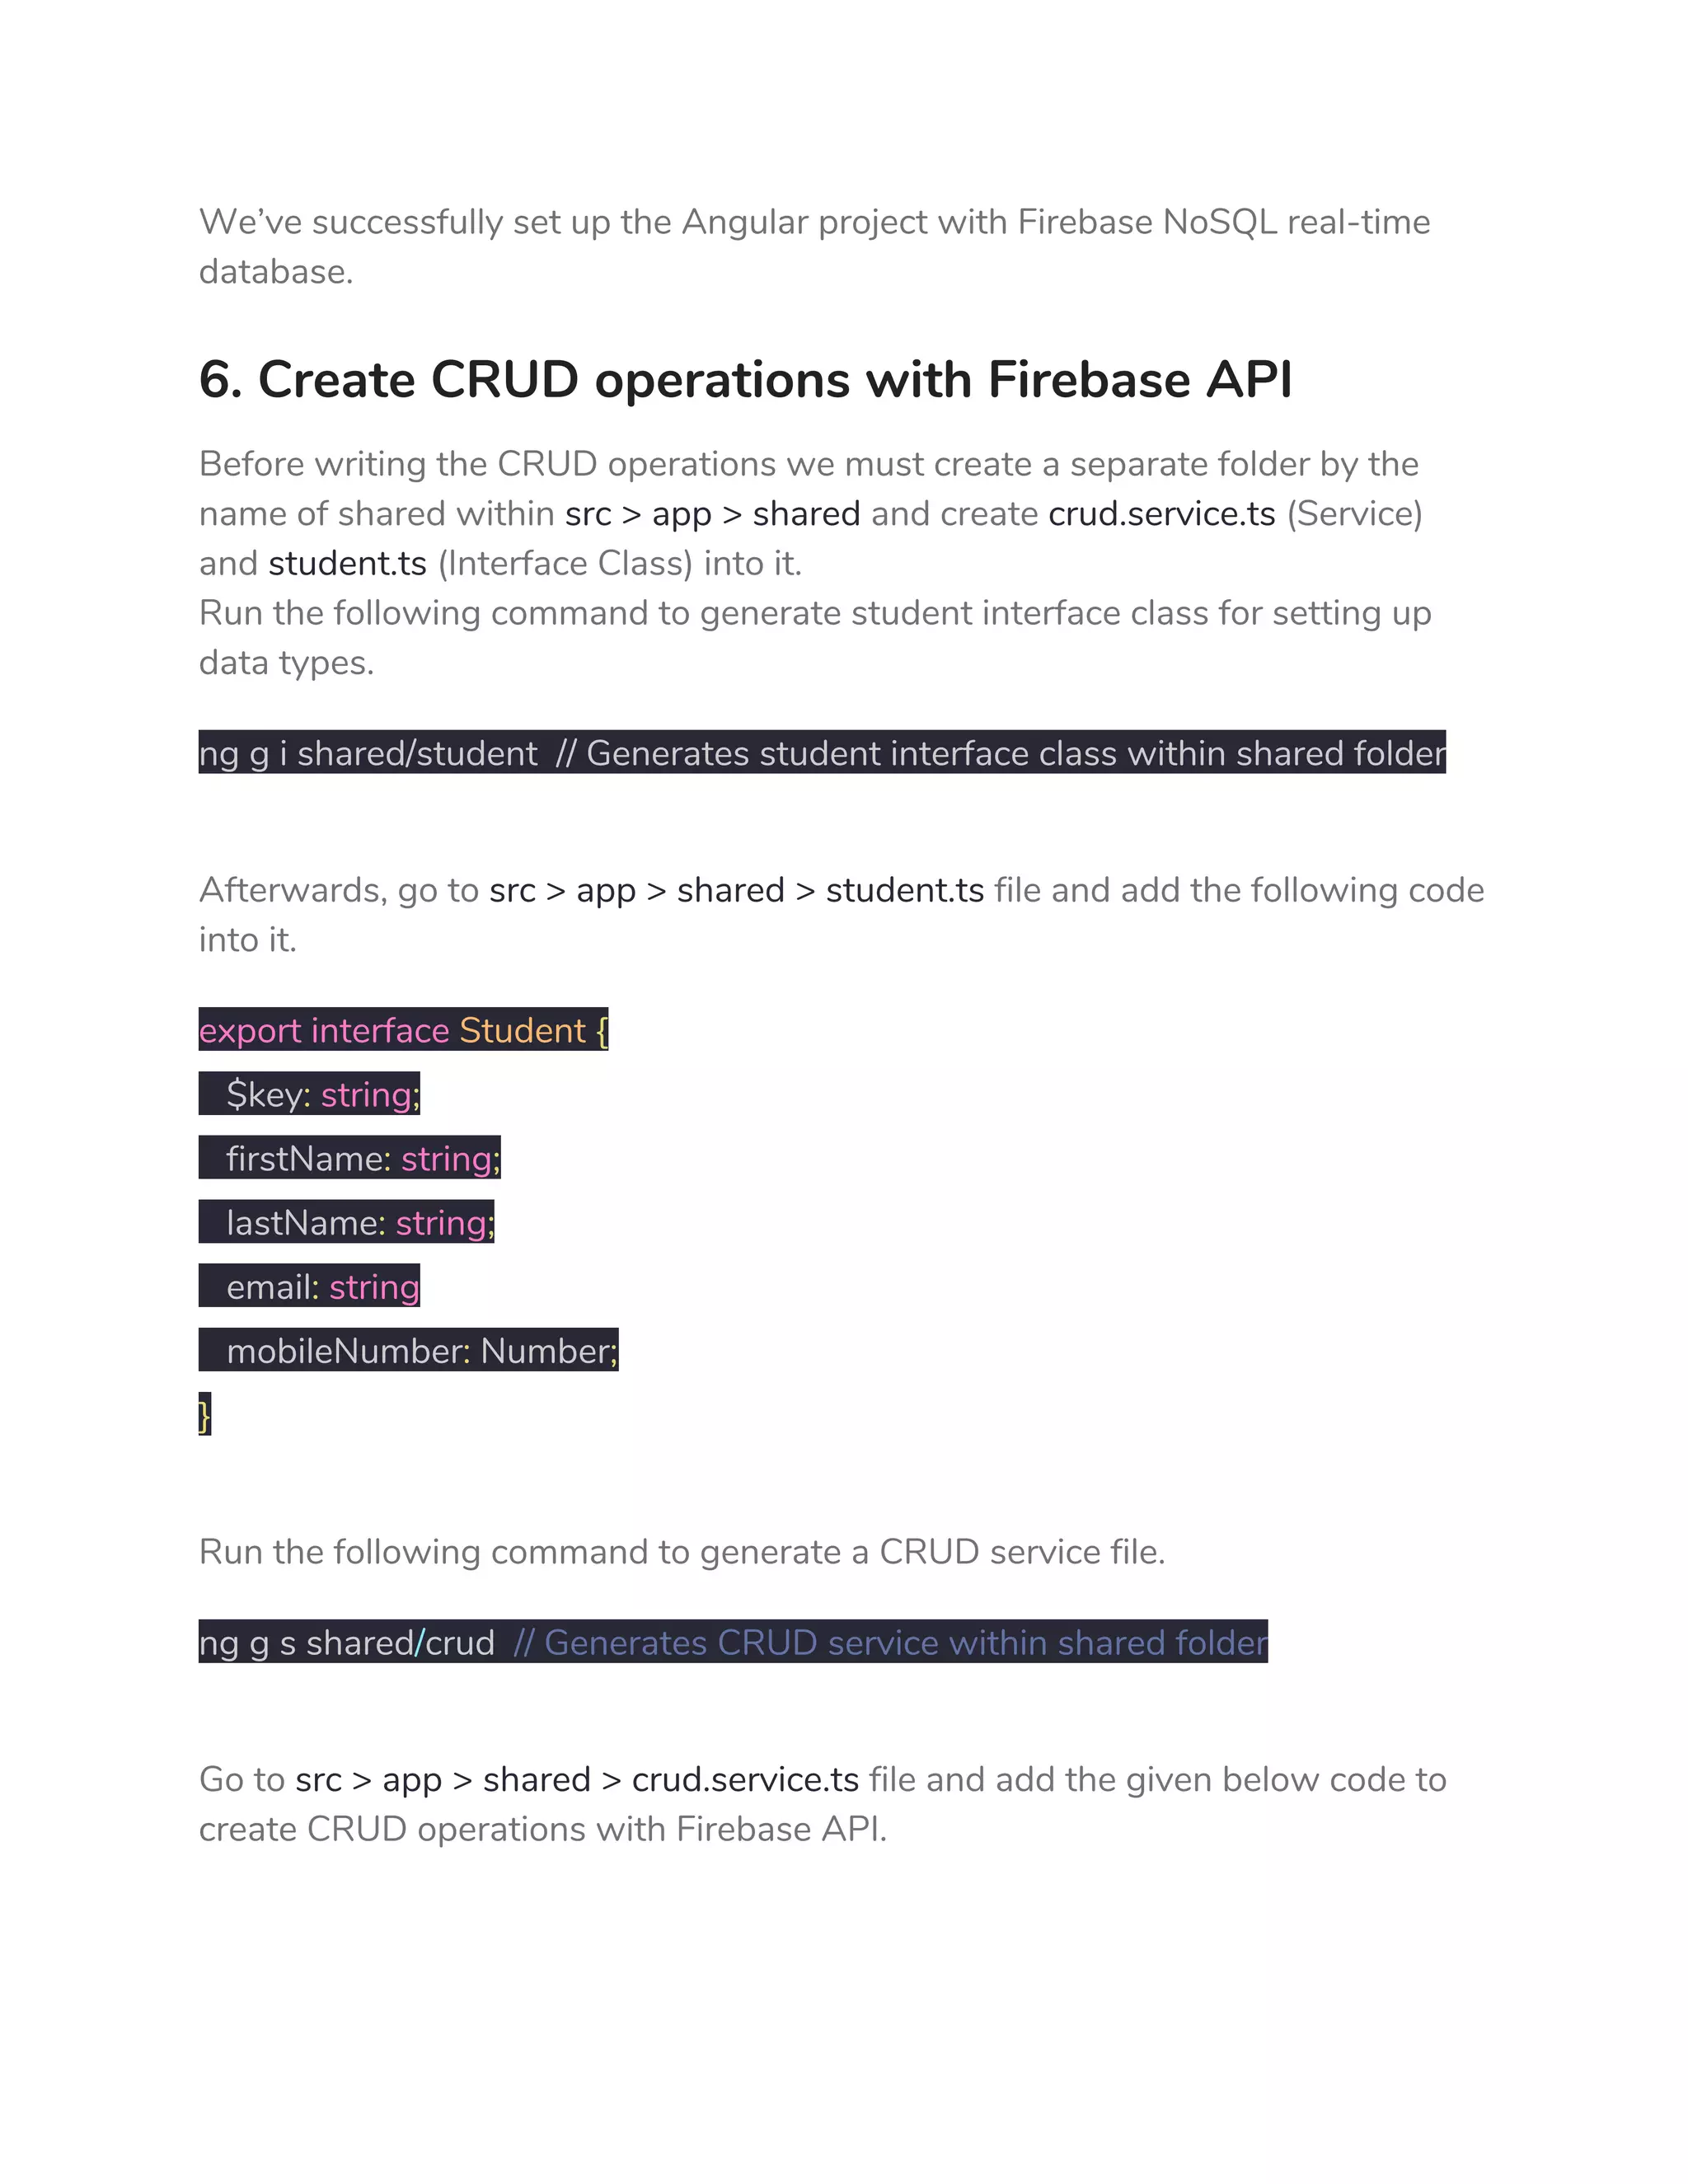
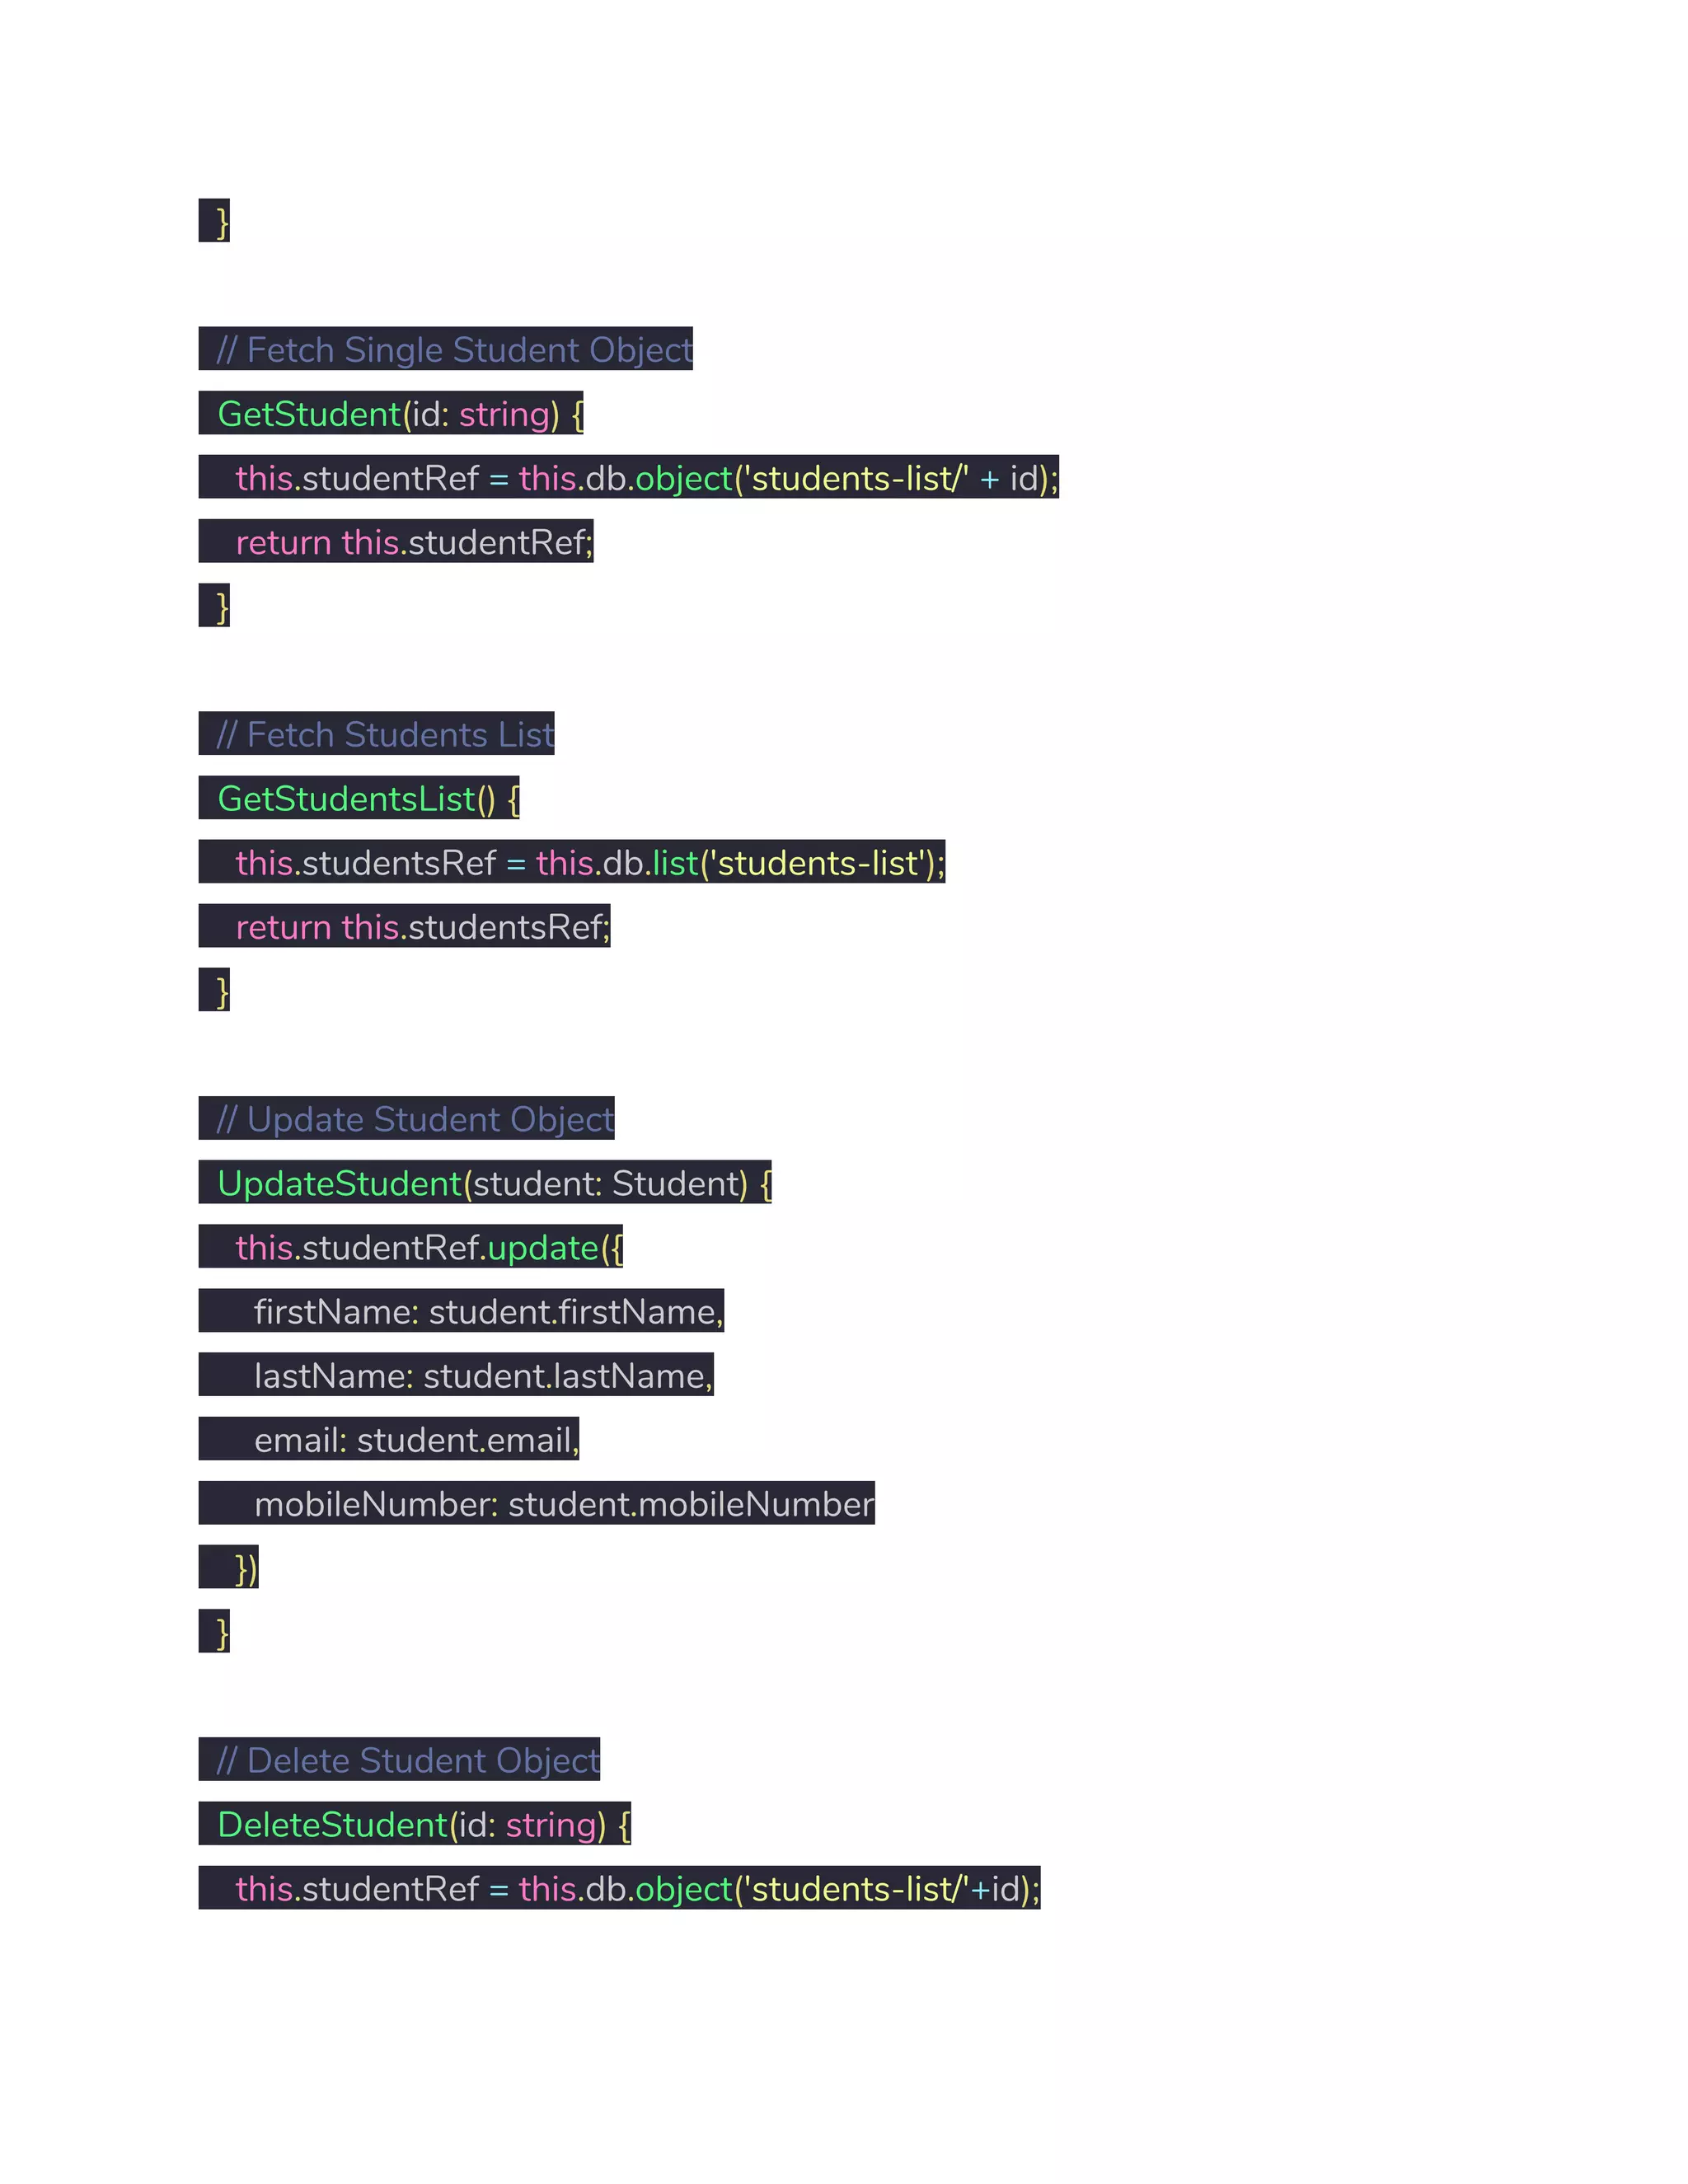
Creation of a shared CRUD service in Angular for managing student data using Firebase.
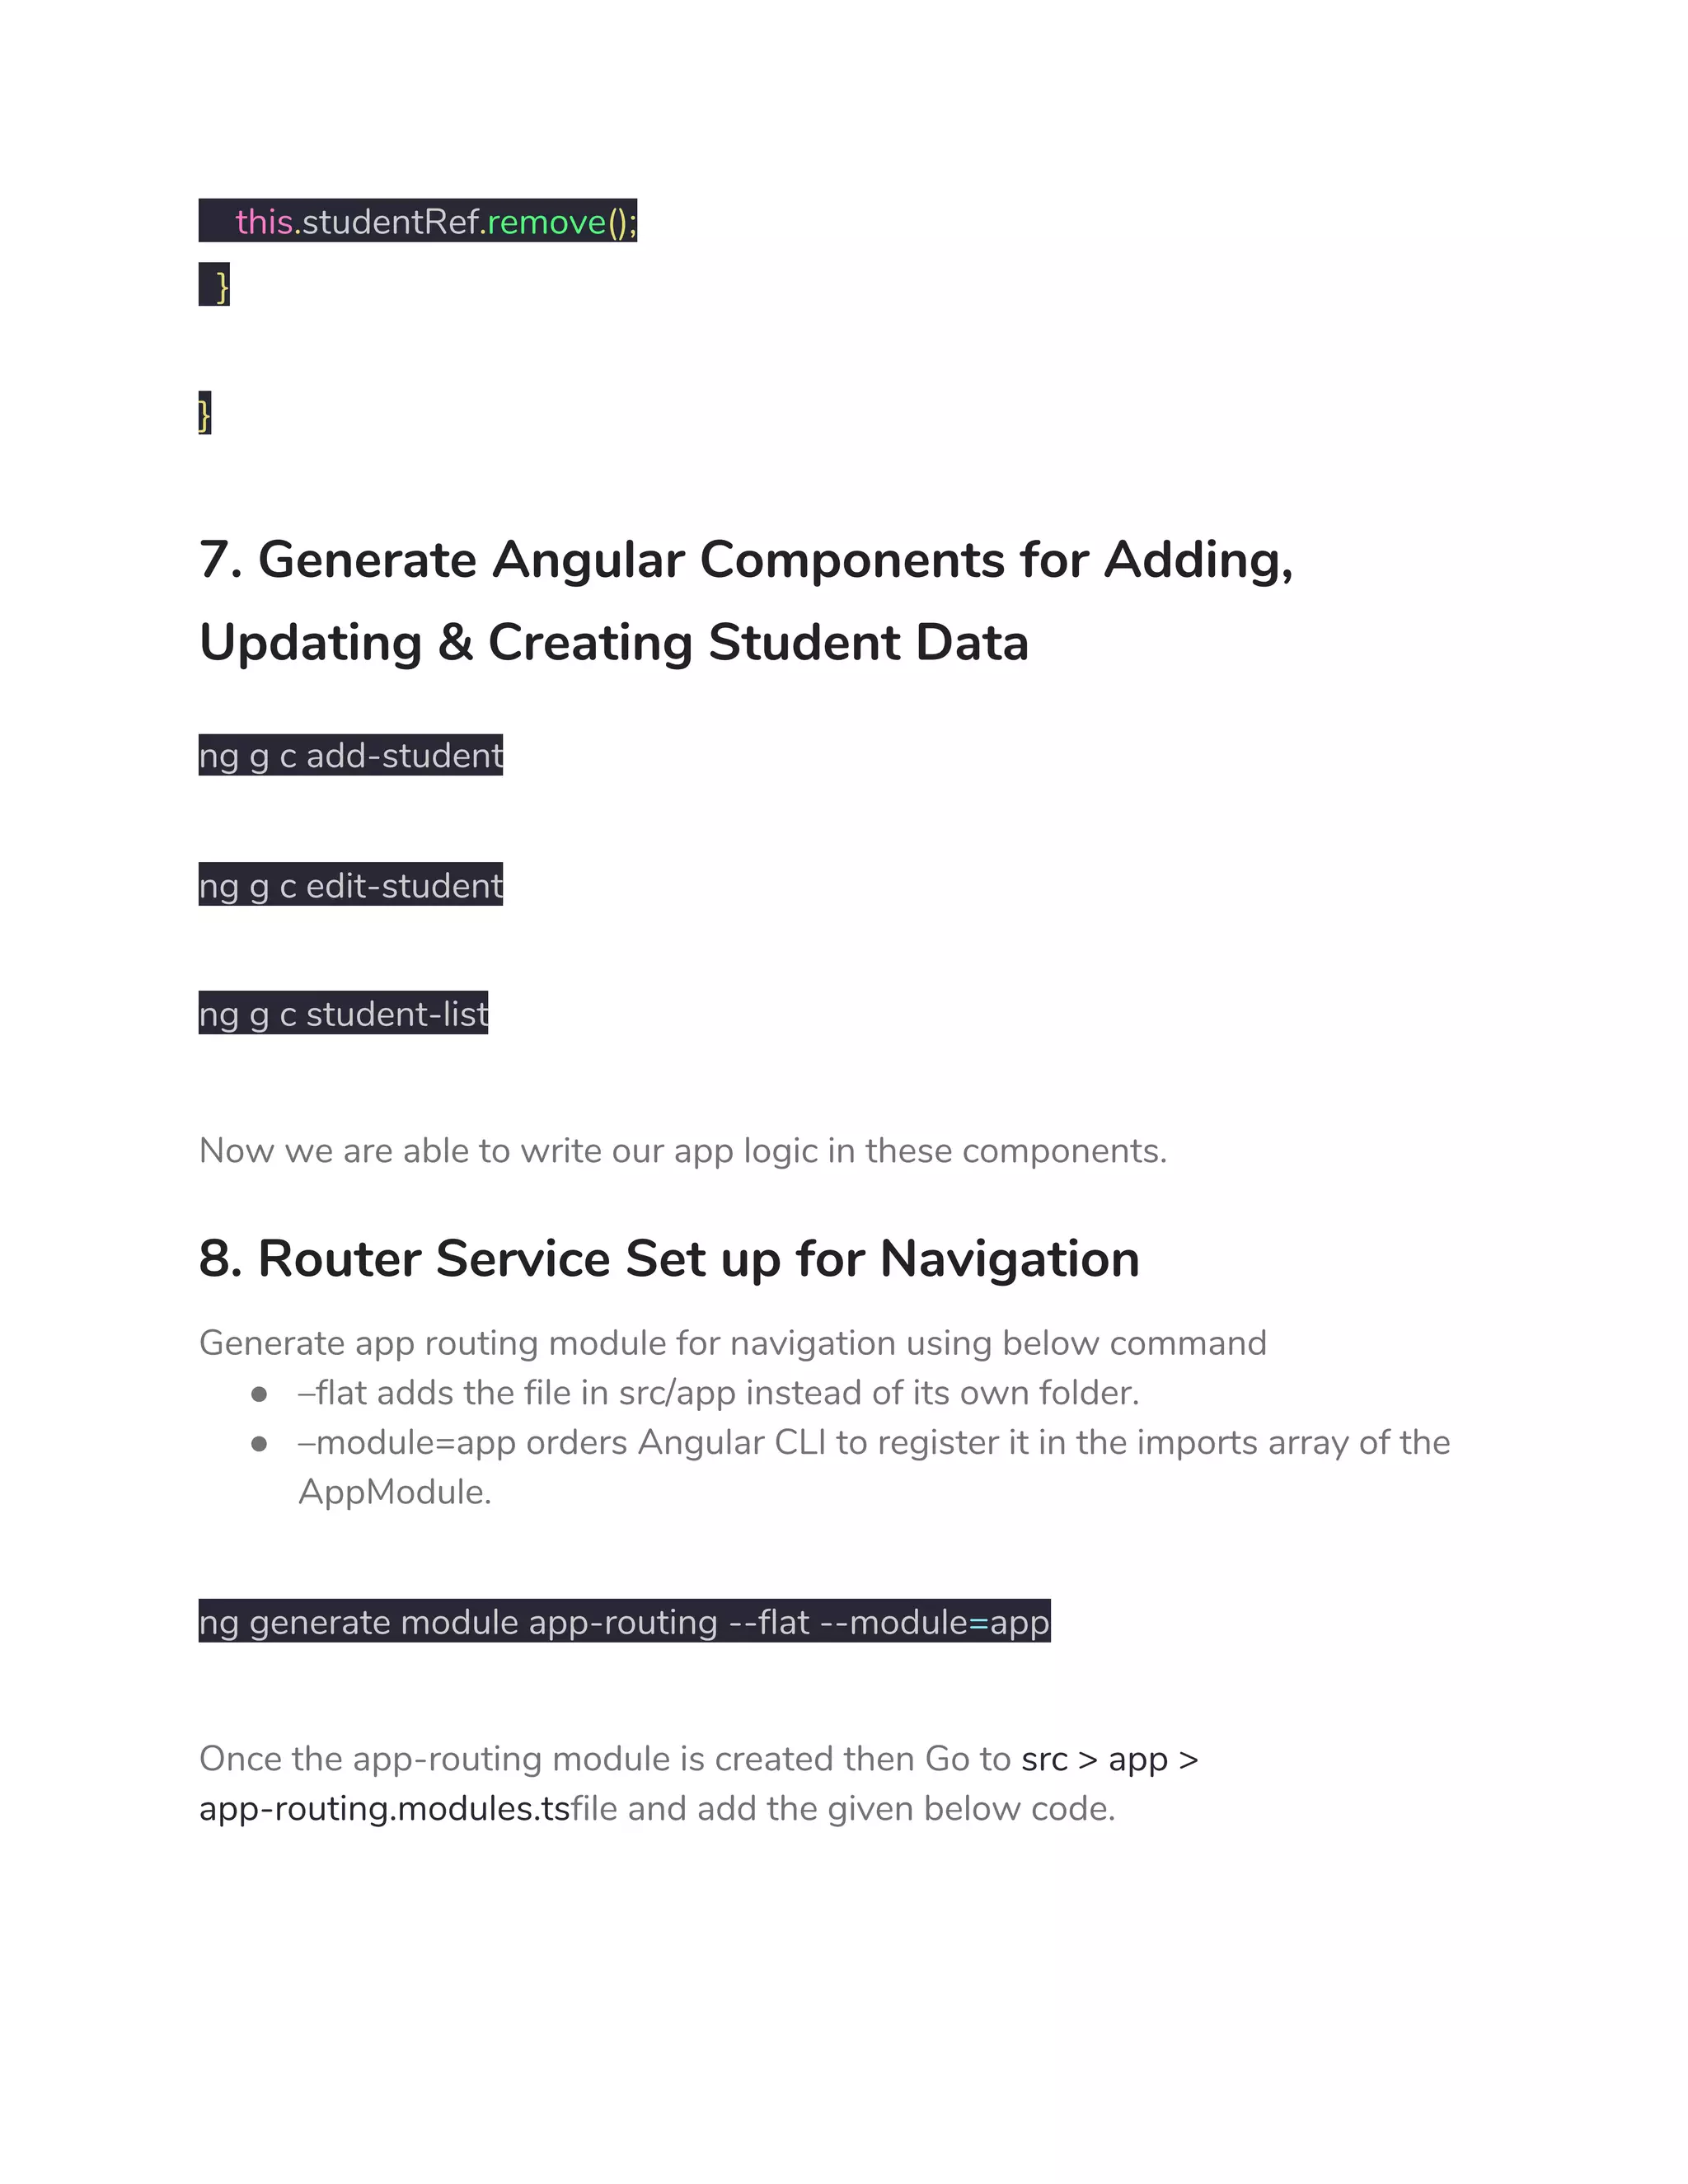
Steps to generate Angular components for CRUD operations and configure routing for navigation.
Implementation of NGX Toastr for displaying alerts when student data is modified.
Setting up Reactive Forms for adding and validating student data in the application.
Installation and configuration of NGX Pagination for displaying student lists with pagination.
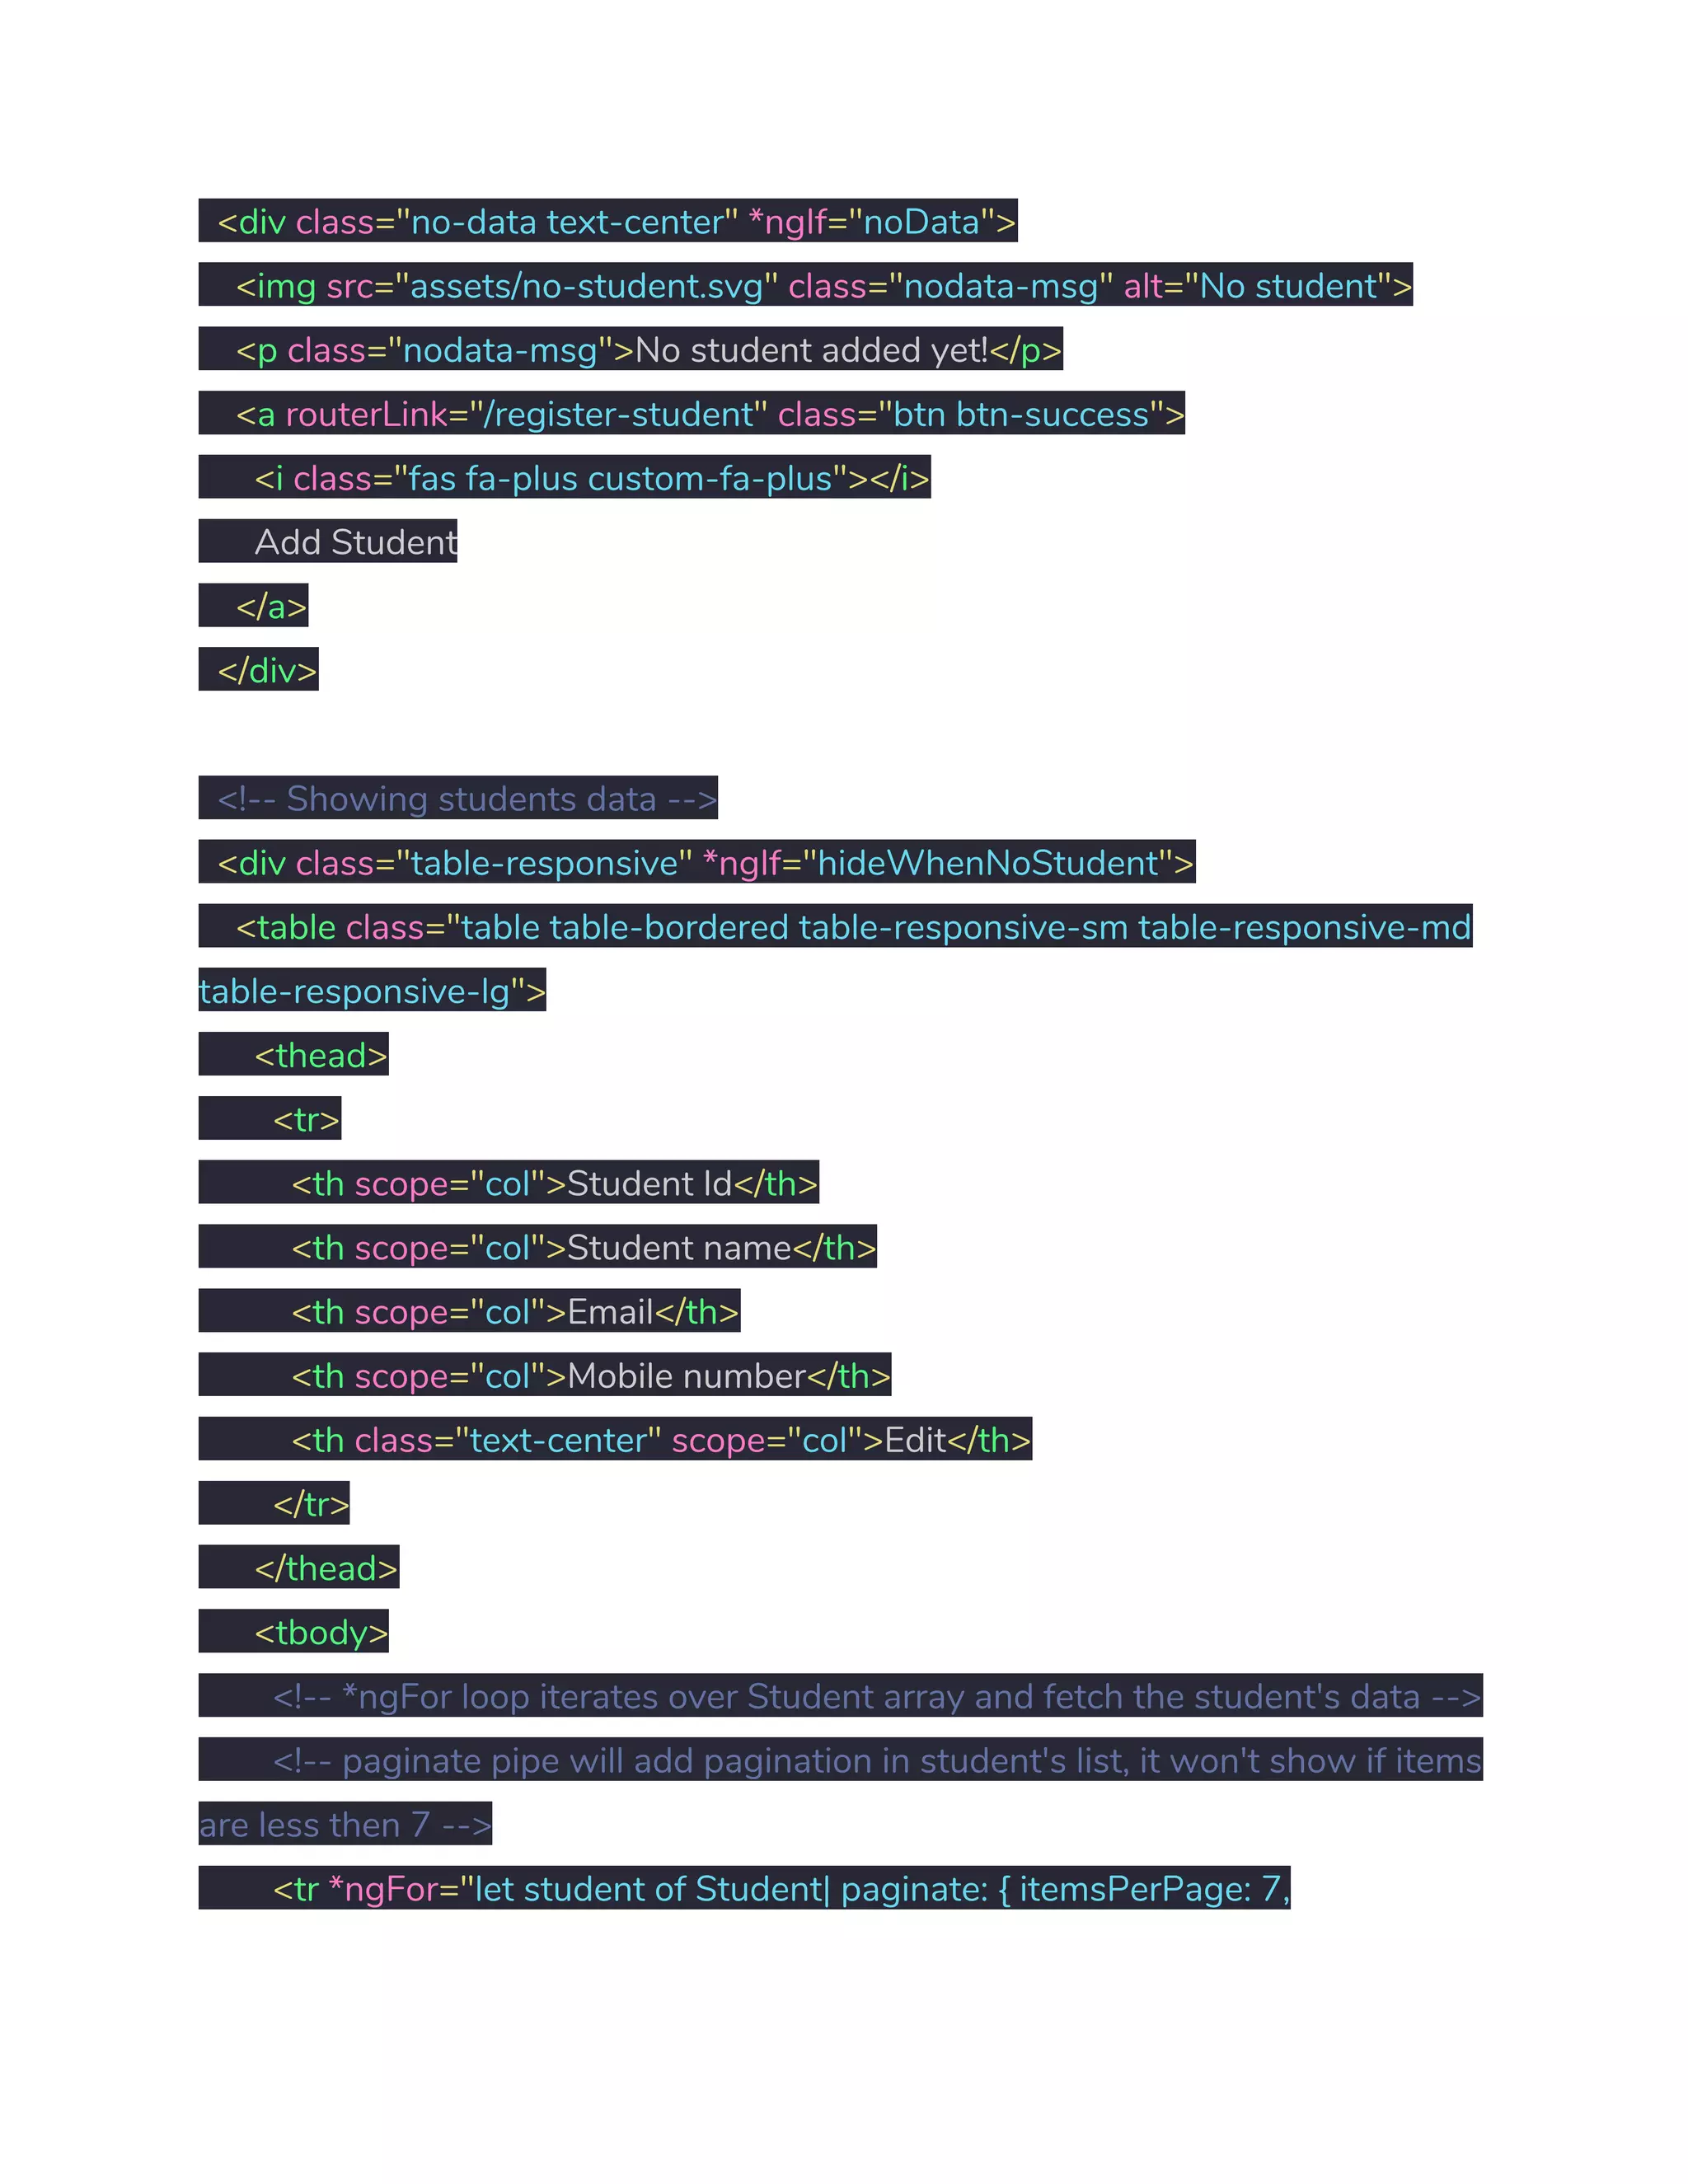
How to display, fetch, and delete student records using the implemented CRUD service with pagination.
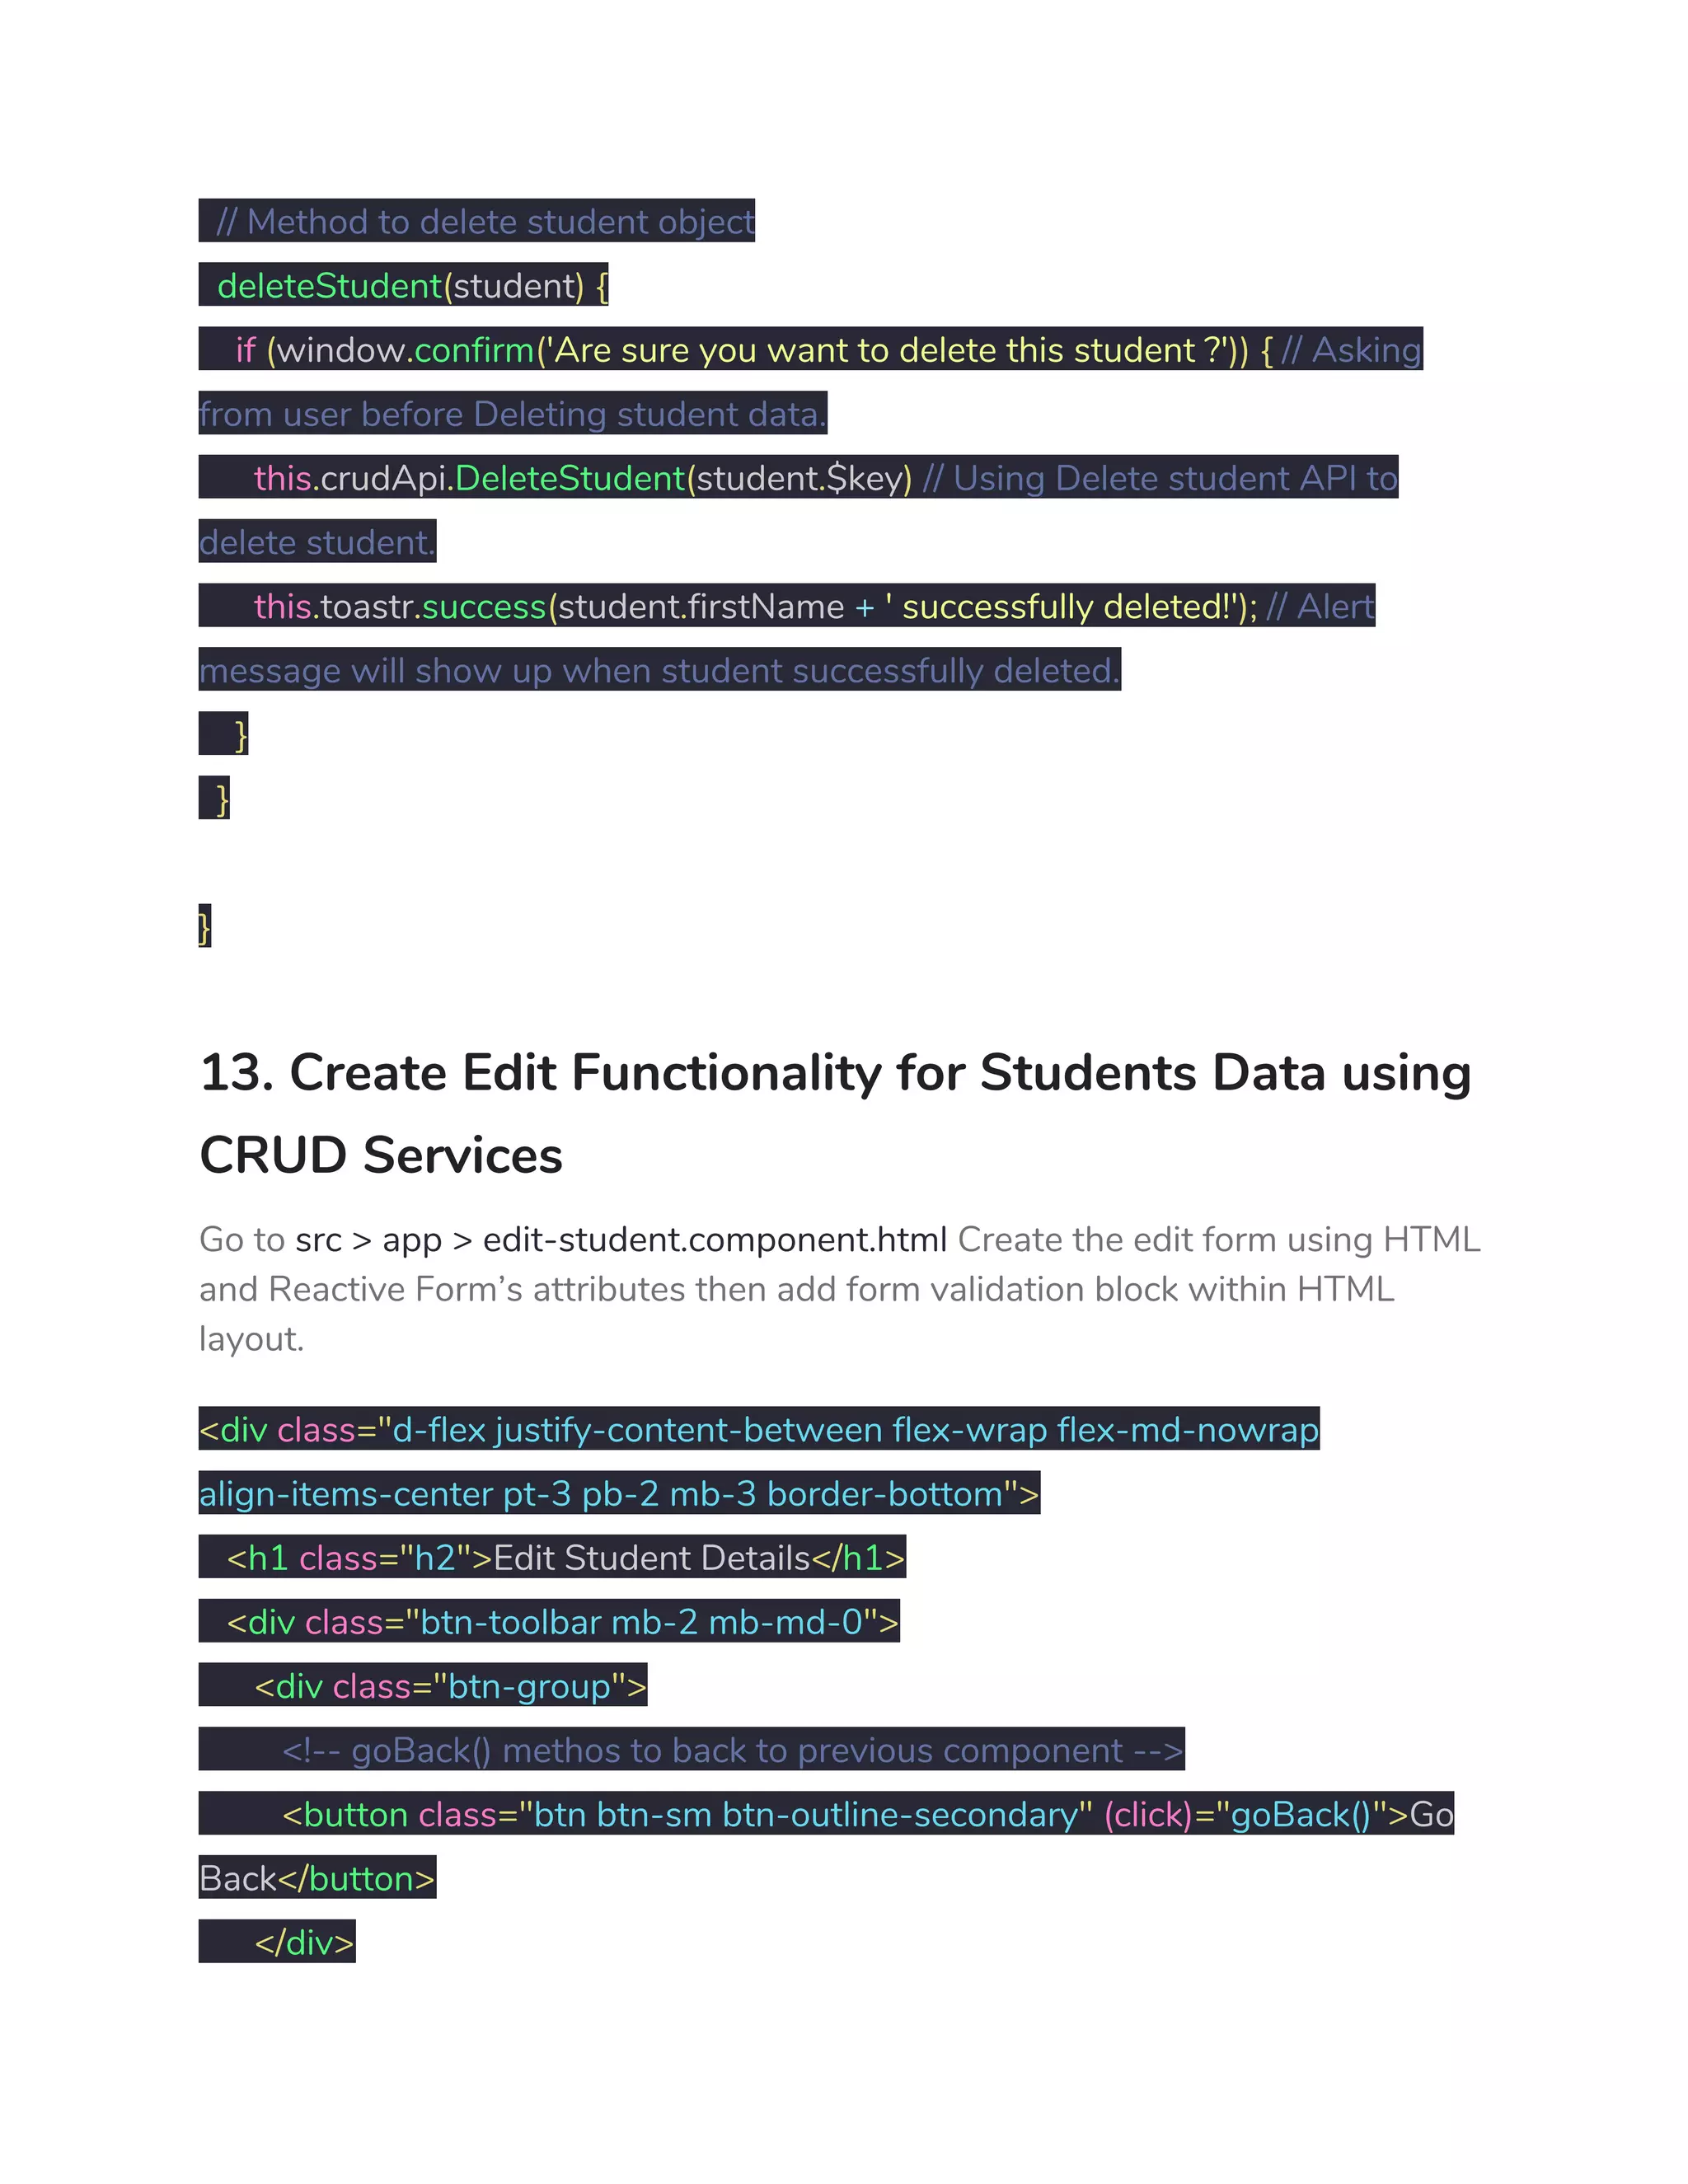
Implementation of edit functionality for student records including form setup and data submission.