
How to configure multiple monitors for remote desktop use
Many users rely on multiple monitors for work. Making sure remote desktop experiences are seamless helps maintain user productivity and reduce IT support calls.
IT teams need to support remote desktop users with whatever peripheral device setup and troubleshooting they need, including multiple monitors.
Users in the financial sector and healthcare -- among many other industries -- are especially accustomed to multiple monitor configurations, putting pressure on IT to adjust the settings to meet user needs. The challenge is getting remote desktops to detect and interact with local hardware when the desktop isn't running locally.
Configuring remote desktop sessions with the Windows App
Previously, remote desktops were available through the Remote Desktop app in the Microsoft Store. However, in May 2025, the Windows App replaced the Remote Desktop app, and the transition is not yet complete.
It's still possible to access a Windows desktop from another Windows computer with the Microsoft Remote Desktop Connection application, MSTSC.exe. For other platforms, such as macOS, accessing a Windows desktop is only possible with the Windows App. Connecting to a desktop in Microsoft Azure also involves using Windows App from a Windows computer.
The Windows App is available in the Microsoft Store, Apple App Store and Google Play Store. Additionally, browser access to remote desktops is available through the Windows Cloud portal.
Access to virtual desktops from the Windows App requires a Microsoft work or school account and doesn't work with a personal account.
Organizations should consider a phased adoption of the Windows App, balancing legacy RDP support with modern features. This approach maximizes employee productivity, minimizes support overhead and ensures alignment with long-term IT strategy.
Technical considerations for setup
Enabling multiple monitors in Windows App is an option the end user needs to enable on their Windows or Mac device. As an IT administrator, it's not something you can configure on the server side. As such, it might be a good idea to write up a good user instruction manual -- feel free to base it off these instructions.
Before IT embarks on this process, it's important to keep the limitations of multiple monitor RDP in mind. While it should be more than enough to have two medium-resolution monitors, RDP supports up to 16 displays. Administrators can further reduce this limit. RDP users are also limited to a maximum resolution of 8192 x 8192, though this might vary between environments. IT can also connect through RDP to a virtual desktop on a virtual server with multiple monitors. This will simply create a virtual desktop on the end user's monitors.
Set up multiple monitors on a remote desktop session
With the new Windows App, the steps to set up multiple monitors on a remote desktop session are fairly straightforward. However, the process varies depending on the OS in use.
In enterprise environments, Windows or macOS are the typical platforms for multi-monitor remote desktop configurations.
How to set up multiple monitors for remote desktop use on Windows
To enable and customize multiple monitor support for a remote desktop session on a Windows device, use the following steps:
- From the Windows App, select Devices, then find the device you want to configure the display settings for.
- Select the three dots on the panel representing the device, then click on Settings.
- Toggle off the Use default settings switch.
- Under Display Settings, select one of the following options:
- All displays. This setting automatically uses all displays for the device.
- Single display. With this setting, you choose one display to use.
- Select displays. With this setting, you select two or more specific displays to use.
Additionally, Windows continues to support several traditional and advanced Remote Desktop Connection methods. These can be helpful in environments that use legacy tools, scripting or specialized configurations.
The first option is to use the traditional Remote Desktop Connection client. Click on the search bar on the Start menu and type in MSTSC/ MULTIMON. This will start up the RDP client in a multi-monitor configuration. From here, you can enter the server address, and it will automatically connect to the server full screen on all your monitors.
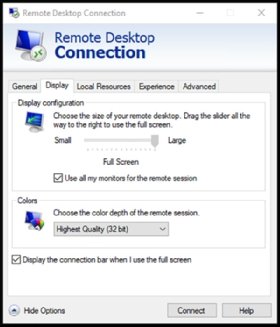
The legacy RDP client also enables multi-monitor support through the UI. Launch the Remote Desktop Connection agent the usual way from the start menu. Then, go to the Display tab and select Use all my monitors for the remote session (Figure 1).
The last legacy option is to edit the RDP file directly. This approach is more advanced.
You can save the connection setting of the RDP session in the general tab of the RDP client. These settings will then be saved in an RDP file. You can edit this file within the client, or simply with the Notepad app.
After opening the RDP file in Notepad, you can change multiple options. But the one that configures multiple monitors is called use multimon:i:1. The number 1 means the option is enabled, and 0 means the option is not enabled.
How to set up multiple monitors for remote desktop use on macOS
To configure multiple monitor support for a remote desktop session on a macOS device, use the following steps:
- From the Windows App, select Devices, then find the device you want to configure the display settings for.
- Select the pencil icon on the panel representing the device.
- Check the box next to Use customized settings.
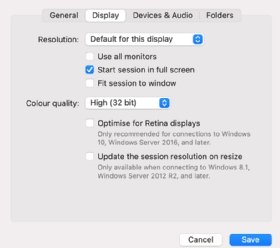
- On the Display tab, select the Use all monitors option (Figure 2).
Multiple monitors in the macOS Windows App is an all-or-nothing selection. In comparison to Windows, where users can choose which monitors to use, on macOS, users can only choose to use one or all monitors.
The 'select displays' feature was available in the Remote Desktop app on macOS. If this option is important for your users, then it's better not to update the app unless Microsoft eventually brings back the feature.
To manually enable multi-monitor mode in macOS, edit the RDP file with Text Editor in the same way as editing the RDP file on Windows. For macOS, the same setting for multiple monitor support is called usemultimon:i:1, where 1 means enabled and 0 means disabled.
Ensuring positive UX on multi-monitor RDP sessions
Enabling multi-monitor access on a remote desktop is the first and most essential step to providing good UX, but IT teams need to account for several other factors.
Using published applications on multiple monitors
Published applications are apps that are loaded from an RDP session, but instead of showing the full remote desktop, the end user can only see the image of the chosen app. This should automatically work on multiple monitor setups. In addition, the end user can drag and drop the application screen to any connected monitor they want.
Using published apps also gives more freedom of use on the end user's device because it will appear that the remote applications are running exactly the same as any local applications. This makes switching between these apps feel natural and normal. It's an excellent alternative for users who only need hosted applications and can run a native desktop for work. The method is especially helpful if the end user connects from a capable Windows device that also hosts local applications.
The 'use selected monitors' option for legacy systems
In legacy RDP clients, sessions automatically detect and use all monitors. However, this might not be the best user experience in certain situations. Consider an example where you have three monitors and want to use local apps on monitor one and use monitors two and three for an RDP session.
For computers still running the legacy Remote Desktop app, the 'use selected monitors' option can configure this setup. This option doesn't apply to the Windows App and only works in legacy RDP clients.
Running the command MSTSC /L will output the available monitors on the system and show the monitor IDs. In this example, the monitor hosting local apps has ID 0, and the other two monitors have ID 1 and 2. With this information, you can edit the RDP file by adding the selectedmonitors:s: option. The correct configuration in this example would be selectedmonitors:s:1,2 together with use multimon:i:1.
Troubleshooting multi-monitor remote desktop performance issues
When using multiple monitors for a remote desktop, performance issues can occur. Users might experience slow screen refresh rates, distorted images or video frame drops, for example. In some cases, a user might not be able to connect to a second monitor in the first place. All these issues can hinder user productivity and increase help desk requests.
For any problems with multiple monitor remote desktop setups, IT can try a few key troubleshooting steps.
Check for human error
Make sure the Windows App is configured to show the remote desktop on multiple monitors. The user might say they enabled it, but you should look for yourself to confirm they haven't missed something.
Make sure all monitors are working properly with the local OS
If the local setting is to mirror the displays, then both monitors should show the same remote desktop screen. Instead, you can configure the monitors to extend the desktop to the additional displays.
Make sure the remote computer supports multiple monitors
When connecting to a computer running Windows Home, only a single monitor is supported. For multiple monitor support, the computer needs to be running Windows Pro, Enterprise or Windows Server.
In general, admins should ensure all remote desktops are configured on supported systems. This minimizes operational risk and prevents workarounds that could compromise compliance in regulated industries.
Verify the screen resolution
Another possible fix is to check the screen resolution. Selecting a resolution that's too high in multiple monitors might exceed the maximum total resolution for all combined displays.
Check the available bandwidth
When all monitors are in use and the UX isn't optimal, find out the available bandwidth. The combined resolution might be too high for the network connection.
IT decision-makers should also note that high-resolution multi-monitor setups can increase network load, which might require bandwidth investments to maintain consistent performance.
Access the remote desktop from another client
To verify whether the problem is within the remote desktop or within the client, access the remote desktop from another client. If another client does work with multiple monitors, the remote desktop is the most likely source of the problem.
If none of these steps solves the issue, restart the remote desktop and try reconnecting. If that doesn't work, try the same process with the client computer.
IT can also check the log files for any indication of the possible source of a multi-monitor RDP problem. Logging is enabled by default for the Windows App. On Windows, the logs are located in %temp%\DiagOutputDir\Windows365\Logs.
On macOS, you can access the log location from the Windows App menu under Help > Troubleshooting > Logging. In the dialog, you can configure the logging level and open the logs folder.
Editor's note: This article was originally written by Christ Twiest in June 2023. Rob Bastiaansen updated this article in November 2025 to reflect changes in Microsoft's remote desktop options and troubleshooting steps.
Chris Twiest works as a technology officer at RawWorks in the Netherlands, focusing on the future Workspace and Cloud technologies for the end user.
Rob Bastiaansen is an independent trainer and consultant based in the Netherlands specializing in VMware and Linux. He writes articles for several print and online publications, and is founder of VMwarebits.com, a site dedicated to technical content related to VMware.