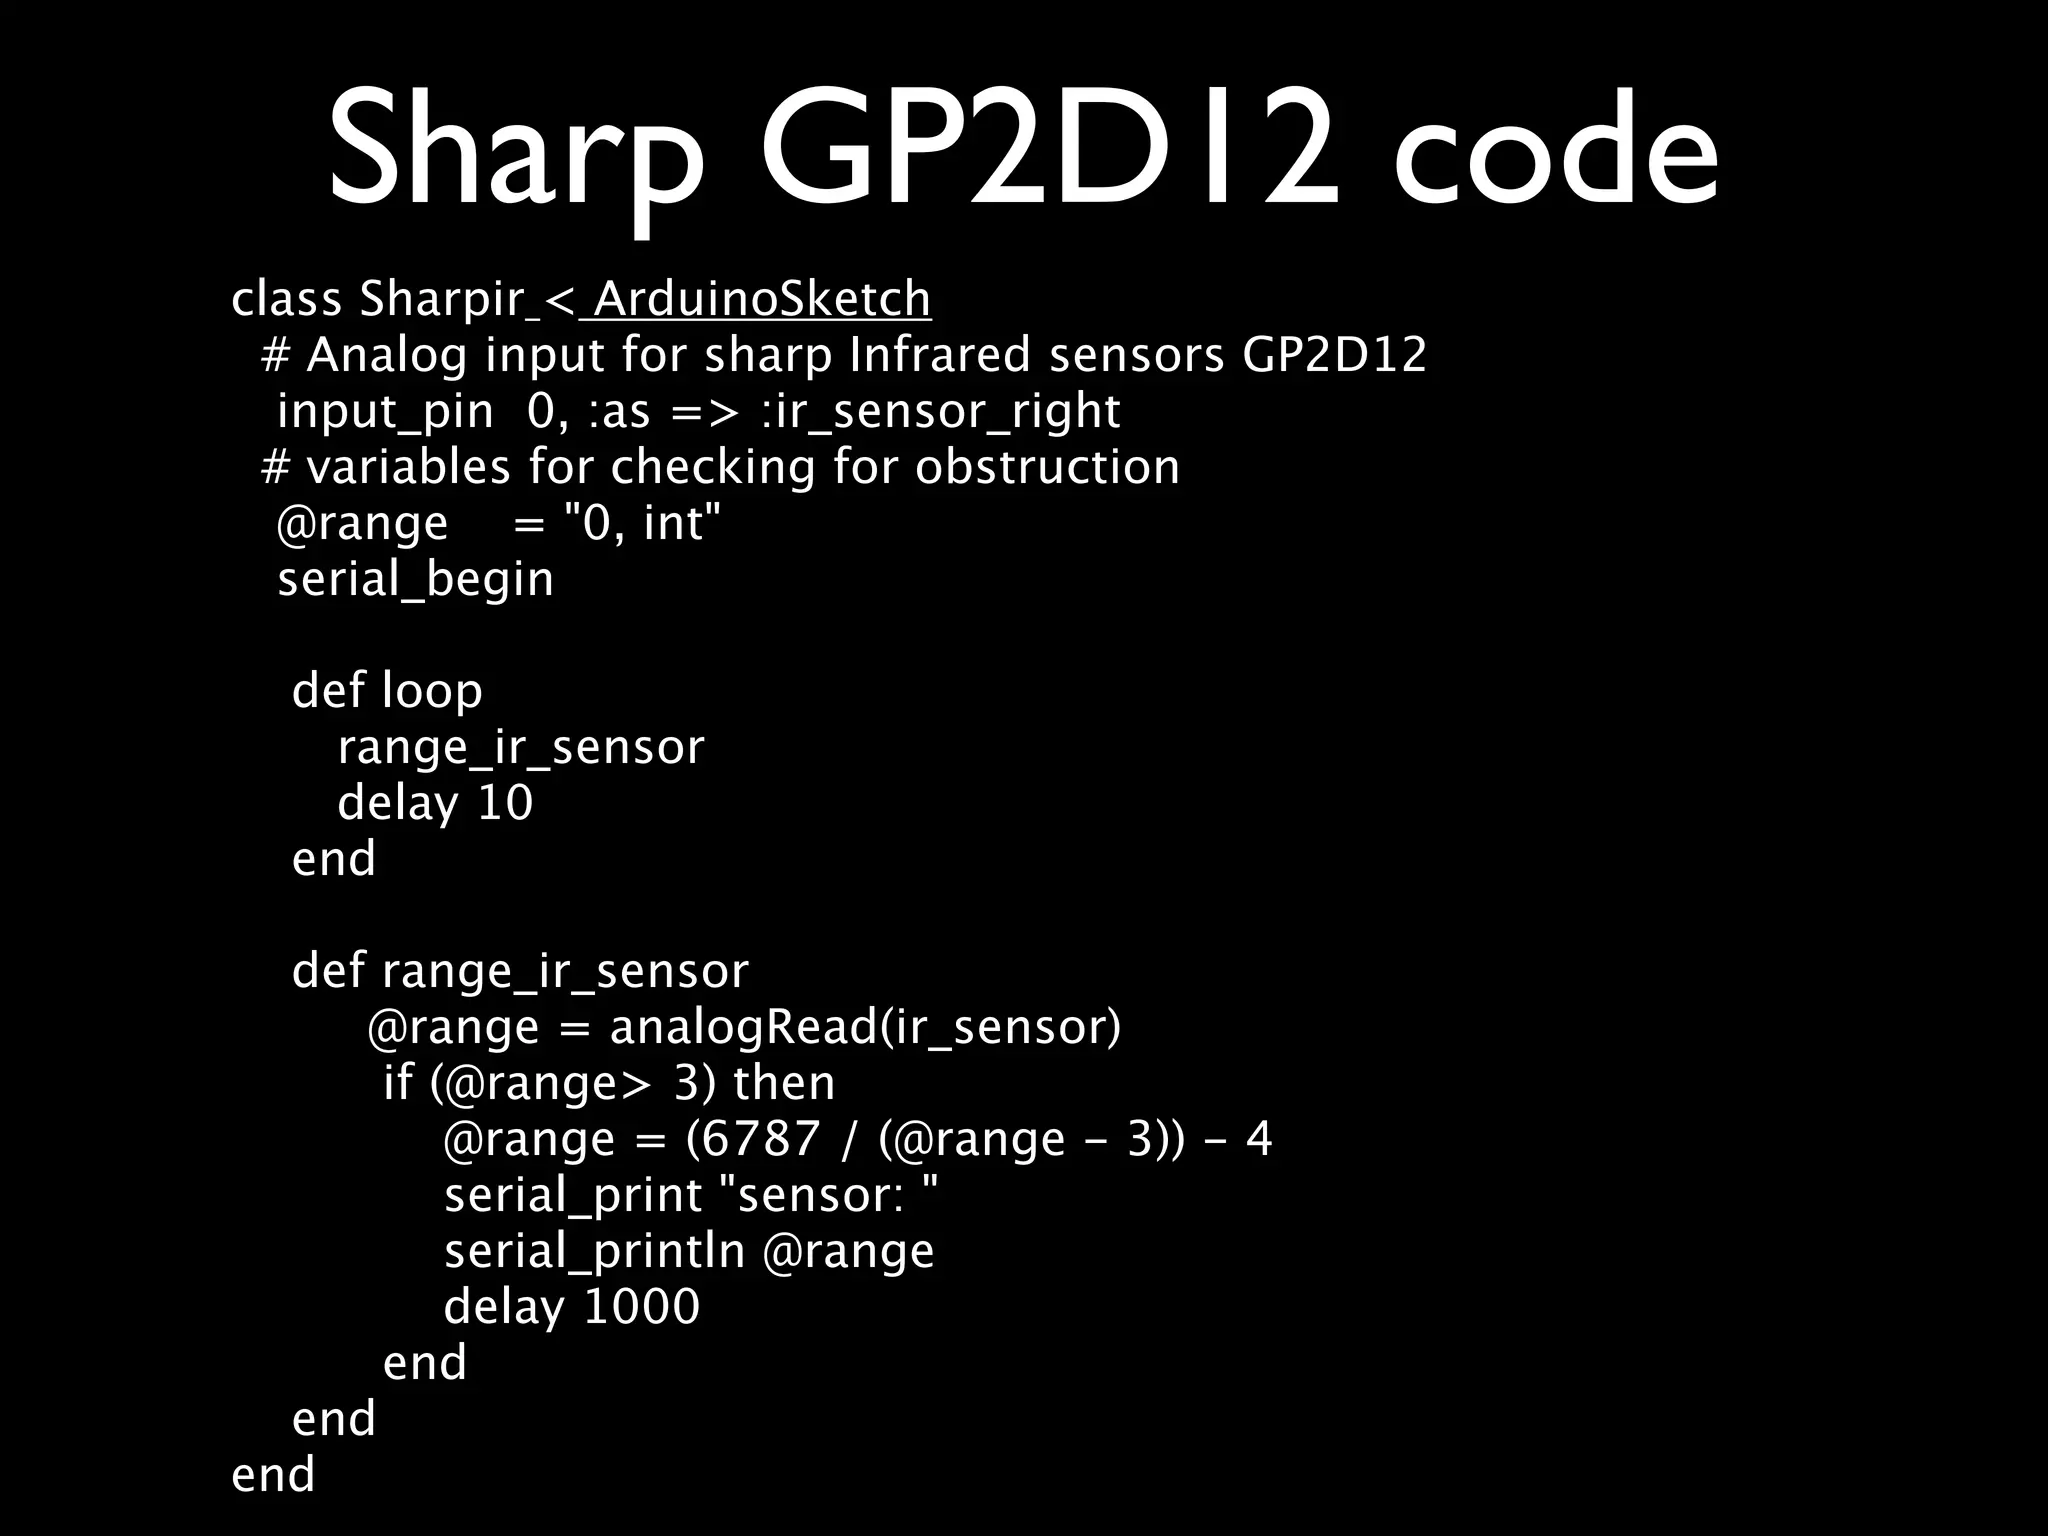
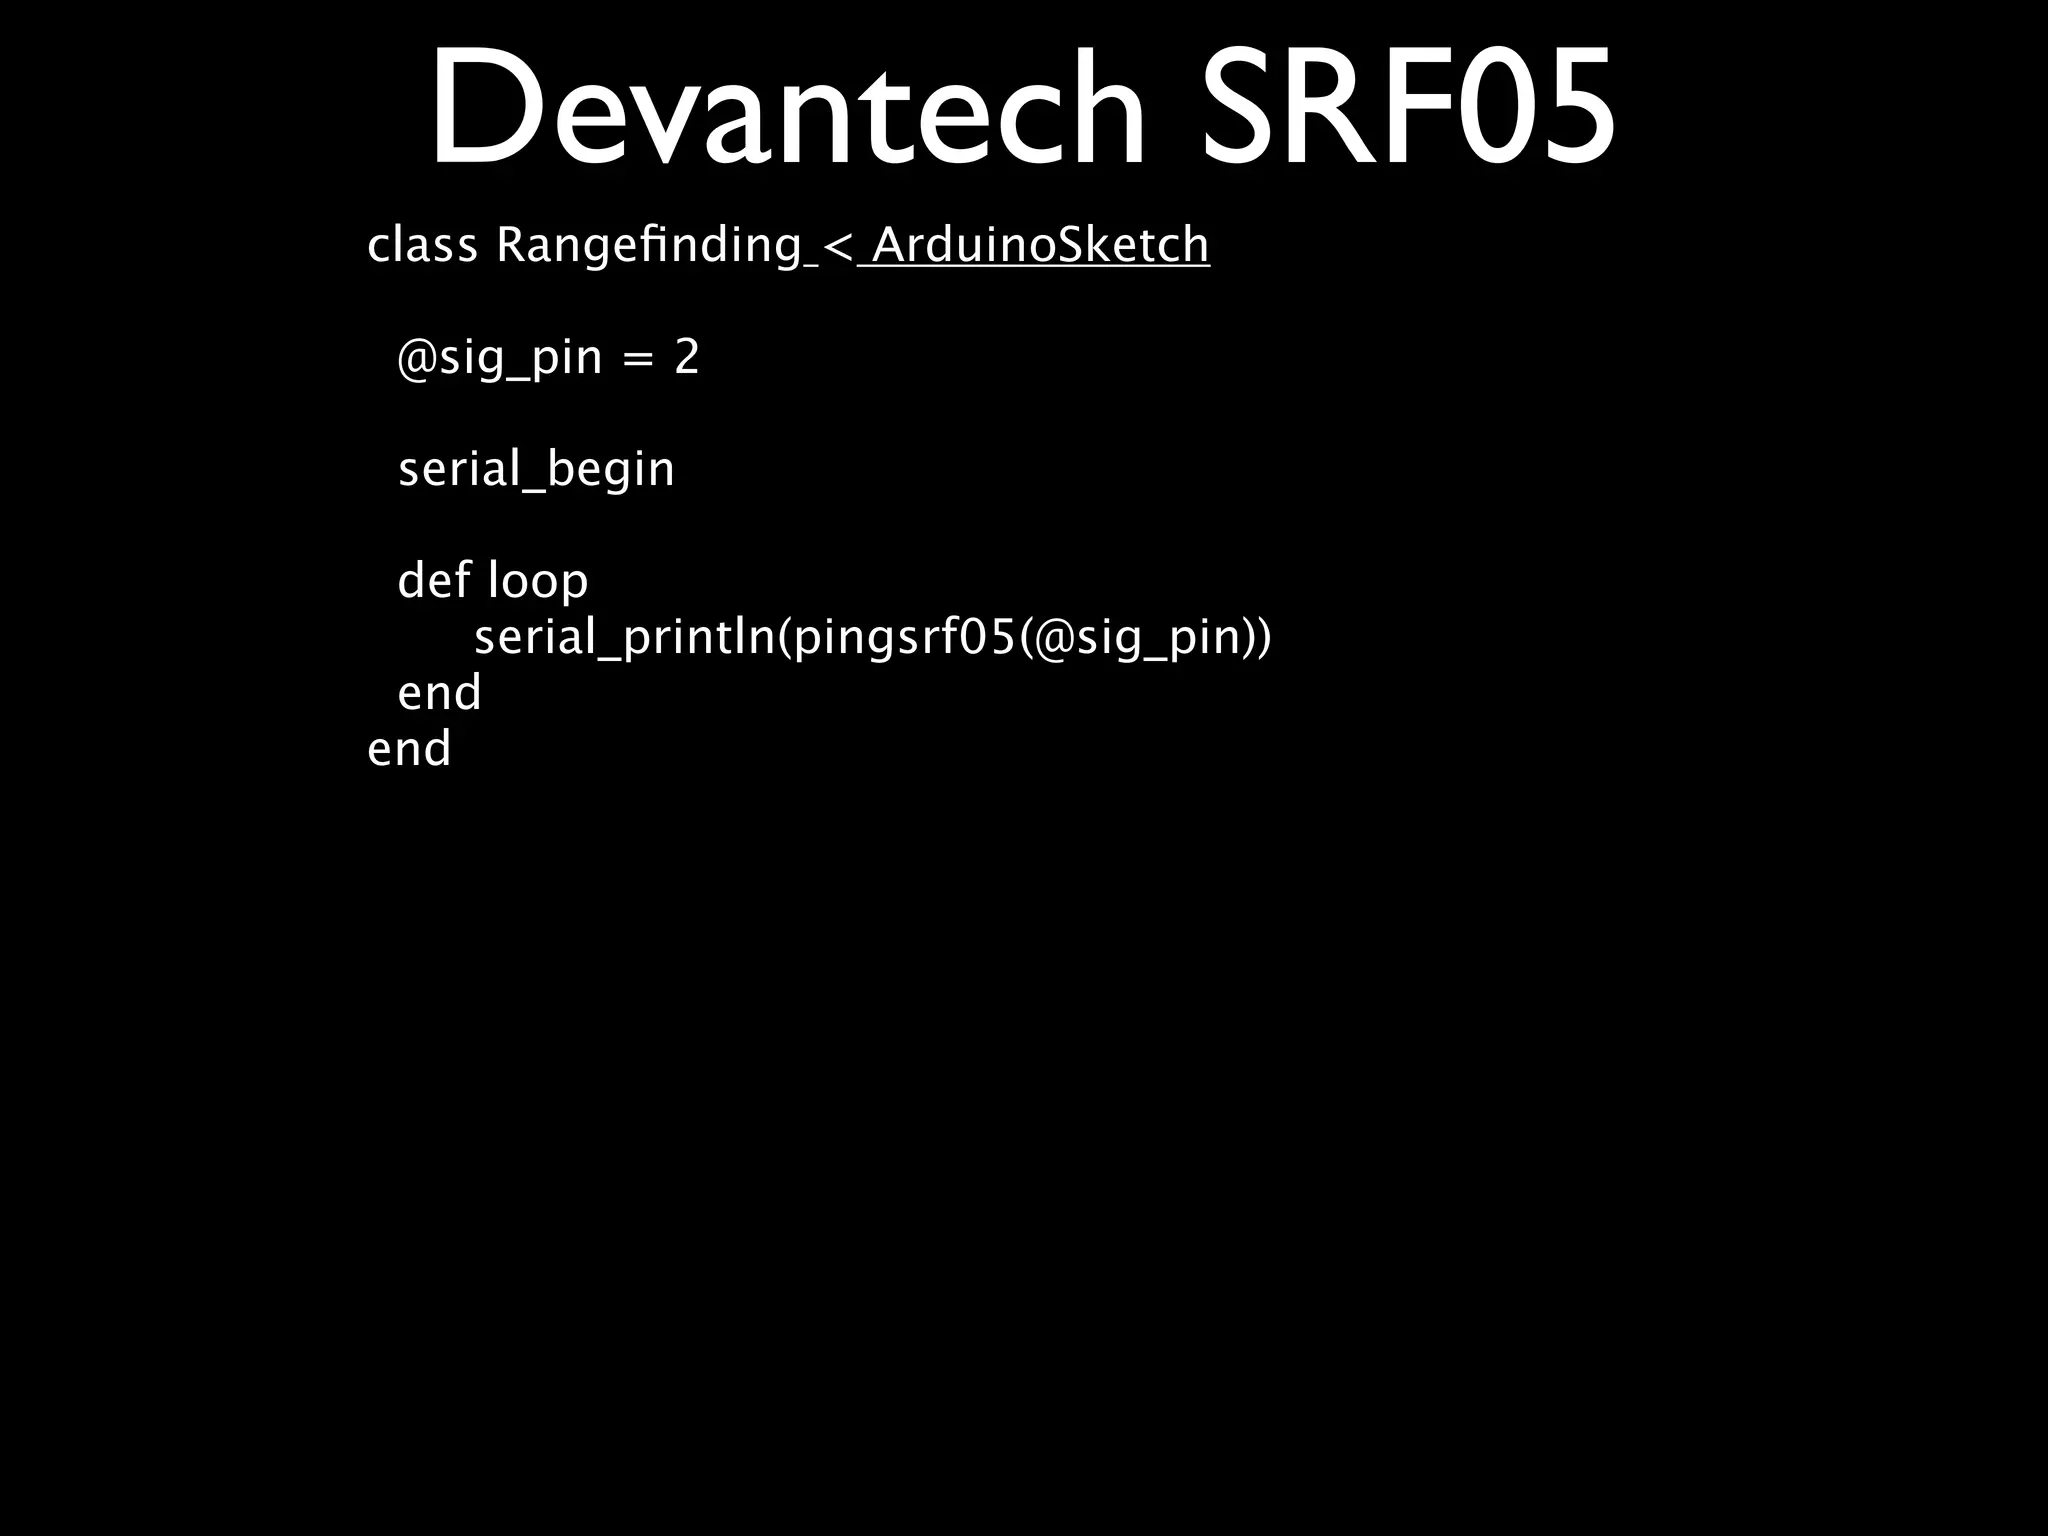
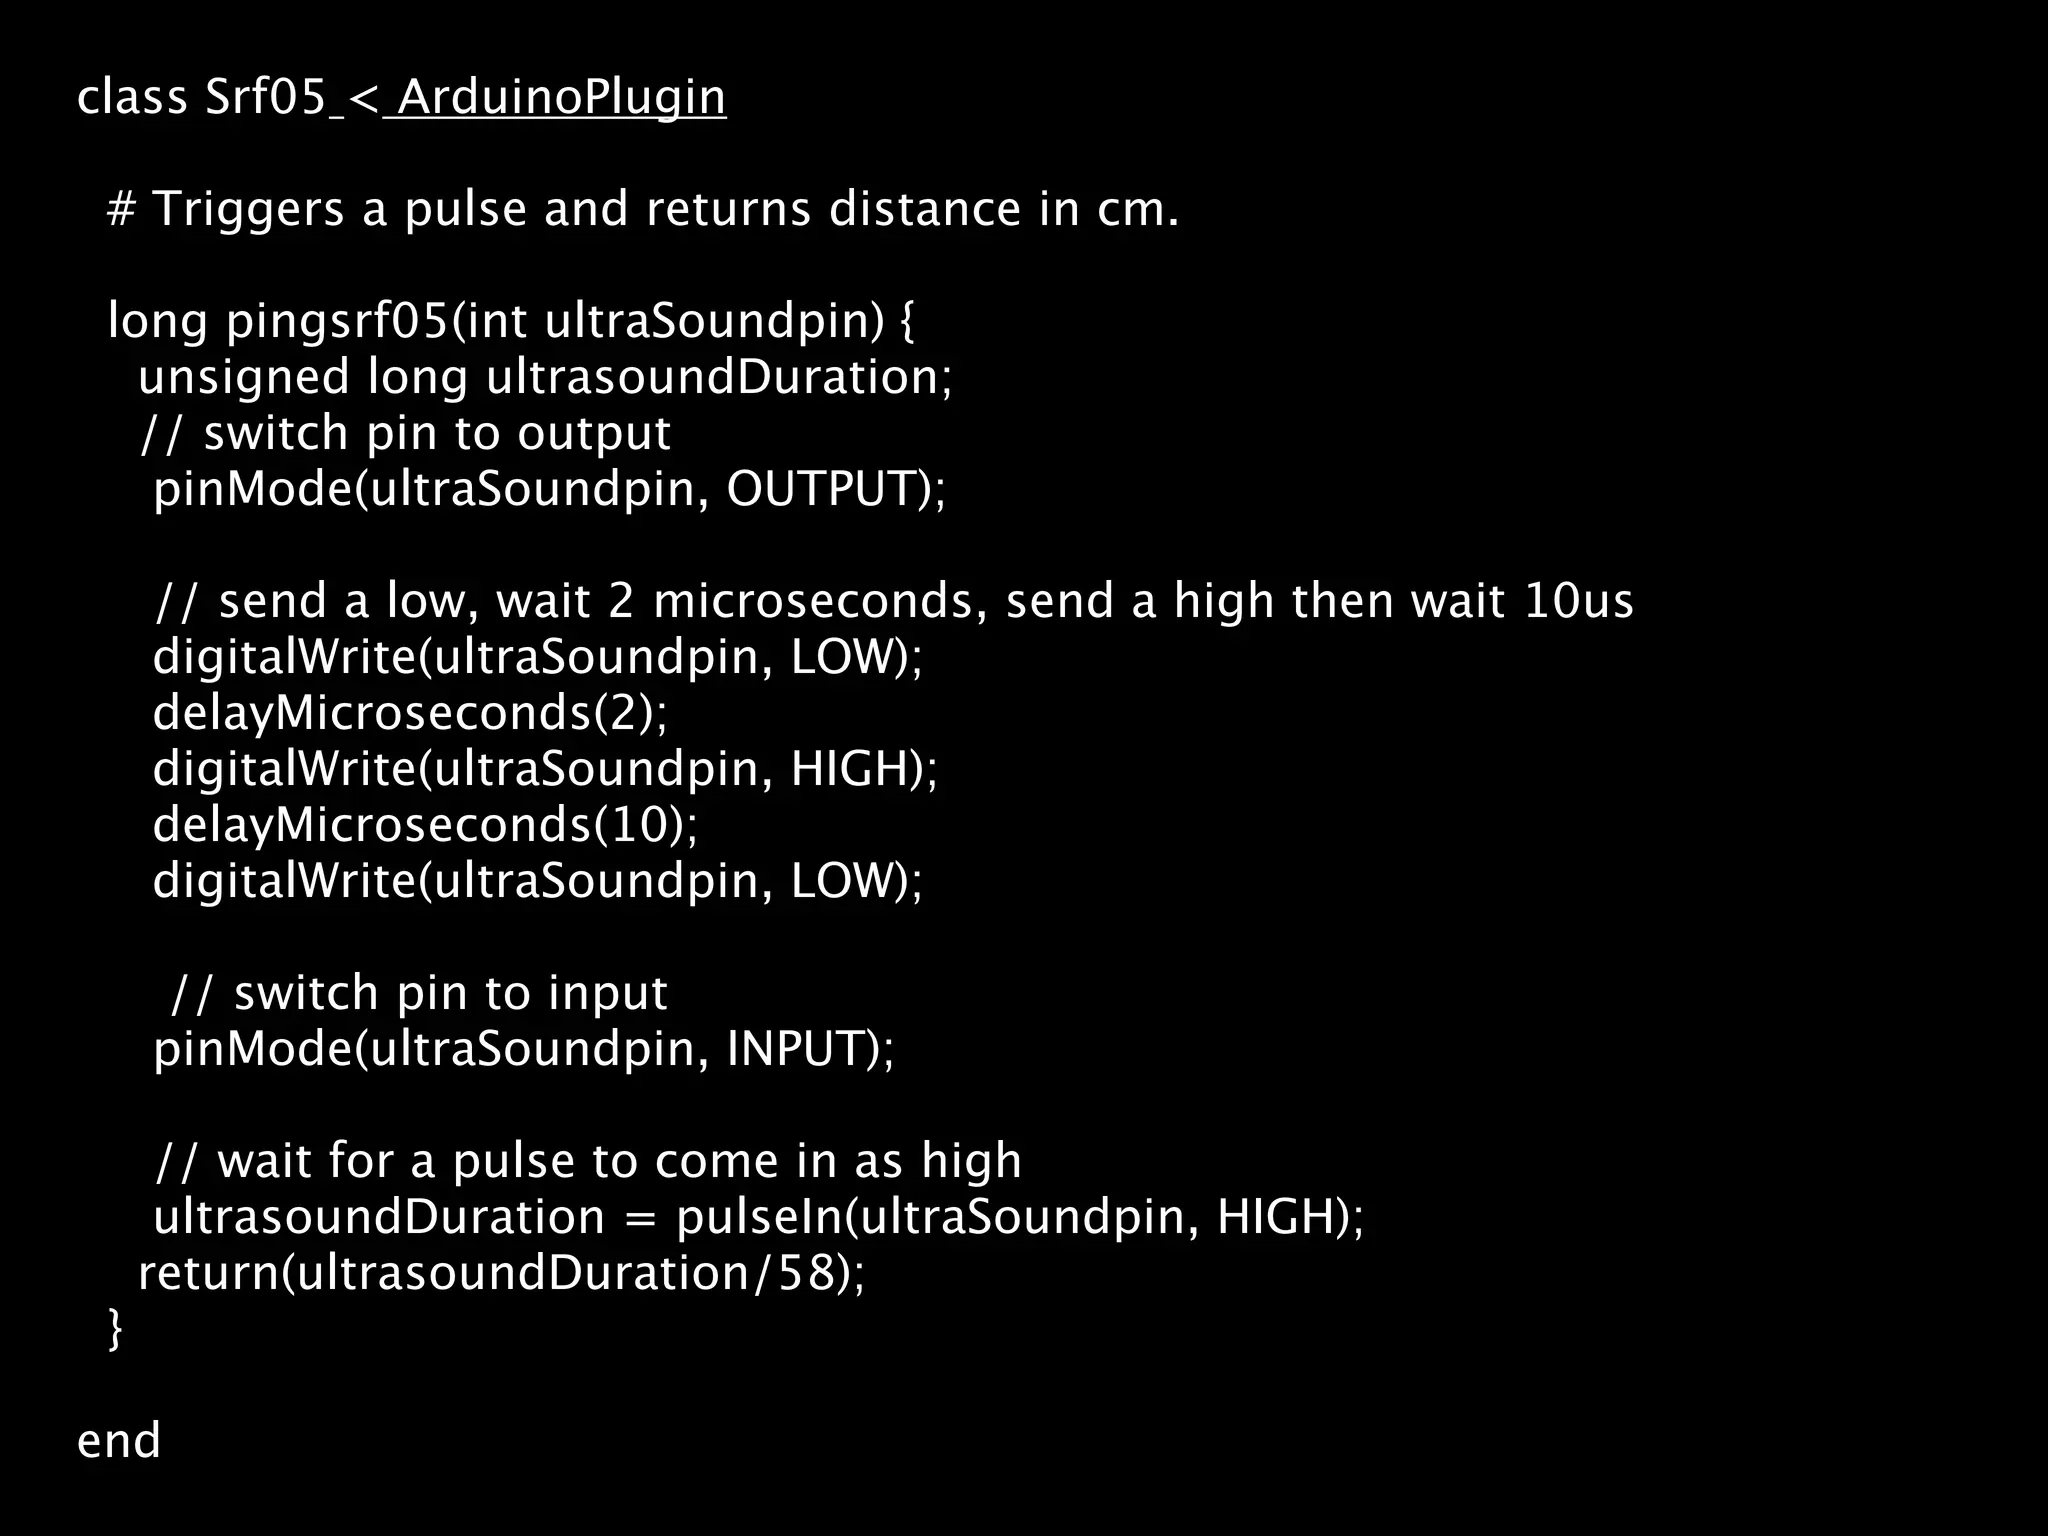
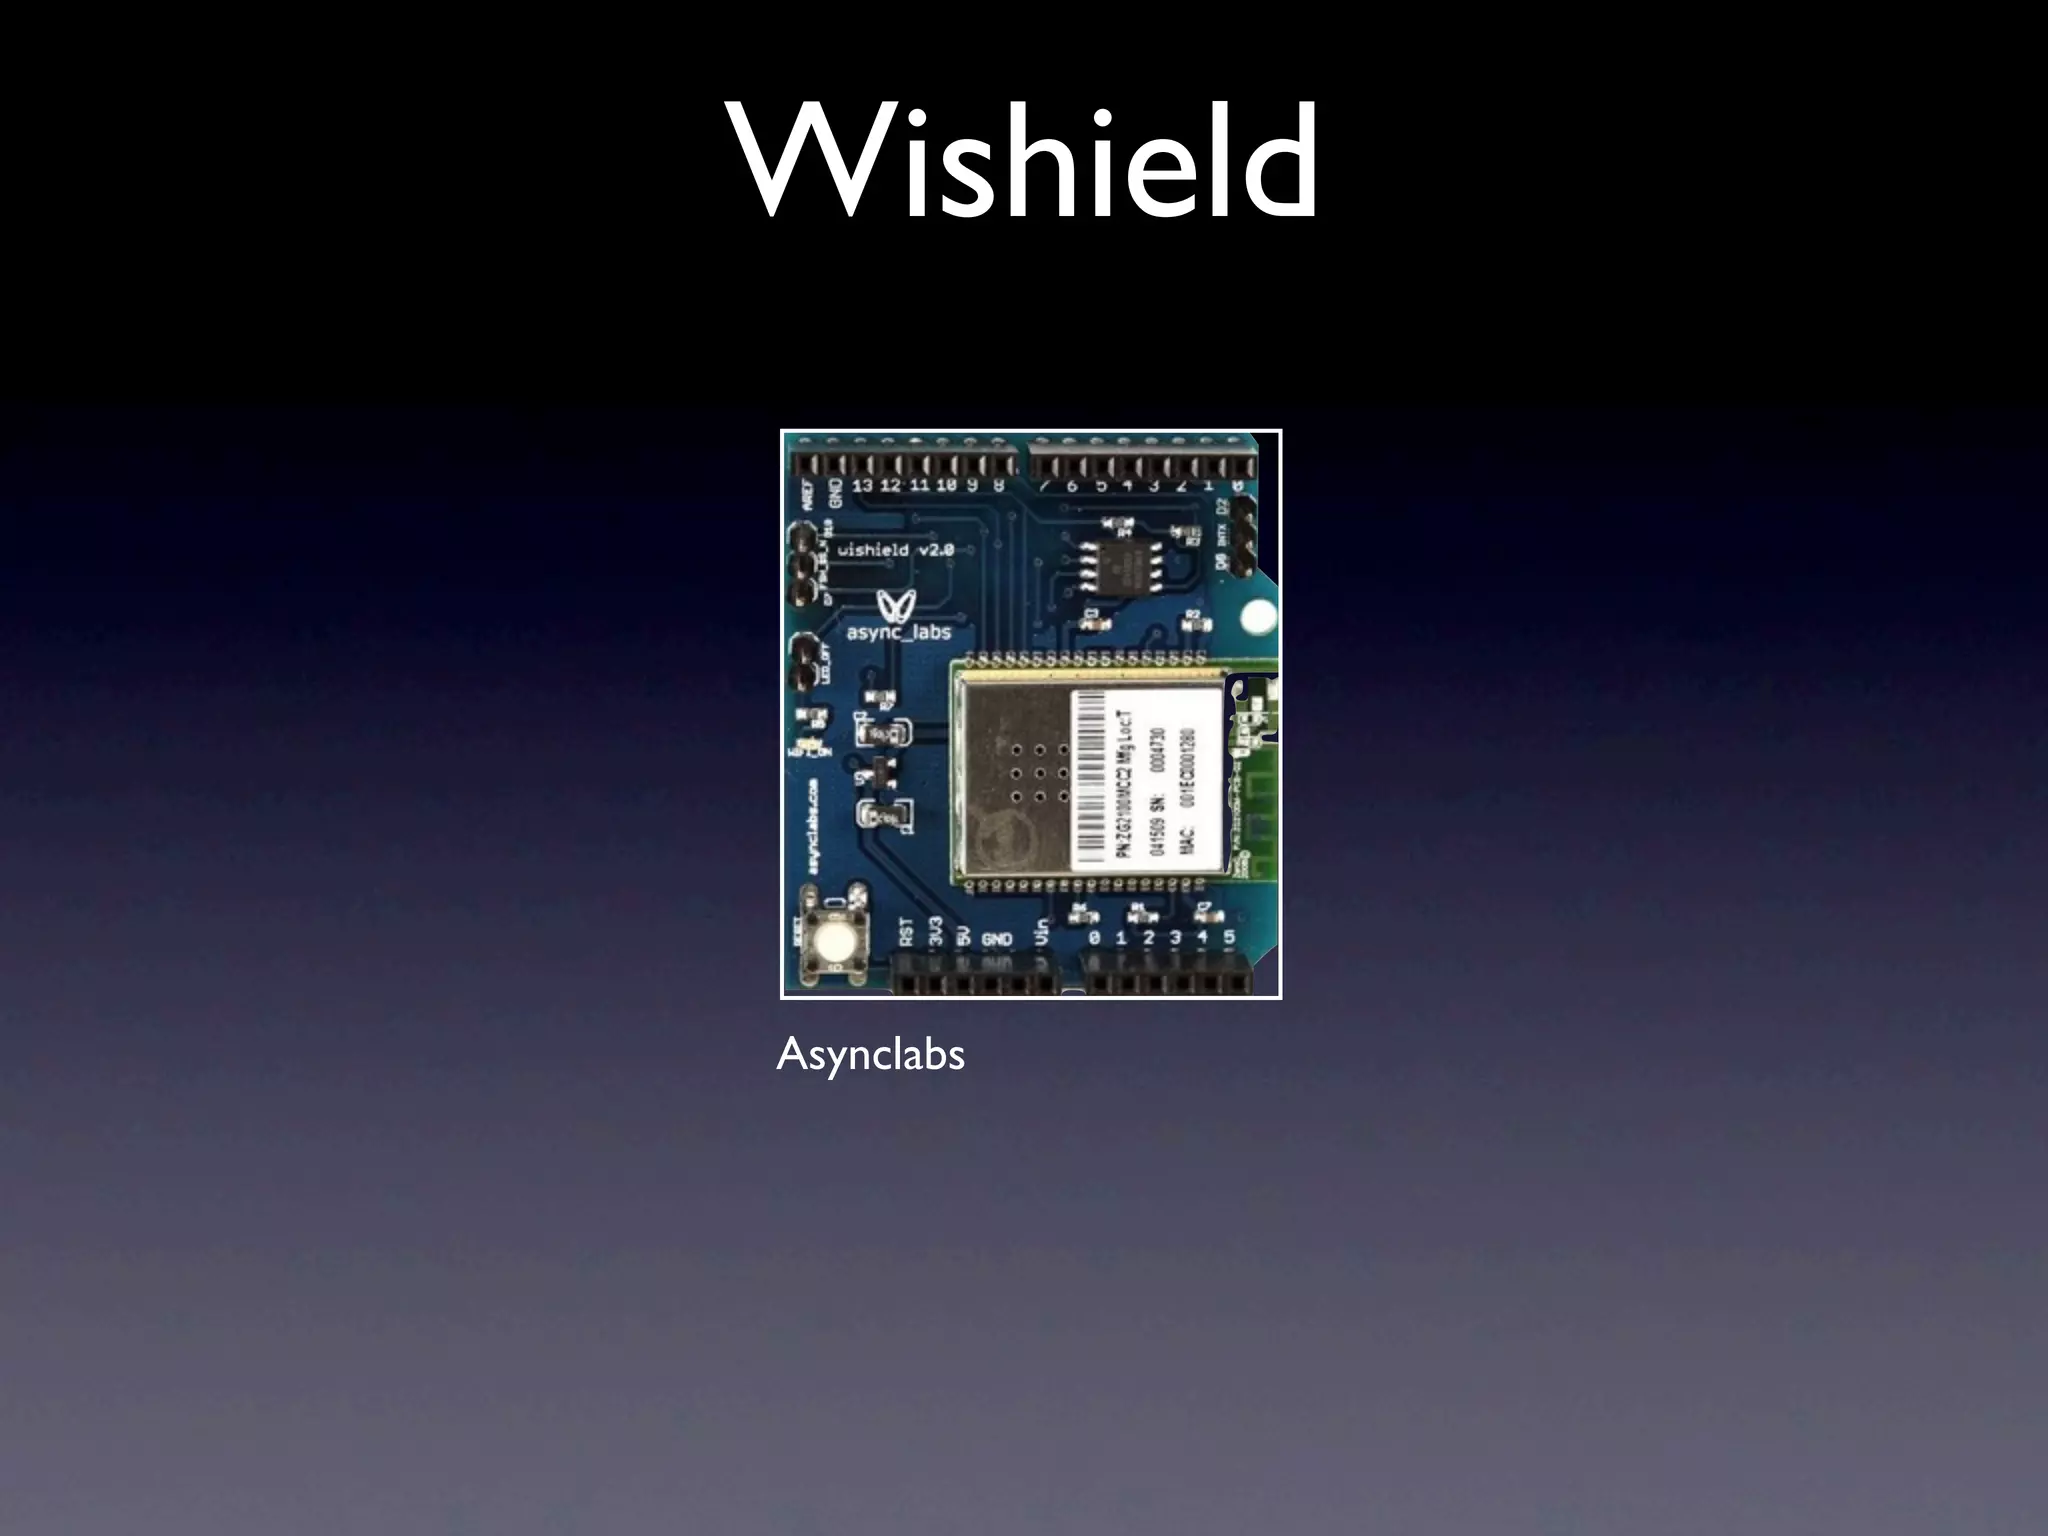
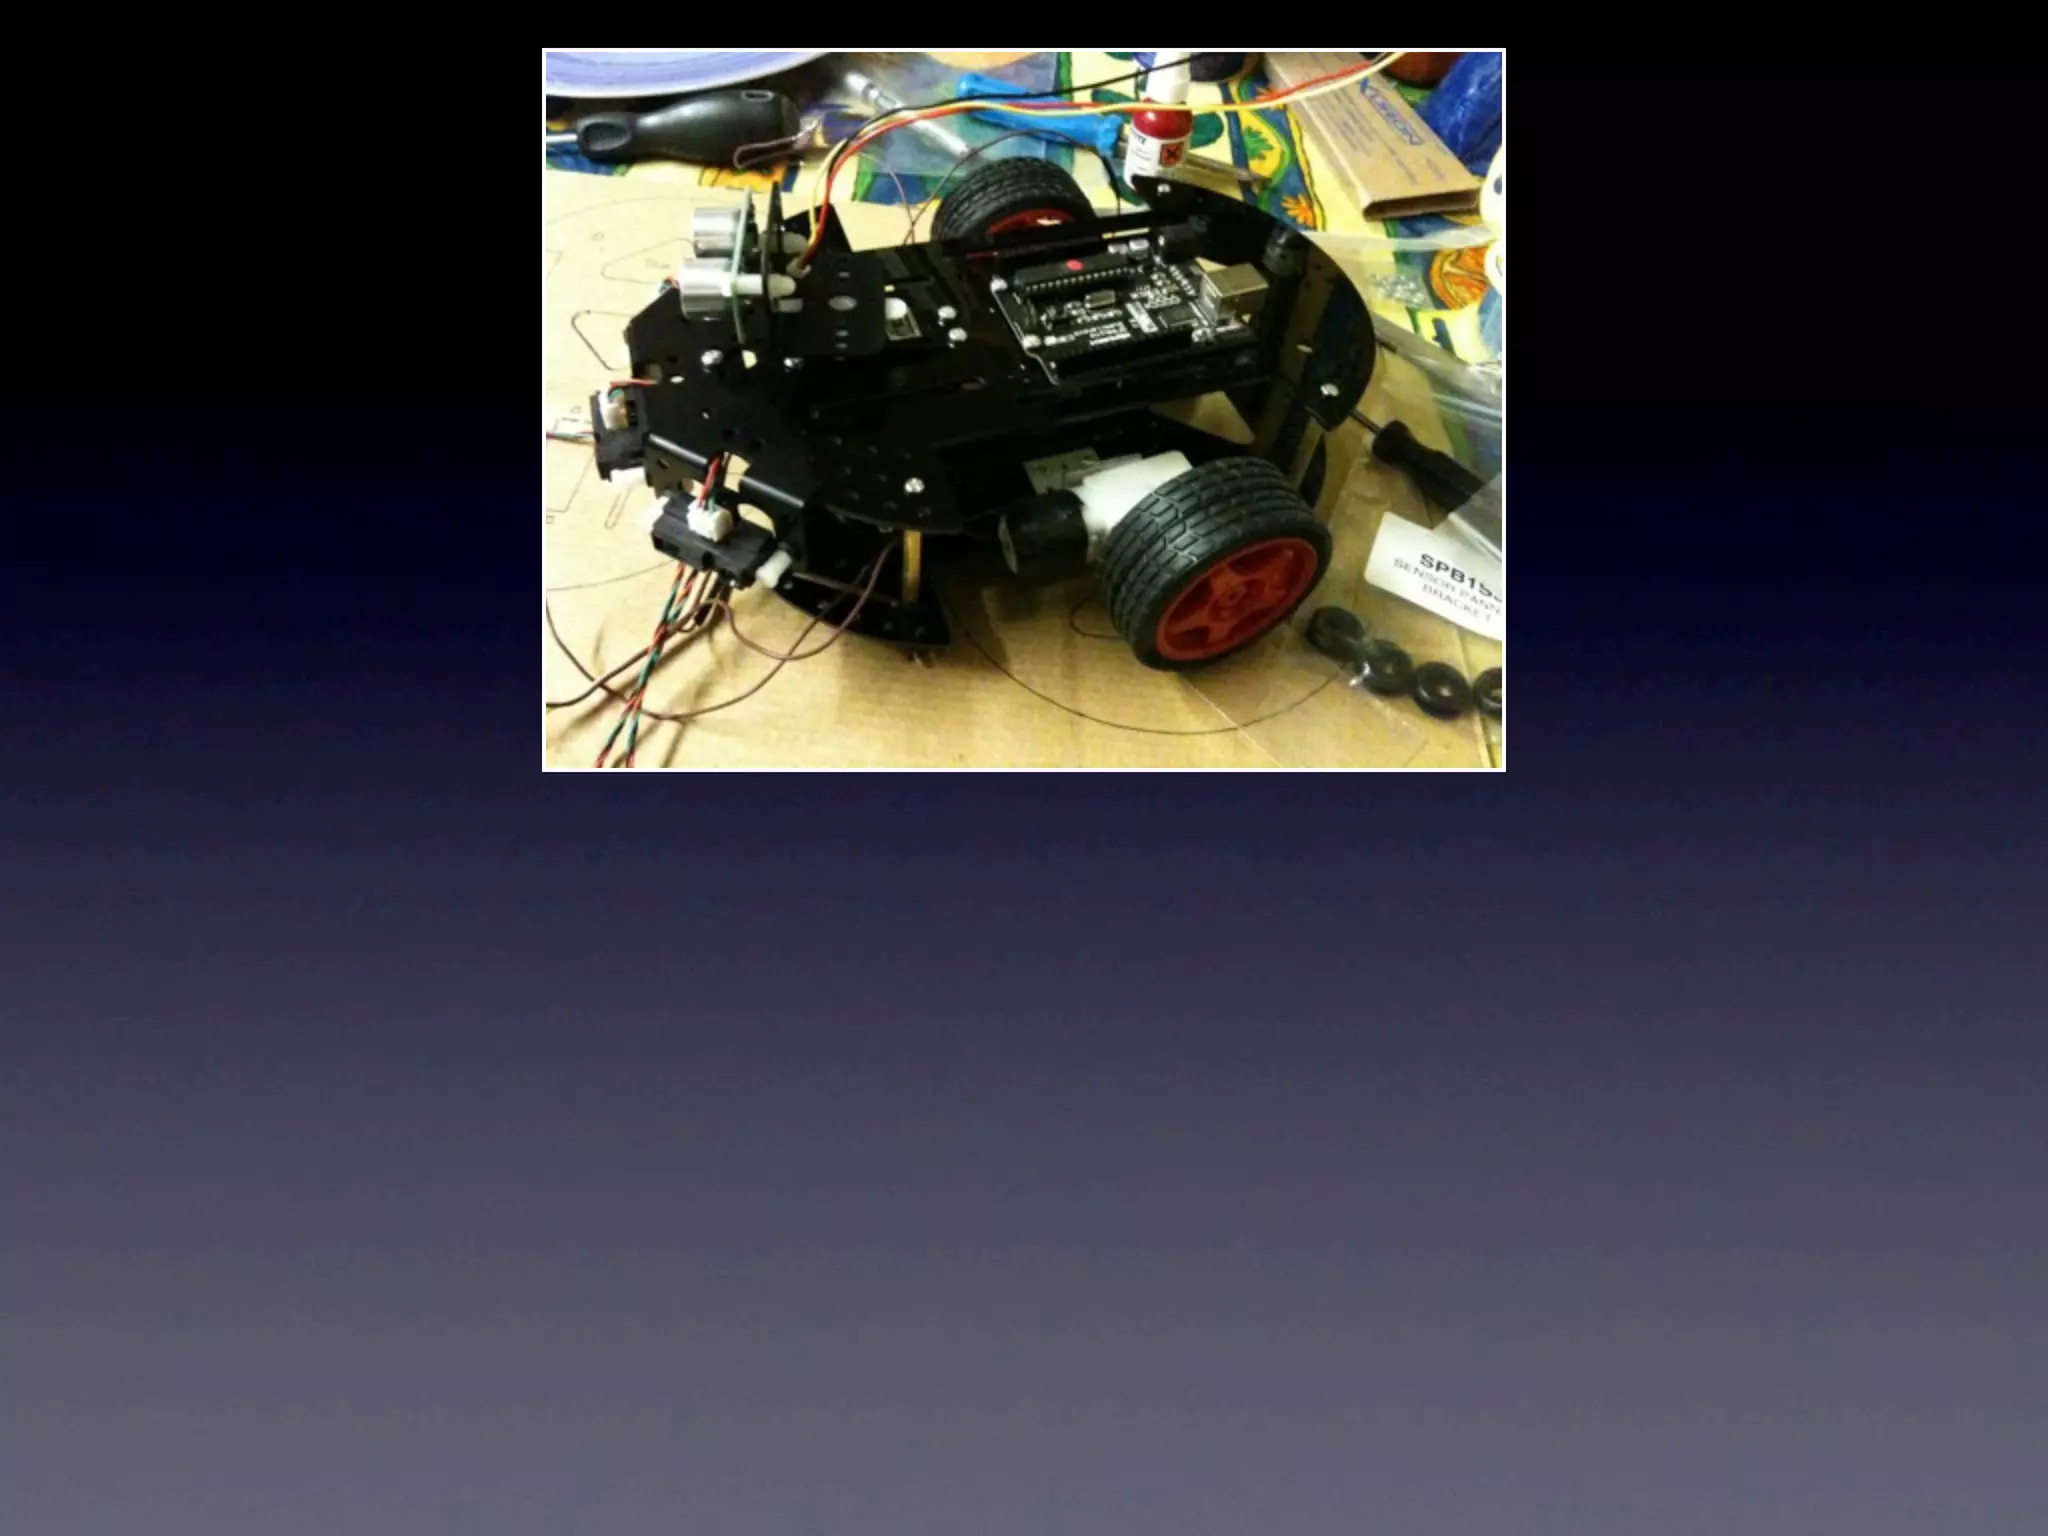
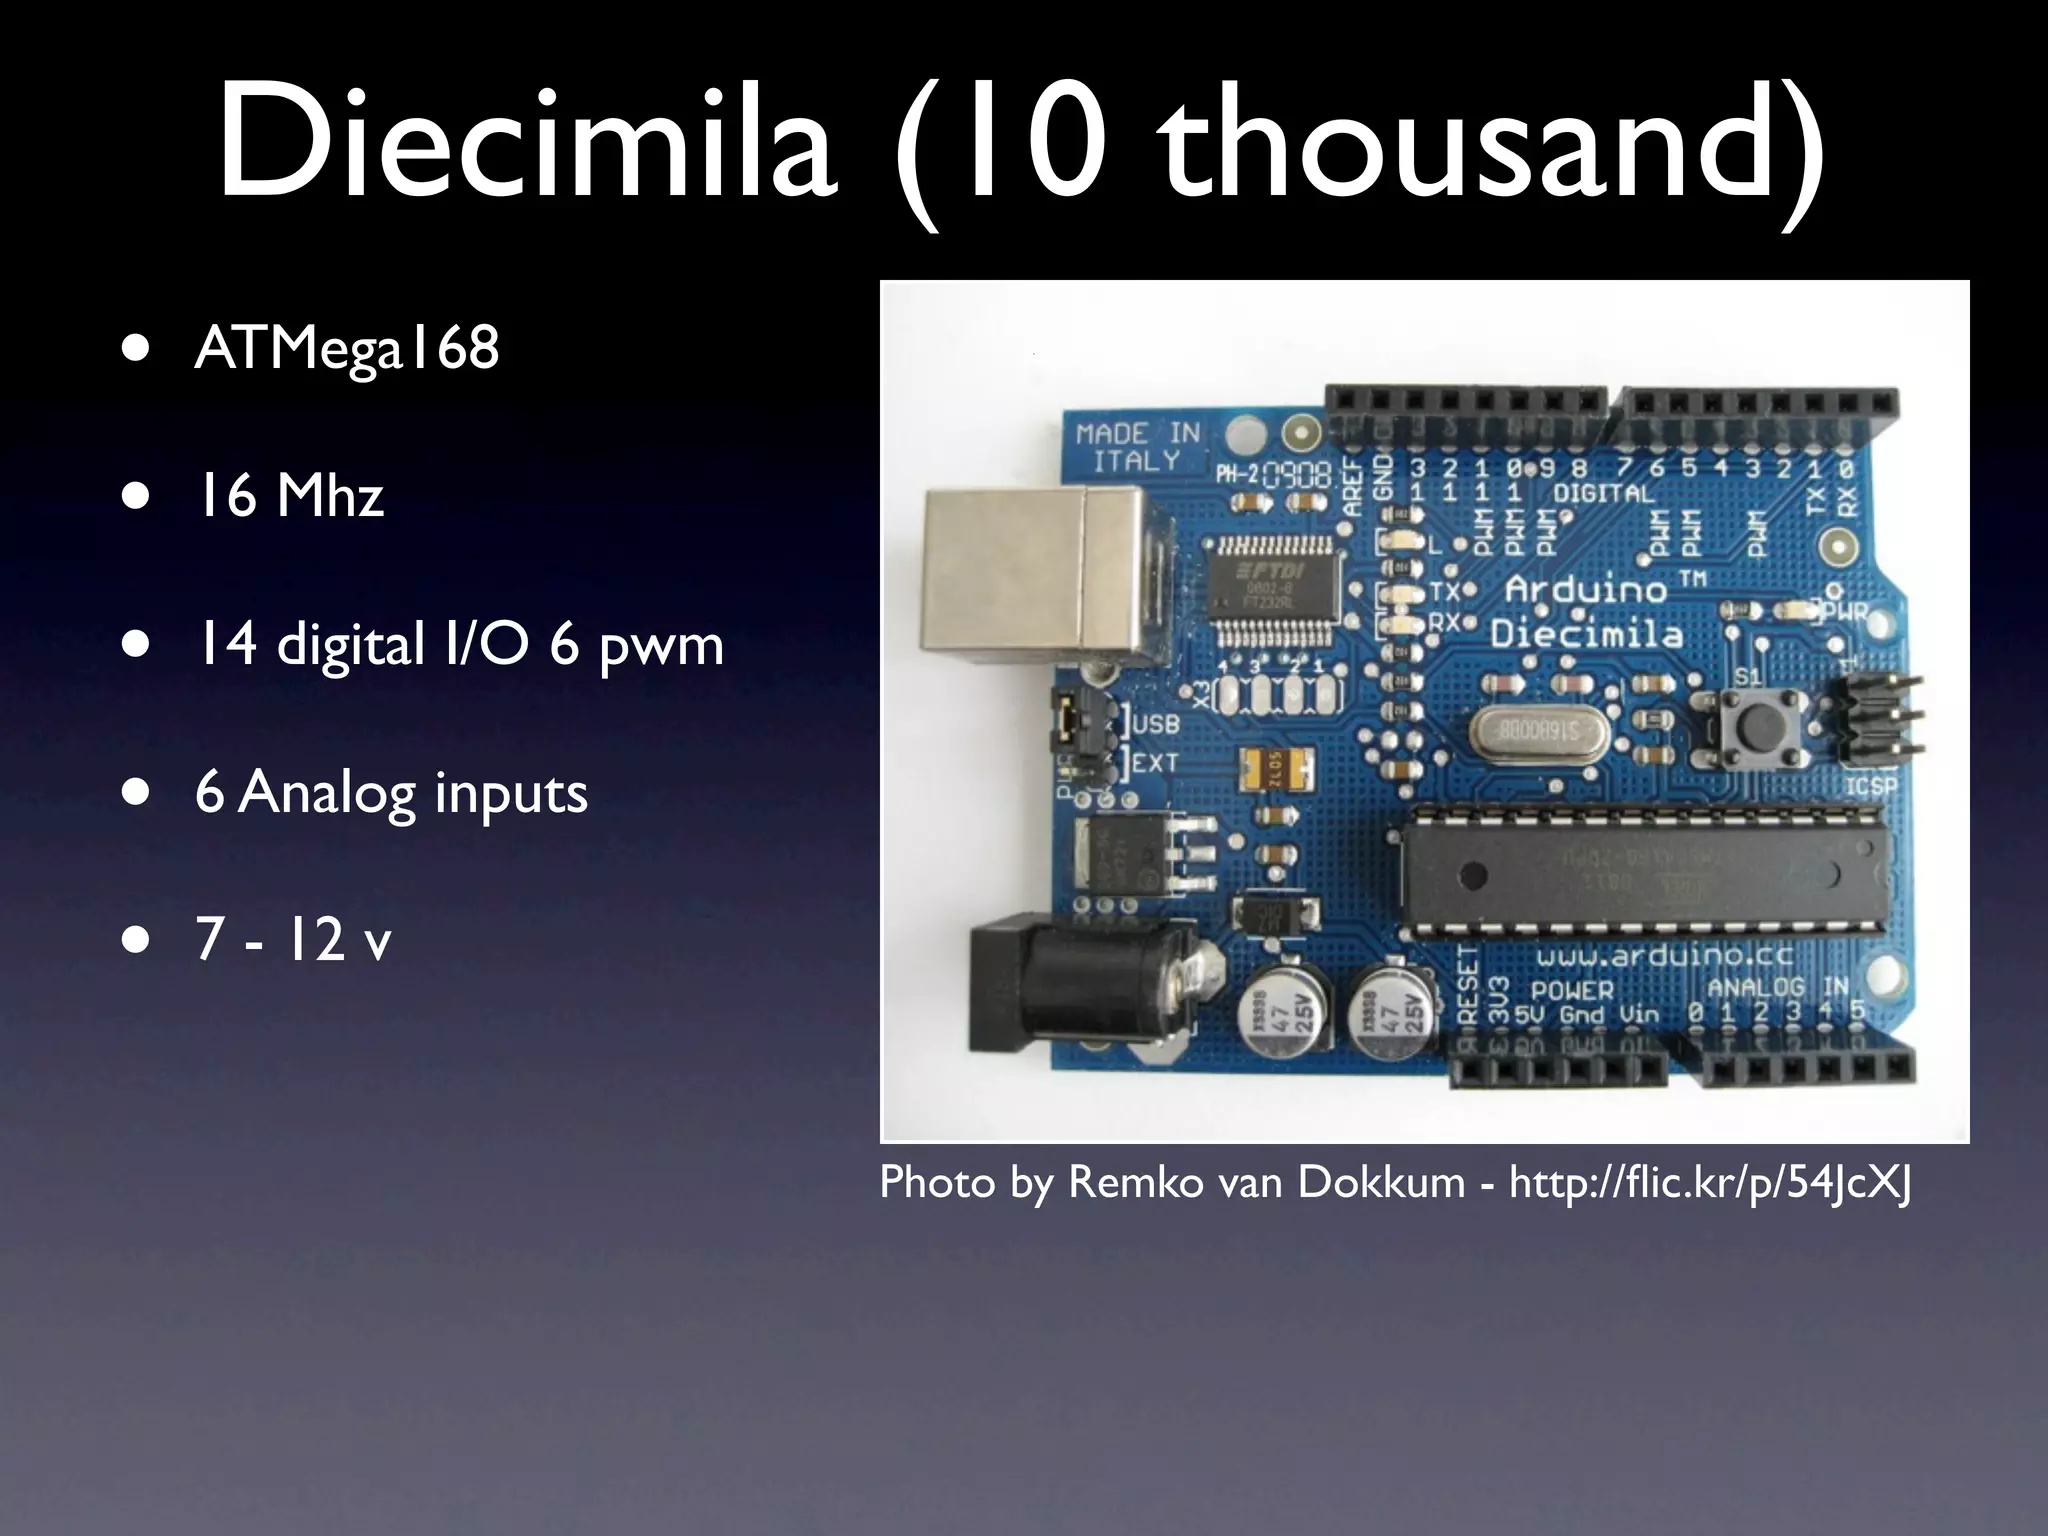
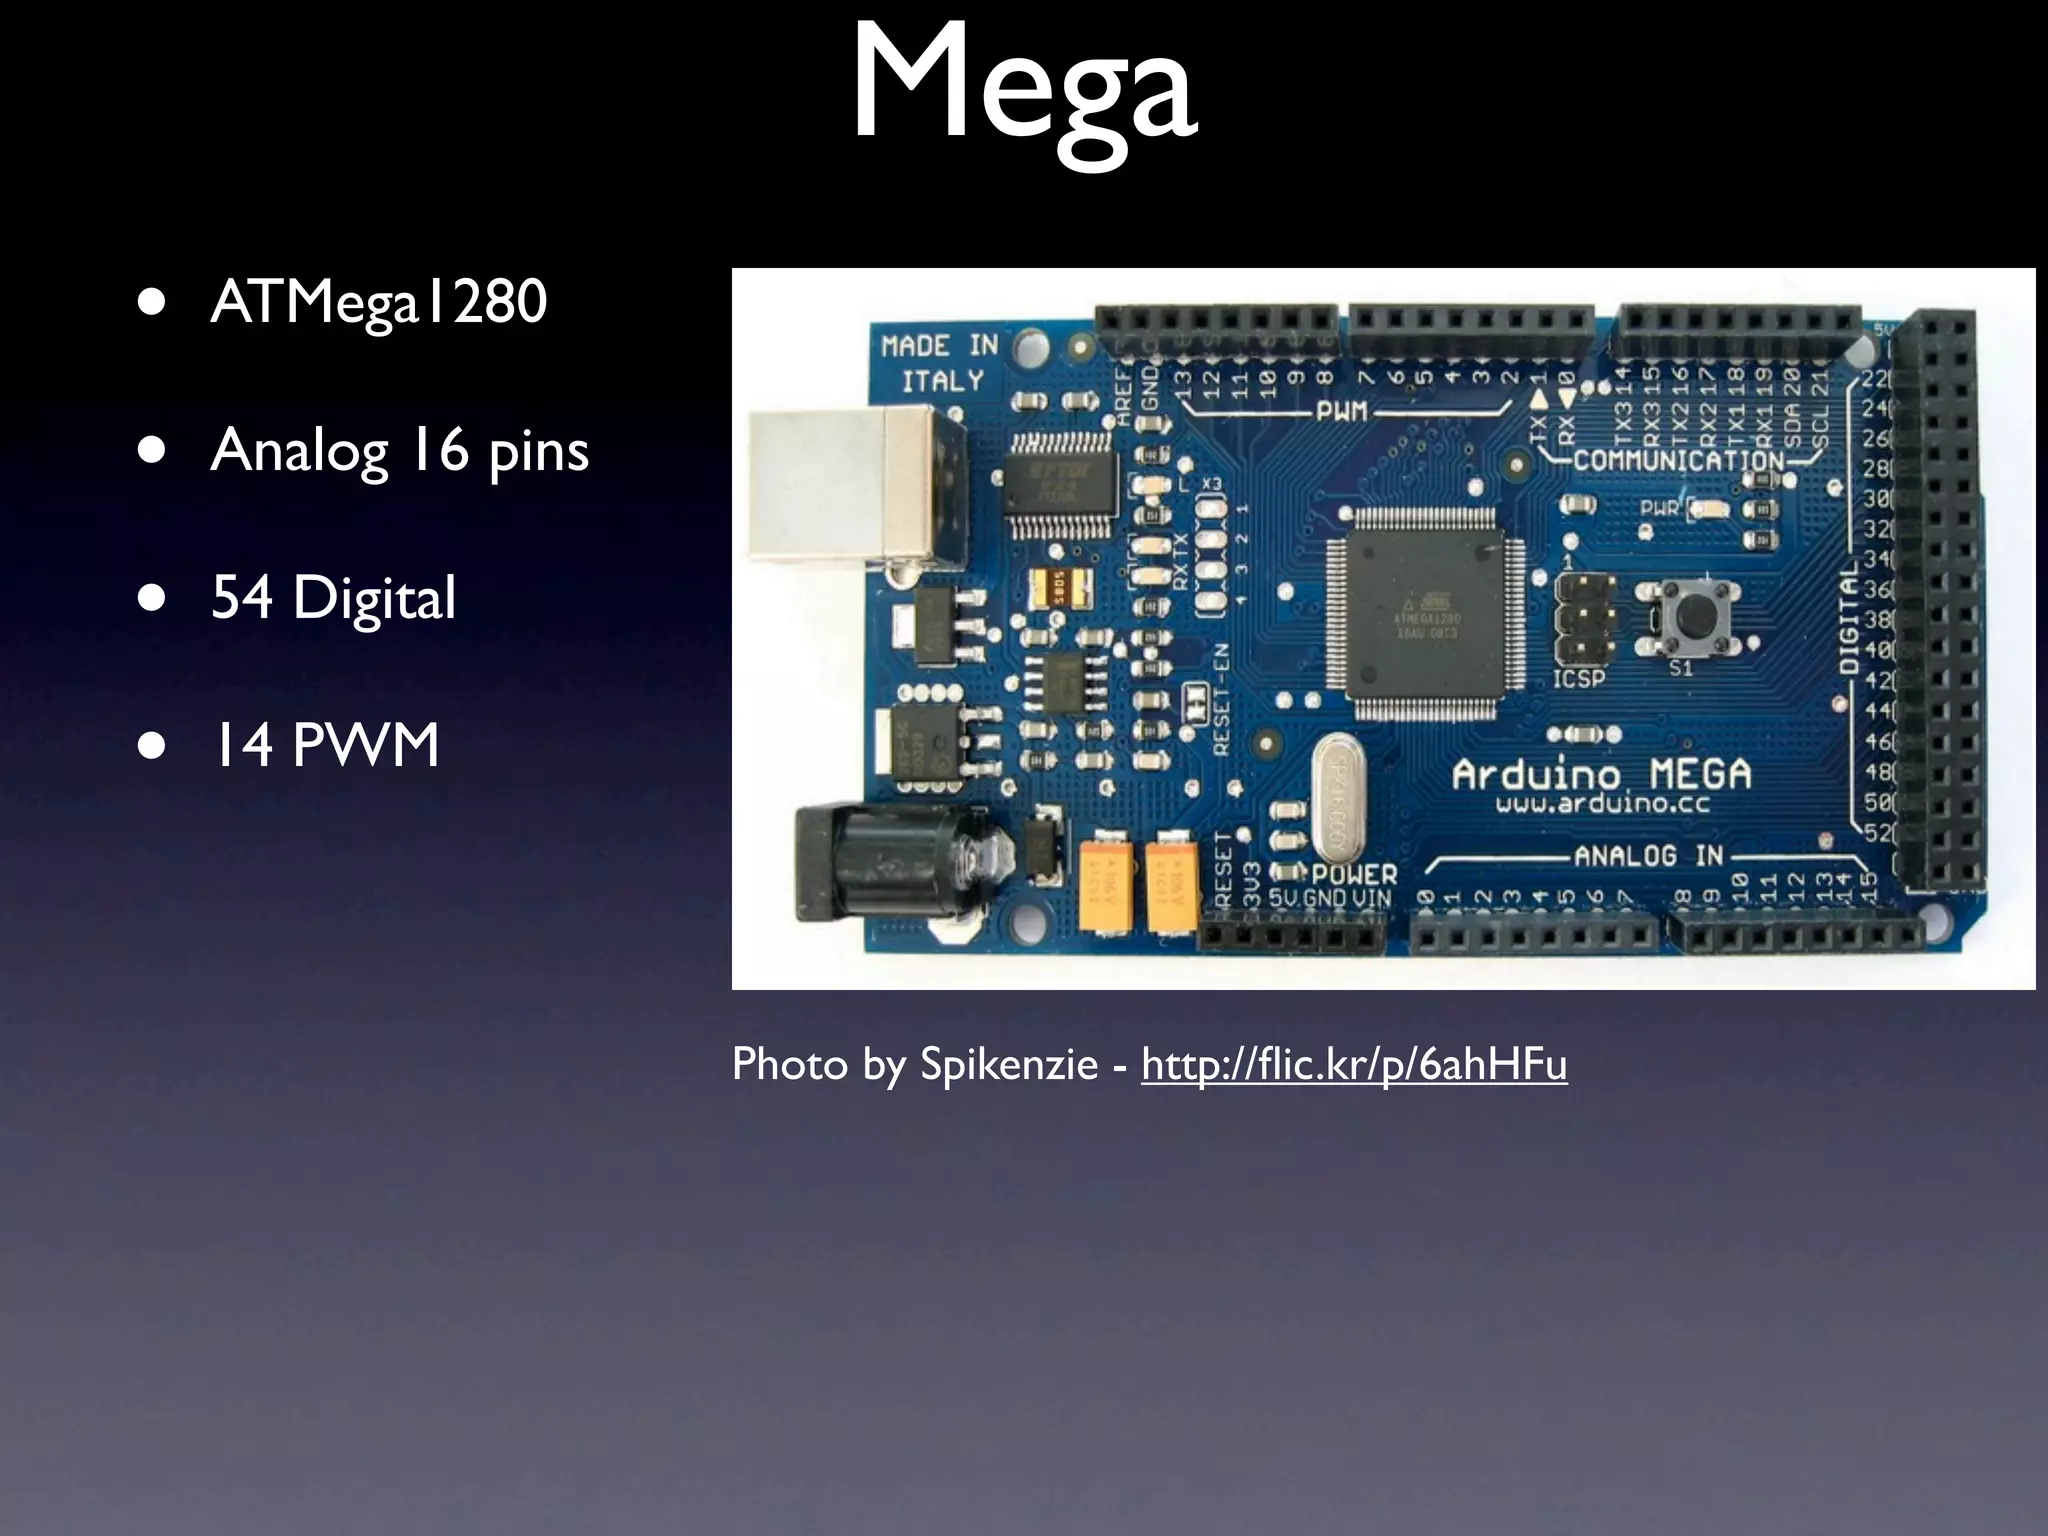
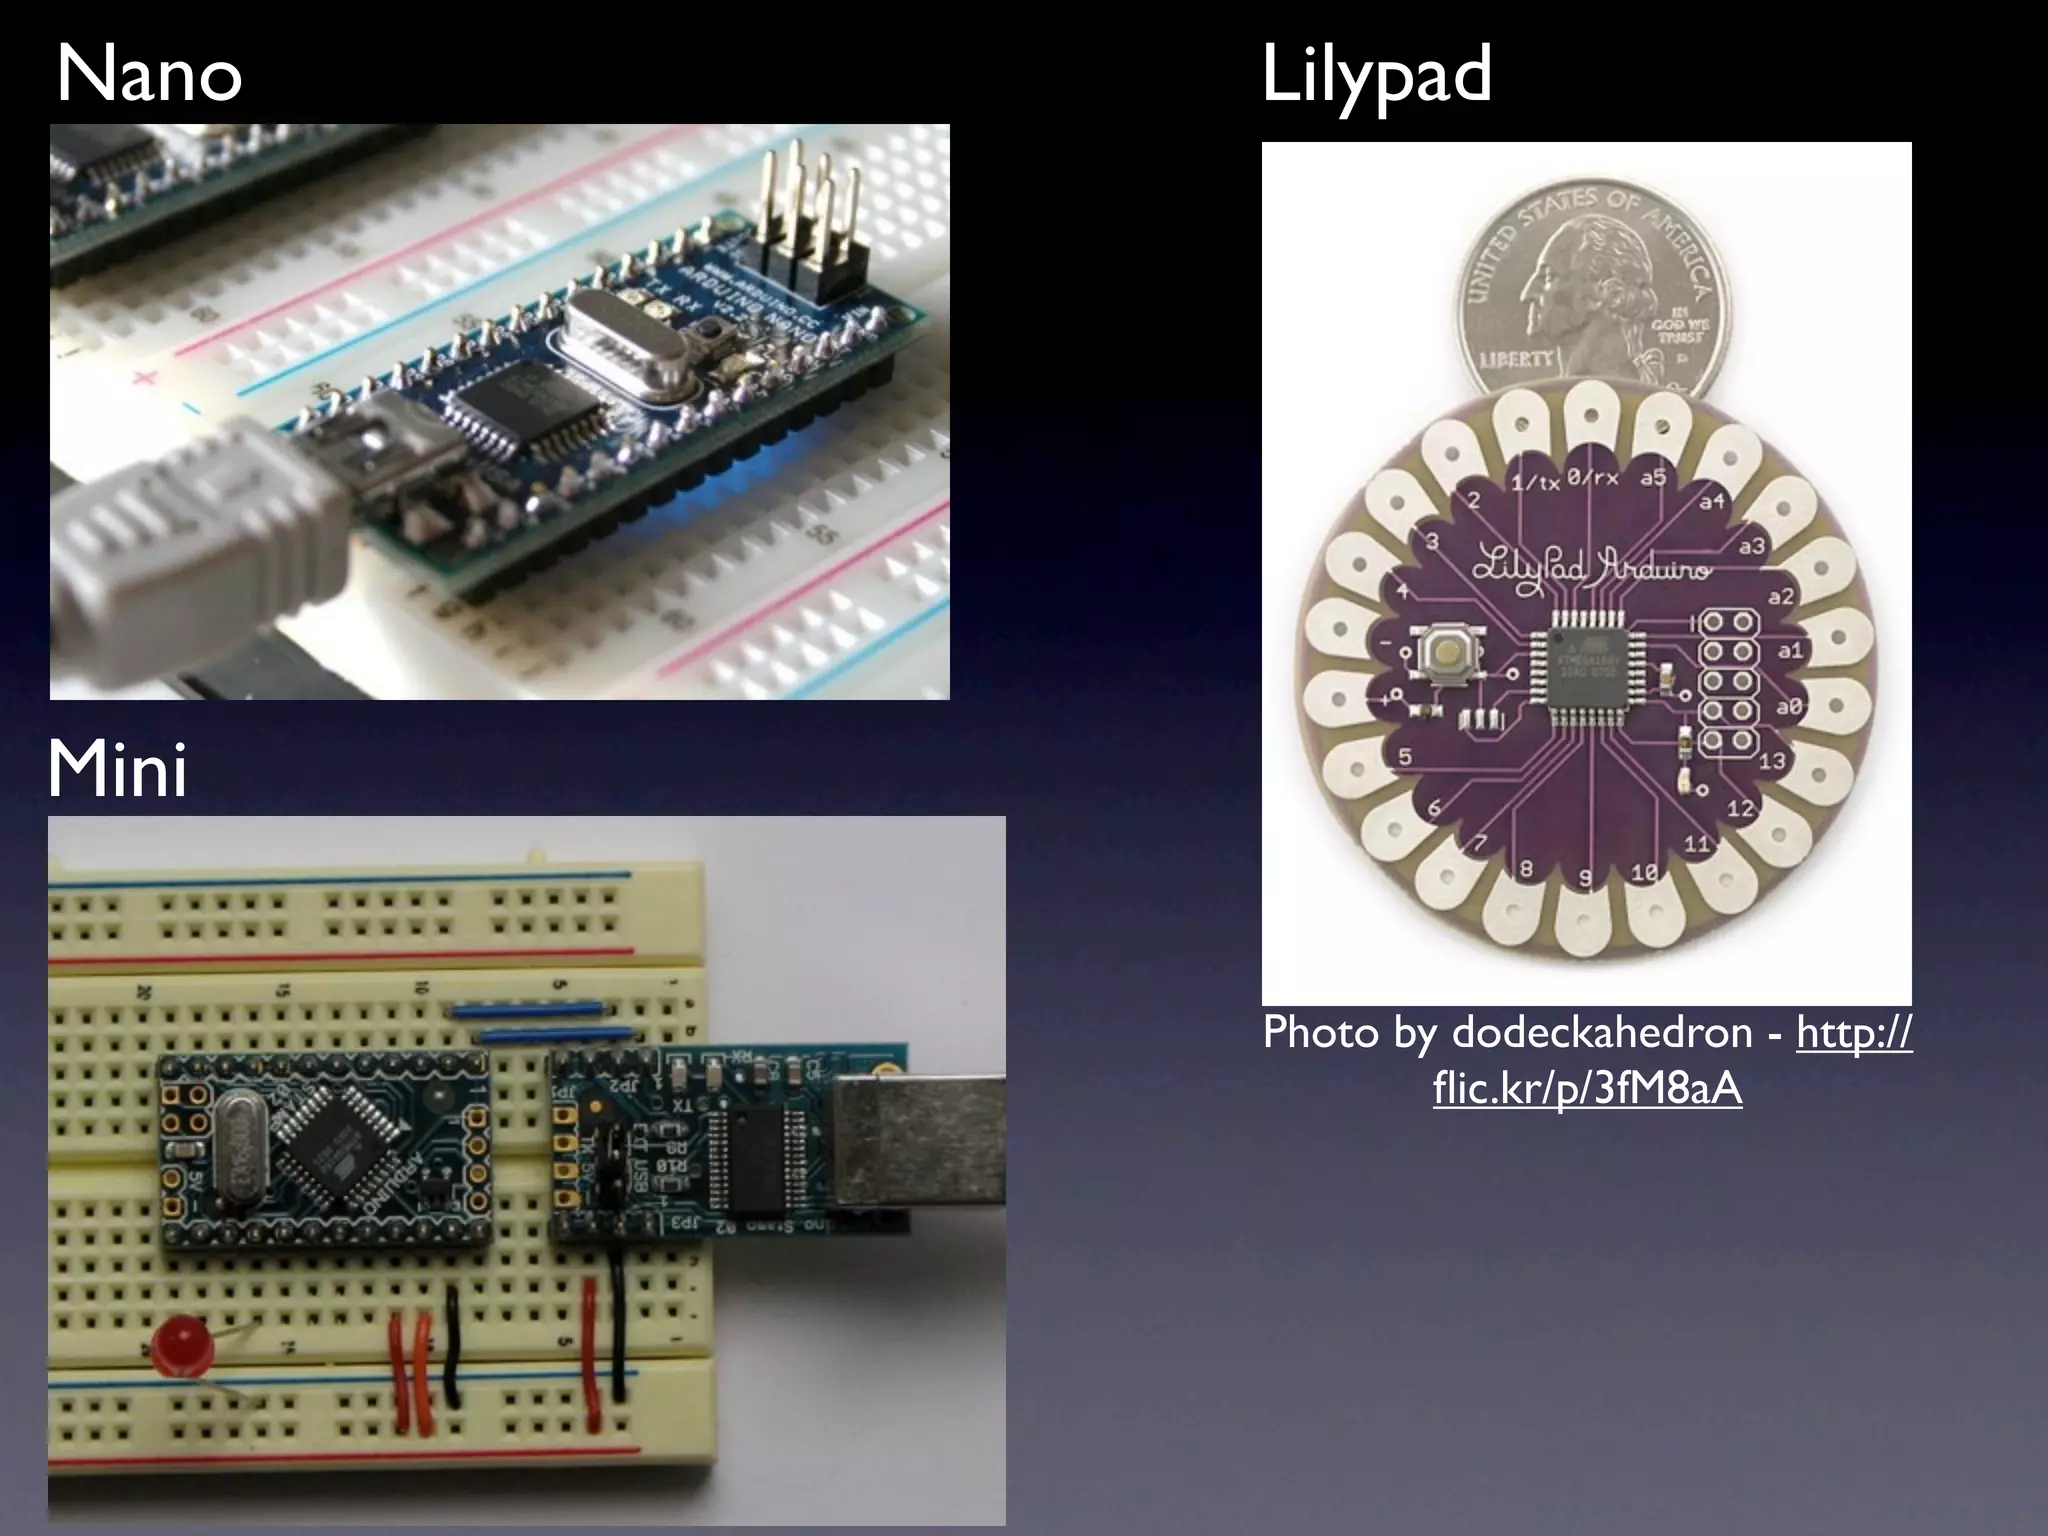
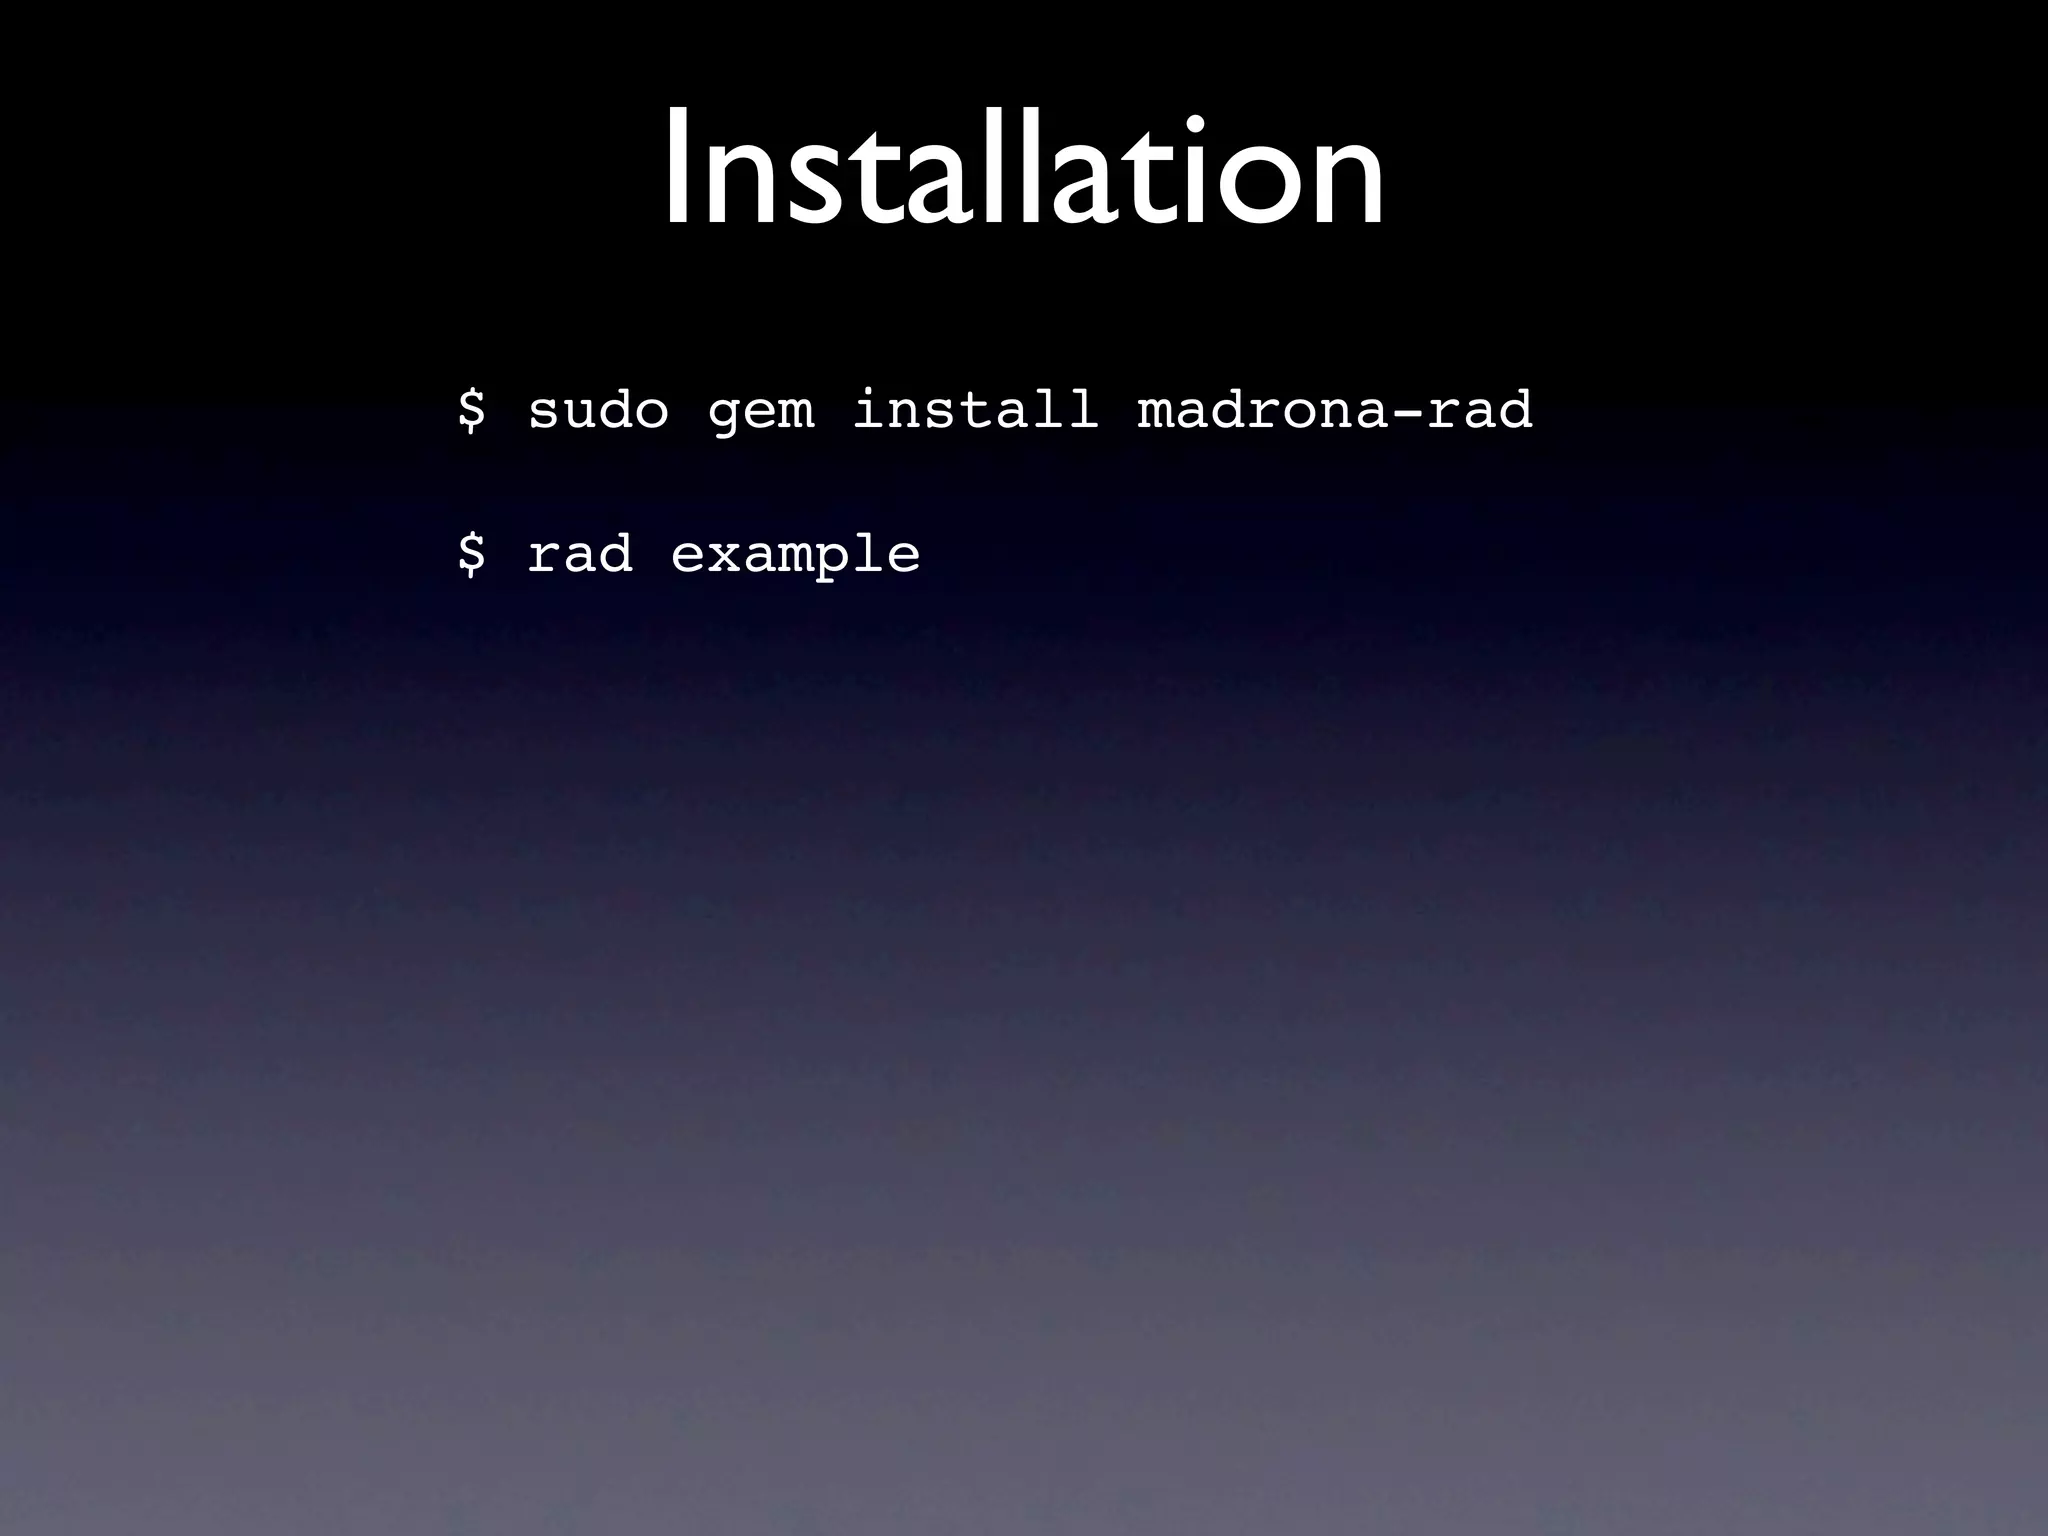
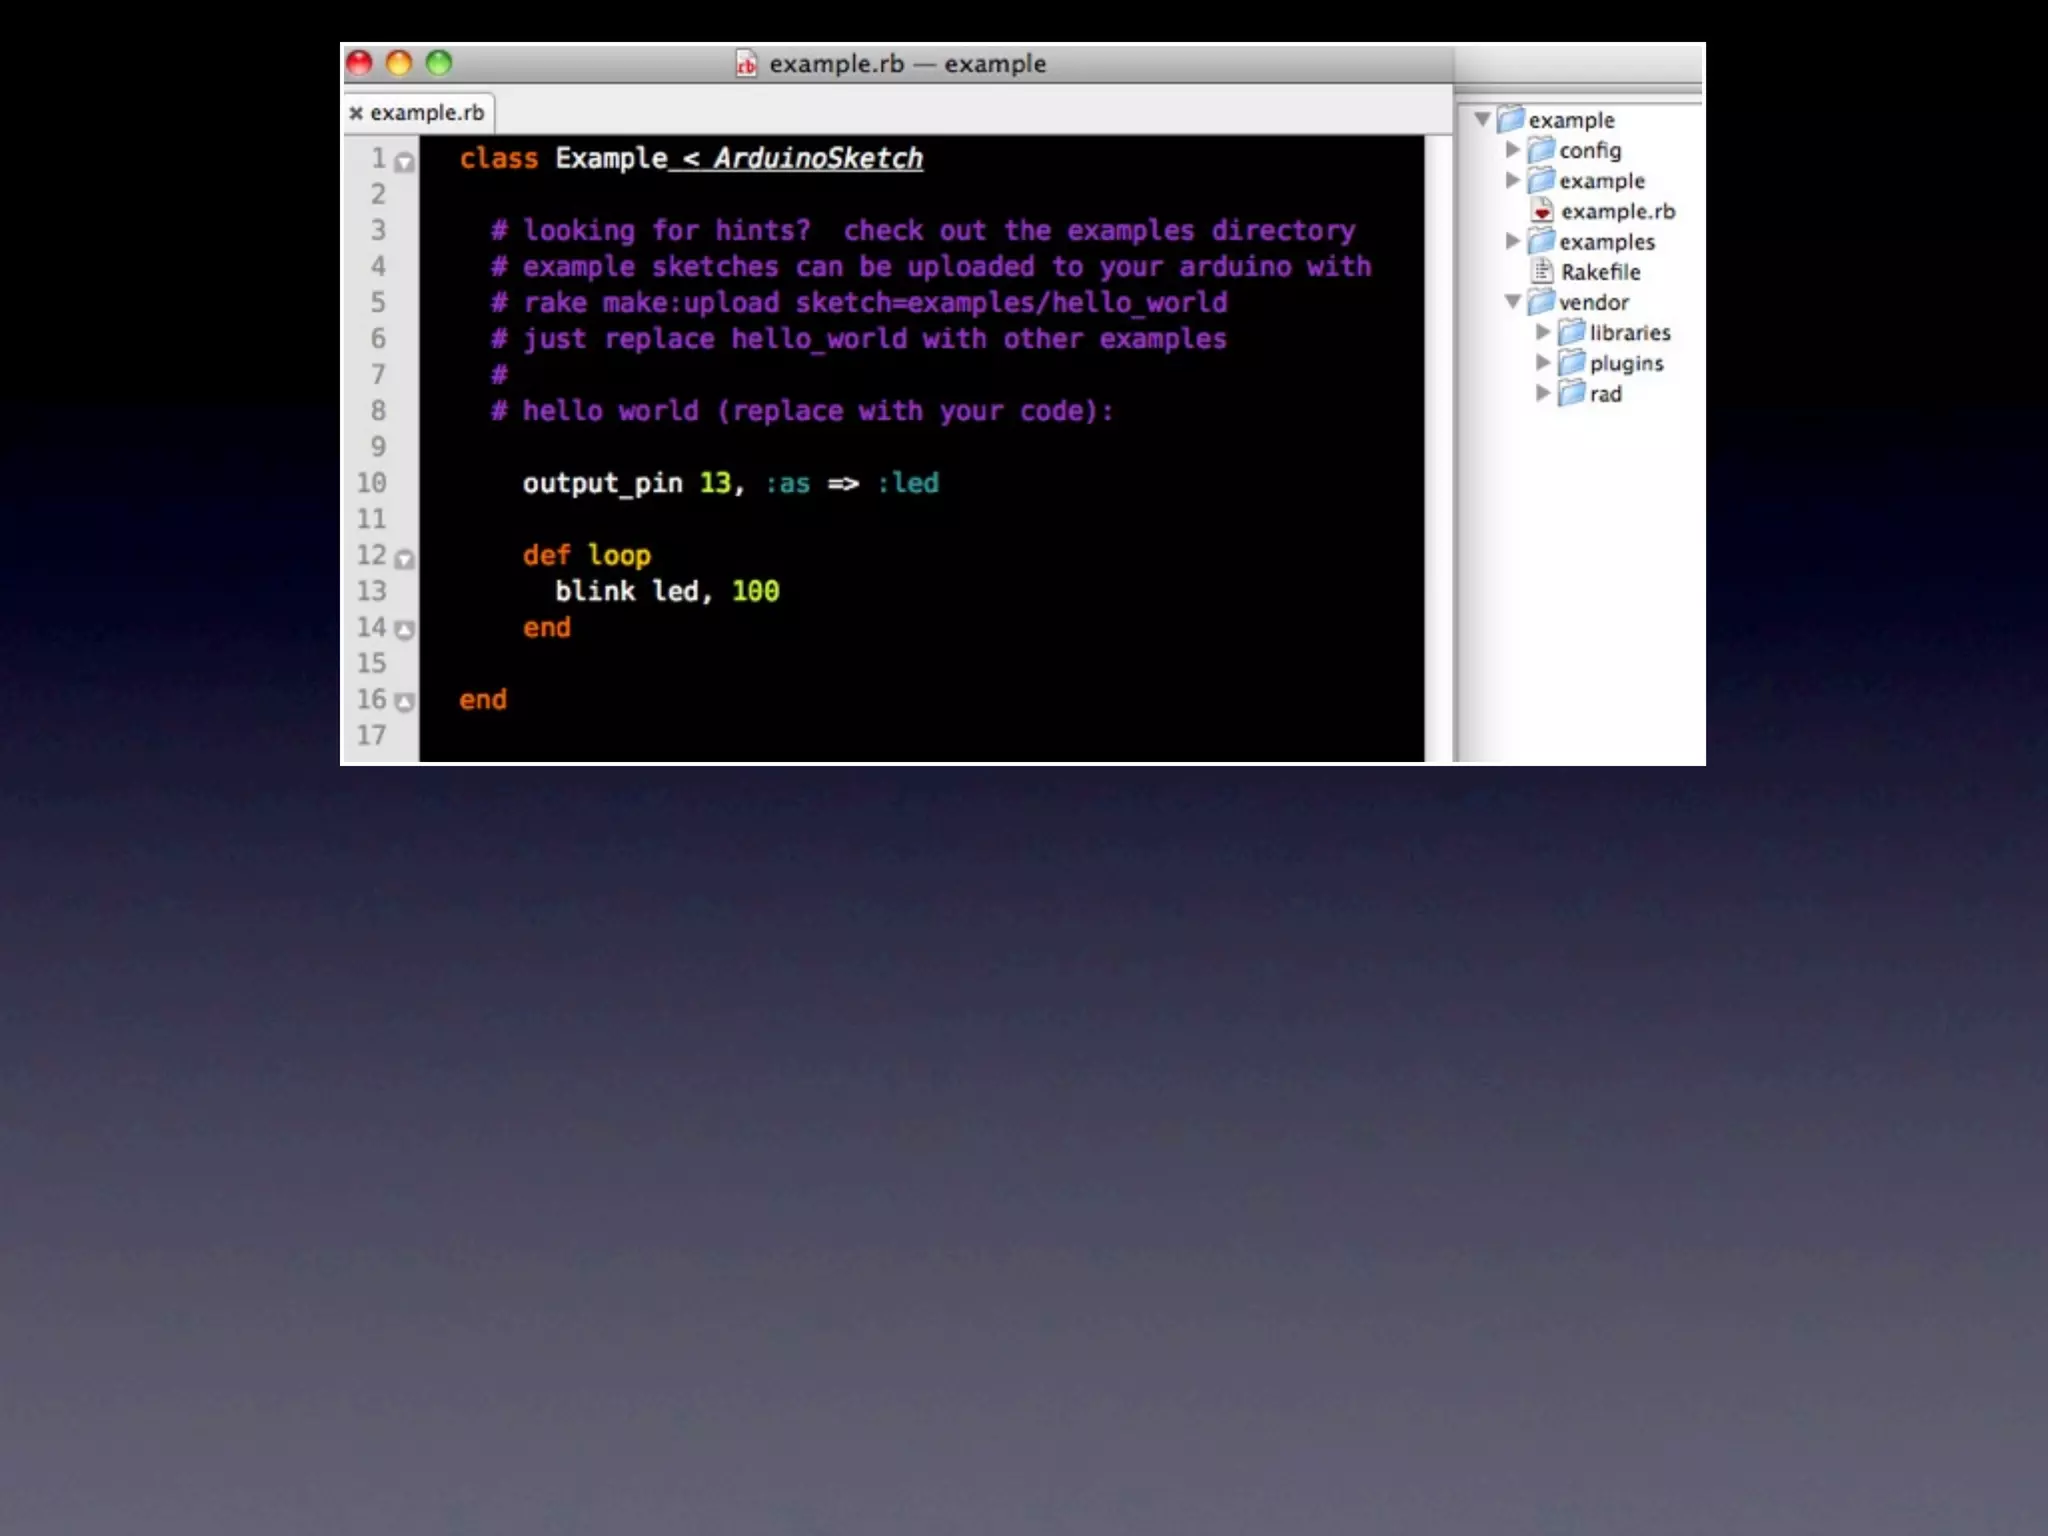
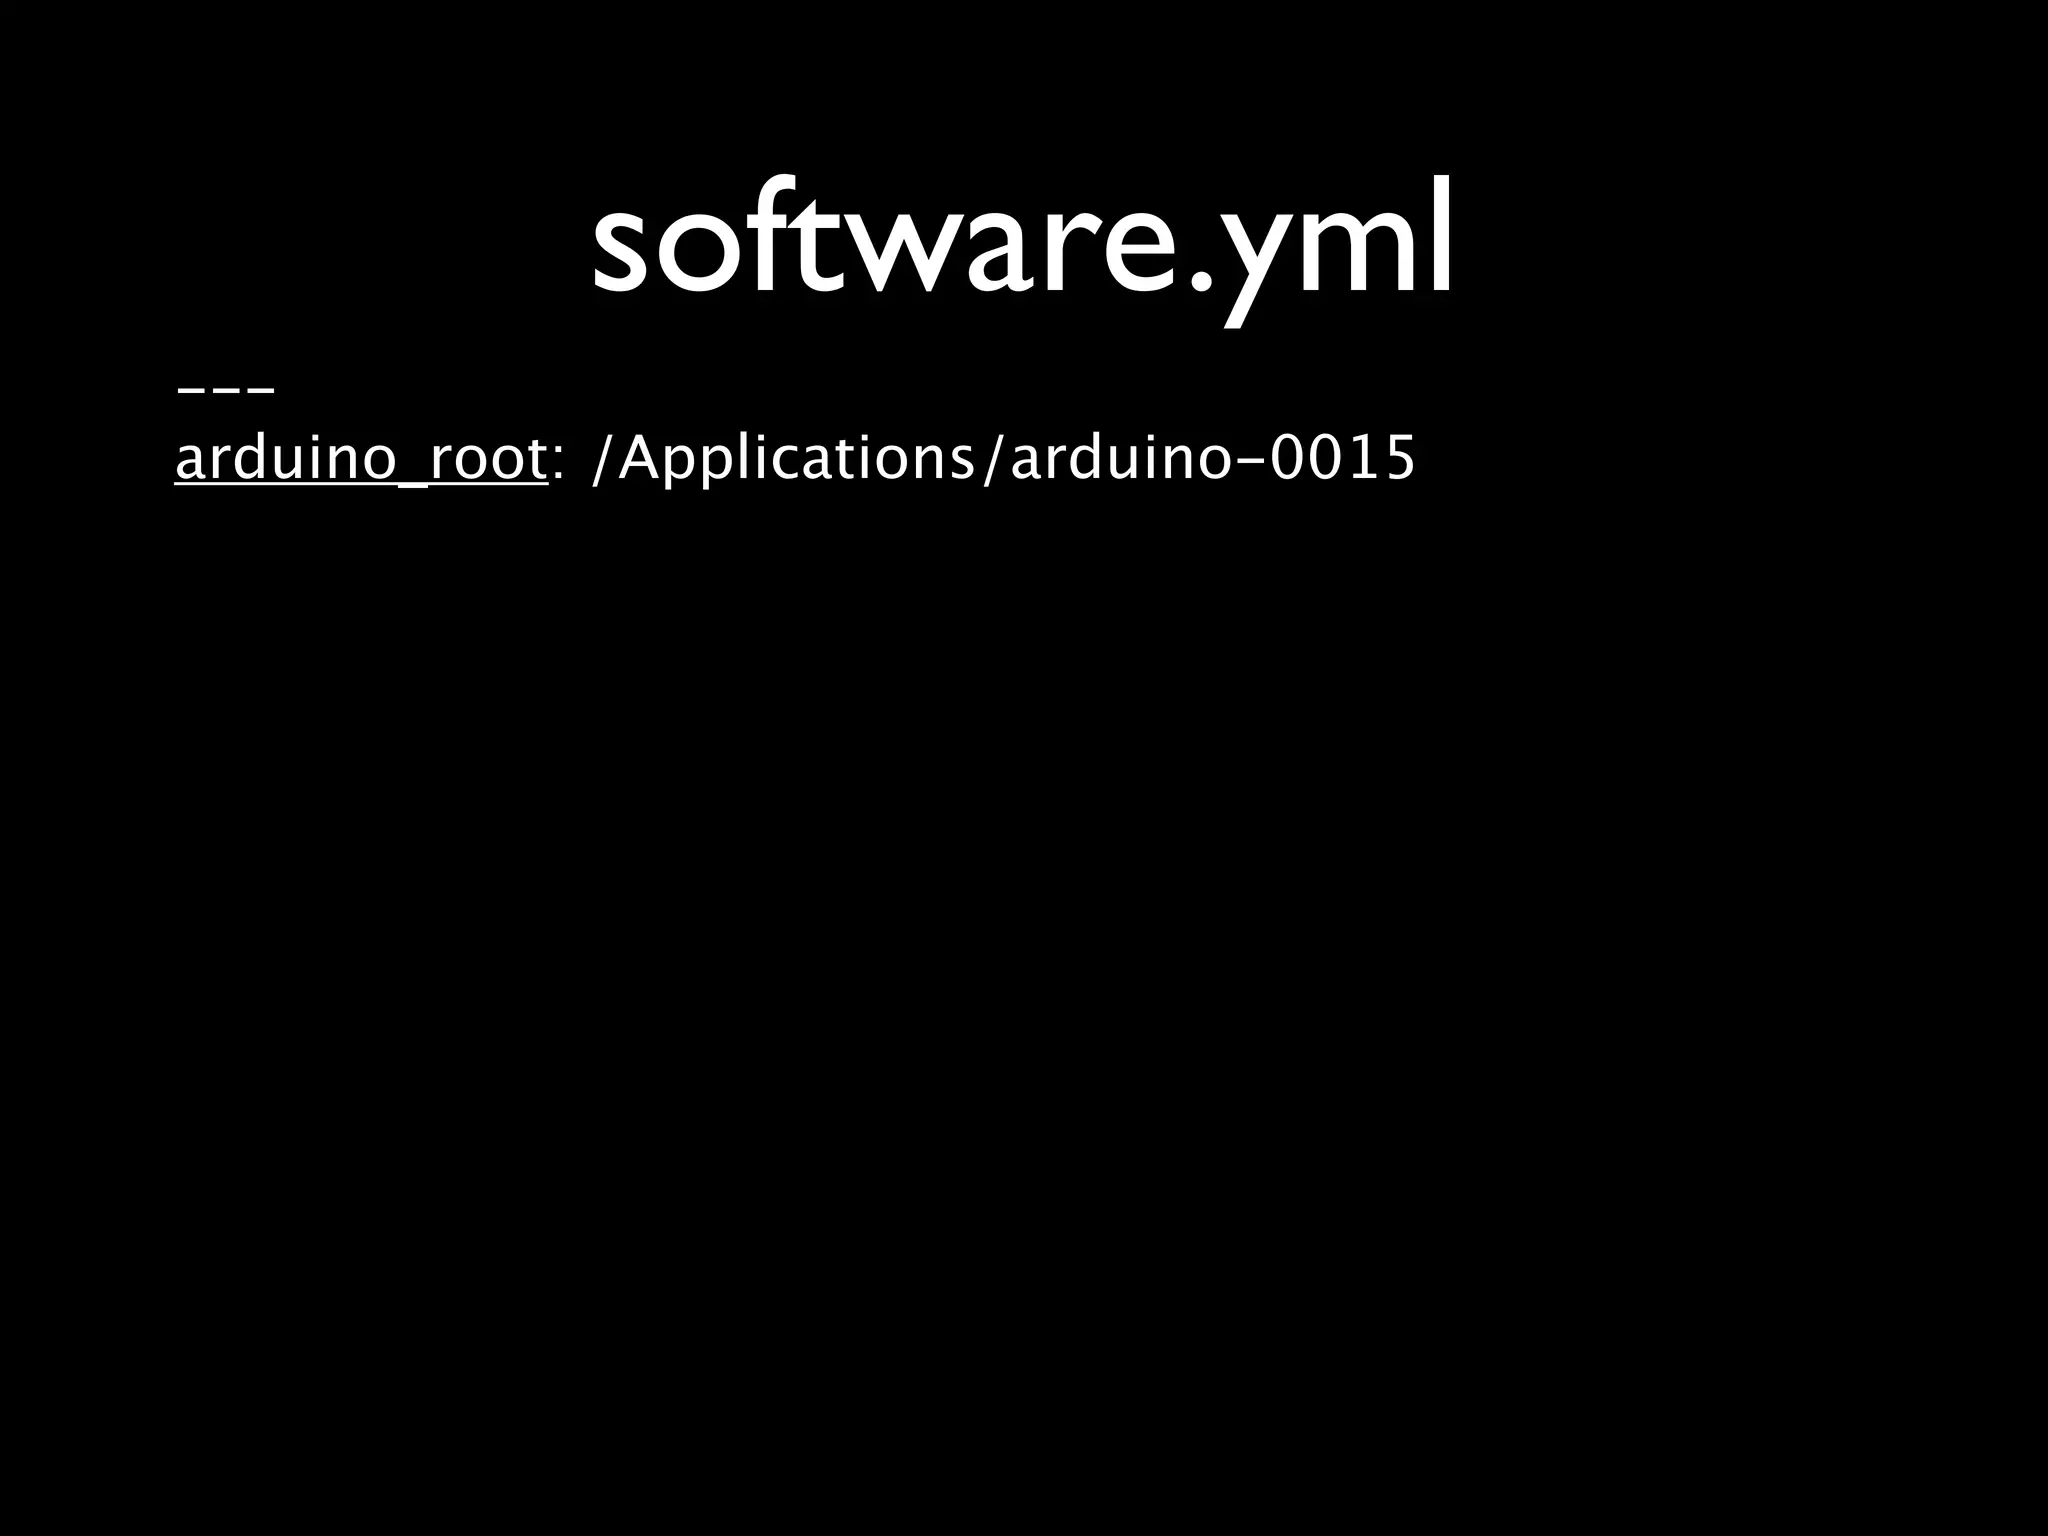
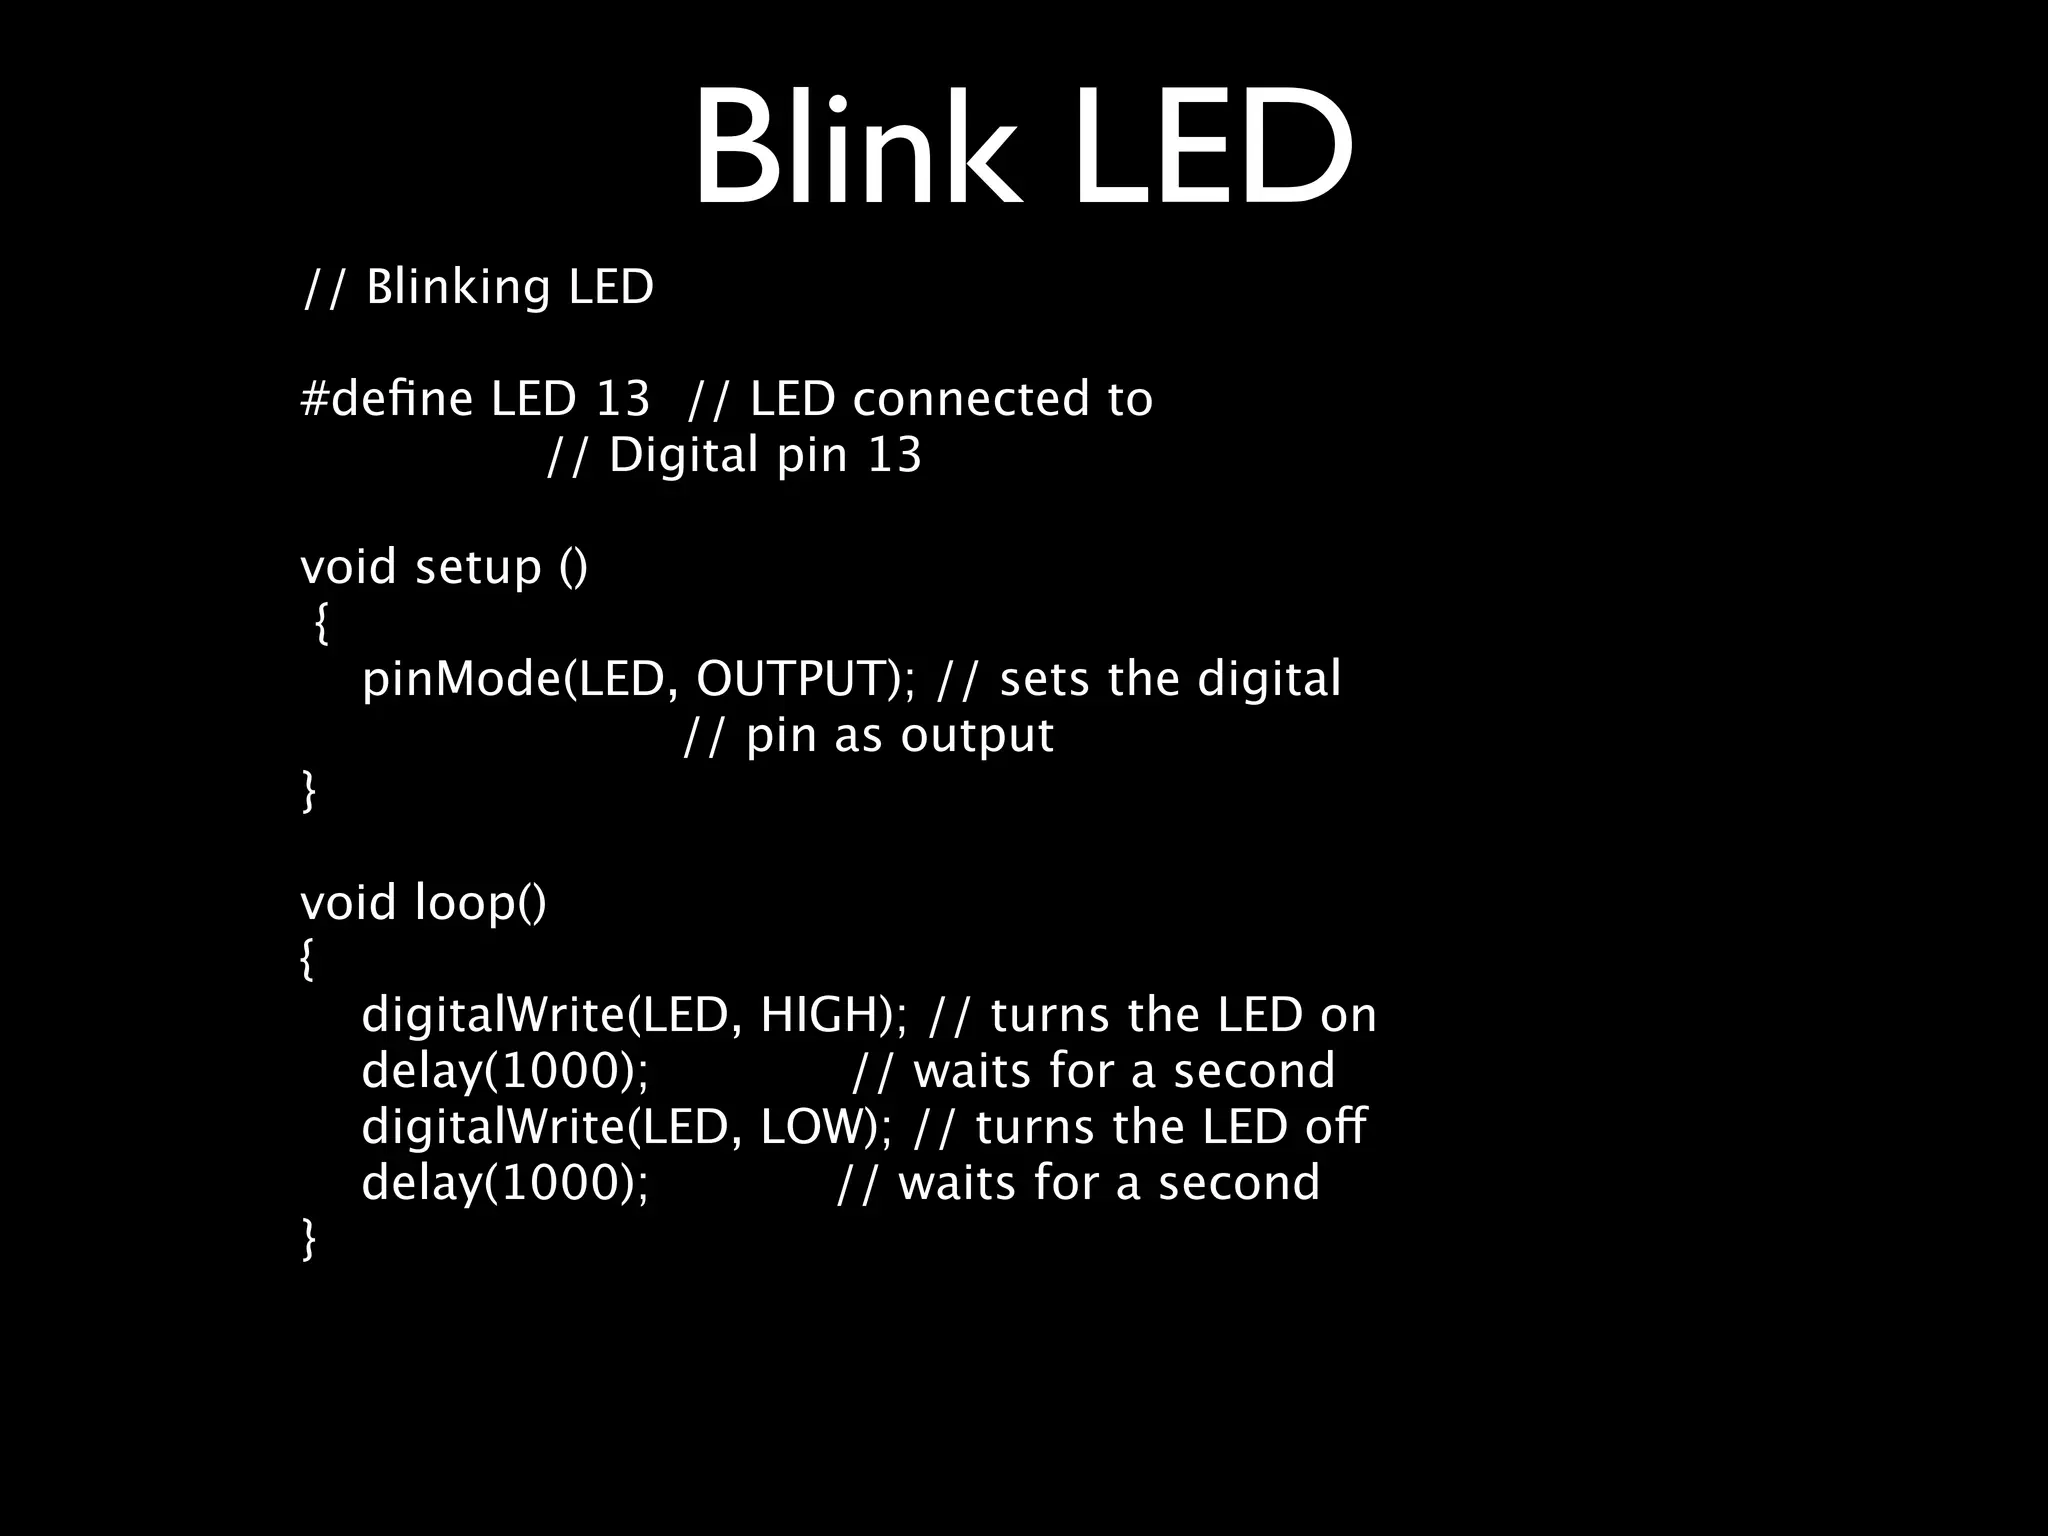
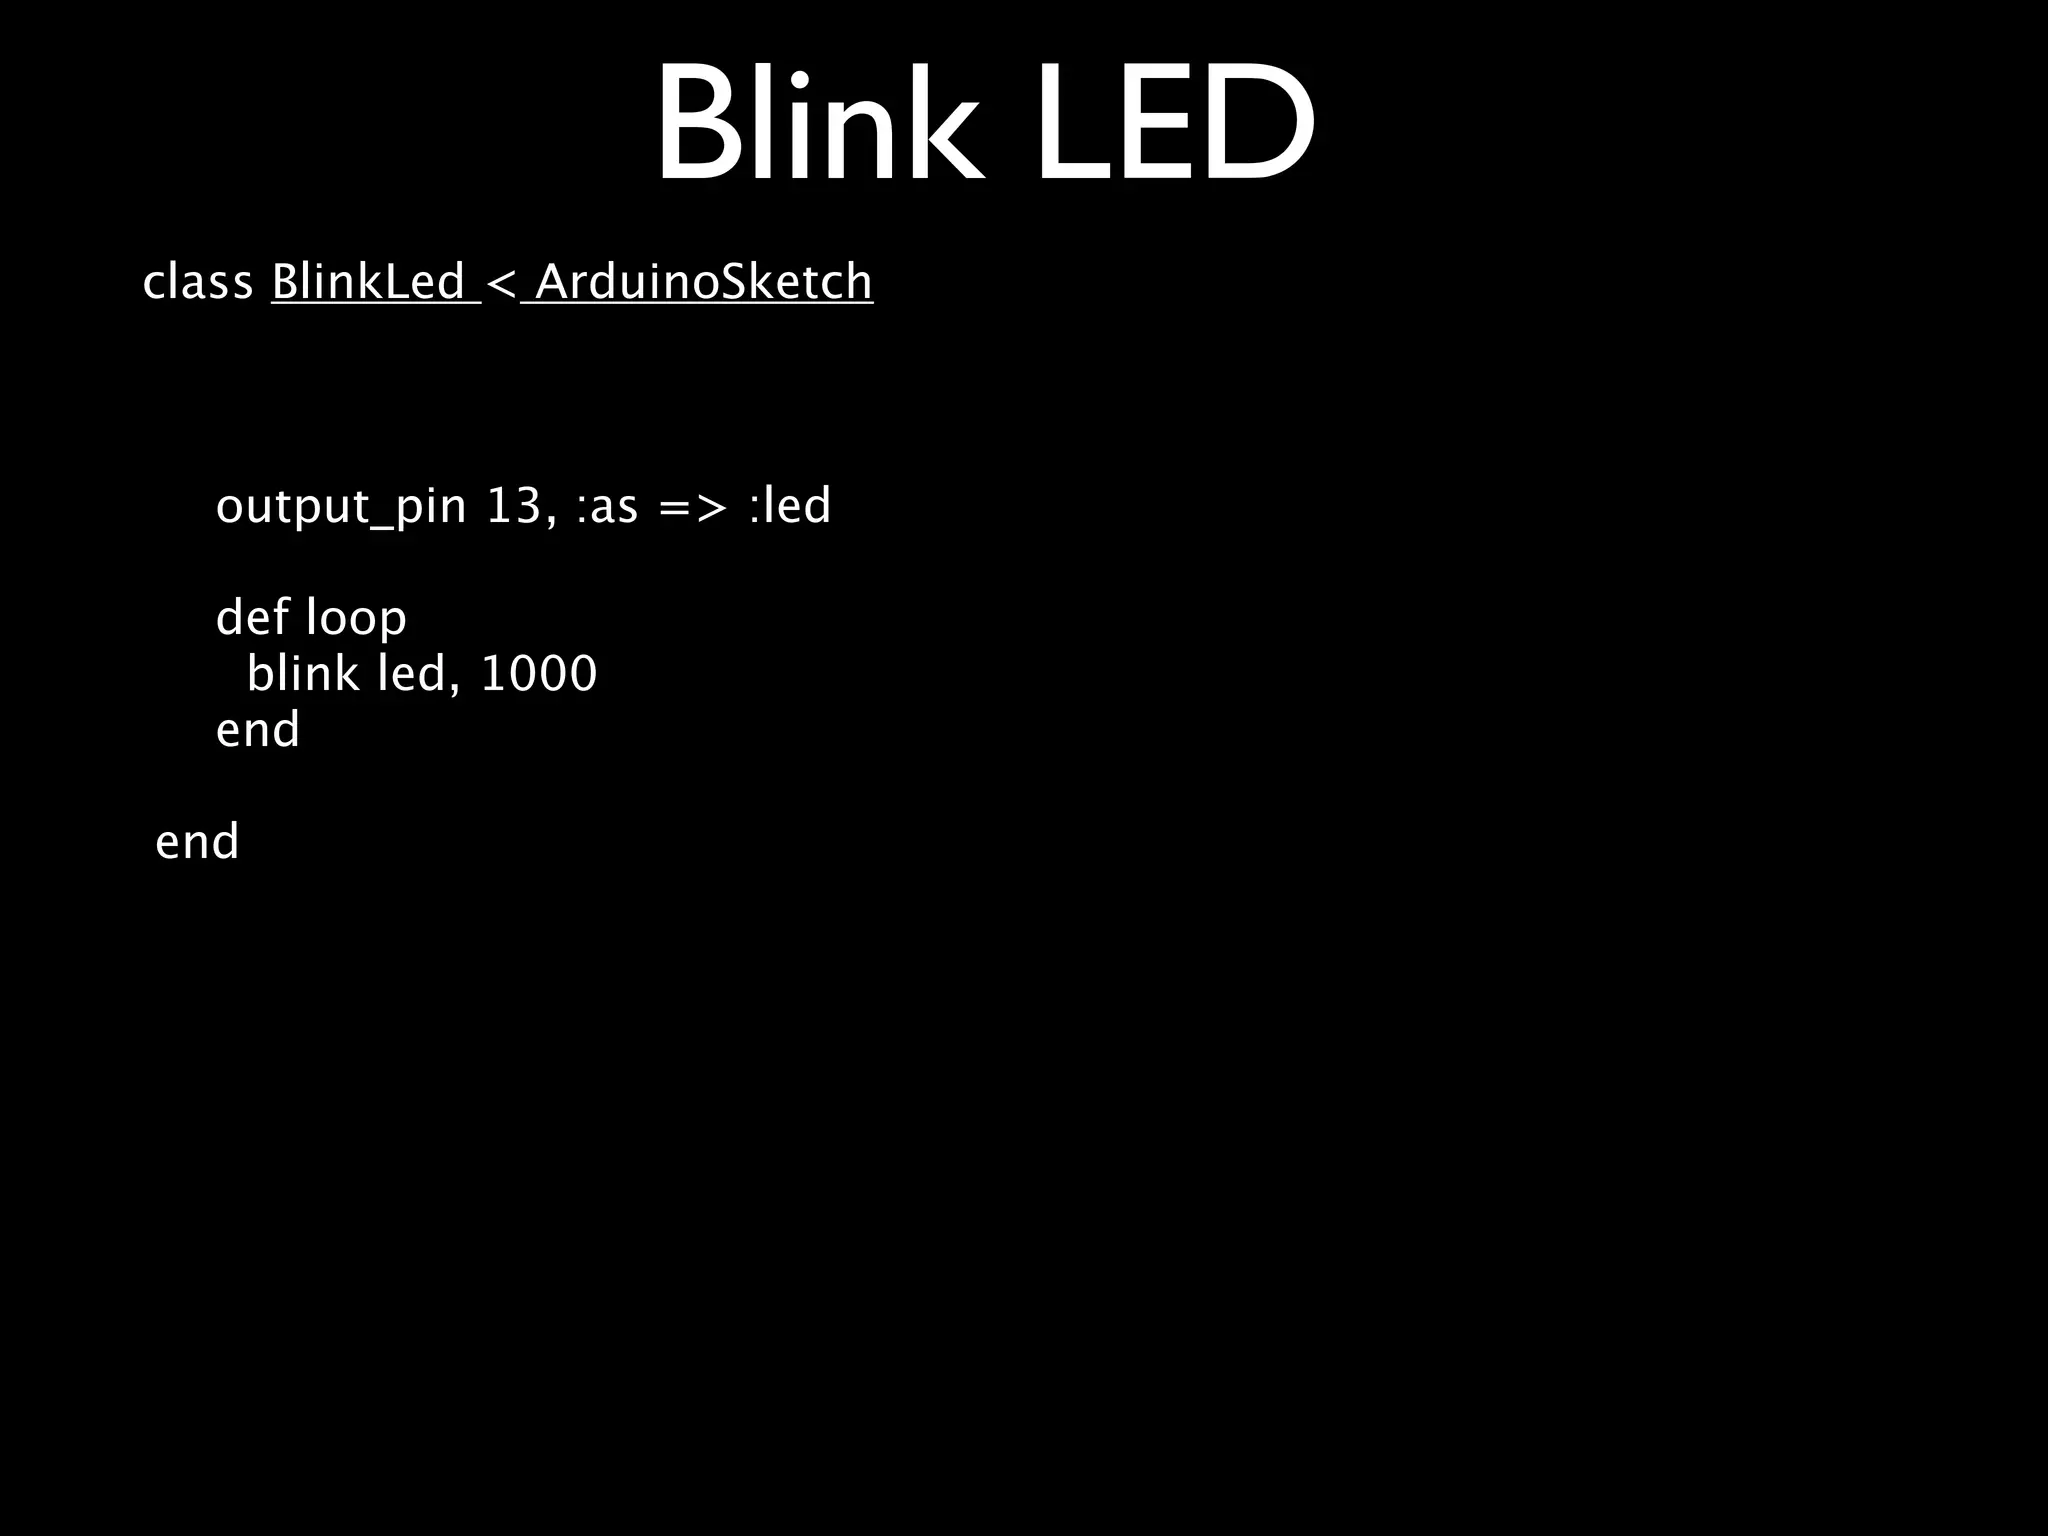
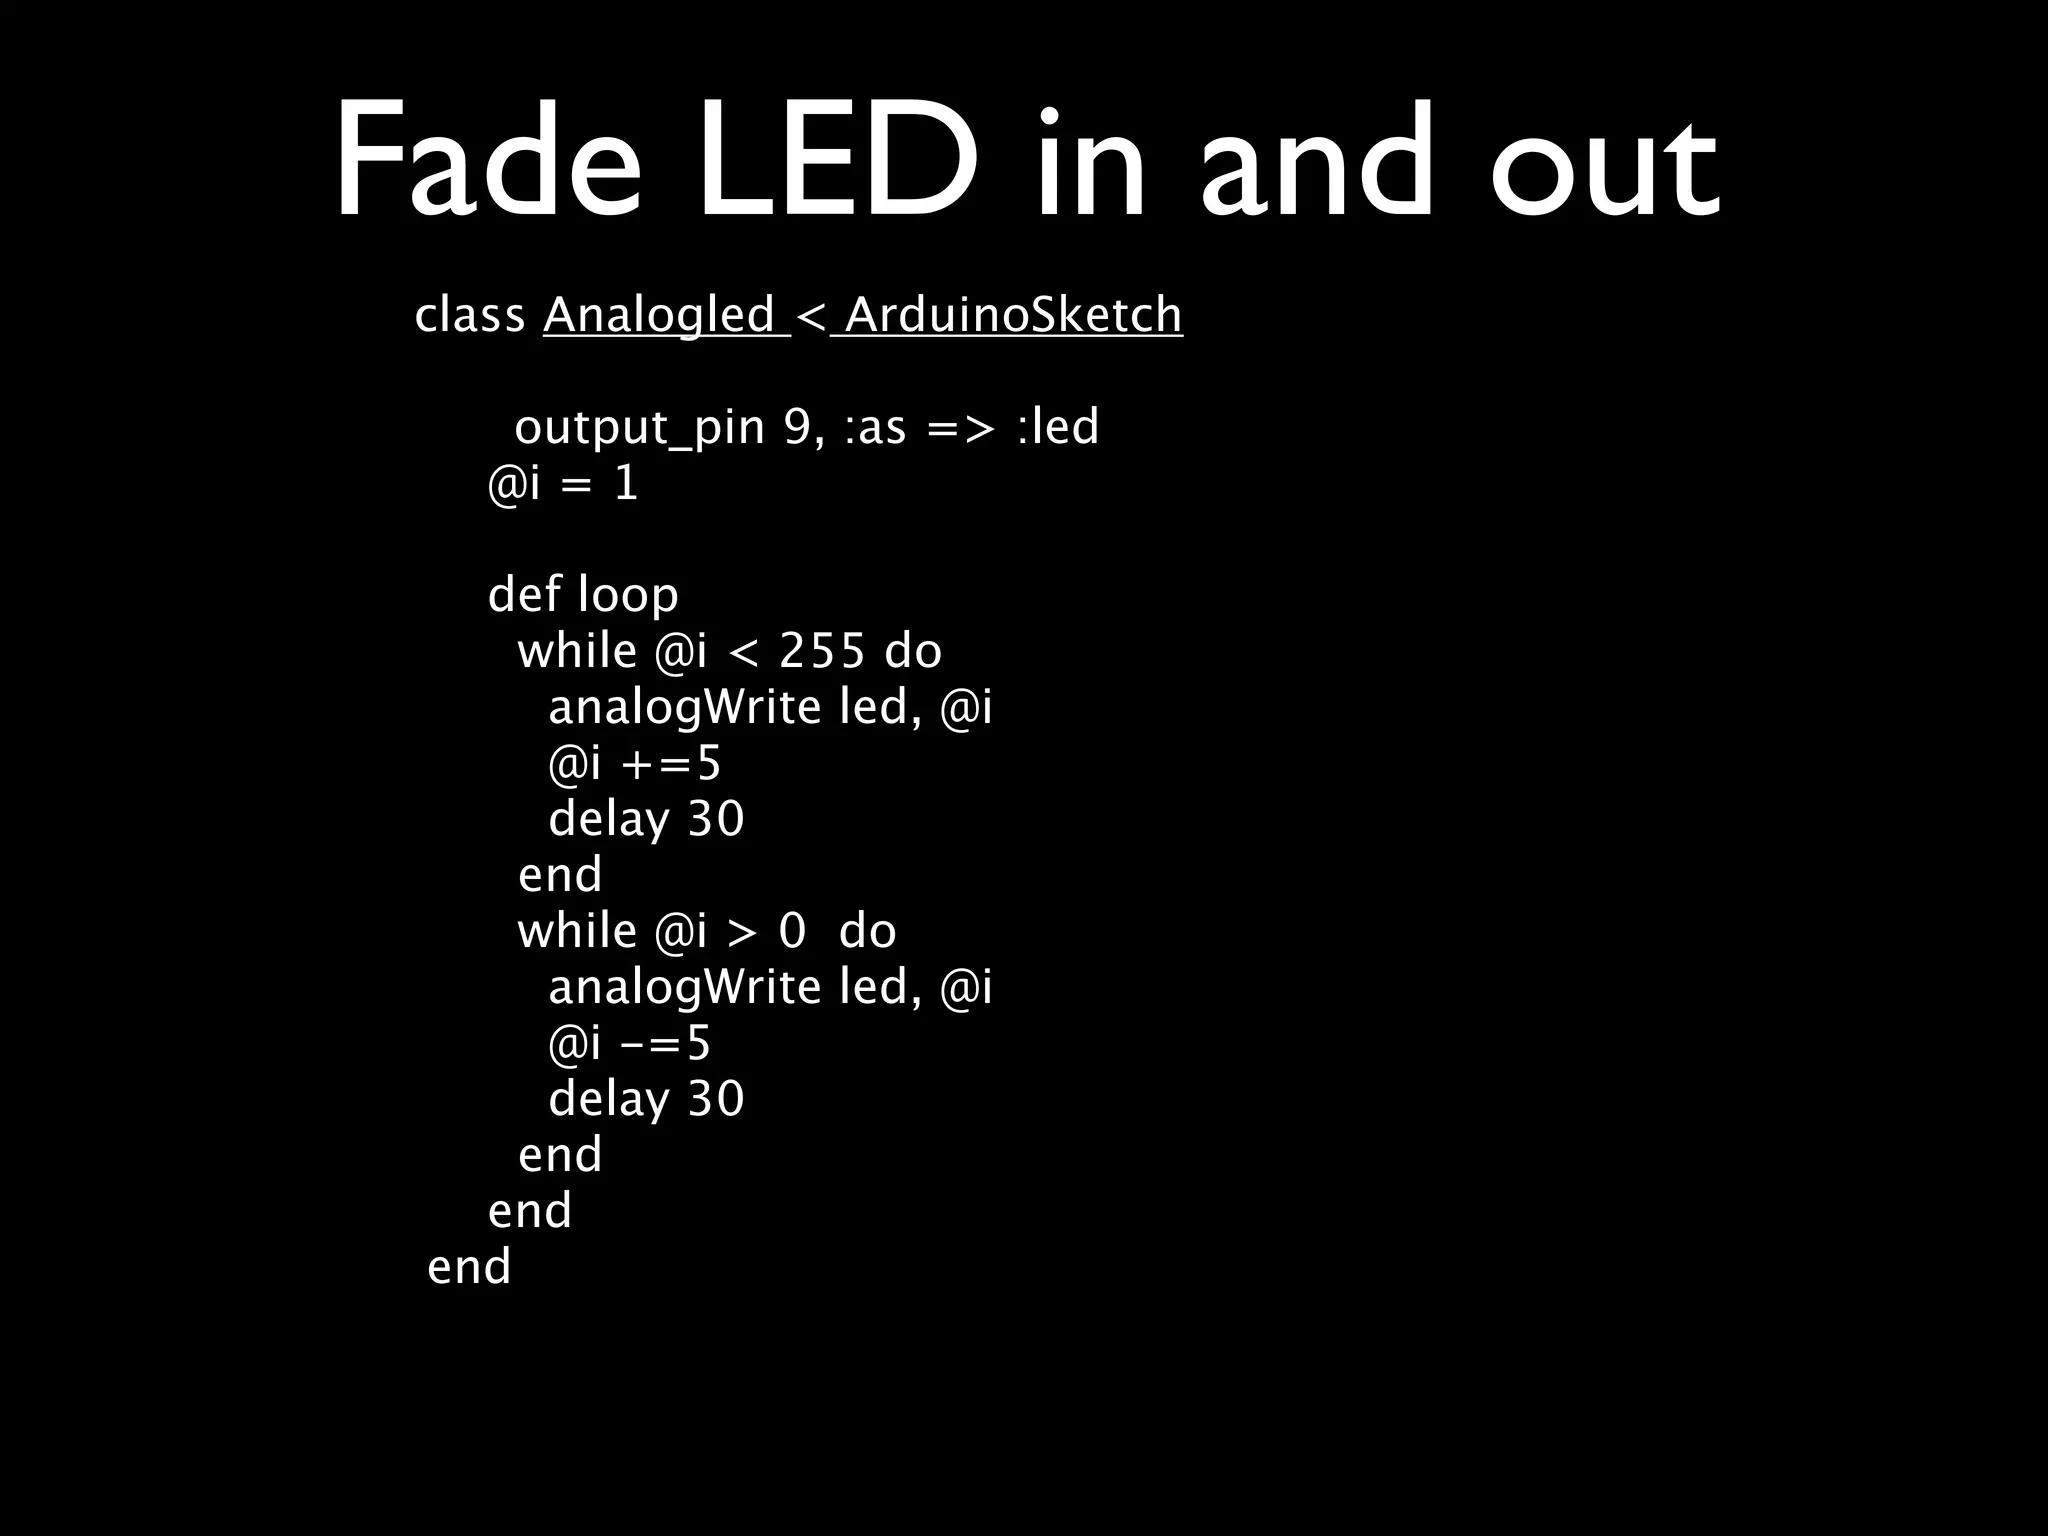
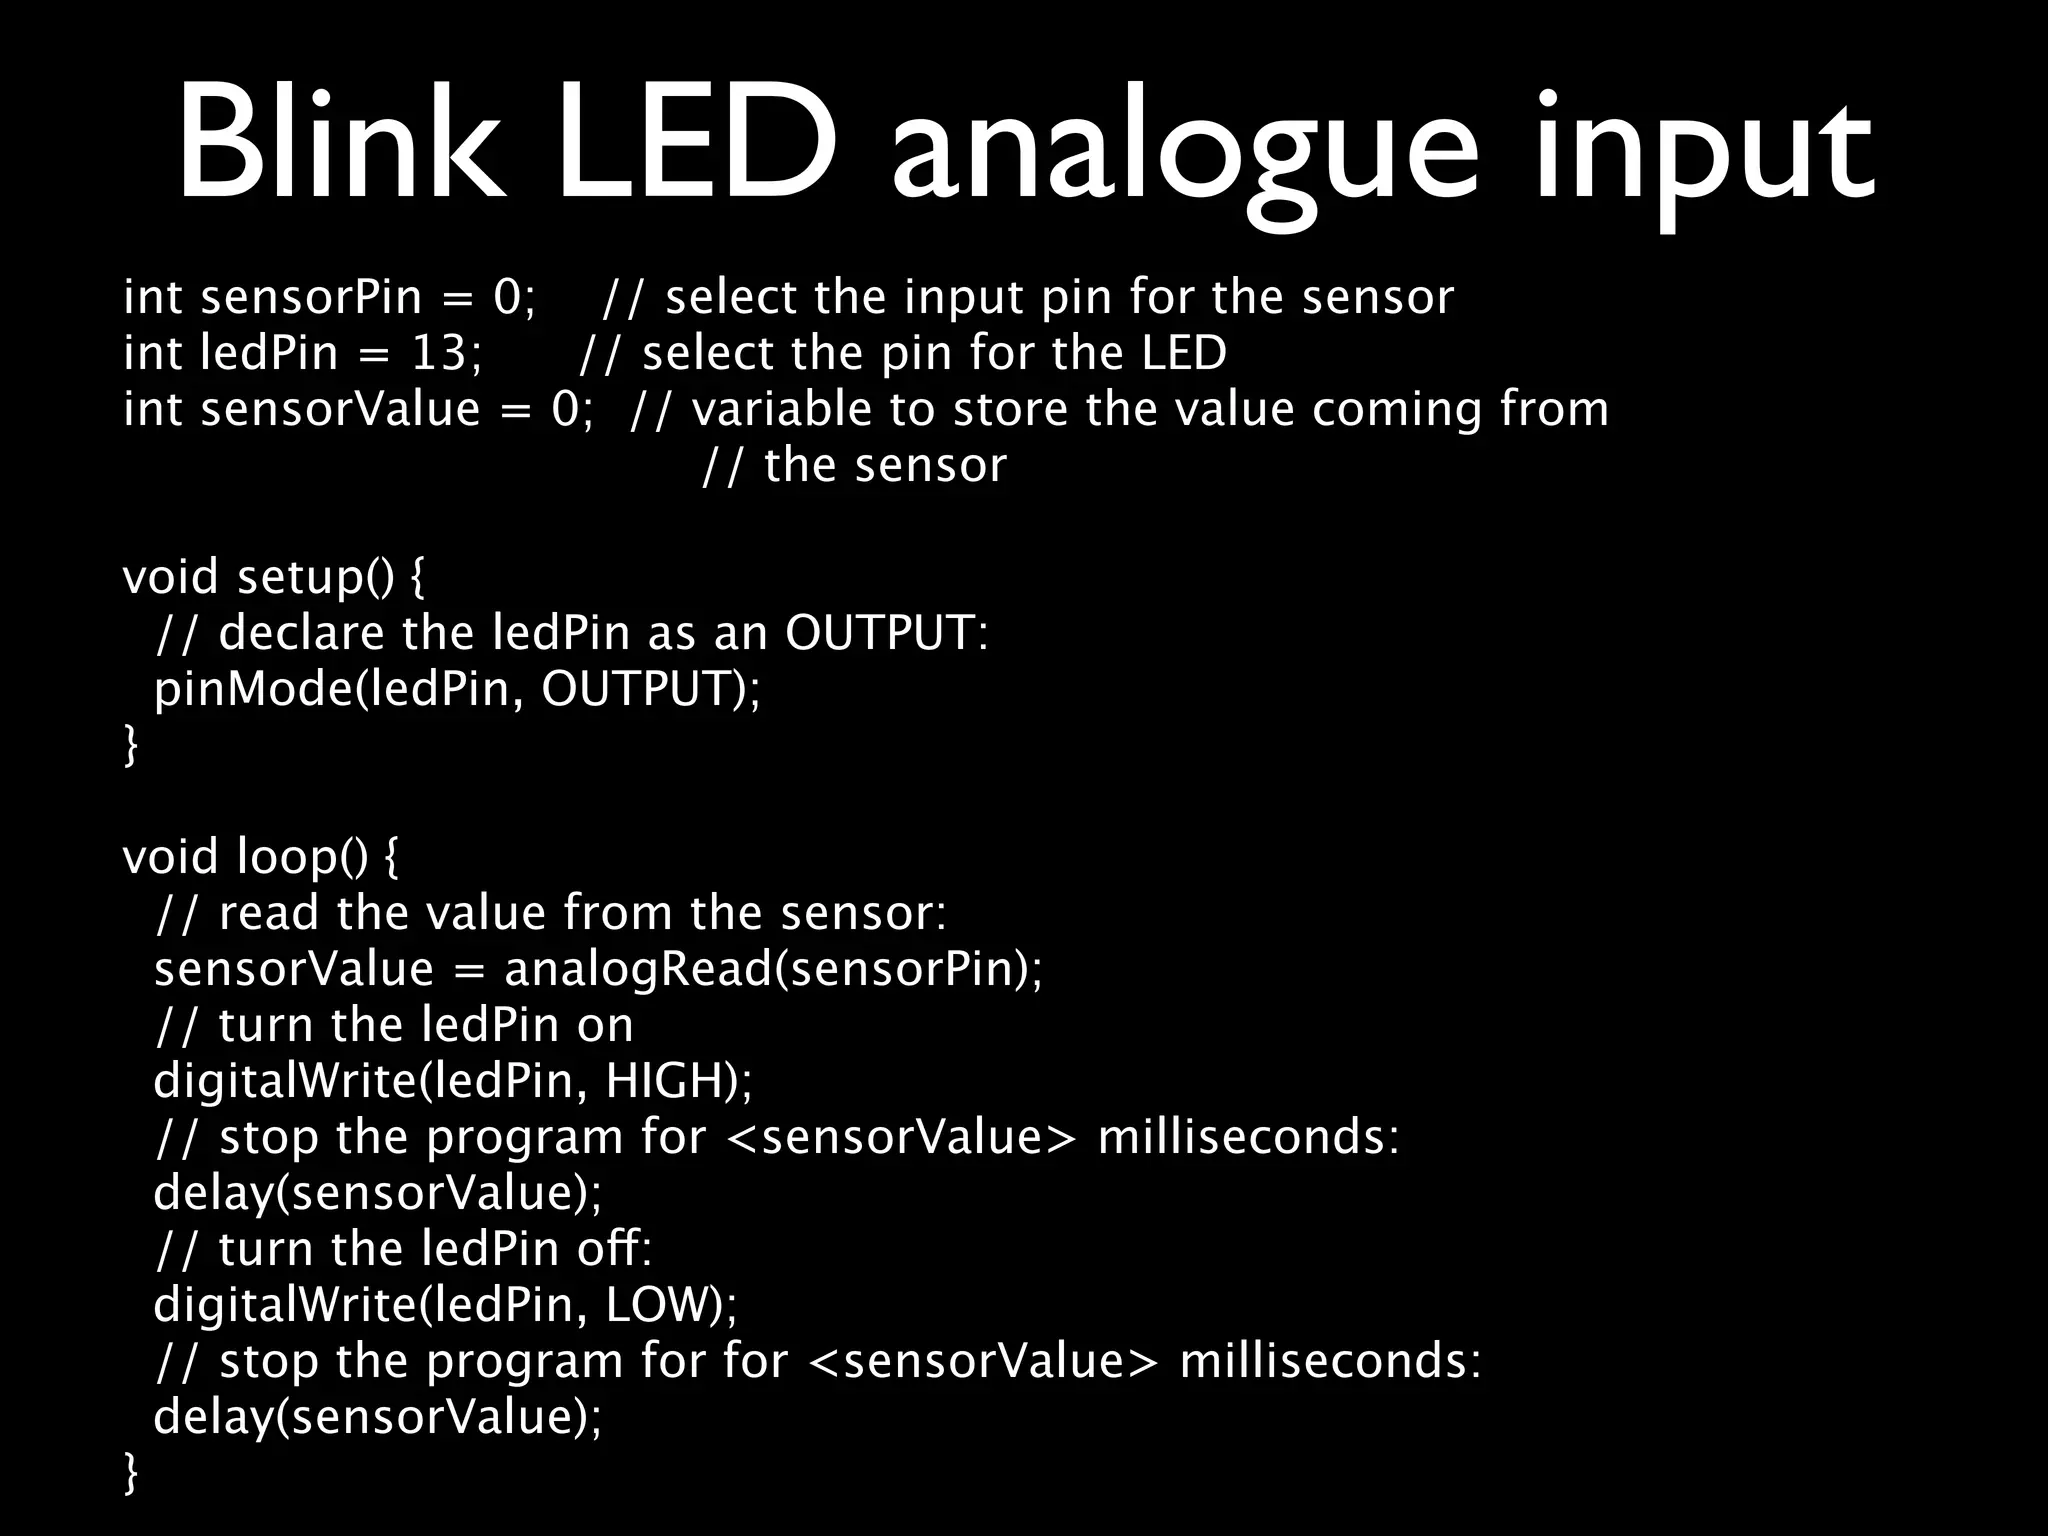
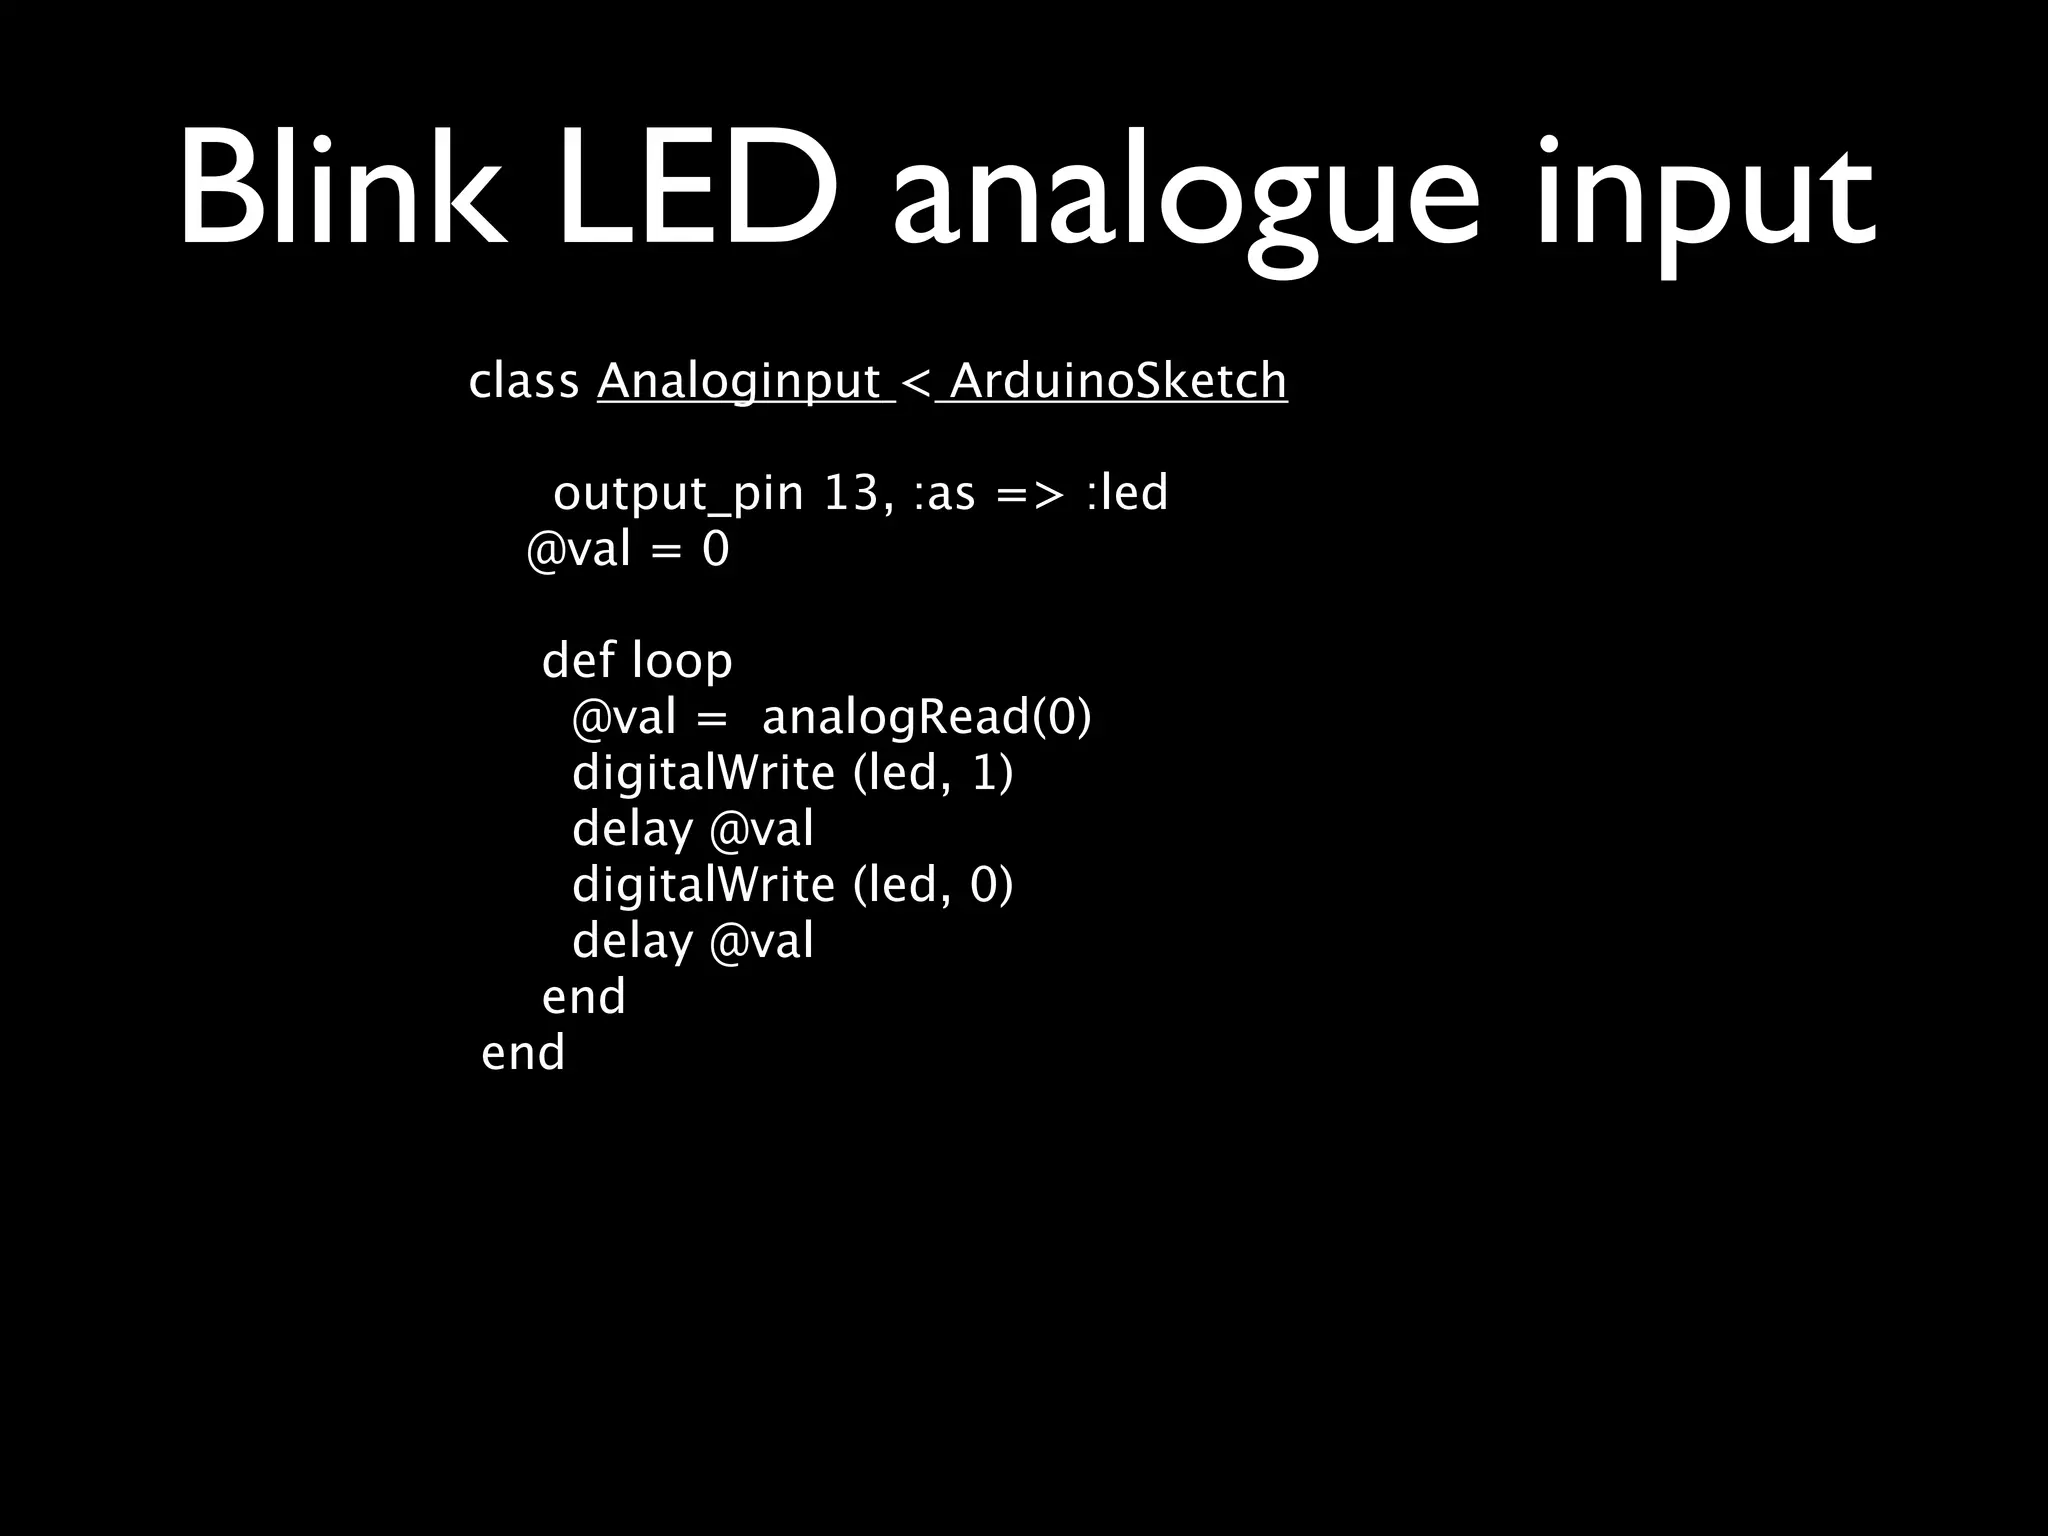
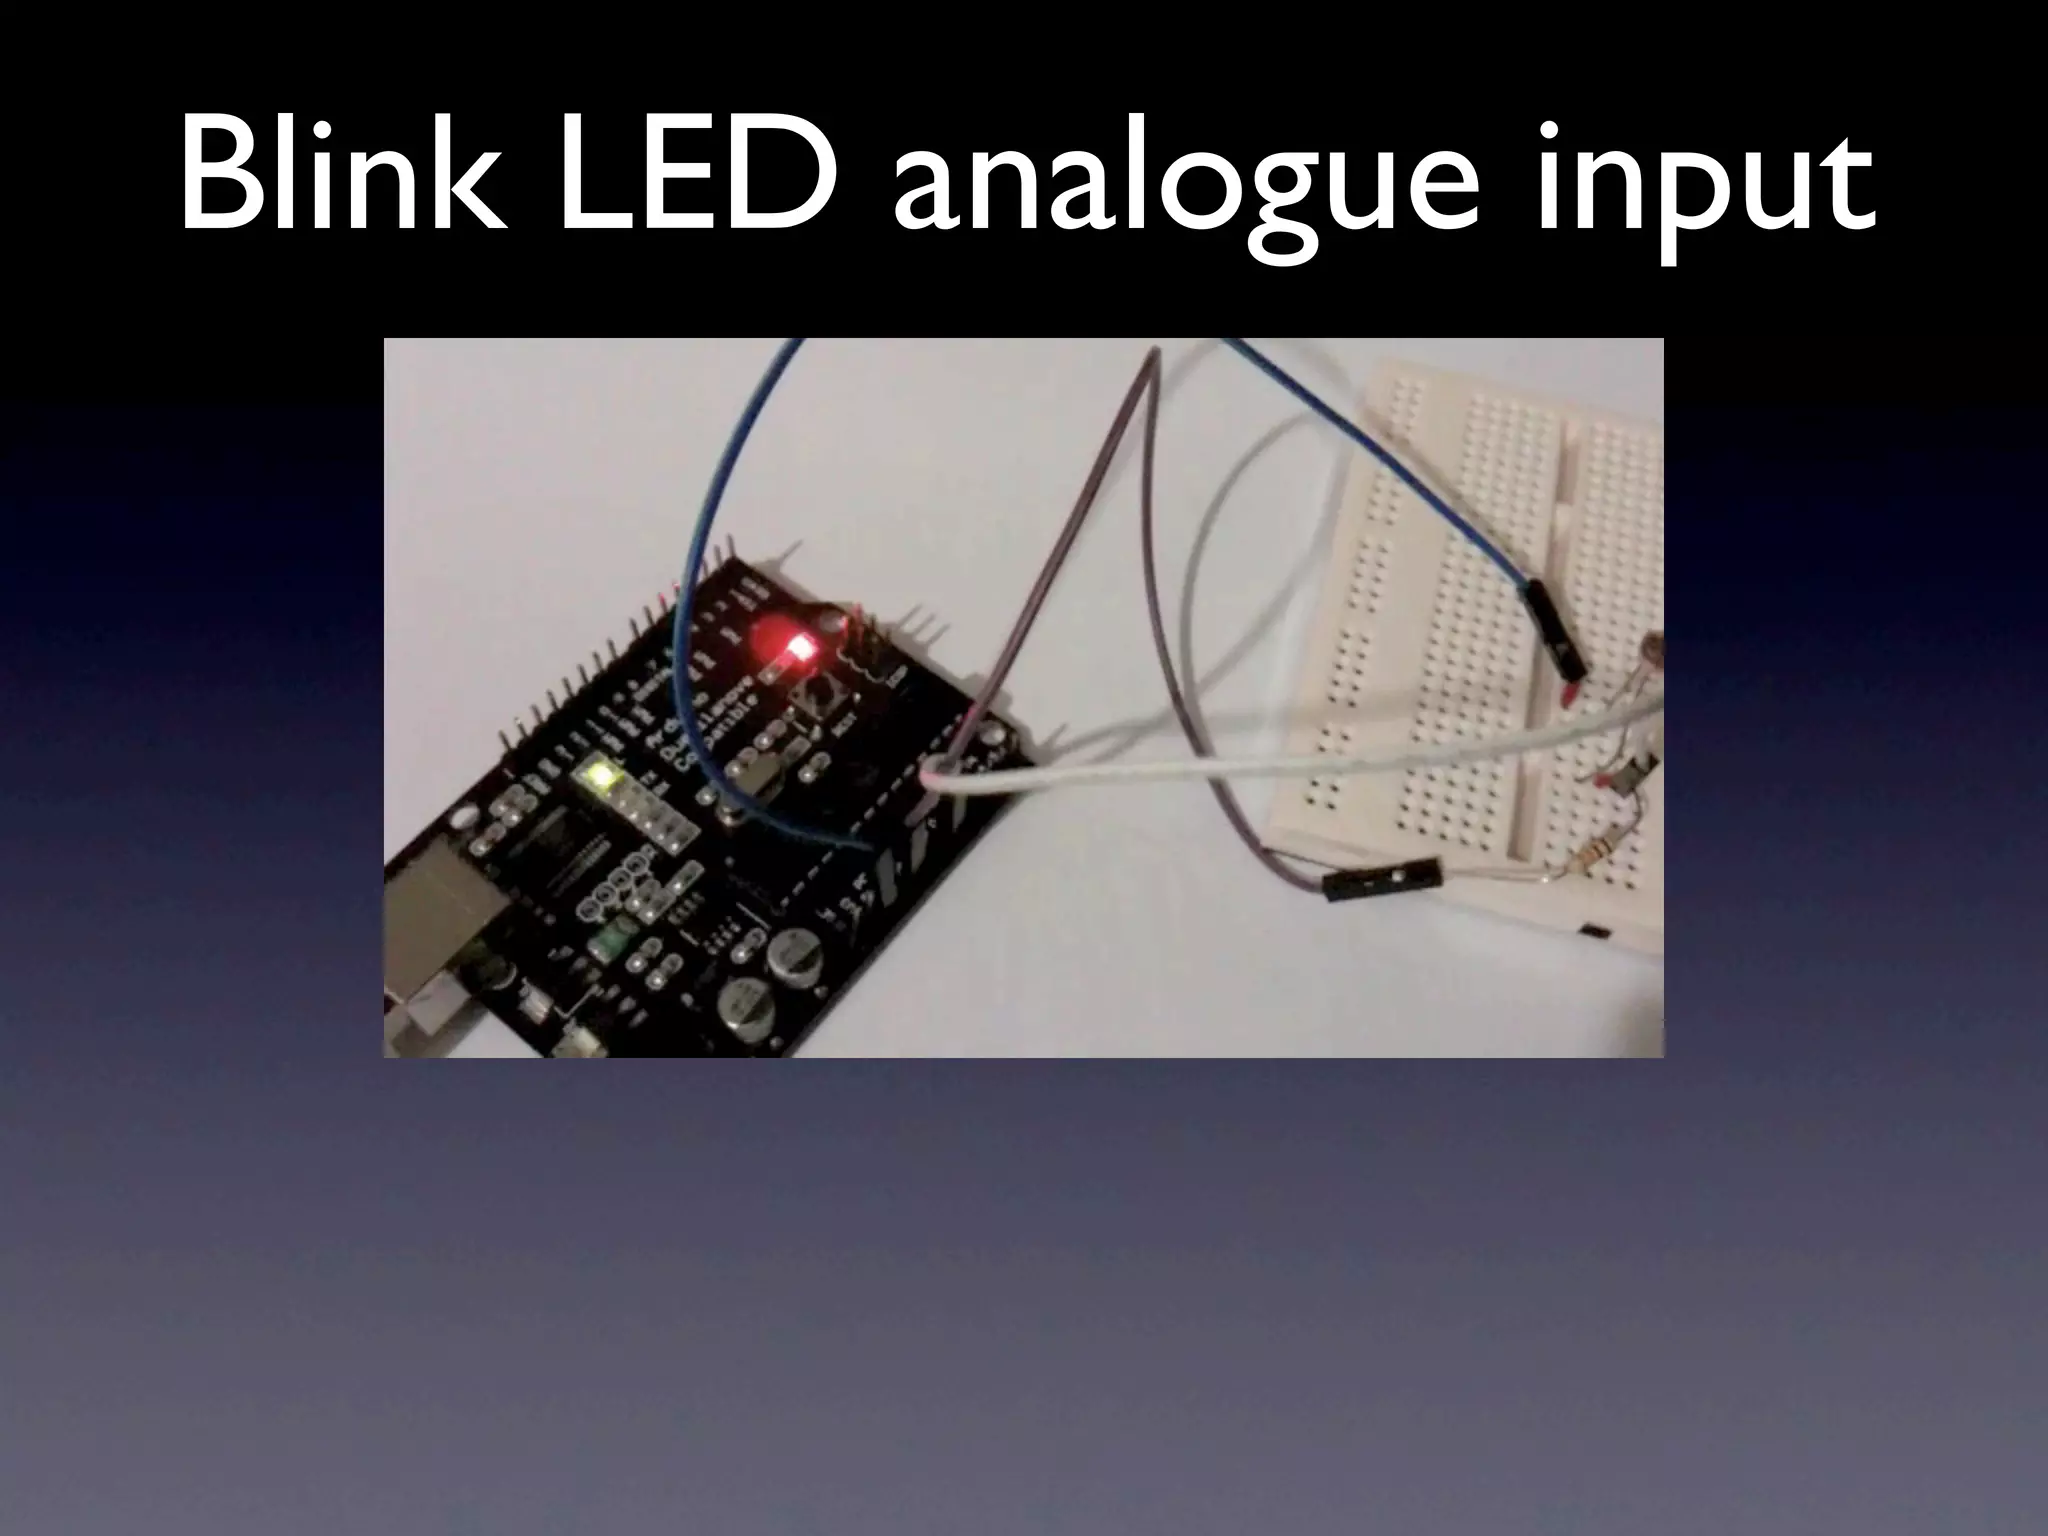
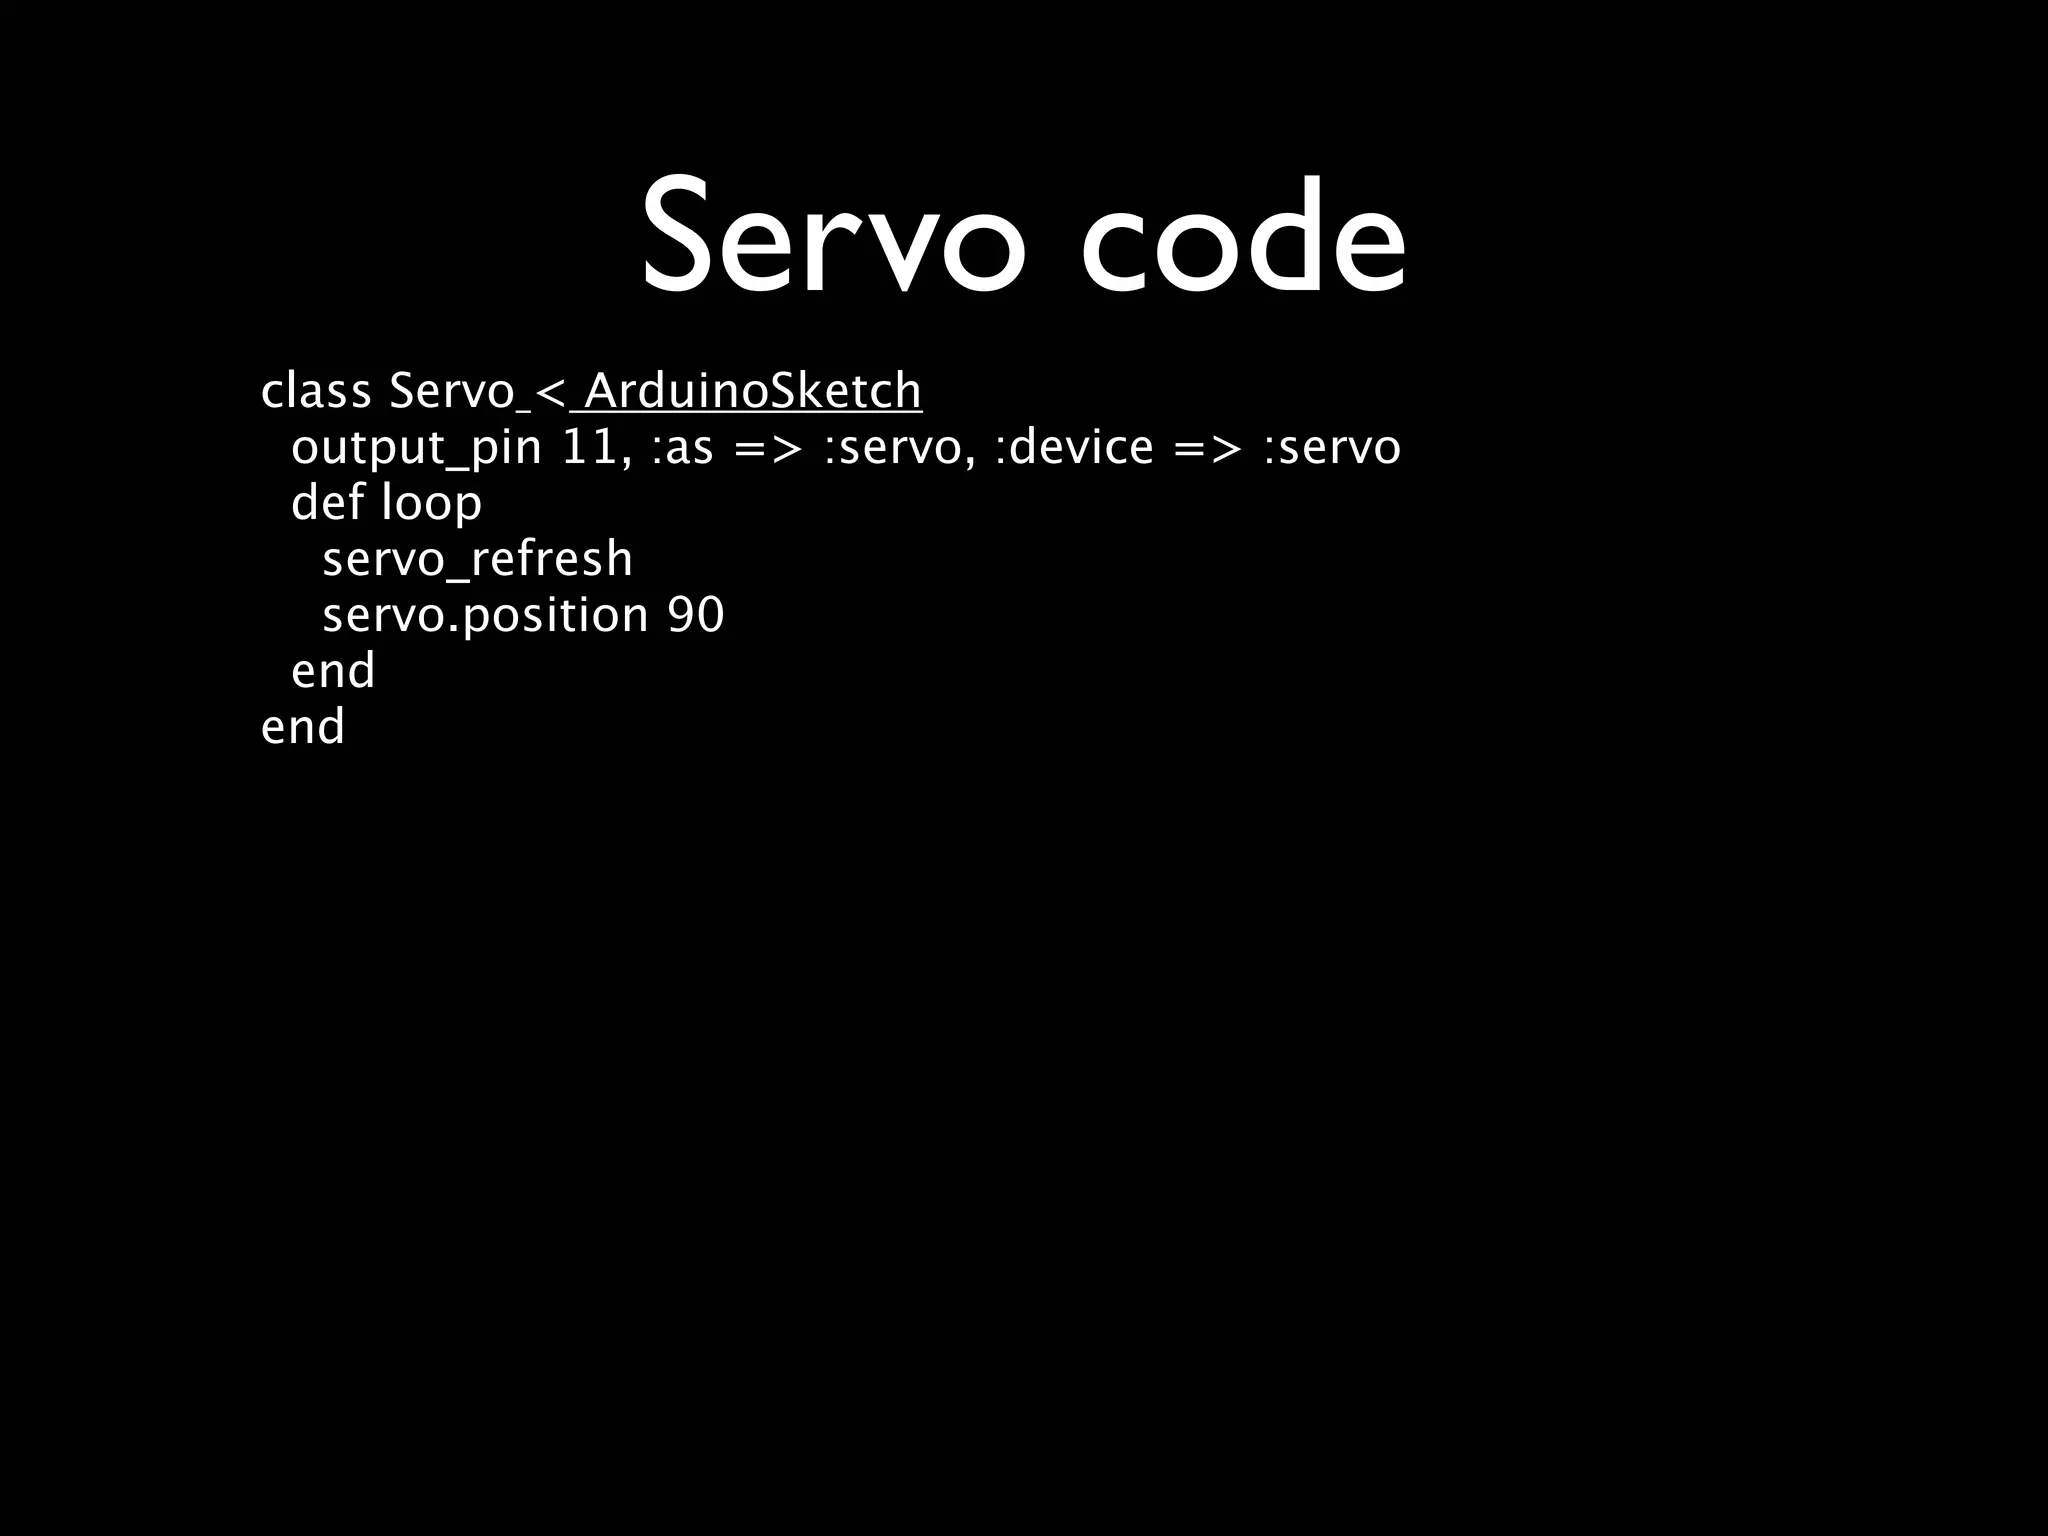
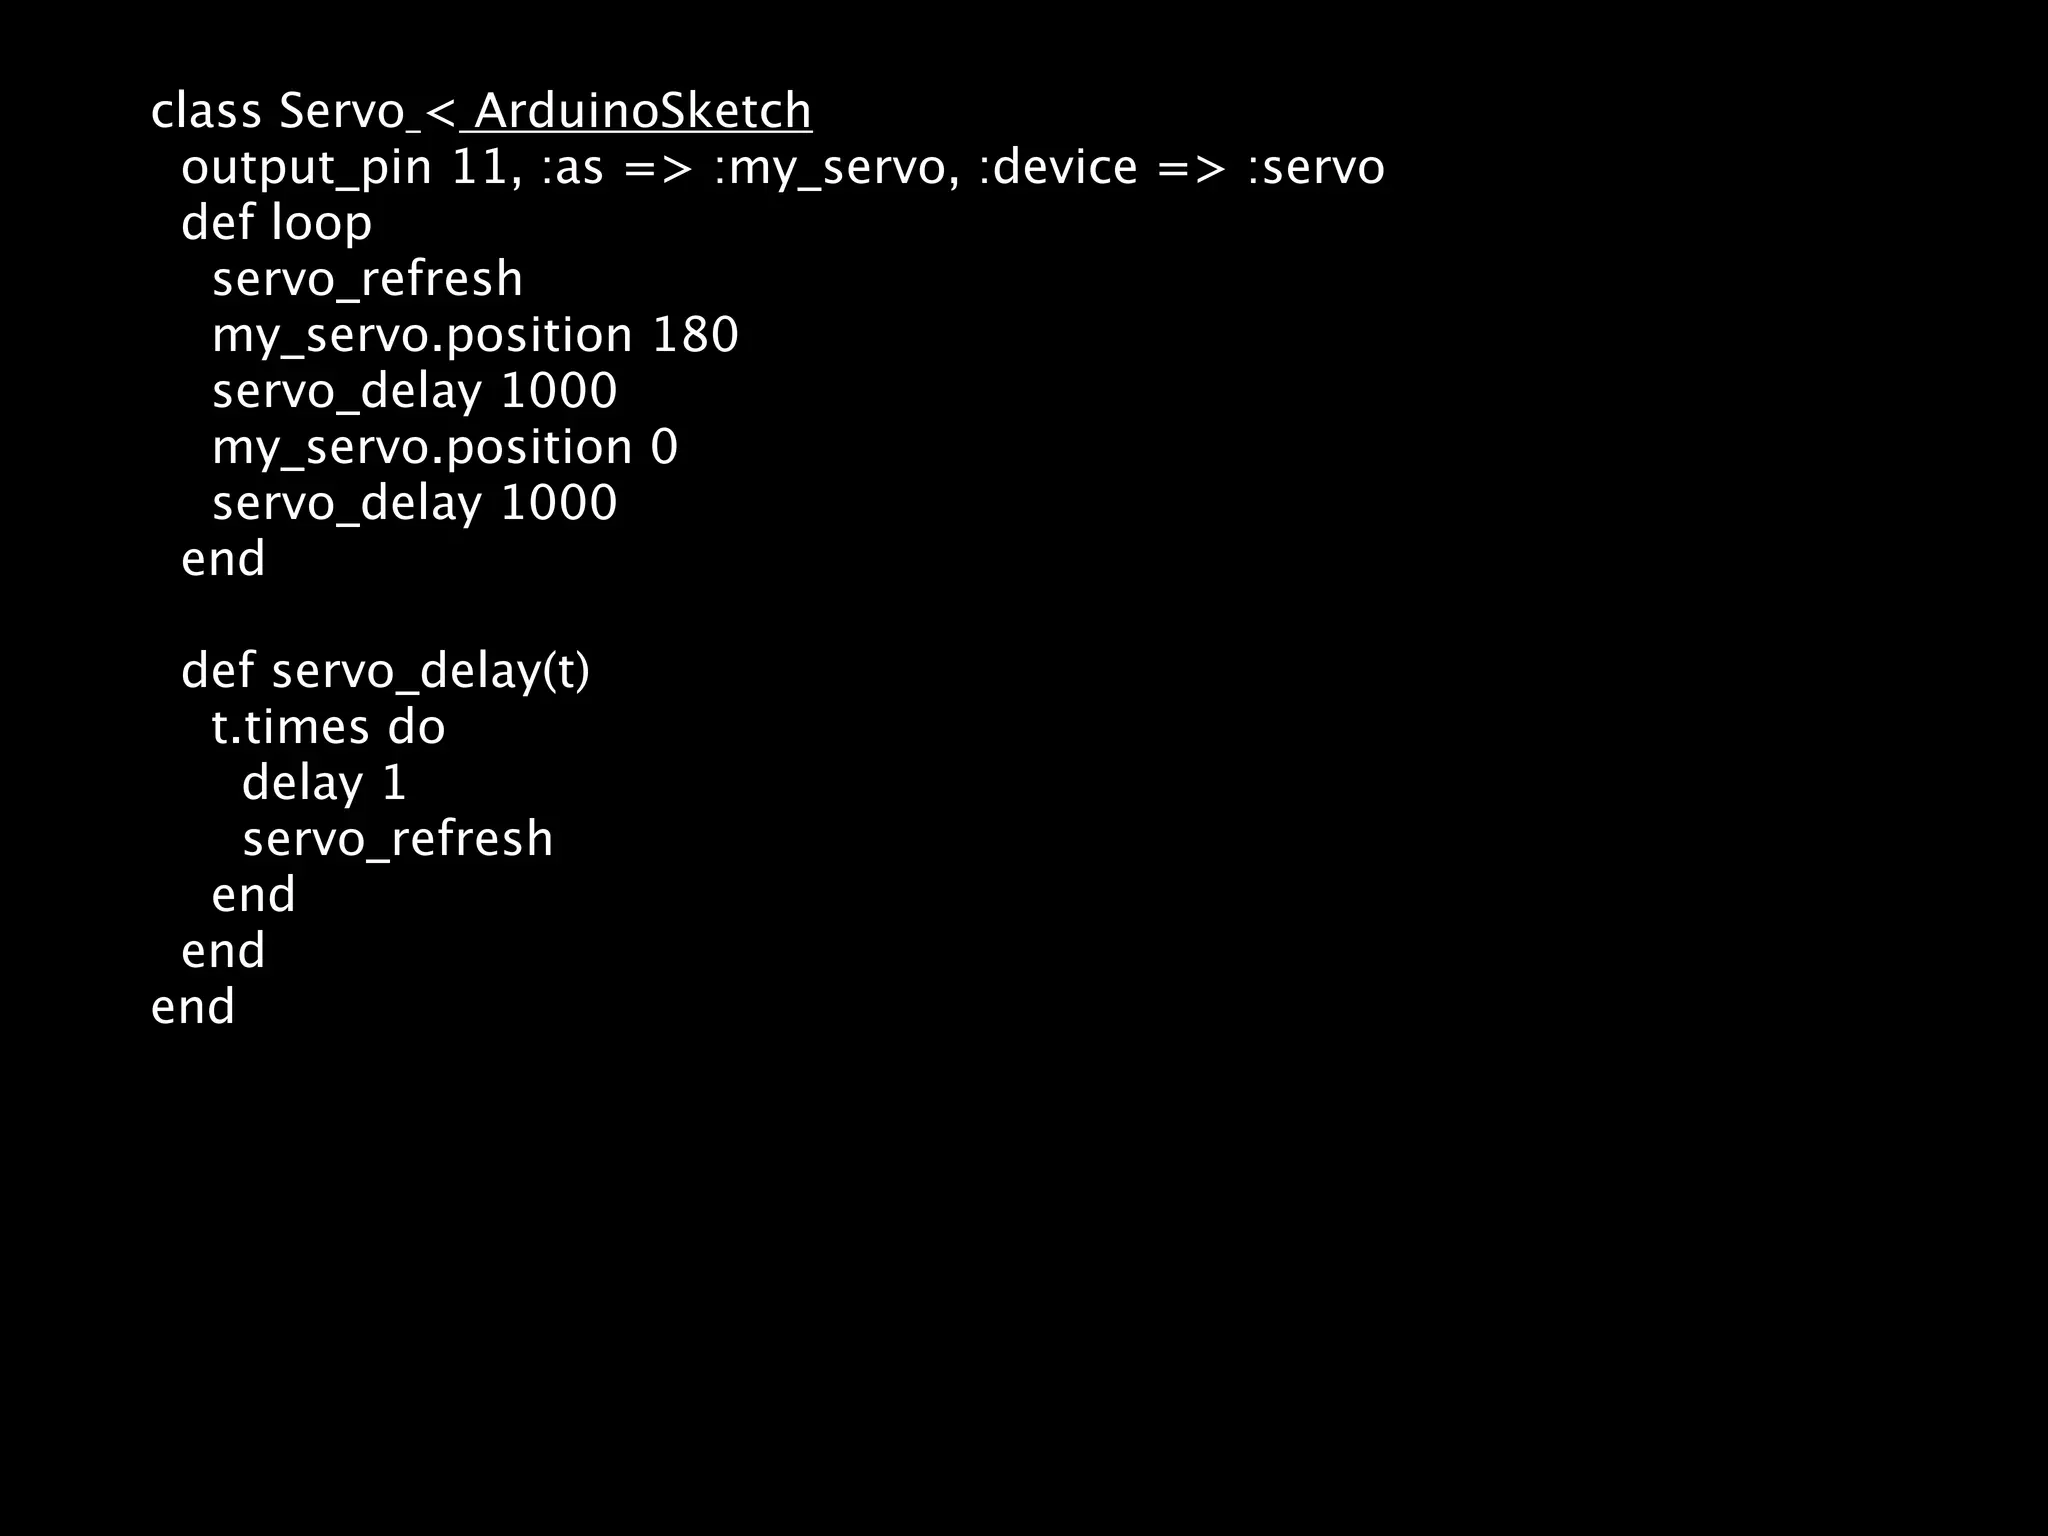
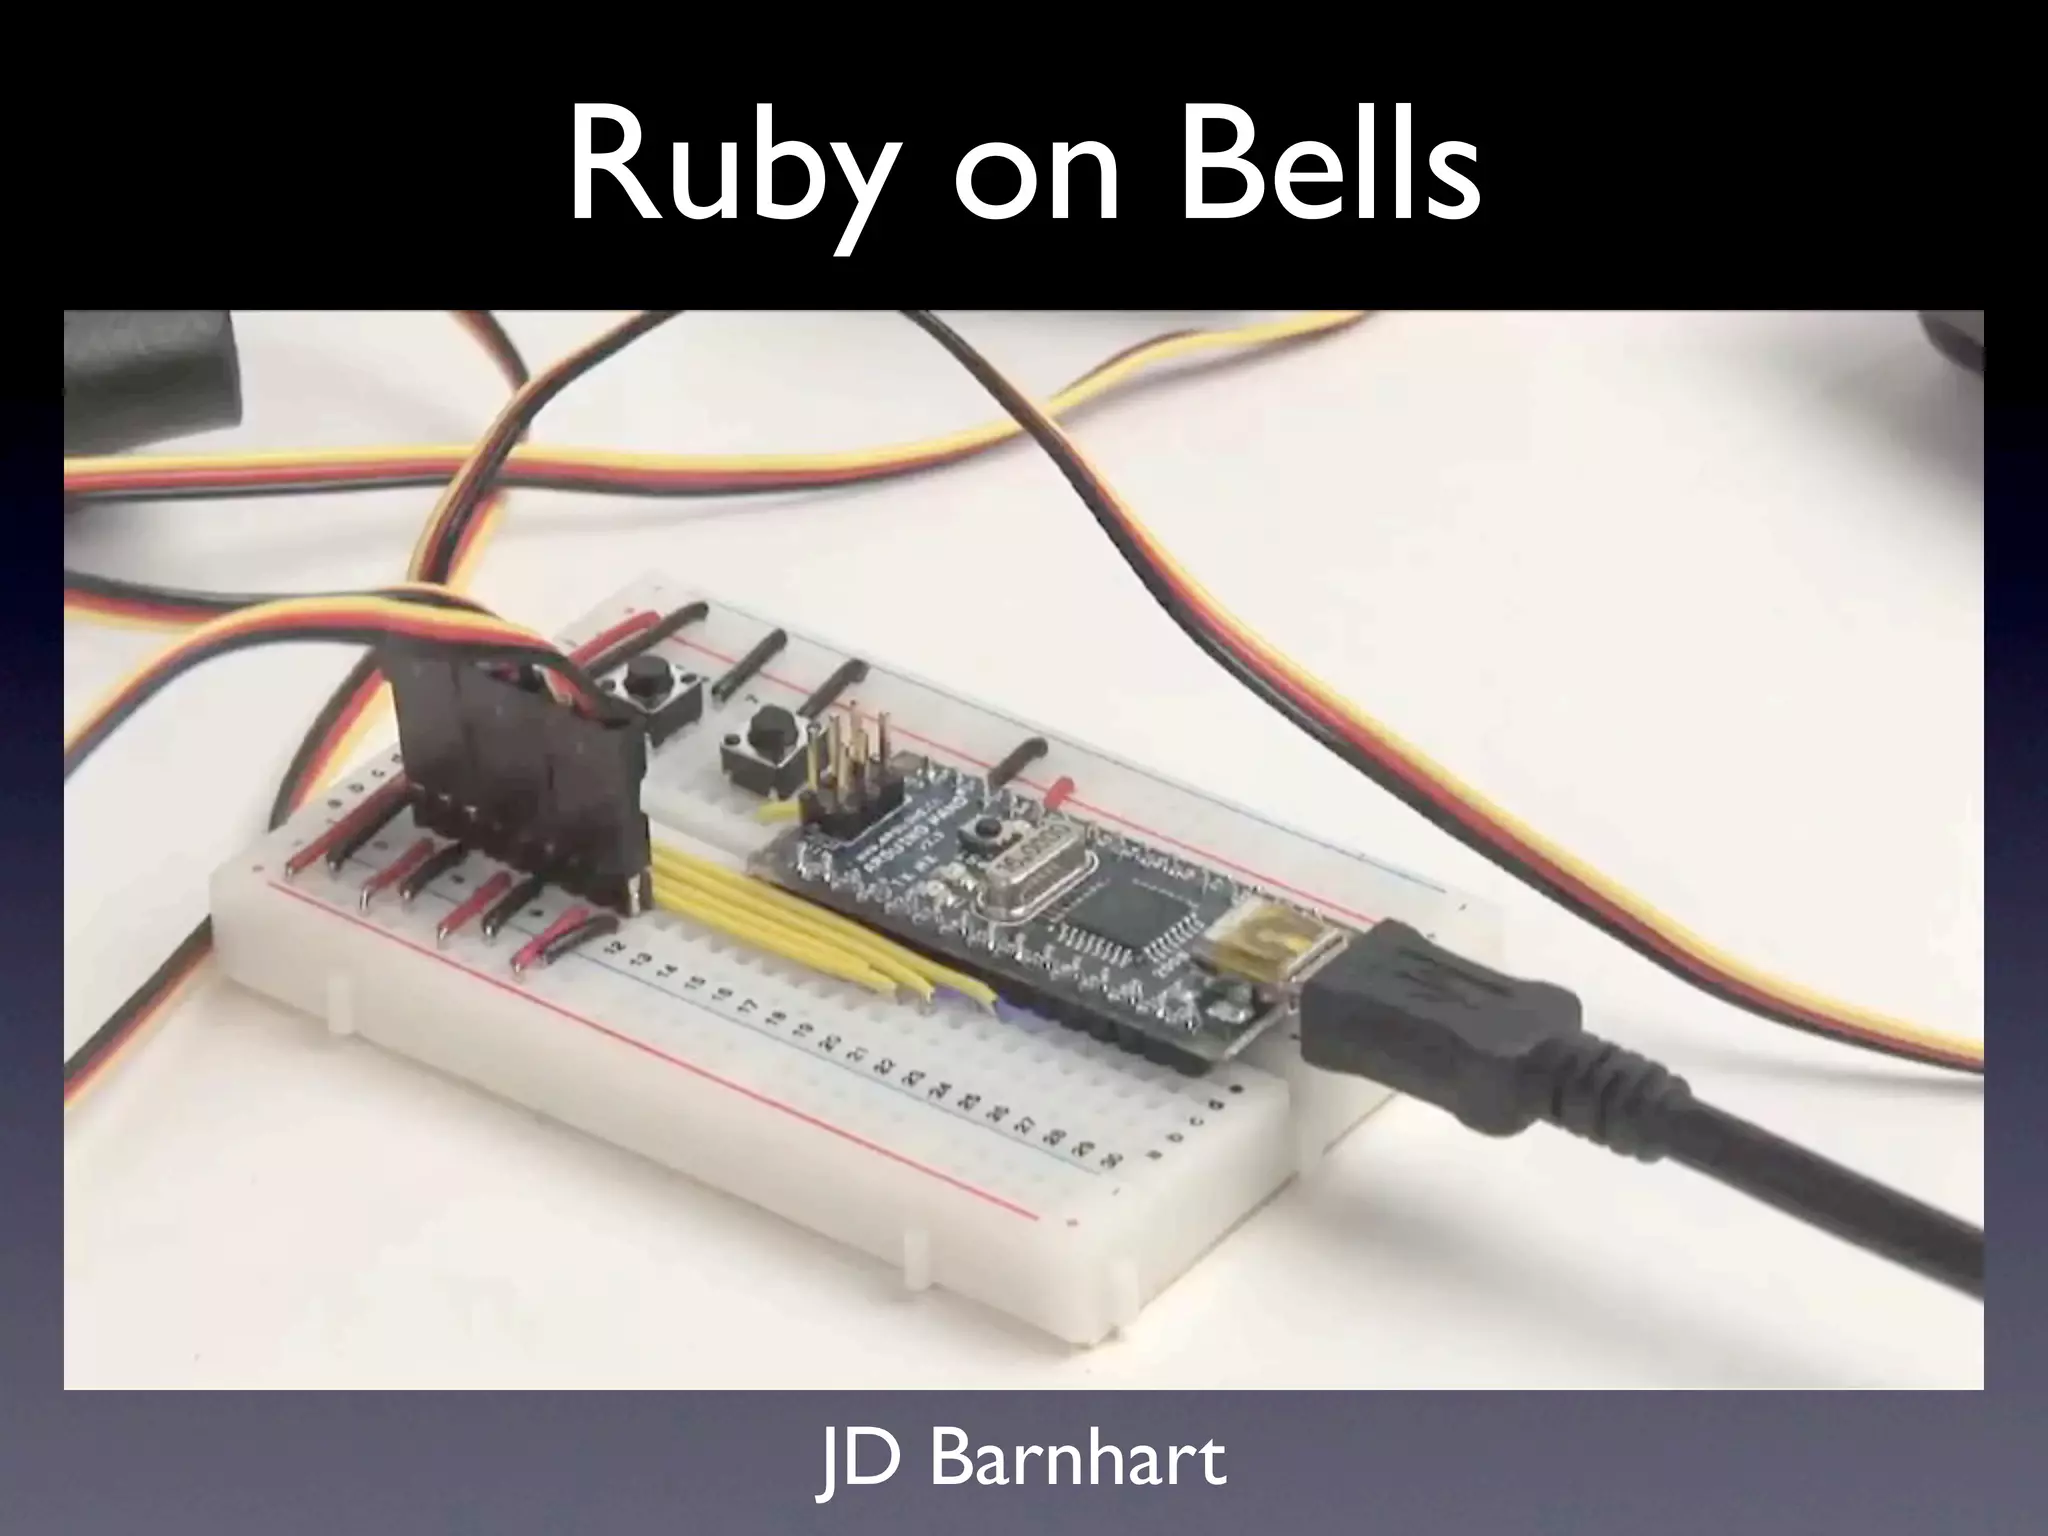
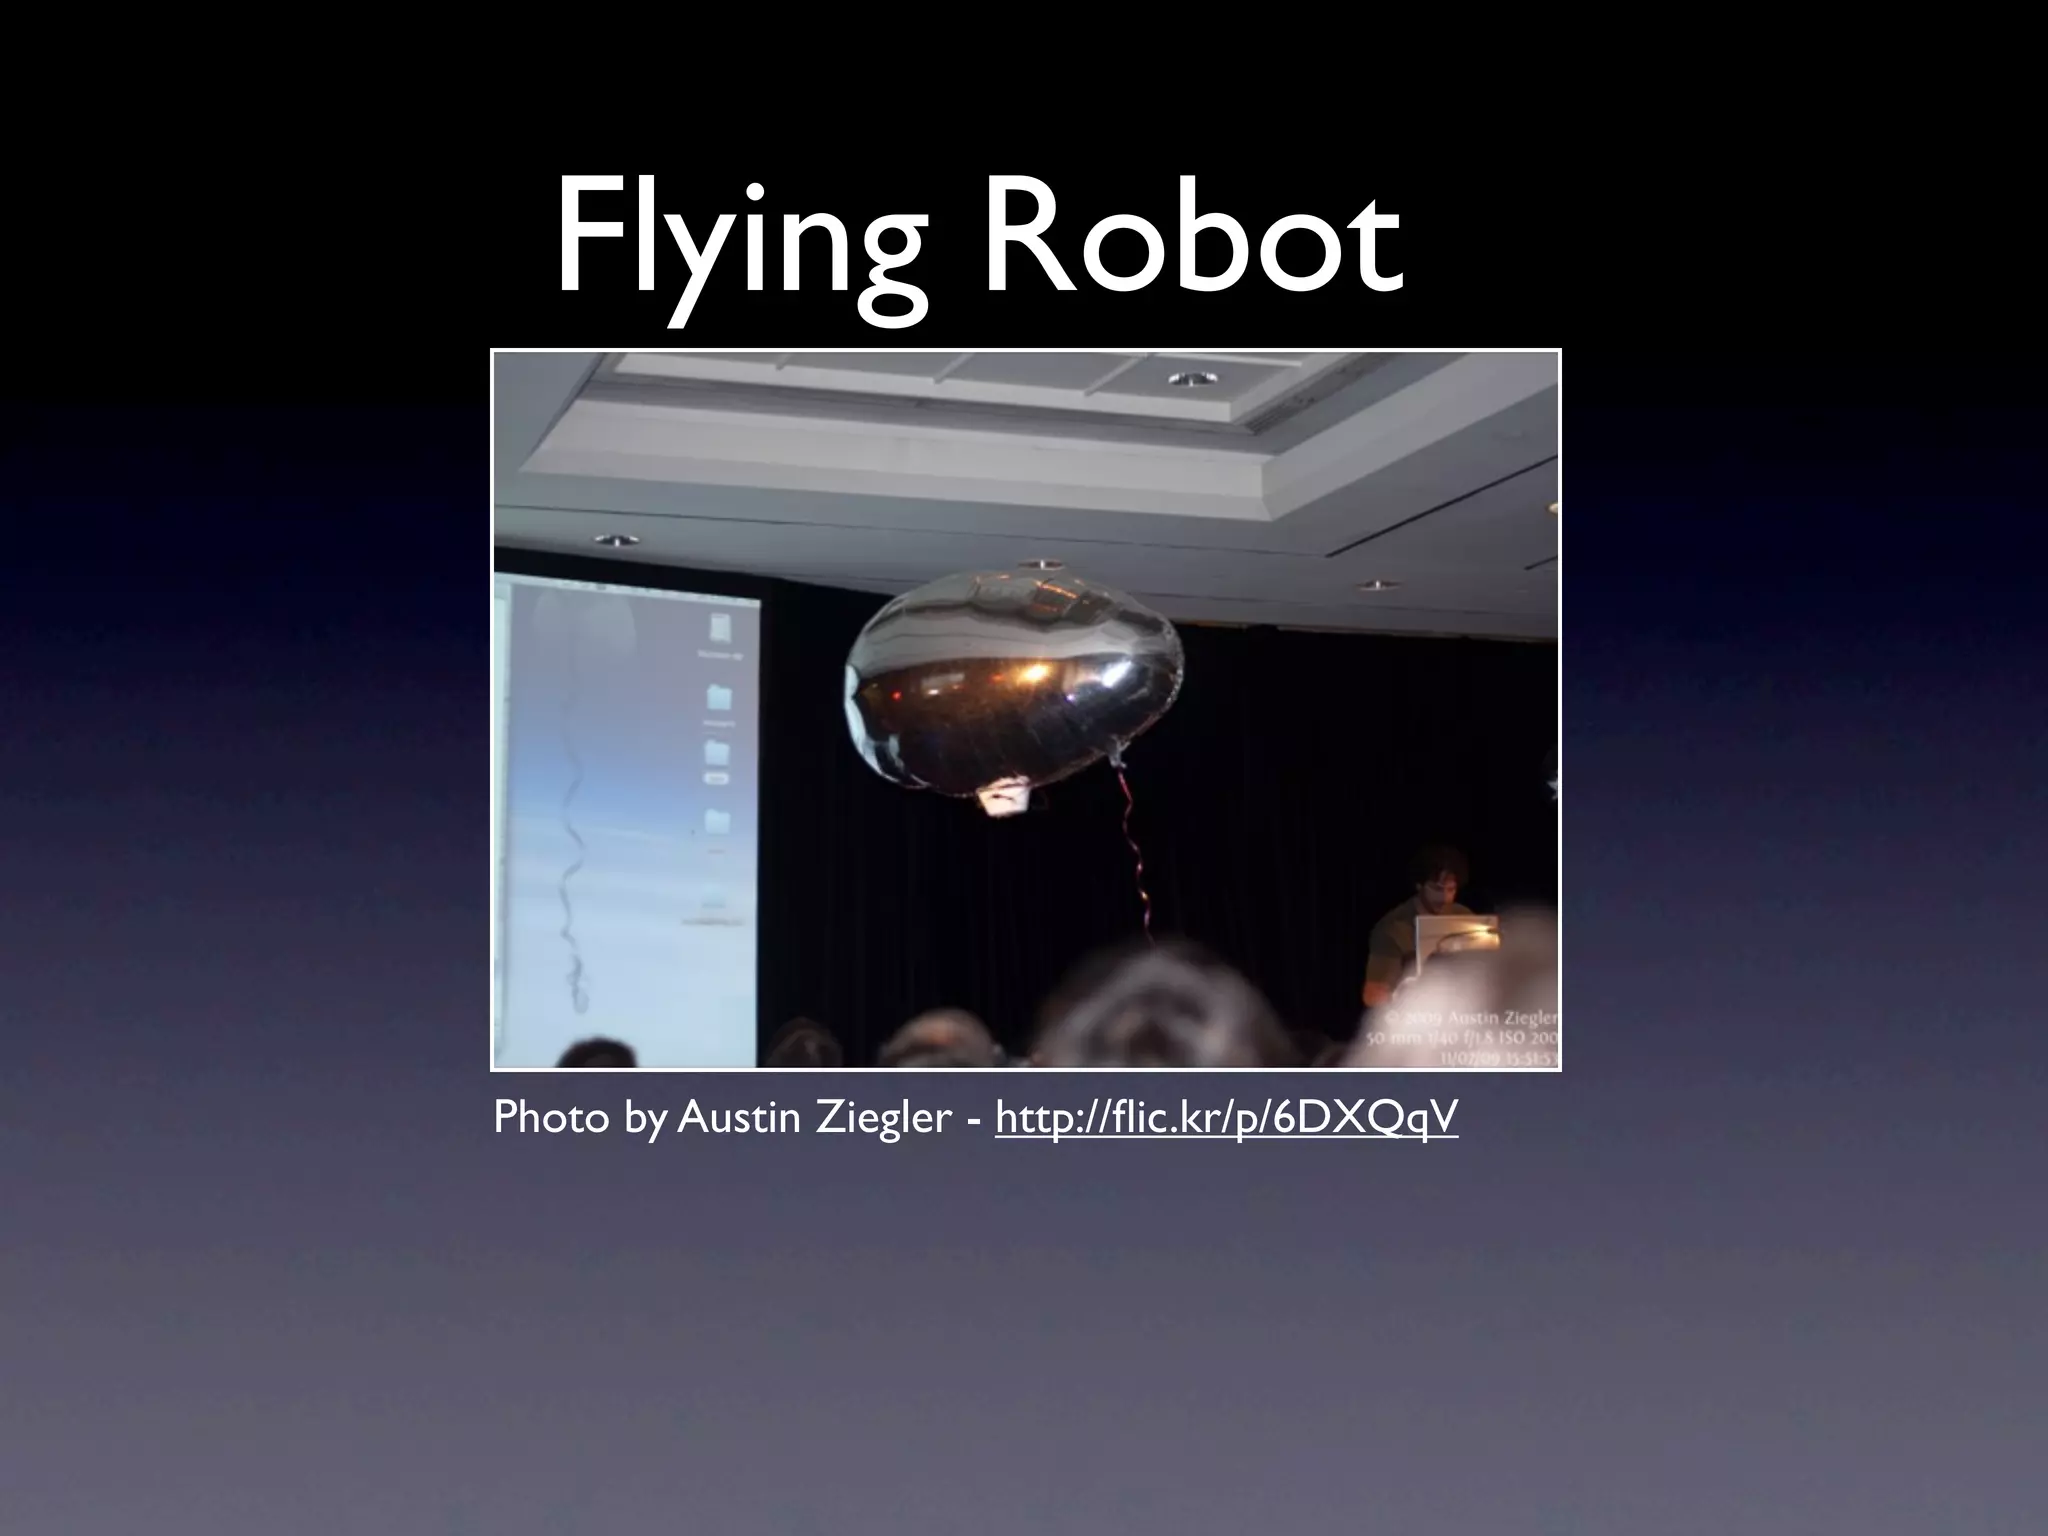
Arduino and Ruby with a (tiny bit of) shoes Martin Evans
Summary • Arduino • RAD (Ruby Arduino Development) • Examples • Projects
Arduino • http://arduino.cc • Examples • Tutorials • Downloads • Forum
Hardware Photo by adafruit - http://flic.kr/p/7LyorG
Photo by pt - http://flic.kr/p/7Luj6T
Duemilanove (2009) • ATMega328p • 60,000 sold 2009 • 6 Analog pins • 14 Digital pins • PWM: 3, 5, 6, 9, 10, and 11. • 16 Mhz • Photo by vouki - http://flic.kr/p/5V6KkG Auto external Voltage
Diecimila (10 thousand) • ATMega168 • 16 Mhz • 14 digital I/O 6 pwm • 6 Analog inputs • 7 - 12 v Photo by Remko van Dokkum - http://flic.kr/p/54JcXJ
Mega • ATMega1280 • Analog 16 pins • 54 Digital • 14 PWM Photo by Spikenzie - http://flic.kr/p/6ahHFu
Nano Lilypad Mini Photo by dodeckahedron - http:// flic.kr/p/3fM8aA
Photo by Osamu Iwasaki - http://flic.kr/p/79ymo7
Shields • Ethernet • Wifi • Motor • I/O • Xbee • Prototype Photo by knolleary - http://flic.kr/p/4YaR9k
Motor controller Photo by Alcoholwang - http://flic.kr/p/69yE7E
I/O Board Photo by Alcoholwang - http://flic.kr/p/69yEch
Software • Processing • Basic IDE • Cross platform • Latest Version is 18
RAD • Ruby Arduino Development • Greg Borenstein 2007 • git://github.com/atduskgreg/rad.git • http://github.com/madrona/rad
Installation $ sudo gem install madrona-rad $ rad example
Hardware.yml ############################################################ ## # Today's MCU Choices (replace the mcu with your arduino board) # atmega8 => Arduino NG or older w/ ATmega8 # atmega168 => Arduino NG or older w/ ATmega168 # mini => Arduino Mini # bt => Arduino BT # diecimila => Arduino Diecimila or Duemilanove w/ ATmega168 # nano => Arduino Nano # lilypad => LilyPad Arduino # pro => Arduino Pro or Pro Mini (8 MHz) # atmega328 => Arduino Duemilanove w/ ATmega328 # mega => Arduino Mega --- serial_port: /dev/tty.usbserial* physical_reset: false mcu: atmega168
software.yml --- arduino_root: /Applications/arduino-0015
Compile rake make:upload
Getting Started with Arduino by Massimo Banzi
Blink LED // Blinking LED #define LED 13 // LED connected to // Digital pin 13 void setup () { pinMode(LED, OUTPUT); // sets the digital // pin as output } void loop() { digitalWrite(LED, HIGH); // turns the LED on delay(1000); // waits for a second digitalWrite(LED, LOW); // turns the LED off delay(1000); // waits for a second }
Blink LED class BlinkLed < ArduinoSketch output_pin 13, :as => :led def loop blink led, 1000 end end
Fade LED in and out int ledPin = 9; // LED connected to digital pin 9 void setup() { // nothing happens in setup } void loop() { // fade in from min to max in increments of 5 points: for(int fadeValue = 0 ; fadeValue <= 255; fadeValue +=5) { // sets the value (range from 0 to 255): analogWrite(ledPin, fadeValue); // wait for 30 milliseconds to see the dimming effect delay(30); } // fade out from max to min in increments of 5 points: for(int fadeValue = 255 ; fadeValue >= 0; fadeValue -=5) { // sets the value (range from 0 to 255): analogWrite(ledPin, fadeValue); // wait for 30 milliseconds to see the dimming effect delay(30); } }
Fade LED in and out class Analogled < ArduinoSketch output_pin 9, :as => :led @i = 1 def loop while @i < 255 do analogWrite led, @i @i +=5 delay 30 end while @i > 0 do analogWrite led, @i @i -=5 delay 30 end end end
Blink LED analogue input int sensorPin = 0; // select the input pin for the sensor int ledPin = 13; // select the pin for the LED int sensorValue = 0; // variable to store the value coming from // the sensor void setup() { // declare the ledPin as an OUTPUT: pinMode(ledPin, OUTPUT); } void loop() { // read the value from the sensor: sensorValue = analogRead(sensorPin); // turn the ledPin on digitalWrite(ledPin, HIGH); // stop the program for <sensorValue> milliseconds: delay(sensorValue); // turn the ledPin off: digitalWrite(ledPin, LOW); // stop the program for for <sensorValue> milliseconds: delay(sensorValue); }
Blink LED analogue input class Analoginput < ArduinoSketch output_pin 13, :as => :led @val = 0 def loop @val = analogRead(0) digitalWrite (led, 1) delay @val digitalWrite (led, 0) delay @val end end
Blink LED analogue input
Serial Read class Serialcom1 < ArduinoSketch input_pin 0, :as => :sensor serial_begin :rate => 19200 def loop serial_println analogRead sensor delay 1000 end end
Plugins and Libraries • C Methods, directives, external variables and assignments and calls that maybe added to main setup method • Arduino libraries
Servo code class Servo < ArduinoSketch output_pin 11, :as => :servo, :device => :servo def loop servo_refresh servo.position 90 end end
class Servo < ArduinoSketch output_pin 11, :as => :my_servo, :device => :servo def loop servo_refresh my_servo.position 180 servo_delay 1000 my_servo.position 0 servo_delay 1000 end def servo_delay(t) t.times do delay 1 servo_refresh end end end
Example Projects Ruby on Bells Barduino Flying Robot
Ruby on bells JD Barnhart
Ruby on Bells JD Barnhart
Barduino Matthew Williams http://github.com/mwilliams/barduino
Barduino Photo by aeden - http://flic.kr/p/5uy7DX
Barduino
Barduino
Flying Robot Damen and Ron Evans http://wiki.github.com/deadprogrammer/flying_robot/ http://github.com/deadprogrammer/ flying_robot_blimpduino http://deadprogrammersociety.blogspot.com/
Flying Robot Photo by Austin Ziegler - http://flic.kr/p/6DXQqV
Flying Robot
Flying Robot
Shoes • Snow Leopard Fail • Toholio serial gem
Flying Robot code • Background • Draw images • Serial update • XBee
Shoes.setup do gem 'toholio-serialport' end require "serialport" require 'lib/flying_robot_proxy' FLYING_ROBOT = FlyingRobotProxy.new
def draw_background @centerx, @centery = 126, 140 fill white stroke black strokewidth 4 oval @centerx - 102, @centery - 102, 204, 204 fill black nostroke oval @centerx - 5, @centery - 5, 10, 10 stroke black strokewidth 1 line(@centerx, @centery - 102, @centerx, @centery - 95) line(@centerx - 102, @centery, @centerx - 95, @centery) line(@centerx + 95, @centery, @centerx + 102, @centery) line(@centerx, @centery + 95, @centerx, @centery + 102) @north = para "N", :top => @centery - 130, :left => @centerx - 10 @south = para "S", :top => @centery + 104, :left => @centerx - 10 @west = para "W", :top => @centery - 12, :left => @centerx - 126 @east = para "E", :top => @centery - 12, :left => @centerx + 104 end
def draw_compass_hand @centerx, @centery = 126, 140 @current_reading = @compass.to_f #[17, @compass.length].to_f return if @current_reading == 0.0 # the compass is oriented in reverse on the blimpduino, so switch it @current_reading = (@current_reading + 180).modulo(360) _x = 90 * Math.sin( @current_reading * Math::PI / 180 ) _y = 90 * Math.cos( @current_reading * Math::PI / 180 ) stroke black strokewidth 6 line(@centerx, @centery, @centerx + _x, @centery - _y) end
Sharp GP2D12 Photo by hmblgrmpf - http://flic.kr/p/hJmoM
Sharp GP2D12 code class Sharpir < ArduinoSketch # Analog input for sharp Infrared sensors GP2D12 input_pin 0, :as => :ir_sensor_right # variables for checking for obstruction @range = "0, int" serial_begin def loop range_ir_sensor delay 10 end def range_ir_sensor @range = analogRead(ir_sensor) if (@range> 3) then @range = (6787 / (@range - 3)) - 4 serial_print "sensor: " serial_println @range delay 1000 end end end
Devantech SRF05 Photo by Lucky Larry - http://flic.kr/p/6E5pZZ
Devantech SRF05 class Rangefinding < ArduinoSketch @sig_pin = 2 serial_begin def loop serial_println(pingsrf05(@sig_pin)) end end
class Srf05 < ArduinoPlugin # Triggers a pulse and returns distance in cm. long pingsrf05(int ultraSoundpin) { unsigned long ultrasoundDuration; // switch pin to output pinMode(ultraSoundpin, OUTPUT); // send a low, wait 2 microseconds, send a high then wait 10us digitalWrite(ultraSoundpin, LOW); delayMicroseconds(2); digitalWrite(ultraSoundpin, HIGH); delayMicroseconds(10); digitalWrite(ultraSoundpin, LOW); // switch pin to input pinMode(ultraSoundpin, INPUT); // wait for a pulse to come in as high ultrasoundDuration = pulseIn(ultraSoundpin, HIGH); return(ultrasoundDuration/58); } end
Wishield Asynclabs
Pachube • http://www.pachube.com • Sign up for account • Get api key • http://www.pachube.com/feeds/6445
Roo-bee • Obstacle avoidance • Sharp IR sensors • Arduino Duemilanove • Devantech SR05 Ultrasound • Servo • Solarbotics Motors
DEMO
Suppliers • Active robots: http://active-robots.com • Ebay jzhaoket and yerobot • http://asynclabs.com • http://bitsbox.co.uk
Thanks • Github http://github.com/lostcaggy • Slides will be on slideshare later

Scottish Ruby Conference 2010 Arduino, Ruby RAD

  • 1.
    Arduino and Ruby witha (tiny bit of) shoes Martin Evans
  • 2.
    Summary • Arduino • RAD(Ruby Arduino Development) • Examples • Projects
  • 3.
    Arduino • http://arduino.cc • Examples •Tutorials • Downloads • Forum
  • 4.
    Hardware Photo by adafruit- http://flic.kr/p/7LyorG
  • 5.
    Photo by pt- http://flic.kr/p/7Luj6T
  • 6.
    Duemilanove (2009) • ATMega328p • 60,000 sold 2009 • 6 Analog pins • 14 Digital pins • PWM: 3, 5, 6, 9, 10, and 11. • 16 Mhz • Photo by vouki - http://flic.kr/p/5V6KkG Auto external Voltage
  • 7.
    Diecimila (10 thousand) • ATMega168 • 16 Mhz • 14 digital I/O 6 pwm • 6 Analog inputs • 7 - 12 v Photo by Remko van Dokkum - http://flic.kr/p/54JcXJ
  • 8.
    Mega • ATMega1280 • Analog 16 pins • 54 Digital • 14 PWM Photo by Spikenzie - http://flic.kr/p/6ahHFu
  • 9.
    Nano Lilypad Mini Photo by dodeckahedron - http:// flic.kr/p/3fM8aA
  • 10.
    Photo by OsamuIwasaki - http://flic.kr/p/79ymo7
  • 11.
    Shields • Ethernet • Wifi • Motor • I/O • Xbee • Prototype Photo by knolleary - http://flic.kr/p/4YaR9k
  • 12.
    Motor controller Photoby Alcoholwang - http://flic.kr/p/69yE7E
  • 13.
    I/O Board Photo byAlcoholwang - http://flic.kr/p/69yEch
  • 14.
    Software • Processing • Basic IDE • Cross platform • Latest Version is 18
  • 15.
    RAD • Ruby ArduinoDevelopment • Greg Borenstein 2007 • git://github.com/atduskgreg/rad.git • http://github.com/madrona/rad
  • 16.
    Installation $ sudo geminstall madrona-rad $ rad example
  • 18.
    Hardware.yml ############################################################ ## # Today's MCUChoices (replace the mcu with your arduino board) # atmega8 => Arduino NG or older w/ ATmega8 # atmega168 => Arduino NG or older w/ ATmega168 # mini => Arduino Mini # bt => Arduino BT # diecimila => Arduino Diecimila or Duemilanove w/ ATmega168 # nano => Arduino Nano # lilypad => LilyPad Arduino # pro => Arduino Pro or Pro Mini (8 MHz) # atmega328 => Arduino Duemilanove w/ ATmega328 # mega => Arduino Mega --- serial_port: /dev/tty.usbserial* physical_reset: false mcu: atmega168
  • 19.
  • 20.
  • 21.
    Getting Started with Arduino by Massimo Banzi
  • 22.
    Blink LED // BlinkingLED #define LED 13 // LED connected to // Digital pin 13 void setup () { pinMode(LED, OUTPUT); // sets the digital // pin as output } void loop() { digitalWrite(LED, HIGH); // turns the LED on delay(1000); // waits for a second digitalWrite(LED, LOW); // turns the LED off delay(1000); // waits for a second }
  • 23.
    Blink LED class BlinkLed< ArduinoSketch output_pin 13, :as => :led def loop blink led, 1000 end end
  • 24.
    Fade LED inand out int ledPin = 9; // LED connected to digital pin 9 void setup() { // nothing happens in setup } void loop() { // fade in from min to max in increments of 5 points: for(int fadeValue = 0 ; fadeValue <= 255; fadeValue +=5) { // sets the value (range from 0 to 255): analogWrite(ledPin, fadeValue); // wait for 30 milliseconds to see the dimming effect delay(30); } // fade out from max to min in increments of 5 points: for(int fadeValue = 255 ; fadeValue >= 0; fadeValue -=5) { // sets the value (range from 0 to 255): analogWrite(ledPin, fadeValue); // wait for 30 milliseconds to see the dimming effect delay(30); } }
  • 25.
    Fade LED inand out class Analogled < ArduinoSketch output_pin 9, :as => :led @i = 1 def loop while @i < 255 do analogWrite led, @i @i +=5 delay 30 end while @i > 0 do analogWrite led, @i @i -=5 delay 30 end end end
  • 26.
    Blink LED analogueinput int sensorPin = 0; // select the input pin for the sensor int ledPin = 13; // select the pin for the LED int sensorValue = 0; // variable to store the value coming from // the sensor void setup() { // declare the ledPin as an OUTPUT: pinMode(ledPin, OUTPUT); } void loop() { // read the value from the sensor: sensorValue = analogRead(sensorPin); // turn the ledPin on digitalWrite(ledPin, HIGH); // stop the program for <sensorValue> milliseconds: delay(sensorValue); // turn the ledPin off: digitalWrite(ledPin, LOW); // stop the program for for <sensorValue> milliseconds: delay(sensorValue); }
  • 27.
    Blink LED analogueinput class Analoginput < ArduinoSketch output_pin 13, :as => :led @val = 0 def loop @val = analogRead(0) digitalWrite (led, 1) delay @val digitalWrite (led, 0) delay @val end end
  • 28.
  • 29.
  • 30.
    Serial Read class Serialcom1< ArduinoSketch input_pin 0, :as => :sensor serial_begin :rate => 19200 def loop serial_println analogRead sensor delay 1000 end end
  • 31.
    Plugins and Libraries • C Methods, directives, external variables and assignments and calls that maybe added to main setup method • Arduino libraries
  • 32.
    Servo code class Servo< ArduinoSketch output_pin 11, :as => :servo, :device => :servo def loop servo_refresh servo.position 90 end end
  • 33.
    class Servo <ArduinoSketch output_pin 11, :as => :my_servo, :device => :servo def loop servo_refresh my_servo.position 180 servo_delay 1000 my_servo.position 0 servo_delay 1000 end def servo_delay(t) t.times do delay 1 servo_refresh end end end
  • 34.
    Example Projects Ruby on Bells Barduino Flying Robot
  • 35.
    Ruby on bells JD Barnhart
  • 36.
    Ruby on Bells JD Barnhart
  • 37.
    Ruby on Bells JD Barnhart
  • 38.
    Barduino Matthew Williams http://github.com/mwilliams/barduino
  • 39.
    Barduino Photo by aeden- http://flic.kr/p/5uy7DX
  • 40.
  • 41.
  • 42.
    Flying Robot Damen and Ron Evans http://wiki.github.com/deadprogrammer/flying_robot/ http://github.com/deadprogrammer/ flying_robot_blimpduino http://deadprogrammersociety.blogspot.com/
  • 43.
    Flying Robot Photo byAustin Ziegler - http://flic.kr/p/6DXQqV
  • 44.
  • 45.
  • 46.
    Shoes • Snow LeopardFail • Toholio serial gem
  • 47.
    Flying Robot code •Background • Draw images • Serial update • XBee
  • 48.
    Shoes.setup do gem'toholio-serialport' end require "serialport" require 'lib/flying_robot_proxy' FLYING_ROBOT = FlyingRobotProxy.new
  • 49.
    def draw_background @centerx, @centery = 126, 140 fill white stroke black strokewidth 4 oval @centerx - 102, @centery - 102, 204, 204 fill black nostroke oval @centerx - 5, @centery - 5, 10, 10 stroke black strokewidth 1 line(@centerx, @centery - 102, @centerx, @centery - 95) line(@centerx - 102, @centery, @centerx - 95, @centery) line(@centerx + 95, @centery, @centerx + 102, @centery) line(@centerx, @centery + 95, @centerx, @centery + 102) @north = para "N", :top => @centery - 130, :left => @centerx - 10 @south = para "S", :top => @centery + 104, :left => @centerx - 10 @west = para "W", :top => @centery - 12, :left => @centerx - 126 @east = para "E", :top => @centery - 12, :left => @centerx + 104 end
  • 50.
    def draw_compass_hand @centerx, @centery = 126, 140 @current_reading = @compass.to_f #[17, @compass.length].to_f return if @current_reading == 0.0 # the compass is oriented in reverse on the blimpduino, so switch it @current_reading = (@current_reading + 180).modulo(360) _x = 90 * Math.sin( @current_reading * Math::PI / 180 ) _y = 90 * Math.cos( @current_reading * Math::PI / 180 ) stroke black strokewidth 6 line(@centerx, @centery, @centerx + _x, @centery - _y) end
  • 51.
    Sharp GP2D12 Photo byhmblgrmpf - http://flic.kr/p/hJmoM
  • 52.
    Sharp GP2D12 code classSharpir < ArduinoSketch # Analog input for sharp Infrared sensors GP2D12 input_pin 0, :as => :ir_sensor_right # variables for checking for obstruction @range = "0, int" serial_begin def loop range_ir_sensor delay 10 end def range_ir_sensor @range = analogRead(ir_sensor) if (@range> 3) then @range = (6787 / (@range - 3)) - 4 serial_print "sensor: " serial_println @range delay 1000 end end end
  • 53.
    Devantech SRF05 Photo by Lucky Larry - http://flic.kr/p/6E5pZZ
  • 54.
    Devantech SRF05 class Rangefinding< ArduinoSketch @sig_pin = 2 serial_begin def loop serial_println(pingsrf05(@sig_pin)) end end
  • 55.
    class Srf05 <ArduinoPlugin # Triggers a pulse and returns distance in cm. long pingsrf05(int ultraSoundpin) { unsigned long ultrasoundDuration; // switch pin to output pinMode(ultraSoundpin, OUTPUT); // send a low, wait 2 microseconds, send a high then wait 10us digitalWrite(ultraSoundpin, LOW); delayMicroseconds(2); digitalWrite(ultraSoundpin, HIGH); delayMicroseconds(10); digitalWrite(ultraSoundpin, LOW); // switch pin to input pinMode(ultraSoundpin, INPUT); // wait for a pulse to come in as high ultrasoundDuration = pulseIn(ultraSoundpin, HIGH); return(ultrasoundDuration/58); } end
  • 56.
  • 57.
    Pachube • http://www.pachube.com • Signup for account • Get api key • http://www.pachube.com/feeds/6445
  • 58.
    Roo-bee • Obstacle avoidance •Sharp IR sensors • Arduino Duemilanove • Devantech SR05 Ultrasound • Servo • Solarbotics Motors
  • 63.
  • 64.
    Suppliers • Active robots:http://active-robots.com • Ebay jzhaoket and yerobot • http://asynclabs.com • http://bitsbox.co.uk
  • 65.
    Thanks • Github http://github.com/lostcaggy •Slides will be on slideshare later

Editor's Notes

  • #4 Great documentation, active forum
  • #5 2005 ATMega 8Open sourceBuild own
  • #7 Most Common and easiest to use 32 kb flash memory 7-12v LED 13 Many clones offer same or extra functionality
  • #8 Sold 10,000 Previous version of the current USB Arduino board 16kb flash memory
  • #9 The big one shield compatible 128kb flash memory 4 hardware uarts
  • #10 Different versionsLilypad 8Mhzsewn onto clothes stylish puple
  • #11 Lilypad example
  • #12 EthernetStackable
  • #13 Motor
  • #14 I/O BoardEasy to add servos and sensorsAdd Bluetooth as Serial port
  • #15 Processing also need to install usb driver suitable for your platform
  • #16 Main Gem outdatedMadrona fork GithubRuby 1.91 readyBrian Lyles Fork can use 18 Uses Ruby2c
  • #17 Basic Installaton on Mac OS X Instructions of Github for other flavours RAD creates directory stucture
  • #18 lots of examples in the examples directory
  • #19 Hardware setup
  • #20 Software set up
  • #21 Write coderake make:upload
  • #22 Co-founder of Arduino Excellent BookEasy start Well explained Examples
  • #23 Processing code
  • #27 Blink LED at rate dependent on sensor value
  • #28 Blinks LED at rate set by sensor
  • #31 Plugins preferred methodLibraries give access to quite a few devices
  • #32 servo refresh called roughly every 50ms, won&amp;#x2019;t call less than 20 to keep position library device:servo tells us to work with servo library written by Brian Riley
  • #33 moving between 2 points, note servo_delay
  • #40 flying robot then adapted to work with blimpduino
  • #42 Ruby conf 2008
  • #43 Problems shoesSnow Leopard Actively being worked on this was where I was going to show my robot linked to shoes however we can briefly look at flying robot code
  • #44 XBees but could use any serial interface
  • #45 Start up in shoes lib serial code
  • #46 background
  • #47 compass
  • #48 3 look left right and centre
  • #49 analogue non linear, algorithm Tom Igoe&amp;#x2019;s book Making things talk
  • #50 Two modes control of ping 4 wires or 3 4th wire tied to ground
  • #51 plugin, digital pin
  • #52 plugin pass pin in and returns distance
  • #53 Wishield Wifi
  • #54 wishield only arrived from United States the other day so still need to write plugin. Arduino working for a few hours sending light values and temperature
  • #55 ModularStackable shieldsPing noise run in circlelooks for clear path
  • #61 No affiliation, working on adding speech and getting bluetooth working with shoes