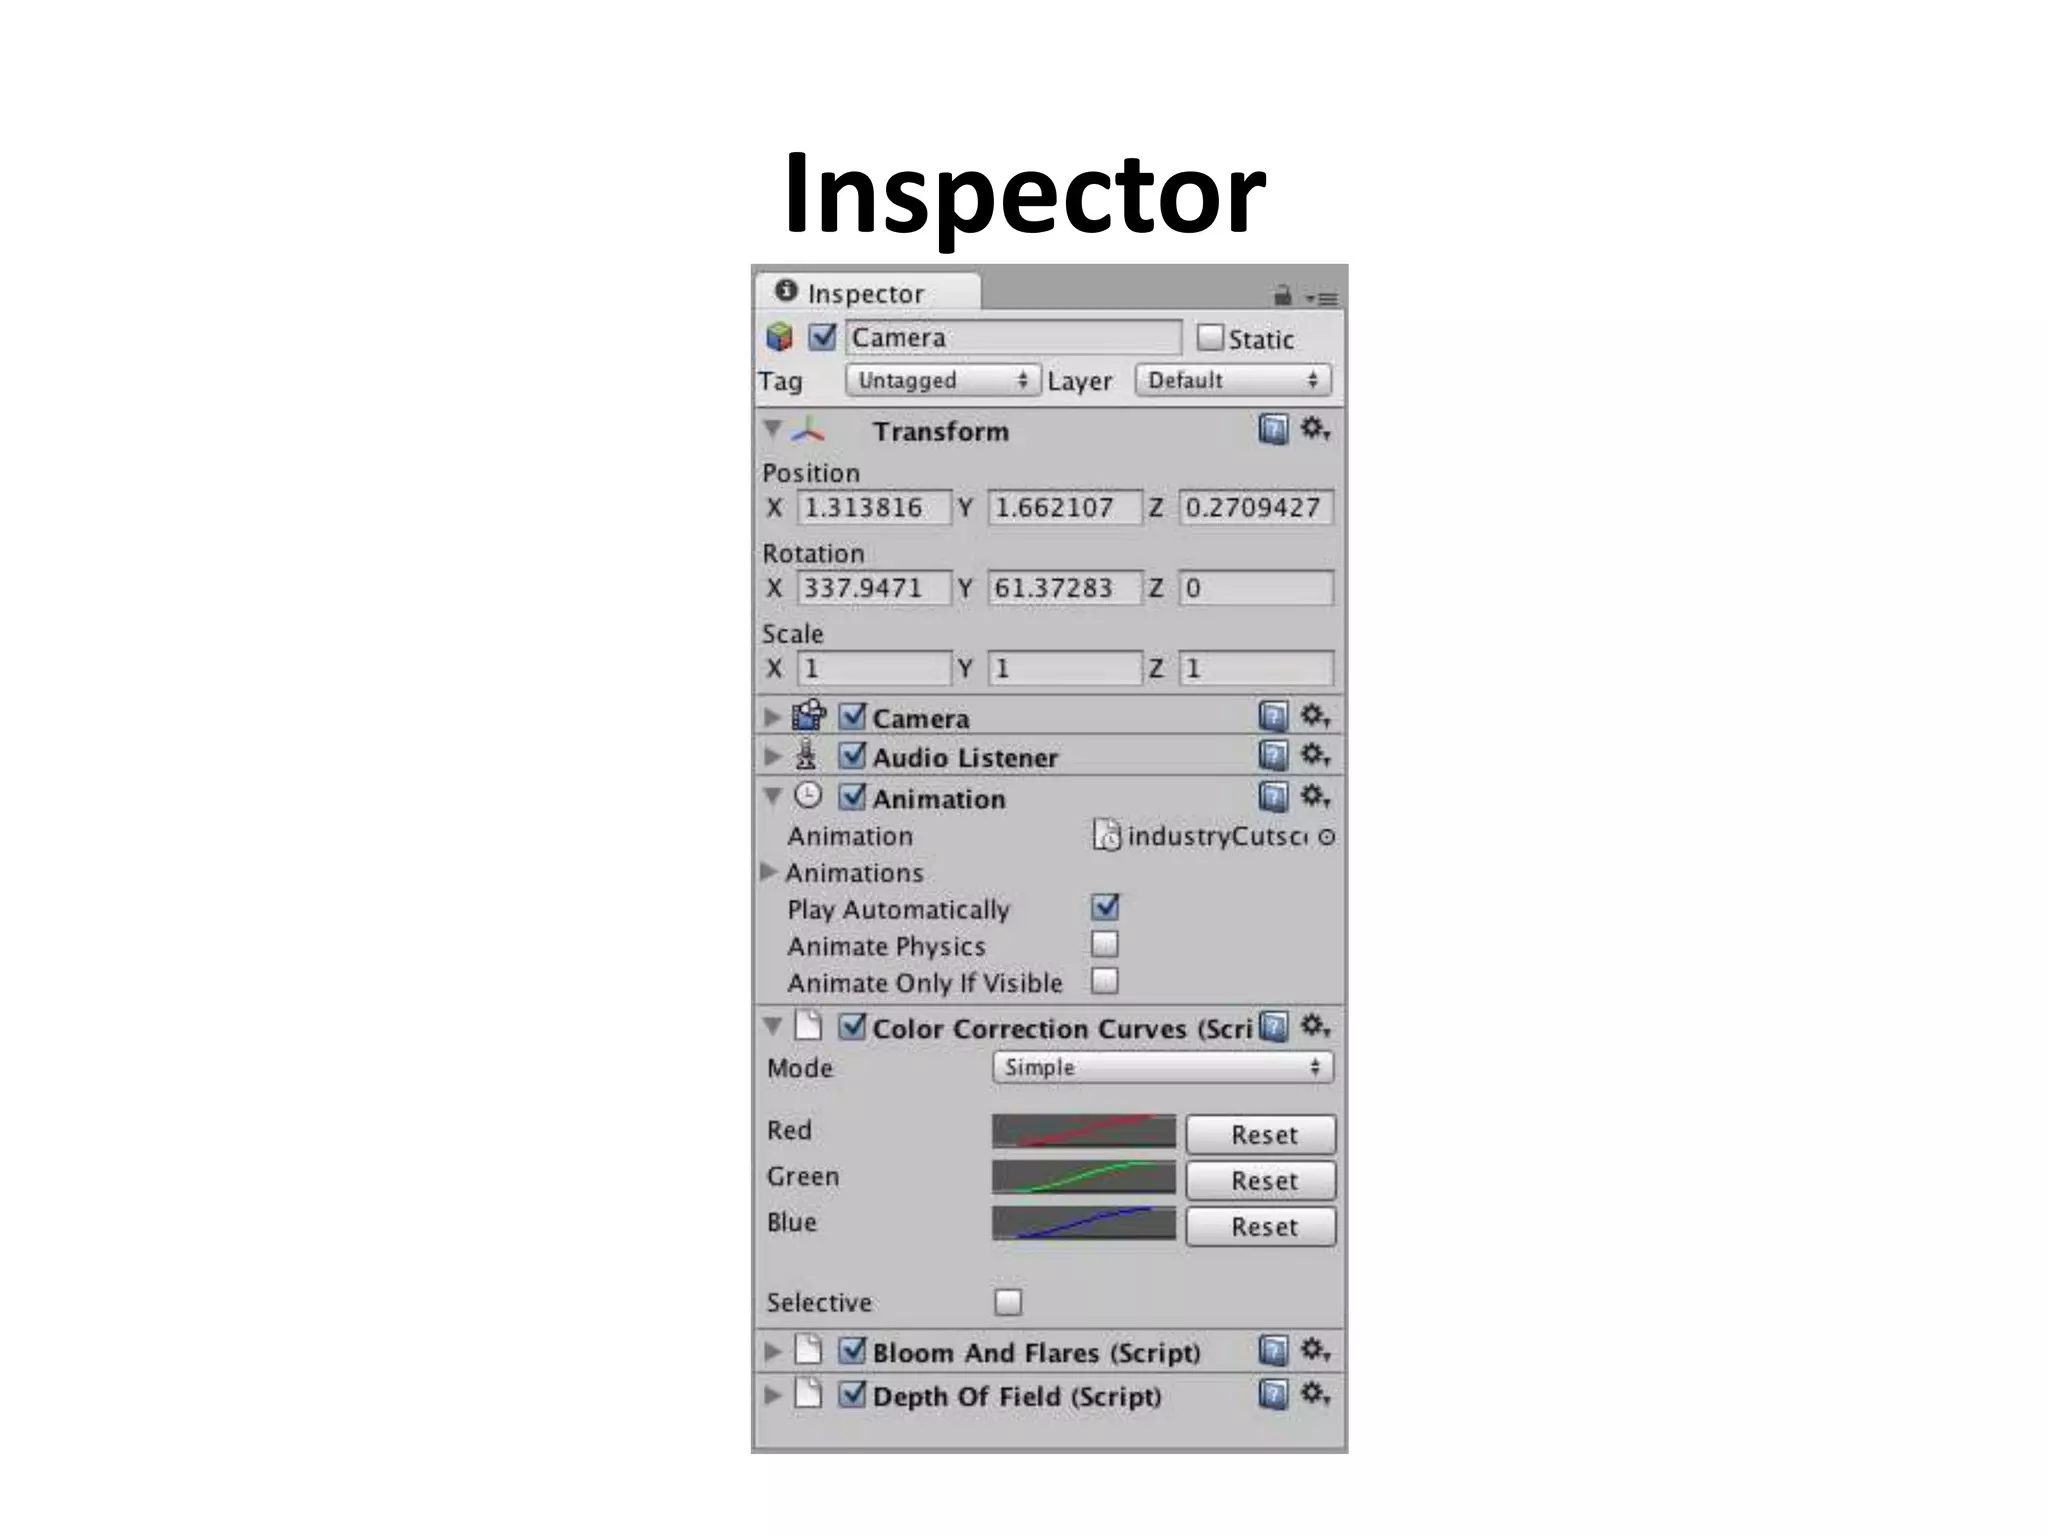
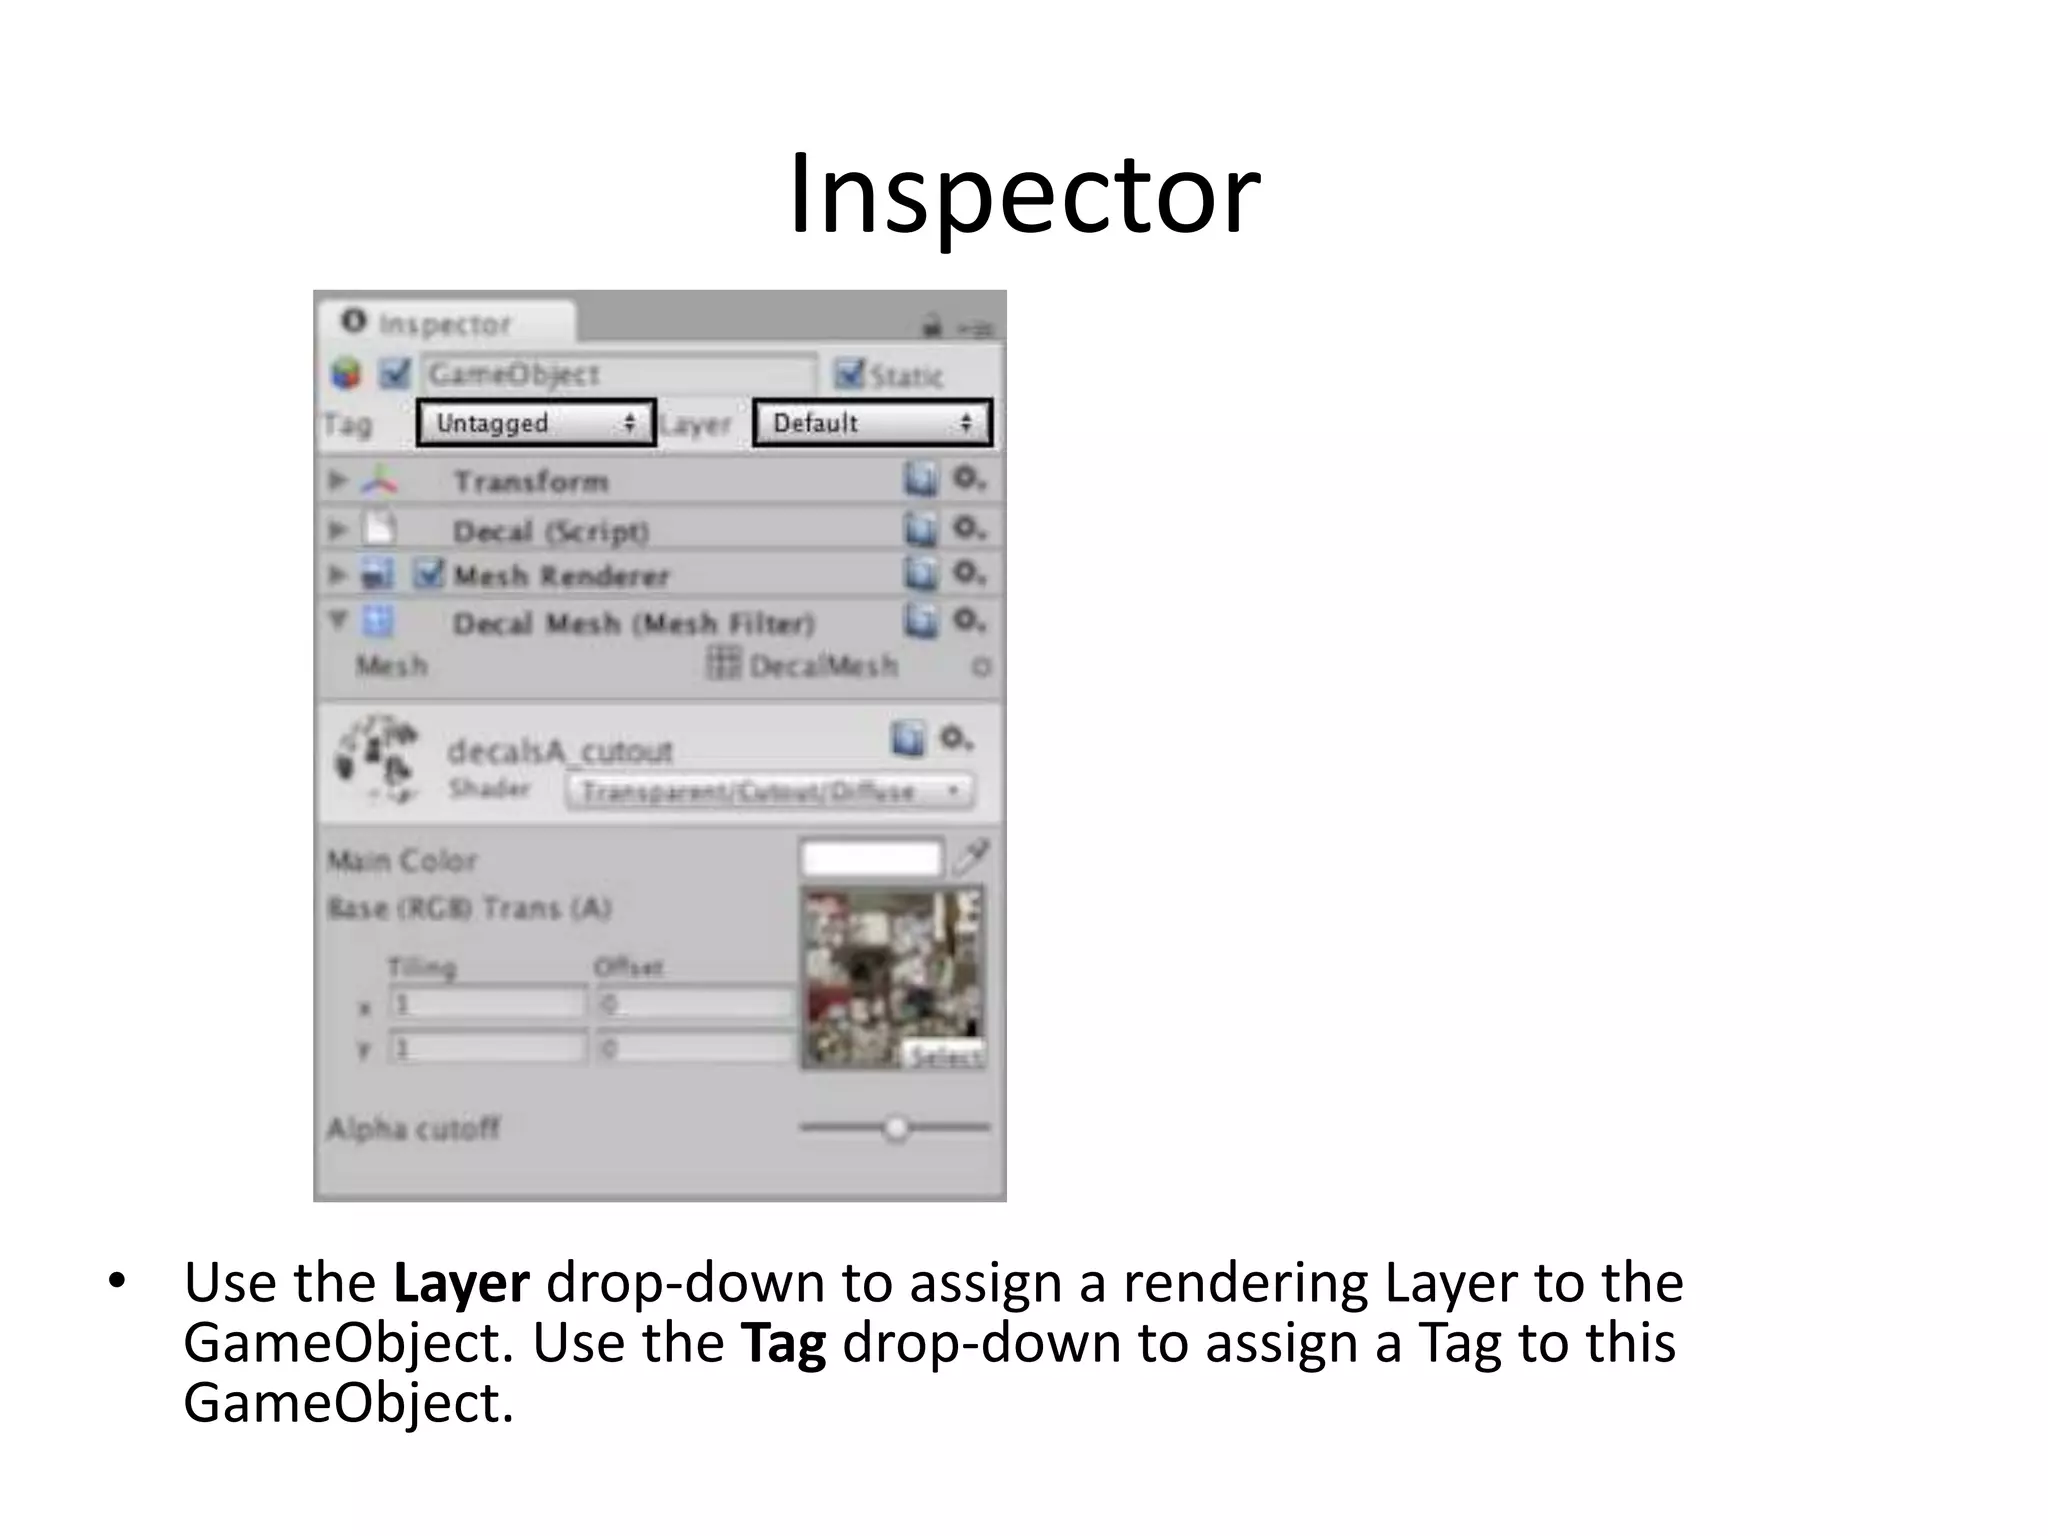
Unity Basics Dr. Natheer Khasawneh
Learning the Interface
Project View
Project View • Every Unity project contains an Assets folder. • The contents of this folder are presented in the Project View. • This is where you store all the assets that make up your game, like scenes, scripts, 3D models, textures, audio files, and Prefabs. • If you right-click on any asset in the Project View, you can choose Reveal in Explorer (Reveal in Finder on Mac) to actually see the asset itself in your file system.
Project View • To add assets to your project, you can drag any file from your OS into the Project View, or use Assets- >Import New Asset. Your asset is now ready to be used in your game. More information about working with assets to be presented later in Asset Workflow. • Scenes are also stored in the Project View. Think of these as individual levels. To create a new Scene, use Control-N. To save the current Scene into the Project View, use Control-S. • Some game assets need to be created from within Unity. To do this, use the Create drop-down, or right click->Create. (see the image in the next slide)
Creating new Asset This will allow you to add scripts, Prefabs, or folders to keep your project organized. You can rename any asset/folder by pressing F2 on Windows, or with two paced clicks on the asset name. If you hold the Alt key while you expand or contract a directory, all subdirectories will also be expanded or contracted.
Hierarchy • The Hierarchy contains every GameObject in the current Scene. • GameObject are: – Direct instances of asset files like 3D models. – Instances of Prefabs • As objects are added and removed from the scene, they will appear and disappear from the Hierarchy as well.
Parenting • Unity uses a concept called Parenting. To make any GameObject the child of another, drag the desired child onto the desired parent in the Hierarchy. • A child will inherit the movement and rotation of its parent. You can now expand and contract the parent to see its children in the Hierarchy without affecting your game.
Parenting Two unparented objects One object parented to another We will learn more about Parenting in the Transform Component topic.
Toolbar • The Toolbar consists of five basic controls. Each relate to different parts of the Editor.
Scene View The Scene View is your interactive sandbox. You will use the Scene View to select and position environments, the player, the camera, enemies, and all other GameObjects. Maneuvering and manipulating objects within the Scene View are some of the most important functions in Unity, so it's important to be able to do them quickly.
Scene View Navigation • See Scene View Navigation for full details on navigating the scene view. Here's a brief overview of the essentials: – Hold the right mouse button to enter Flythrough mode. This turns your mouse and WASD keys (plus Q and E for up and down) into quick first-person view navigation. – Select any GameObject and press the F key. This will center the Scene View and pivot point on the selection. – Use the arrow keys to move around on the X/Z plane. – Hold Alt and click-drag to orbit the camera around the current pivot point. – Hold Alt and middle click-drag to drag the Scene View camera around. – Hold Alt and right click-drag to zoom the Scene View. This is the same as scrolling with your mouse wheel.
Scene View Navigation You might also find use in the Hand Tool (shortcut: Q), especially if you are using a one-button mouse. With the Hand tool is selected, In the upper-right corner of the Scene View is the Scene Gizmo. This displays the Scene Camera's current orientation, and allows you to quickly modify the viewing angle.
Scene View Control Bar • The Scene View control bar lets you see the scene in various view modes - Textured, Wireframe, RGB, Overdraw, and many others. It will also enable you to see (and hear) in-game lighting, game elements, and sound in the Scene View. See View Modes for all the details.
Game View • The Game View is rendered from the Camera(s) in your game. It is representative of your final, published game. You will need to use one or more Cameras to control what the player actually sees when they are playing your game. We will discuss more about Cameras, in the Camera Component page.
Play Mode • Use the buttons in the Toolbar to control the Editor Play Mode and see how your published game will play. While in Play mode, any changes you make are temporary, and will be reset when you exit Play mode. The Editor UI will darken to remind you of this.
Game View Control Bar • The first drop-down on the Game View control bar is the Aspect Drop-down. Here, you can force the aspect ratio of the Game View window to different values. It can be used to test how your game will look on monitors with different aspect ratios. • Further to the right is the Maximize on Play toggle. While enabled, the Game View will maximize itself to 100% of your Editor Window for a nice full-screen preview when you enter Play mode. • Continuing to the right is the Gizmos toggle. While enabled, all Gizmos that appear in Scene View will also be drawn in Game View. This includes Gizmos drawn using any of the Gizmos class functions. • Finally we have the Stats button. This shows Rendering Statistics window that is very useful for Optimizing Graphics Performance.
Inspector
Inspector • Games in Unity are made up of multiple GameObjects that contain meshes, scripts, sounds, or other graphical elements like Lights. The Inspector displays detailed information about your currently selected GameObject, including all attached Components and their properties. Here, you modify the functionality of GameObjects in your scene. Later we will discuss more about about the GameObject-Component relationship. • Any property that is displayed in the Inspector can be directly modified. Even script variables can be changed without modifying the script itself. You can use the Inspector to change variables at runtime to experiment and find the magic gameplay for your game. In a script, if you define a public variable of an object type (like GameObject or Transform), you can drag and drop a GameObject or Prefab into the Inspector to make the assignment.
Inspector Assigning script variable in the inspector window Click the question mark beside any Component name in the Inspector to load its Component Reference page. Please view the Component Reference for a complete and detailed guide to all of Unity's Components.
Inspector • Use the Layer drop-down to assign a rendering Layer to the GameObject. Use the Tag drop-down to assign a Tag to this GameObject.
Other Views • The Console shows logs of messages, warnings, and errors. • The Animation View can be used to animate objects in the scene. • The Profiler can be used to investigate and find the performance bottle-necks in your game. • The Asset Server View can be used to manage version control of the project using Unity's Asset Server. • The Lightmapping View can be used to manage lightmaps using Unity's built-in lightmapping. • The Occlusion Culling View can be used to manage Occlusion Culling for improved performance.
Customizing Your Workspace You can customize your Layout of Views by click-dragging the Tab of any View to one of several locations. Dropping a Tab in the Tab Area of an existing window will add the Tab beside any existing Tabs. Alternatively, dropping a Tab in any Dock Zone will add the View in a new window.
Asset Workflow • Here we'll explain the steps to use a single asset with Unity. These steps are general and are meant only as an overview for basic actions. For the example, we'll talk about using a 3D mesh.
Create Rough Asset • Use any supported 3D modeling package to create a rough version of your asset. Our example will use Maya. Work with the asset until you are ready to save. For a list of applications that are supported by Unity: • Maya • Cinema 4D • 3ds Max • Cheetah3D • Modo • Lightwave • Blender • Other applications: unity can read .FBX, .dae, .3DS, .dxf and .obj files, so if your program can export to this format you're home free. FBX exporters for popular 3D packages can be found here. Many packages also have a Collada exporter available.
Import • When you save your asset initially, you should save it normally to the Assets folder in your Project folder. • When you open the Unity project, the asset will be detected and imported into the project. When you look in the Project View, you'll see the asset located there, right where you saved it. • Note that Unity uses the FBX exporter provided by your modeling package to convert your models to the FBX file format. You will need to have the FBX exporter of your modeling package available for Unity to use. • Alternatively, you can directly export as FBX from your application and save in the Projects folder. For a list of applications that are supported by Unity, please see this page.
Adding Asset to the Scene • Simply click and drag the mesh from the Project View to the Hierarchy or Scene View to add it to the Scene. When you drag a mesh to the scene, you are creating a GameObject that has a Mesh Renderer Component. • If you are working with a texture or a sound file, you will have to add it to a GameObject that already exists in the Scene or Project.
Putting Different Assets Together • Here is a brief description of the relationships between the most common assets – A Texture is applied to a Material – A Material is applied to a GameObject (with a Mesh Renderer Component) – An Animation is applied to a GameObject (with an Animation Component) – A sound file is applied to a GameObject (with an Audio Source Component)
Creating a Prefab • Prefabs are a collection of GameObjects & Components that can be re-used in your scenes. Several identical objects can be created from a single Prefab, called instancing. • Take trees for example. Creating a tree Prefab will allow you to instance several identical trees and place them in your scene. Because the trees are all linked to the Prefab, any changes that are made to the Prefab will automatically be applied to all tree instances. So if you want to change the mesh, material, or anything else, you just make the change once in the Prefab and all the other trees inherit the change. You can also make changes to an instance, and choose GameObject->Apply Changes to Prefab from the main menu. This can save you lots of time during setup and updating of assets.
Creating a Prefab • When you have a GameObject that contains multiple Components and a hierarchy of child GameObjects, you can make a Prefab of the top-level GameObject (or root), and re-use the entire collection of GameObjects. • Think of a Prefab as a blueprint for a structure of GameObjects. All the Prefab clones are identical to the blueprint. Therefore, if the blueprint is updated, so are all the clones. There are different ways you can update the Prefab itself by changing one of its clones and applying those changes to the blueprint. We will explain more about this in Prefabs page.
Creating Prefab • To create a Prefab from a GameObject in your scene • Create a new Prefab in your Project View. • Name the new Prefab whatever you like. • Click on the Game Object in the scene that you want to make into a Prefab. Drag it to the new Prefab • You should see the Game Object's name text turn blue. • You have now created a re-usable prefab.
Updating Assets • You have imported, instantiated, and linked your asset to a Prefab. • Now when you want to edit your source asset, just double- click it from the Project View. • The appropriate application will launch, and you can make any changes you want. • When you're done updating it, just Save it. • Then, when you switch back to Unity, the update will be detected, and the asset will be re-imported. • The asset's link to the Prefab will also be maintained. • So the effect you will see is that your Prefab will update.That's all you have to know to update assets. Just open it and save!
Creating Scenes • Scenes contain the objects of your game. • They can be used to create a main menu, individual levels, and anything else. • Think of each unique Scene file as a unique level. • In each Scene, you will place your environments, obstacles, and decorations, essentially designing and building your game in pieces.
Instancing Prefabs • Once you've created a Prefab, you can quickly and easily make copies of the Prefab, called an Instance. • To create an instance of any Prefab, drag the Prefab from the Project View to the Hierarchy or Scene View. • Now you have a unique instance of your Prefab to position and tweak as you like.
Adding Component & Scripts • When you have a Prefab or any GameObject highlighted, you can add additional functionality to it by using Components. • Scripts are a type of Component. • To add a Component, just highlight your GameObject and select a Component from the Component menu. You will then see the Component appear in the Inspector of the GameObject. Scripts are also contained in the Component menu by default. • If adding a Component breaks the GameObject's connection to its Prefab, you can always use GameObject- >Apply Changes to Prefab from the menu to re-establish the link.
Placing GameObjects • Once your GameObject is in the scene, you can use the Transform Tools to position it wherever you like. • Additionally, you can use the Transform values in the Inspector to fine-tune placement and rotation.
Working with Cameras • You can position, rotate, and parent cameras just like any other GameObject. • A camera is just a GameObject with a Camera Component attached to it. • Therefore it can do anything a regular GameObject can do, and then some camera-specific functions too. • There are also some helpful Camera scripts that are installed with the standard assets package when you create a new project. You can find them in Components->Camera-Control from the menu.
Lights • Except for some very few cases, you will always need to add Lights to your scene. • There are three different types of lights, and all of them behave a little differently from each other. The important thing is that they add atmosphere and ambience to your game. • Different lighting can completely change the mood of your game, and using lights effectively will be an important subject to learn.
Publishing Builds • At any time while you are creating your game, you might want to see how it looks when you build and run it outside of the editor as a standalone or web player. • Next we will explain how to access the Build Settings and how to create different builds of your games.
Publishing Builds • File->Build Settings... is the menu item to access the Build Settings window. It pops up an editable list of the scenes that will be included when you build your game.
Publishing Builds • Games developed with unity may be deployed to: • Desktop – Web Player Streaming – Offline webplayer deployment – Building standalone players • Android

unity basics

  • 1.
  • 2.
  • 3.
  • 4.
    Project View • EveryUnity project contains an Assets folder. • The contents of this folder are presented in the Project View. • This is where you store all the assets that make up your game, like scenes, scripts, 3D models, textures, audio files, and Prefabs. • If you right-click on any asset in the Project View, you can choose Reveal in Explorer (Reveal in Finder on Mac) to actually see the asset itself in your file system.
  • 5.
    Project View • Toadd assets to your project, you can drag any file from your OS into the Project View, or use Assets- >Import New Asset. Your asset is now ready to be used in your game. More information about working with assets to be presented later in Asset Workflow. • Scenes are also stored in the Project View. Think of these as individual levels. To create a new Scene, use Control-N. To save the current Scene into the Project View, use Control-S. • Some game assets need to be created from within Unity. To do this, use the Create drop-down, or right click->Create. (see the image in the next slide)
  • 6.
    Creating new Asset Thiswill allow you to add scripts, Prefabs, or folders to keep your project organized. You can rename any asset/folder by pressing F2 on Windows, or with two paced clicks on the asset name. If you hold the Alt key while you expand or contract a directory, all subdirectories will also be expanded or contracted.
  • 7.
    Hierarchy • The Hierarchycontains every GameObject in the current Scene. • GameObject are: – Direct instances of asset files like 3D models. – Instances of Prefabs • As objects are added and removed from the scene, they will appear and disappear from the Hierarchy as well.
  • 8.
    Parenting • Unity usesa concept called Parenting. To make any GameObject the child of another, drag the desired child onto the desired parent in the Hierarchy. • A child will inherit the movement and rotation of its parent. You can now expand and contract the parent to see its children in the Hierarchy without affecting your game.
  • 9.
    Parenting Two unparented objectsOne object parented to another We will learn more about Parenting in the Transform Component topic.
  • 10.
    Toolbar • The Toolbarconsists of five basic controls. Each relate to different parts of the Editor.
  • 11.
    Scene View The SceneView is your interactive sandbox. You will use the Scene View to select and position environments, the player, the camera, enemies, and all other GameObjects. Maneuvering and manipulating objects within the Scene View are some of the most important functions in Unity, so it's important to be able to do them quickly.
  • 12.
    Scene View Navigation •See Scene View Navigation for full details on navigating the scene view. Here's a brief overview of the essentials: – Hold the right mouse button to enter Flythrough mode. This turns your mouse and WASD keys (plus Q and E for up and down) into quick first-person view navigation. – Select any GameObject and press the F key. This will center the Scene View and pivot point on the selection. – Use the arrow keys to move around on the X/Z plane. – Hold Alt and click-drag to orbit the camera around the current pivot point. – Hold Alt and middle click-drag to drag the Scene View camera around. – Hold Alt and right click-drag to zoom the Scene View. This is the same as scrolling with your mouse wheel.
  • 13.
    Scene View Navigation Youmight also find use in the Hand Tool (shortcut: Q), especially if you are using a one-button mouse. With the Hand tool is selected, In the upper-right corner of the Scene View is the Scene Gizmo. This displays the Scene Camera's current orientation, and allows you to quickly modify the viewing angle.
  • 14.
    Scene View ControlBar • The Scene View control bar lets you see the scene in various view modes - Textured, Wireframe, RGB, Overdraw, and many others. It will also enable you to see (and hear) in-game lighting, game elements, and sound in the Scene View. See View Modes for all the details.
  • 15.
    Game View • TheGame View is rendered from the Camera(s) in your game. It is representative of your final, published game. You will need to use one or more Cameras to control what the player actually sees when they are playing your game. We will discuss more about Cameras, in the Camera Component page.
  • 16.
    Play Mode • Usethe buttons in the Toolbar to control the Editor Play Mode and see how your published game will play. While in Play mode, any changes you make are temporary, and will be reset when you exit Play mode. The Editor UI will darken to remind you of this.
  • 17.
    Game View ControlBar • The first drop-down on the Game View control bar is the Aspect Drop-down. Here, you can force the aspect ratio of the Game View window to different values. It can be used to test how your game will look on monitors with different aspect ratios. • Further to the right is the Maximize on Play toggle. While enabled, the Game View will maximize itself to 100% of your Editor Window for a nice full-screen preview when you enter Play mode. • Continuing to the right is the Gizmos toggle. While enabled, all Gizmos that appear in Scene View will also be drawn in Game View. This includes Gizmos drawn using any of the Gizmos class functions. • Finally we have the Stats button. This shows Rendering Statistics window that is very useful for Optimizing Graphics Performance.
  • 18.
  • 19.
    Inspector • Games inUnity are made up of multiple GameObjects that contain meshes, scripts, sounds, or other graphical elements like Lights. The Inspector displays detailed information about your currently selected GameObject, including all attached Components and their properties. Here, you modify the functionality of GameObjects in your scene. Later we will discuss more about about the GameObject-Component relationship. • Any property that is displayed in the Inspector can be directly modified. Even script variables can be changed without modifying the script itself. You can use the Inspector to change variables at runtime to experiment and find the magic gameplay for your game. In a script, if you define a public variable of an object type (like GameObject or Transform), you can drag and drop a GameObject or Prefab into the Inspector to make the assignment.
  • 20.
    Inspector Assigning script variablein the inspector window Click the question mark beside any Component name in the Inspector to load its Component Reference page. Please view the Component Reference for a complete and detailed guide to all of Unity's Components.
  • 21.
    Inspector • Use theLayer drop-down to assign a rendering Layer to the GameObject. Use the Tag drop-down to assign a Tag to this GameObject.
  • 22.
    Other Views • TheConsole shows logs of messages, warnings, and errors. • The Animation View can be used to animate objects in the scene. • The Profiler can be used to investigate and find the performance bottle-necks in your game. • The Asset Server View can be used to manage version control of the project using Unity's Asset Server. • The Lightmapping View can be used to manage lightmaps using Unity's built-in lightmapping. • The Occlusion Culling View can be used to manage Occlusion Culling for improved performance.
  • 23.
    Customizing Your Workspace Youcan customize your Layout of Views by click-dragging the Tab of any View to one of several locations. Dropping a Tab in the Tab Area of an existing window will add the Tab beside any existing Tabs. Alternatively, dropping a Tab in any Dock Zone will add the View in a new window.
  • 24.
    Asset Workflow • Herewe'll explain the steps to use a single asset with Unity. These steps are general and are meant only as an overview for basic actions. For the example, we'll talk about using a 3D mesh.
  • 25.
    Create Rough Asset •Use any supported 3D modeling package to create a rough version of your asset. Our example will use Maya. Work with the asset until you are ready to save. For a list of applications that are supported by Unity: • Maya • Cinema 4D • 3ds Max • Cheetah3D • Modo • Lightwave • Blender • Other applications: unity can read .FBX, .dae, .3DS, .dxf and .obj files, so if your program can export to this format you're home free. FBX exporters for popular 3D packages can be found here. Many packages also have a Collada exporter available.
  • 26.
    Import • When yousave your asset initially, you should save it normally to the Assets folder in your Project folder. • When you open the Unity project, the asset will be detected and imported into the project. When you look in the Project View, you'll see the asset located there, right where you saved it. • Note that Unity uses the FBX exporter provided by your modeling package to convert your models to the FBX file format. You will need to have the FBX exporter of your modeling package available for Unity to use. • Alternatively, you can directly export as FBX from your application and save in the Projects folder. For a list of applications that are supported by Unity, please see this page.
  • 27.
    Adding Asset tothe Scene • Simply click and drag the mesh from the Project View to the Hierarchy or Scene View to add it to the Scene. When you drag a mesh to the scene, you are creating a GameObject that has a Mesh Renderer Component. • If you are working with a texture or a sound file, you will have to add it to a GameObject that already exists in the Scene or Project.
  • 28.
    Putting Different AssetsTogether • Here is a brief description of the relationships between the most common assets – A Texture is applied to a Material – A Material is applied to a GameObject (with a Mesh Renderer Component) – An Animation is applied to a GameObject (with an Animation Component) – A sound file is applied to a GameObject (with an Audio Source Component)
  • 29.
    Creating a Prefab •Prefabs are a collection of GameObjects & Components that can be re-used in your scenes. Several identical objects can be created from a single Prefab, called instancing. • Take trees for example. Creating a tree Prefab will allow you to instance several identical trees and place them in your scene. Because the trees are all linked to the Prefab, any changes that are made to the Prefab will automatically be applied to all tree instances. So if you want to change the mesh, material, or anything else, you just make the change once in the Prefab and all the other trees inherit the change. You can also make changes to an instance, and choose GameObject->Apply Changes to Prefab from the main menu. This can save you lots of time during setup and updating of assets.
  • 30.
    Creating a Prefab •When you have a GameObject that contains multiple Components and a hierarchy of child GameObjects, you can make a Prefab of the top-level GameObject (or root), and re-use the entire collection of GameObjects. • Think of a Prefab as a blueprint for a structure of GameObjects. All the Prefab clones are identical to the blueprint. Therefore, if the blueprint is updated, so are all the clones. There are different ways you can update the Prefab itself by changing one of its clones and applying those changes to the blueprint. We will explain more about this in Prefabs page.
  • 31.
    Creating Prefab • Tocreate a Prefab from a GameObject in your scene • Create a new Prefab in your Project View. • Name the new Prefab whatever you like. • Click on the Game Object in the scene that you want to make into a Prefab. Drag it to the new Prefab • You should see the Game Object's name text turn blue. • You have now created a re-usable prefab.
  • 32.
    Updating Assets • Youhave imported, instantiated, and linked your asset to a Prefab. • Now when you want to edit your source asset, just double- click it from the Project View. • The appropriate application will launch, and you can make any changes you want. • When you're done updating it, just Save it. • Then, when you switch back to Unity, the update will be detected, and the asset will be re-imported. • The asset's link to the Prefab will also be maintained. • So the effect you will see is that your Prefab will update.That's all you have to know to update assets. Just open it and save!
  • 33.
    Creating Scenes • Scenescontain the objects of your game. • They can be used to create a main menu, individual levels, and anything else. • Think of each unique Scene file as a unique level. • In each Scene, you will place your environments, obstacles, and decorations, essentially designing and building your game in pieces.
  • 34.
    Instancing Prefabs • Onceyou've created a Prefab, you can quickly and easily make copies of the Prefab, called an Instance. • To create an instance of any Prefab, drag the Prefab from the Project View to the Hierarchy or Scene View. • Now you have a unique instance of your Prefab to position and tweak as you like.
  • 35.
    Adding Component &Scripts • When you have a Prefab or any GameObject highlighted, you can add additional functionality to it by using Components. • Scripts are a type of Component. • To add a Component, just highlight your GameObject and select a Component from the Component menu. You will then see the Component appear in the Inspector of the GameObject. Scripts are also contained in the Component menu by default. • If adding a Component breaks the GameObject's connection to its Prefab, you can always use GameObject- >Apply Changes to Prefab from the menu to re-establish the link.
  • 36.
    Placing GameObjects • Onceyour GameObject is in the scene, you can use the Transform Tools to position it wherever you like. • Additionally, you can use the Transform values in the Inspector to fine-tune placement and rotation.
  • 37.
    Working with Cameras •You can position, rotate, and parent cameras just like any other GameObject. • A camera is just a GameObject with a Camera Component attached to it. • Therefore it can do anything a regular GameObject can do, and then some camera-specific functions too. • There are also some helpful Camera scripts that are installed with the standard assets package when you create a new project. You can find them in Components->Camera-Control from the menu.
  • 38.
    Lights • Except forsome very few cases, you will always need to add Lights to your scene. • There are three different types of lights, and all of them behave a little differently from each other. The important thing is that they add atmosphere and ambience to your game. • Different lighting can completely change the mood of your game, and using lights effectively will be an important subject to learn.
  • 39.
    Publishing Builds • Atany time while you are creating your game, you might want to see how it looks when you build and run it outside of the editor as a standalone or web player. • Next we will explain how to access the Build Settings and how to create different builds of your games.
  • 40.
    Publishing Builds • File->BuildSettings... is the menu item to access the Build Settings window. It pops up an editable list of the scenes that will be included when you build your game.
  • 41.
    Publishing Builds • Gamesdeveloped with unity may be deployed to: • Desktop – Web Player Streaming – Offline webplayer deployment – Building standalone players • Android